# UpsellBay Documentation
Canonical: https://wpanchorbay.github.io/upsellbay/
This file contains the main public documentation content in a machine-readable text format.
## Welcome to UpsellBay
URL: https://wpanchorbay.github.io/upsellbay/
Description: Increase WooCommerce average order value (AOV) with native order bumps and journey-integrated offers.
import { CardGrid } from '@astrojs/starlight/components';
import Card from '../../components/starlight/Card.astro';
import WPAnchorBayFooter from '../../components/WPAnchorBayFooter.astro';
## What UpsellBay Is
UpsellBay is a WooCommerce-native offer engine that helps merchants increase average order value without replacing the existing store journey. It adds relevant offers directly into the places shoppers already use:
- Product pages
- Cart
- Checkout
- Thank-you pages
It is built for stores that want measurable upsells, cross-sells, and order bumps while keeping WooCommerce familiar for both shoppers and store teams.
## What Problems It Solves
UpsellBay is designed for stores that want to grow order value without adding funnel-builder complexity or disrupting checkout. It helps solve a few common problems:
- Shoppers miss relevant add-ons because offers appear too late or not at all
- Cross-sells feel disconnected from the actual WooCommerce journey
- Checkout upsells often require replacing or heavily customizing checkout
- Store teams need offer performance data without collecting customer PII
- Merchants want higher AOV without rebuilding storefront flows that already work
## Who Should Use It
UpsellBay is a good fit for:
- WooCommerce merchants who want to increase AOV with native offers
- Store managers who need a simple, operational workflow inside **WooCommerce -> UpsellBay**
- Agencies building upsell systems for client stores without introducing a custom funnel stack
- Teams that want product, cart, checkout, and thank-you offers in one plugin
It is especially useful when you want stronger merchandising and better offer visibility while preserving your current checkout experience.
## How It Works
UpsellBay follows the existing WooCommerce buying journey instead of replacing it:
1. Create an offer in the UpsellBay admin.
2. Choose the placement, product, discount, schedule, and targeting rules.
3. UpsellBay checks whether the offer is eligible for the current shopper and context.
4. Eligible offers render in supported storefront locations.
5. UpsellBay tracks aggregate results such as views, accepts, dismissals, revenue, and discounts.
This lets you test and optimize offers across the full journey while keeping the storefront recognizable and stable.
## What These Docs Cover
This documentation matches the current UpsellBay plugin implementation. It focuses on:
- Merchant setup and daily operations inside **WooCommerce -> UpsellBay**
- Offer creation, field-by-field configuration, and storefront behavior
- Settings, diagnostics, licensing, and retention controls
- Storefront expectations for product, cart, checkout, and thank-you placements
- Developer-facing architecture and extension notes
Create a real first offer, preview it safely in test mode, and understand what to verify before going live.
Learn the full offer workflow, from the Offers table to the Add Offer screen, targeting rules, and performance review.
See where UpsellBay renders on product, cart, checkout, and thank-you pages and how placement limits affect visibility.
Inspect the public architecture, storage contracts, REST routes, and hooks available to external developers.
## Best Starting Points
- New store: [Introduction](/upsellbay/getting-started/introduction/) -> [Setup Wizard](/upsellbay/getting-started/setup-wizard/) -> [Quick Start](/upsellbay/getting-started/quick-start/)
- Offer builders: [Offers Overview](/upsellbay/usage/offers/01-overview/) -> [Creating an Offer](/upsellbay/usage/offers/02-create/) -> [Targeting Rules](/upsellbay/usage/offers/04-targeting-rules/)
- Store managers: [Dashboard](/upsellbay/usage/dashboard/) -> [General Settings](/upsellbay/usage/settings/01-general/) -> [Data Settings](/upsellbay/usage/settings/02-data/)
- Operations and support: [Help & Diagnostics](/upsellbay/usage/help/) -> [Compatibility Guide](/upsellbay/compatibility/) -> [Data Retention](/upsellbay/data-retention/)
## Agent Access & Capabilities
URL: https://wpanchorbay.github.io/upsellbay/agents/overview/
Description: Guidelines for AI coding agents operating and inspecting UpsellBay.
## AI Integration
UpsellBay is built to be easily navigated by AI coding agents.
### Discovery Endpoints
- **Discovery Index:** Public LLM indexing at `/llms.txt` and full text corpus at `/llms-full.txt`.
- **MCP configuration:** MCP configurations exposed at `/.well-known/mcp.json` to allow agents to interact with live stats diagnostics.
## Safety Rules & Guardrails
URL: https://wpanchorbay.github.io/upsellbay/agents/safety-rules/
Description: Strict code isolation policies, PII-safe operations, and CartBay anti-coupling.
## Operational Safety
AI Agents must follow these absolute rules:
- **CartBay Anti-Coupling:** Do not read or write to CartBay tables or options. No abandoned cart email recovery flows are permitted.
- **HPOS Compliance:** Only query WooCommerce objects using WC CRUD APIs (do not query database tables directly).
- **PII Protection:** Never write user emails, names, or addresses to logs or dashboard analytics tables.
## Development Workflows
URL: https://wpanchorbay.github.io/upsellbay/agents/workflows/
Description: Standard instructions for automated code generation and plugin modifications.
## Code Modification Rules
- **Phased Implementation:** Always follow the phase milestones outlined in `.meta/tasks/index.md`.
- **Commit Format:** Use conventional commits in lowercase (e.g., `feat: add product page offer render`).
- **Data Integrity:** Keep structural changes isolated. Never mix application modifications and documentation changes in single commits.
## Compatibility Guide
URL: https://wpanchorbay.github.io/upsellbay/compatibility/
Description: Use this guide to validate UpsellBay with your theme, checkout stack, and store workflow before launch.
## Compatibility Approach
UpsellBay is built to be WooCommerce-native, but every store has its own theme, checkout customizations, and plugin stack. The safest rollout path is always staged validation.
## Areas To Validate
- theme styling on product, cart, checkout, and thank-you pages
- any checkout-field or checkout-layout plugins
- cart drawer or mini-cart behavior
- product types used as offer products
- mobile layout behavior
## Data Retention
URL: https://wpanchorbay.github.io/upsellbay/data-retention/
Description: Understand what UpsellBay stores, how long it keeps it, and how cleanup controls work.
## What UpsellBay Stores
- offer definitions
- global plugin settings
- aggregate non-PII analytics
- temporary offer session state
- operational logs
## Default Behavior
UpsellBay preserves data by default on uninstall unless the merchant explicitly enables uninstall cleanup.
## Developer Guide
URL: https://wpanchorbay.github.io/upsellbay/developer/
Description: External developer reference for UpsellBay architecture, storage contracts, REST routes, and hooks.
## For External Developers
This section is for agencies, plugin authors, and store engineers building around UpsellBay.
It focuses on the stable integration surface only:
- Plugin architecture and module boundaries
- Public data identifiers and storage contracts
- REST routes you can call safely
- Hooks and filters intended for extension work
Internal build, release, QA, and team workflow notes are intentionally excluded from this section.
## Start Here
- [Architecture Overview](/upsellbay/developer/architecture/) for the runtime map and extension boundaries
- [Data & Storage](/upsellbay/developer/data-and-storage/) for identifiers, meta keys, and persistence rules
- [REST API](/upsellbay/developer/rest-api/) for current route contracts
- [Hooks & Filters](/upsellbay/developer/hooks-and-filters/) for stable extension points
## Integration Rules
- Treat `WPAnchorBay\UpsellBay\Core\Constants` as the source of truth for shared identifiers.
- Use documented hooks, REST routes, and WooCommerce CRUD objects instead of patching private internals.
- Do not write directly to WooCommerce order tables or rely on admin HTML structure.
- Do not trust client-sent price, discount, or eligibility values when integrating with public routes.
## Architecture Overview
URL: https://wpanchorbay.github.io/upsellbay/developer/architecture/
Description: High-level runtime architecture and the extension boundaries external developers can rely on.
## Runtime Shape
UpsellBay is a WooCommerce-native offer engine. Its runtime code lives under `app/` and uses the namespace `WPAnchorBay\UpsellBay`.
The plugin follows a small-service architecture:
- `upsellbay.php`
Loads the plugin, runs environment checks, and starts the bootstrap.
- `app/Core/Plugin.php`
Coordinates service registration, WordPress hooks, and module startup order.
- `app/Core/Container.php`
Provides a lightweight dependency container for runtime services.
## Main Modules
- `Core`
Shared identifiers, bootstrap, settings, installer, scheduler, and hook helpers.
- `Admin`
WooCommerce admin screens such as Offers, Settings, Tools, Help, and Wizard.
- `Api`
REST route registration and controller classes.
- `Data`
Repositories and session storage adapters.
- `Domain`
Business logic for offers, rules, discounts, storefront rendering, analytics, attribution, cart mutation, logging, and compatibility checks.
- `Integrations`
WooCommerce-specific integrations such as Block Checkout and licensing.
- `Utils`
Cross-cutting helpers including rate limiting, token handling, and import/export.
## Storefront Flow
At runtime, UpsellBay follows this path:
1. An offer is loaded from the private `upsellbay_offer` CPT.
2. Rules and schedule checks determine whether the offer is eligible.
3. A placement renderer builds escaped storefront HTML for classic WooCommerce contexts.
4. Public REST routes handle accept and dismiss actions using a plugin-issued session token.
5. Attribution and aggregate analytics are written server-side.
Block Checkout support follows the same business rules, but uses WooCommerce Blocks integration points instead of classic PHP render hooks.
## Public vs Private Contract
External developers should treat these as the supported integration surface:
- Documented hooks and filters
- REST routes under `upsellbay/v1`
- Shared identifiers from `Core\Constants`
- Offer export/import JSON shape
Avoid coupling to:
- The internal container wiring
- Admin page markup or CSS selectors
- Private class construction details
- Direct database writes outside documented storage contracts
## Background Jobs
URL: https://wpanchorbay.github.io/upsellbay/developer/background-jobs/
Description: Idempotent Action Scheduler tasks, rollups, and data cleanup.
## Job Management
UpsellBay schedules background operations via Action Scheduler under the `upsellbay` group.
- **Reconciliation Task:** Rollover session clicks to the daily stats table (`upsellbay_offer_stats_daily`).
- **Cleanup Task:** Prunes stale tracking transients and session metrics.
- **License Checker:** Verifies license activation status weekly.
## Build Process
URL: https://wpanchorbay.github.io/upsellbay/developer/build-process/
Description: Asset compiling, bun tasks, and internationalization commands.
## Asset Building
Frontend script compiling is handled via webpack and Astro scripts:
- **Source Location:** `src/` directory.
- **Compiled Files:** Written to the `assets/` directory.
### Build Commands
```bash
# Build production assets
bun run build
# Rebuild POT localization template
bun run i18n:make-pot
```
## Data & Storage
URL: https://wpanchorbay.github.io/upsellbay/developer/data-and-storage/
Description: Storage contracts, shared identifiers, and the persistence rules external integrations should follow.
## Shared Identifiers
These values are part of the public integration surface:
| Identifier | Value |
| --- | --- |
| Namespace root | `WPAnchorBay\UpsellBay\` |
| Text domain | `upsellbay` |
| Plugin slug | `upsellbay` |
| REST namespace | `upsellbay/v1` |
| Option prefix | `upsellbay_` |
| Offer and attribution meta prefix | `_ub_` |
| Hook prefix | `upsellbay_` |
| Offer post type | `upsellbay_offer` |
| Stats table suffix | `upsellbay_offer_stats_daily` |
| Action Scheduler group | `upsellbay` |
## Storage Model
### Offers
- Offers are stored in the private `upsellbay_offer` post type.
- Configuration is stored as `_ub_` post meta.
- External code should create or normalize offer payloads through the plugin schema, not by guessing raw meta.
Core fields external integrations usually care about:
| Meta key | Purpose |
| --- | --- |
| `_ub_offer_type` | Placement type: checkout, product, cart, or thank-you |
| `_ub_status` | Draft, paused, or active state |
| `_ub_offer_product_id` | Product being offered |
| `_ub_discount_type` | Discount mode |
| `_ub_discount_value` | Discount amount |
| `_ub_headline` | Shopper-facing title |
| `_ub_rules` | Normalized eligibility rules |
| `_ub_rules_match` | `all` or `any` rule logic |
| `_ub_placement_config` | Placement-specific configuration |
| `_ub_hide_if_in_cart` | Whether to hide the offer if the product is already in cart |
| `_ub_priority` | Lower numbers render first |
### Settings
- Global plugin settings are stored in the single option `upsellbay_settings`.
### Analytics
- Aggregate daily analytics are stored in `{$wpdb->prefix}upsellbay_offer_stats_daily`.
- The table is non-PII by design and is meant for reporting, not customer history reconstruction.
### Logs
- Operational logs are stored in `{$wpdb->prefix}upsellbay_logs`.
### Session State
- UpsellBay stores accepted offers, dismissed offers, cart item keys, placement context, and hashed validation tokens in the WooCommerce session.
- Session storage should not contain email addresses, phone numbers, license keys, or payment identifiers.
## Order Attribution
UpsellBay writes order and order-item attribution through WooCommerce CRUD objects, not direct SQL.
Key attribution meta includes:
- `_ub_offer_id`
- `_ub_offer_type`
- `_ub_offer_placement`
- `_ub_discount_type`
- `_ub_discount_amount`
- `_ub_source_context`
- `_ub_source_order_id`
- `_ub_source_offer_id`
- `_ub_follow_on_order`
## Integration Rules
- Use WooCommerce CRUD APIs for orders and order items.
- Do not write directly to HPOS tables, `wp_postmeta`, or order item meta tables.
- Do not store customer PII in custom analytics or session extensions.
- Use the documented import/export flow for portable offer templates.
## Development Environment
URL: https://wpanchorbay.github.io/upsellbay/developer/development-environment/
Description: Mock data, WP-CLI commands, and sandbox setup guidelines.
## Sandbox Setup
- **Local Server:** Standard LocalWP or Docker containers.
- **CLI Management:** WP-CLI configuration commands are registered under the `wp upsellbay` namespace.
- **Mock Data Generation:** Developer scripts generate dummy offers and stats to verify dashboard rendering speed.
## Hooks & Filters
URL: https://wpanchorbay.github.io/upsellbay/developer/hooks-and-filters/
Description: Stable WordPress hooks for extending UpsellBay without coupling to private internals.
## Hook Policy
UpsellBay exposes hooks at service boundaries, not inside every internal class.
All documented hook names use the `upsellbay_` prefix.
## Filters
| Hook | Purpose | Signature |
| --- | --- | --- |
| `upsellbay_offer_schema` | Extend normalized offer defaults. | `(array $defaults): array` |
| `upsellbay_available_placements` | Extend placement labels for integration UIs. | `(array $placements): array` |
| `upsellbay_placement_config_positions` | Adjust predefined placement position labels. | `(array $positions): array` |
| `upsellbay_offer_query_args` | Adjust offer repository query args. | `(array $query_args, array $filters): array` |
| `upsellbay_rule_context` | Add server-derived values to rule evaluation. | `(array $context): array` |
| `upsellbay_rule_result` | Override one normalized rule result. | `(bool $result, array $rule, array $context): bool` |
| `upsellbay_eligible_offers` | Adjust eligible offers after validation and prioritization. | `(array $offers, string $placement, array $context): array` |
| `upsellbay_render_offer_html` | Adjust already-escaped storefront markup. | `(string $html, array $offer, string $placement, array $context): string` |
| `upsellbay_offer_price` | Adjust the server-calculated offer price. | `(string $offer_price, string $original_price, array $meta): string` |
| `upsellbay_discount_amount` | Adjust the server-calculated discount amount. | `(string $discount_amount, string $original_price, string $offer_price, array $meta): string` |
| `upsellbay_attribution_meta` | Add non-PII attribution data before WooCommerce CRUD writes. | `(array $meta, array $offer, string $placement): array` |
| `upsellbay_analytics_event` | Adjust aggregate analytics payloads before persistence. | `(array $payload): array` |
## Actions
| Hook | Fires when | Signature |
| --- | --- | --- |
| `upsellbay_offer_created` | A validated offer is created. | `(int $offer_id, array $offer): void` |
| `upsellbay_offer_updated` | A validated offer is updated. | `(int $offer_id, array $offer): void` |
| `upsellbay_offer_deleted` | An offer is deleted. | `(int $offer_id): void` |
| `upsellbay_offer_rendered` | A storefront placement renders an offer. | `(int $offer_id, string $placement, array $offer, array $context): void` |
| `upsellbay_offer_accepted` | A shopper accepts an offer through a public route. | `(int $offer_id, string $placement, array $result): void` |
| `upsellbay_offer_dismissed` | A shopper dismisses an offer for the current session. | `(int $offer_id, string $placement): void` |
| `upsellbay_attribution_written` | Attribution data is written to a WooCommerce object. | `($item, array $meta, array $offer, string $placement): void` |
| `upsellbay_follow_on_order_created` | A thank-you follow-on order is linked to its source data. | `($order, int $source_order_id, int $source_offer_id): void` |
| `upsellbay_daily_stats_reconciled` | A daily aggregate row is repaired or reconciled. | `(string $date, int $offer_id, string $placement): void` |
## Import and Export Filters
| Hook | Purpose | Signature |
| --- | --- | --- |
| `upsellbay_export_payload` | Adjust the portable export envelope. | `(array $payload, array $offers): array` |
| `upsellbay_import_mapping` | Normalize product mapping before resolution. | `(array $mapping, array $offer, int $index): array` |
| `upsellbay_import_sku_match` | Resolve a product ID from a portable SKU. | `(int $product_id, string $sku, array $mapping, array $offer): int` |
| `upsellbay_import_post_status` | Choose the imported post status. | `(string $post_status, array $offer, int $index): string` |
| `upsellbay_import_validation_errors` | Add validation errors without bypassing import rules. | `(array $errors, array $payload): array` |
## Extension Rules
- Treat hook inputs as untrusted unless they were produced server-side by UpsellBay.
- Do not bypass capabilities, nonces, session-token validation, or server-side pricing rules.
- Keep custom attribution and analytics data non-PII.
## Release Process
URL: https://wpanchorbay.github.io/upsellbay/developer/release-process/
Description: Versioning, POT regeneration, and WooCommerce Marketplace submission.
## Release Checklist
1. Regenerate POT files: `bun run i18n:make-pot`.
2. Confirm PHPStan and PHPUnit tests pass.
3. Update version numbers in `upsellbay.php` and `readme.txt`.
4. Package the plugin ZIP archive: `zip -r upsellbay.zip .`.
5. Upload to WooCommerce Marketplace / QIT validation channels.
## REST API Reference
URL: https://wpanchorbay.github.io/upsellbay/developer/rest-api/
Description: Current REST routes exposed by UpsellBay and the security rules around them.
## Namespace
All routes live under `upsellbay/v1`.
## Public Storefront Routes
These routes are designed for storefront interactions. They require a valid UpsellBay session token and are rate-limited.
| Route | Method | Purpose | Required params |
| --- | --- | --- | --- |
| `/bump-toggle` | `POST` | Accept or remove a checkout bump. | `offer_id`, `accepted`, `token`, optional `placement` |
| `/cart-offer-add` | `POST` | Accept a product, cart, or thank-you offer. | `offer_id`, `token`, optional `placement`, optional `source_order_id` |
| `/dismiss` | `POST` | Dismiss an offer for the current session. | `offer_id`, `token`, optional `placement` |
Public routes do not trust client-sent price, discount, stock, or eligibility values. Those are recalculated server-side.
## Admin Routes
These routes are intended for WooCommerce admins and editor tooling.
| Route | Method | Purpose | Access |
| --- | --- | --- | --- |
| `/offer-preview` | `GET` | Return a safe preview payload for an offer editor request. | `manage_woocommerce` |
| `/products` | `GET` | Product search for offer setup. | `manage_woocommerce` |
| `/categories` | `GET` | Category search for rule and trigger setup. | `manage_woocommerce` |
| `/recommendations` | `GET` | Product recommendations for offer setup. | `manage_woocommerce` |
| `/license/activate` | `POST` | Activate a stored license key. | `manage_woocommerce` |
| `/license/status` | `GET` | Read current license status. | `manage_woocommerce` |
| `/license/deactivate` | `POST` | Remove local license state. | `manage_woocommerce` |
## Planned, Not Yet Public
The plugin architecture reserves space for analytics summary and import routes, but external developers should not rely on undocumented endpoints until they are shipped and documented here.
## Security Rules
- Public write routes require a valid plugin-issued session token.
- Public write routes are rate-limited before expensive work runs.
- Admin routes require `manage_woocommerce`.
- Sensitive values such as license keys, raw tokens, and payment identifiers should never be exposed in custom route responses.
## Testing & QA
URL: https://wpanchorbay.github.io/upsellbay/developer/testing-and-qa/
Description: QA validation, PHPUnit, PHPStan, PHPCS, and E2E Playwright tests.
## Test Frameworks
UpsellBay requires verifying code quality prior to commits:
- **PHPCS:** Runs WordPress Coding Standards lint tasks.
- **PHPStan:** Validates static typing rules.
- **PHPUnit:** Exercises database CRUD and rule engines.
- **Playwright:** Validates storefront checkouts and Block Checkout behaviors.
### Run Quality Scripts
```bash
composer phpcs
composer phpstan
composer test
```
## Troubleshooting Guide
URL: https://wpanchorbay.github.io/upsellbay/developer/troubleshooting/
Description: System diagnostics, logging file paths, and known issue solutions.
## Common Issues & Fixes
- **Offer Fails to Render:** Check that **Test Mode** is active or verify that rule filters are satisfied.
- **Block Checkout Errors:** Confirm WooCommerce block compatibility is active.
- **Stats Dashboard is Blank:** Verify the daily cron task rolled over data to `{$wpdb->prefix}upsellbay_offer_stats_daily`.
## Log Files
Logs are written under `wp-content/uploads/wc-logs/upsellbay-*.log`.
## First Offer Tutorial
URL: https://wpanchorbay.github.io/upsellbay/first-offer/
Description: Practical tutorial for creating a safe first UpsellBay offer from start to finish.
## Goal
This walkthrough is for merchants who want one reliable first success without configuring every advanced feature on day one.
## Recommended First Offer
Start with a checkout bump or product page offer. Those are usually the easiest to understand and validate.
## Step-by-Step
1. Turn on **Test mode** in **Settings -> General**.
2. Create a new offer from **Offers** or use the **Setup Wizard**.
3. Choose one offer product with obvious relevance.
4. Write a short headline and clear button text.
5. Leave rules simple or empty for the first pass.
6. Save the offer as `Draft`.
7. Preview it in the correct storefront context.
8. If the placement looks right, switch the offer to `Active`.
9. After review, turn off test mode when you are ready for live shoppers.
## Installation
URL: https://wpanchorbay.github.io/upsellbay/getting-started/installation/
Description: Install and activate the private UpsellBay WooCommerce plugin safely on a WordPress site.
UpsellBay is distributed as a private premium plugin from WPAnchorBay. Install it like a normal WordPress plugin ZIP, then activate it from the WordPress admin.
## Before You Install
Confirm the store meets the [Requirements](/upsellbay/getting-started/requirements/), especially WooCommerce, PHP, checkout, and email delivery requirements.
## Install from WordPress Admin
Get the UpsellBay plugin ZIP (`upsellbay.zip`) file from WPAnchorBay site, or from your purchase email or the marketplace you purchased from. Then follow these steps:
1. In WordPress admin, go to **Plugins**.
2. Make sure you have already installed [WooCommerce](/upsellbay/getting-started/requirements/#woocommerce) and activated it.
3. Click **Add New**.
4. Click **Upload Plugin**.
5. Choose the UpsellBay ZIP (`upsellbay.zip`) file.
6. Click **Install Now**.
7. Click **Activate Plugin**.
:::note
If WooCommerce is not active, UpsellBay shows an admin notice and does not initialize its recovery runtime.
:::
## After Activation
After plugin activation, UpsellBay creates its default options, registers recovery session statuses, seeds default recovery email content, and schedules recurring Action Scheduler jobs.
You can go to the UpsellBay dashboard by clicking on the **Overview** link on the UpsellBay row of the plugins list.
**UpsellBay appears in:**
There are several ways to access UpsellBay:
- **WordPress Admin Direct:** `WooCommerce > UpsellBay`
- **From Plugins Page:** `Plugins > UpsellBay > Manage`
**Verify Installation:**
- Confirm `WooCommerce > UpsellBay`can be found and opens.
- Confirm no WooCommerce-missing notice appears.
- Continue to [Setup Wizard](/upsellbay/getting-started/setup-wizard/).
## Updating UpsellBay
UpsellBay uses a private updater connected to the WPAnchorBay license server. Activate a valid license key to receive continuous updates.
:::note
UpsellBay is not intended for WordPress.org hosting. The private updater and proprietary license metadata are intentional.
:::
## Introduction to UpsellBay
URL: https://wpanchorbay.github.io/upsellbay/getting-started/introduction/
Description: Understand what UpsellBay does, where it fits in WooCommerce, and how it increases AOV without replacing checkout.
## What UpsellBay Is
UpsellBay is a WooCommerce-native offer engine for increasing average order value without replacing your store's checkout flow. It adds targeted offers to four native stages of the buying journey:
- Product page
- Cart
- Checkout
- Thank-you page
UpsellBay is designed for merchants who want higher order values while keeping WooCommerce recognizable and stable.
## What UpsellBay Does
- Creates and stores offers inside a dedicated UpsellBay offer type
- Evaluates targeting rules against the current shopper and cart context
- Renders eligible offers in supported storefront placements
- Tracks aggregate, non-PII performance metrics such as views, accepts, dismissals, revenue, and discounts
- Gives store managers a WooCommerce-native admin workflow for creation, preview, filtering, and diagnostics
## What UpsellBay Does Not Try To Be
- It is not a funnel builder
- It is not a checkout replacement
- It is not an abandoned cart recovery tool
- It does not depend on CartBay
- It does not require you to redesign the storefront just to run one offer
## Main Admin Areas
Inside **WooCommerce -> UpsellBay**, the plugin is organized into a few practical areas:
- **Dashboard** for store status and aggregate performance
- **Offers** for creating, editing, previewing, filtering, and deleting offers
- **Settings** for global behavior, style tokens, license management, data retention, and logs
- **Tools** for masked diagnostics and import validation
- **Help** for documentation and support links
- **Setup Wizard** for creating a safe first draft offer
## Offer Placements
UpsellBay offers can be placed in four different locations:
### Product page offer
Use this when the shopper is evaluating a product and you want to recommend a complementary item before they leave the page.
### Cart offer
Use this when the shopper has already built intent and is reviewing the basket. This is a strong place for cross-sells and threshold-helper style offers.
### Checkout bump
Use this when the shopper is close to ordering and you want to present a single low-friction add-on near the order submission area.
### Thank-you follow-on offer
Use this when you want to promote a second purchase after the order is complete. In the current v1 flow, the shopper is sent to a separate follow-on checkout rather than a tokenized one-click charge.
## How UpsellBay Chooses What To Show
An offer is considered for display only when all of the following line up:
1. UpsellBay is globally enabled in Settings.
2. The placement is globally enabled in Settings.
3. The individual offer is set to `Active`.
4. The offered product is valid, purchasable, and in stock.
5. The placement matches the offer type.
6. The schedule and targeting rules match the current context.
7. The placement limit has not already been filled by higher-priority eligible offers.
## License Activation
URL: https://wpanchorbay.github.io/upsellbay/getting-started/license-activation/
Description: Activate, check, reactivate, remove, and understand your UpsellBay license state.
## Where License Management Lives
Go to **WooCommerce -> UpsellBay -> Settings -> License**.
### Activate New Key
When you purchase a license, you receive a license key through your email or you can get it from your account page on [wpachorbay.com](https://wpanchorbay.com/my-account/) or the platform where you purchased it.
Input your license key on the **Activate New Key** field and click **Activate License** button. The expected license key format is:
`WPAB-XXXXXXXXXXXX-XXXXXXXXXXXX`
If the format is invalid, Settings returns a validation error instead of sending a malformed request.
If the license key is valid, the plugin sends a request to the UpsellBay API to activate the license. Once activated, you will see status **Active**.
## Related Settings Reference
For the full field-by-field documentation of this area, see [License Settings](/upsellbay/usage/settings/03-license/).
## Quick Start Guide
URL: https://wpanchorbay.github.io/upsellbay/getting-started/quick-start/
Description: Create, preview, refine, and publish a safe first UpsellBay offer.
## Fastest Safe Path
This is the recommended first-run path for most stores:
1. Enable **Test mode** in **Settings -> General** if it is not already on.
2. Open **Offers** and create a new offer, or use the **Setup Wizard**.
3. Start with one placement and one clearly relevant product.
4. Add minimal targeting rules first.
5. Save as `Draft` while refining copy and discounts.
6. Switch the offer to `Active` only after previewing it in the right storefront context.
7. Disable **Test mode** only when you are ready for shoppers to see live offers.
## Recommended First Offer Example
For most stores, a checkout bump is the easiest first test:
1. Go to **WooCommerce -> UpsellBay -> Offers**.
2. Click **Add Offer**.
3. Enter an internal **Offer name**.
4. Set **Status** to `Draft` while you work.
5. Set **Offer type** to `Checkout bump`.
6. Keep **Offer goal** as `Add-on` unless this is clearly a follow-on or upgrade experience.
7. Choose the **Offer product**.
8. Write a short **Headline** and optional **Body text**.
9. Set **Button text** to something clear like `Add to order`.
10. Leave rules empty for the first preview, or add one simple rule such as a cart subtotal threshold.
11. Choose a discount type only if you want to test an incentive.
12. Save the offer.
13. Open the preview link or visit checkout with a product already in the cart.
14. When the placement looks correct, change **Status** to `Active`.
## What To Verify Before Publishing
- The offer appears in the correct placement
- The copy is understandable without reading extra instructions
- The offered product is the correct item and stock is available
- The discount math is what you intended
- The placement does not crowd payment methods or major cart actions
- Mobile layout does not produce horizontal scroll or clipped controls
## Screenshot Placeholder
Replace with: the Offers list and the first saved checkout bump in the editor.
## After Your First Offer
- Add targeting rules to narrow who sees it
- Review **Display position**, **Schedule**, and **Priority**
- Check the Dashboard and offer-level performance later for views and accepts
## Requirements
URL: https://wpanchorbay.github.io/upsellbay/getting-started/requirements/
Description: Technical requirements and operational assumptions for running UpsellBay in a WooCommerce store.
## Minimum Versions
UpsellBay currently targets the following minimum platform versions:
- PHP `8.1+`
- WordPress `6.9+`
- WooCommerce `10.8+`
These version expectations come from the plugin's runtime baseline.
## WooCommerce Assumptions
- WooCommerce must be installed and active
- Offer products must be valid WooCommerce products
- The store should use standard WooCommerce data and checkout behavior
- You should validate your exact theme and plugin stack before live rollout
## Recommended Store Conditions
- HTTPS enabled across storefront and checkout
- A theme that already works well with WooCommerce templates
- A staging site for validating placement appearance and conflicts
- At least one completed test order if you plan to use thank-you page offers
## Operational Expectations
- UpsellBay stores aggregate offer analytics without customer PII
- Order attribution is written through WooCommerce CRUD APIs
- Offer session behavior is temporary and time-bounded
- Global settings are stored in one normalized settings option
## Checkout Note
UpsellBay's product direction includes modern WooCommerce compatibility, but you should still validate checkout behavior in your exact environment before rollout. If your store relies heavily on custom checkout extensions or Cart/Checkout Blocks, review the [Compatibility Guide](/upsellbay/compatibility/) and test on staging first.
## Before You Install
Confirm that you have:
1. A WooCommerce store meeting the version requirements above
2. Permission to manage WooCommerce settings
3. At least one product you can use as an offer product
4. A test path for previewing product, cart, checkout, and thank-you placements
## Setup Wizard
URL: https://wpanchorbay.github.io/upsellbay/getting-started/setup-wizard/
Description: Use the first-run wizard to create a safe draft offer and enable admin-only preview mode.
## What The Setup Wizard Does
The Setup Wizard creates a first draft offer from a small set of required inputs. It is intentionally minimal and is best used when you want a clean starting point before moving into the full offer editor.
When you submit the wizard:
- UpsellBay creates a draft offer using placement-specific defaults
- The selected product becomes the offered product
- Your headline replaces the default headline
- If you leave **Enable test mode** checked, test mode is turned on globally
- The created offer is saved as the first-offer reference in plugin settings
## Wizard Fields
### Placement
Choose the storefront location you want to test first:
- `Checkout bump`
- `Product page offer`
- `Cart offer`
- `Thank-you follow-on offer`
This choice also sets the default copy, default offer goal, and default display position behind the scenes.
### Offer product
This is the product shoppers can add from the offer. Use the product search control to find the exact item.
Choose a product that is:
- Purchasable
- In stock
- Easy to explain in one short line of copy
- Appropriate for the selected placement
### Headline
This is the primary offer message. Keep it short and concrete.
### Preview first / Enable test mode
When checked, UpsellBay enables global test mode so only admins and store managers can safely preview eligible offers before shoppers see them.
## What The Wizard Does Not Ask Yet
The wizard deliberately skips advanced fields such as:
- status selection
- detailed targeting rules
- discount strategy
- schedule
- priority
- conflict override
You configure those inside the full offer editor after the draft is created.
## Screenshot Placeholder

Replace with: the full Setup Wizard screen showing placement, product picker, headline, and test mode.
## Recommended Workflow
1. Pick the first placement you want to validate.
2. Choose one product with obvious relevance to that placement.
3. Write a short headline.
4. Leave test mode enabled.
5. Create the draft.
6. Open the newly created offer and finish the rest of the configuration in the full editor.
## Meta files and discovery endpoints
URL: https://wpanchorbay.github.io/upsellbay/others/ai-crawler/
Description: Discover LLM-friendly metadata endpoints and crawler policy for UpsellBay docs.
These public machine-readable files help crawlers, agents, and automation discover the docs and related integration metadata:
- [robots.txt](../../robots.txt) for crawler policy and the sitemap reference.
- [llms.txt](../../llms.txt) for the concise LLM-friendly overview of the documentation set. This endpoint is also advertised with a site-wide `` tag.
- [llms-full.txt](../../llms-full.txt) for the expanded plain-text export of the docs corpus. This endpoint is also advertised with a site-wide `` tag.
- Per-page Markdown/MDX source exports under `/markdown/` (`/markdown/.md`), for example [markdown/index.md](../../markdown/index.md) or [markdown/others/ai-crawler.md](../../markdown/others/ai-crawler.md). Each documentation page advertises its own export with a page-specific `` tag.
- [sitemap-index.xml](../../sitemap-index.xml) for the top-level sitemap index.
- [sitemap-0.xml](../../sitemap-0.xml) for the generated URL list currently referenced by the sitemap index.
- [.well-known/mcp.json](../../.well-known/mcp.json) for MCP discovery metadata related to the public documentation site.
## Frequently Asked Questions
URL: https://wpanchorbay.github.io/upsellbay/others/faq/
Description: Find answers to common questions about the UpsellBay WooCommerce native offer engine.
Here are answers to the most frequently asked questions about configuring, operating, and extending UpsellBay.
## General Questions
### What is UpsellBay?
UpsellBay is a premium WooCommerce-native Average Order Value (AOV) offer engine. It allows merchants to display relevant, targeted offers during the buying journey, including:
- **Product Page**: Add-ons or frequently-bought-together offers.
- **Cart Page**: Cross-sells and threshold-based helper offers.
- **Checkout**: Order bumps on classic and block checkouts.
- **Thank-You Page**: Post-purchase checkout offers that start a separate follow-on journey.
### Does UpsellBay replace the WooCommerce checkout?
No. Unlike standard funnel builders that replace the checkout with a custom flow, UpsellBay preserves your existing checkout journey. It integrates directly into the WooCommerce classic and Block Checkouts without altering the payment gateways or checkout structure.
### Does UpsellBay require CartBay to run?
No. UpsellBay is completely independent. It is designed, installed, and operated without any reliance on CartBay options, sessions, database tables, REST routes, or scheduled jobs.
---
## Technical & Compatibility
### Is UpsellBay compatible with High-Performance Order Storage (HPOS)?
Yes. UpsellBay is fully compatible with WooCommerce HPOS (formerly Custom Order Tables). It strictly uses the WooCommerce CRUD APIs (`wc_get_order()`, `$order->update_meta_data()`, etc.) and does not query or write to standard WordPress postmeta or custom tables directly for order details.
### Does it support Block Checkout?
Yes. UpsellBay supports modern WooCommerce Block checkouts using official extensibility points, Slot/Fill, Store API integration, and documented checkout fields.
### Are there any performance impacts?
UpsellBay is highly optimized for performance:
- **Checkout Overhead**: Adds less than 150ms p95 server time with 50 active offers (object cache disabled).
- **Rule Evaluation**: Evaluates rule sets in less than 10ms p95 per request.
- **Dashboard Load**: Dashboard metrics use daily aggregate rollups, ensuring loading times under 500ms even with 100,000+ orders.
---
## Analytics & Attribution
### How is attributed revenue calculated?
When a customer accepts an offer (e.g., checks a checkout bump or clicks "Add to Cart" on a cross-sell), the plugin records the accepted offer ID. Once the order is successfully processed, the revenue of that specific offer item is attributed to the offer.
### Does UpsellBay collect customer PII?
No. In compliance with security and privacy best practices, all analytics data stored in the `{$wpdb->prefix}upsellbay_offer_stats_daily` table is aggregated and contains no customer PII (Personally Identifiable Information) or sensitive identifiers.
## Setup Guide
URL: https://wpanchorbay.github.io/upsellbay/setup/
Description: Central setup guide linking installation, wizard, first-offer workflow, and settings review.
## Recommended Setup Order
1. Review [Requirements](/upsellbay/getting-started/requirements/)
2. Complete [Installation](/upsellbay/getting-started/installation/)
3. Run the [Setup Wizard](/upsellbay/getting-started/setup-wizard/) or create a manual draft
4. Review [General Settings](/upsellbay/usage/settings/01-general/)
5. Follow the [First Offer Tutorial](/upsellbay/first-offer/)
## Cart Offer
URL: https://wpanchorbay.github.io/upsellbay/storefront/cart-offer/
Description: Use cart page real estate to cross-sell products and help customers reach incentive thresholds.
## What is a Cart Offer?
A Cart Offer is displayed on the main shopping cart page, typically just below the cart items table or near the cart totals. At this stage, the customer is reviewing their intended purchases before proceeding to checkout.
This is the perfect place to present cross-sells or to encourage the customer to spend a little more to reach a specific goal, like free shipping.
## How it Works
1. **Dynamic Recalculation:** As a customer adds, removes, or changes item quantities on the cart page, UpsellBay instantly evaluates the new cart state against your active offer rules.
2. **Threshold Logic:** If an offer is configured to trigger based on a cart subtotal (e.g., "Spend $50, get 10% off Product X"), the offer dynamically appears or disappears as the cart total fluctuates.
3. **Seamless AJAX Updates:** Accepting the offer adds the item via an asynchronous AJAX request. This instantly updates the cart totals without forcing a full page reload, maintaining the customer's momentum and focus.
## How to Create a Cart Offer
Follow these steps to create your first Cart Offer:
### 1. Core Configuration
Go to **WooCommerce > UpsellBay > Offers** and click **Add Offer**.
- **Offer name:** An internal name to identify the offer in your admin.
- **Offer type:** Select **Cart cross-sell**.
- **Status:** Set to **Active** (or **Draft** if you want to test it first).
- **Offer goal:** Select the intent of your offer (e.g., **Cross-sell** or **Threshold Offer**).
- **Offer product:** Search and select the exact product you want to recommend to shoppers.
### 2. Triggers and Rules
UpsellBay needs to know *when* to show this offer. You can set this up using basic triggers or advanced rules.
- **Trigger product IDs:** Enter comma-separated product IDs. The offer will show if any of these products are in the cart.
- **Trigger category IDs:** Enter comma-separated category IDs. The offer will show if a product from these categories is in the cart.
For more complex logic, leave triggers empty and use **Rules**:
- **Rule matching:** Choose whether the customer must meet **All rules** or **Any rule**.
- **Rules Builder:** Create conditions like cart subtotals, specific user roles, or stock statuses.
### 3. Display and Content
Customize how the offer looks and feels to the shopper:
- **Headline:** The main title of your offer.
- **Body text:** Optional short description (max 240 characters) shown below the headline.
- **Button text:** The call-to-action on the button.
- **Show product image:** Check to display the offered product's thumbnail image.
- **Hide if in cart:** Check this to automatically hide the offer if the customer has already added the offered product to their cart.
### 4. Pricing and Discounts
Incentivize the customer to take action:
- **Discount type:** Choose between No discount, Percentage, Fixed amount off, or Fixed offer price.
- **Discount value:** Enter the numeric value. The live preview will automatically show you the updated price based on your selection.
### 5. Finalizing
- **Priority:** If multiple offers are eligible, the one with the lower priority number wins.
- **Start / End date:** Optionally schedule your offer to run during a specific timeframe.
Click **Save offer**. If your status is Active, the cart offer will immediately start showing on the cart page!
## The Sales Psychology
Cart Offers utilize two proven psychological drivers:
- **Goal Gradient Effect:** Humans are highly motivated to complete a goal when they are close to it. If they are $5 away from free shipping, a $10 cart offer feels like a smart financial decision rather than an extra expense.
- **Logical Pairing:** The customer is currently reviewing their intended purchases. Offering a logical pairing at this exact moment ("I bought the shoes, but I need the socks") feels helpful and additive, not pushy.
## What Can Go Wrong
- **Distraction from Checkout:** The primary goal of the cart page is to get the customer to click "Proceed to Checkout." If your cart offer is too large, too loud, or confusing, it can cause the customer to pause, rethink, or abandon their cart.
- **Irrelevant Upsells:** Offering a completely unrelated product here breaks the customer's shopping momentum. The offer must make logical sense based on what is already in their cart.
- **Hidden Totals:** If adding the offer causes the total price to jump unexpectedly without clearly displaying the discount, it can erode trust.
## How This Helps Your Business
Cart offers are exceptional at driving incremental revenue through volume. By strategically pricing cart offers to bump orders just over your free shipping or discount thresholds, you increase AOV while simultaneously making the customer feel like they won a deal.
## Checkout Bump
URL: https://wpanchorbay.github.io/upsellbay/storefront/checkout-bump/
Description: Learn how to effectively use checkout order bumps to increase your average order value.
## What is a Checkout Bump?
A Checkout Bump is a low-friction, impulse-buy offer presented directly on the checkout page, usually right before the "Place Order" button. It consists of a simple checkbox, a compelling headline, and a short description.
Because the customer has already decided to purchase and entered their payment information, adding a checkout bump requires zero extra steps—just a single click.
## How it Works
1. **Eligibility Check:** When the customer reaches the checkout page, UpsellBay instantly evaluates your active bump rules (e.g., minimum cart total, specific products in cart).
2. **Seamless Rendering:** The offer is rendered natively within the WooCommerce checkout flow, inheriting your active theme's styling and typography so it looks like a built-in feature.
3. **Frictionless Addition:** The customer simply checks the box. UpsellBay utilizes an AJAX request to instantly add the product, apply any associated discounts, and recalculate the order total without ever reloading the page.
4. **Single Transaction:** The customer clicks "Place Order," seamlessly purchasing the original cart contents plus the bump item in a single, unified transaction.
## How to Create a Checkout Bump
Follow these steps to create your first Checkout Bump:
### 1. Core Configuration
Go to **WooCommerce > UpsellBay > Offers** and click **Add Offer**.
- **Offer name:** An internal name to identify the offer in your admin.
- **Offer type:** Select **Checkout bump**.
- **Status:** Set to **Active** (or **Draft** if you want to test it first).
- **Offer goal:** Select the intent of your offer (e.g., **Add-on** for a complementary item).
- **Offer product:** Search and select the exact product you want to recommend to shoppers.
### 2. Triggers and Rules
UpsellBay needs to know *when* to show this offer. You can set this up using basic triggers or advanced rules.
- **Trigger product IDs:** Enter comma-separated product IDs.
- **Trigger category IDs:** Enter comma-separated category IDs.
For more complex logic, leave triggers empty and use **Rules**:
- **Rule matching:** Choose whether the customer must meet **All rules** or **Any rule**.
- **Rules Builder:** Create conditions like cart subtotals, specific user roles, stock statuses, or customer order counts.
### 3. Display and Content
Customize how the offer looks and feels to the shopper:
- **Headline:** The main title of your offer.
- **Body text:** Optional short description (max 240 characters) shown below the headline. Keep this punchy for checkout bumps.
- **Button text:** N/A for standard checkbox checkout bumps, but useful if using alternative layouts.
- **Show product image:** Check to display the offered product's thumbnail image inside the bump box.
- **Hide if in cart:** Check this to automatically hide the offer if the customer has already added the offered product to their cart.
### 4. Pricing and Discounts
Incentivize the customer to take action:
- **Discount type:** Choose between No discount, Percentage, Fixed amount off, or Fixed offer price.
- **Discount value:** Enter the numeric value. The live preview will automatically show you the updated price based on your selection.
### 5. Finalizing
- **Priority:** If multiple checkout bumps are eligible, the one with the lower priority number wins.
- **Start / End date:** Optionally schedule your offer to run during a specific timeframe.
Click **Save offer**. If your status is Active, the checkout bump will immediately start showing on the checkout page!
## The Sales Psychology
Checkout bumps operate on the highly effective principles of **Impulse Purchasing** and **Frictionless Buying**:
- **High Intent:** The customer is at the absolute peak of their buying intent. They have their wallet out and are ready to finalize.
- **Low Commitment:** Checkout bumps are most effective when they are inexpensive, "no-brainer" add-ons that require zero additional research or decision-making.
- **The "While I'm At It" Effect:** Framing the offer as an exclusive, one-time convenience ("Add rush processing," "Include a protective case") significantly boosts conversion rates because it leverages the momentum of the primary purchase.
## What Can Go Wrong
- **Too Expensive:** Bumps should generally be 10-20% of the total order value. Offering a $100 bump on a $20 order creates friction and causes cart abandonment.
- **Irrelevant Offers:** Offering a generic product that doesn't complement the main purchase will lead to low conversion rates.
- **Too Much Text:** The checkout page is not the place for long sales letters. If the customer has to stop and read a paragraph, they might rethink their entire purchase. Keep the copy short and punchy.
- **Placement Blindness:** If the bump looks exactly like a standard terms and conditions checkbox, it will be ignored.
## How This Helps Your Business
Checkout bumps have one of the highest conversion rates of any upsell strategy (often 10-30%). Because the customer acquisition cost (CAC) has already been paid to get them to the checkout page, the revenue generated from a checkout bump is almost entirely pure profit, dramatically increasing your Average Order Value (AOV) with minimal effort.
## Checkout Bumps (Classic & Block)
URL: https://wpanchorbay.github.io/upsellbay/storefront/checkout/
Description: Order bumps on classic checkouts and block-based checkout blocks.
## Checkout Integrations
UpsellBay seamlessly integrates with modern WooCommerce architecture without requiring any custom coding or theme modifications.
### Classic Checkout
For stores utilizing the standard WooCommerce checkout shortcode, the offer is elegantly injected directly above the "Place Order" button area using the native `woocommerce_review_order_before_submit` hook. This ensures maximum visibility exactly when the customer is ready to convert.
### Block Checkout
For stores utilizing the modern WooCommerce Cart and Checkout Blocks, UpsellBay integrates using the official Additional Checkout Fields API. The offer is rendered as a clean, native checklist card fully integrated within the block framework, guaranteeing compatibility with modern block themes.
## Accessibility
All checkout toggles support screen readers, label associations, and keyboard navigation.
## Storefront Experience
URL: https://wpanchorbay.github.io/upsellbay/storefront/overview/
Description: Learn how UpsellBay transforms the customer buying journey with high-converting, native-feeling offers.
## The UpsellBay Advantage
UpsellBay is designed to maximize your Average Order Value (AOV) by presenting the right offer at the exact moment your customer is ready to buy. Unlike traditional popups that disrupt the shopping experience, UpsellBay's offers are seamlessly integrated into the WooCommerce flow.
Our storefront layouts follow native WooCommerce structures to feel like a natural part of the buying process:
- **Zero Intrusion:** No full-screen popups, countdown timers, or disruptive modals that annoy customers.
- **Unified Branding:** Offers automatically inherit typography, colors, and margins from your active theme.
- **Frictionless:** One-click additions without page reloads.
## The Shopper Journey
A successful upselling strategy targets different psychological states throughout the buying journey:
```text
Product Page ──> Cart ──> Checkout ──> Thank-You Page
```
UpsellBay allows you to place targeted offers at each of these critical touchpoints:
1. **[Product Page Offers](/upsellbay/storefront/product-page-offer):** Capture attention early with "Frequently Bought Together" or add-on items.
2. **[Cart Offers](/upsellbay/storefront/cart-offer):** Help customers reach thresholds (like free shipping) or cross-sell related products.
3. **[Checkout Bumps](/upsellbay/storefront/checkout-bump):** Low-friction impulse buys presented right before the final purchase decision.
4. **[Thank-You Offers](/upsellbay/storefront/thank-you-offer):** Capitalize on post-purchase euphoria with an exclusive, limited-time follow-on offer.
## Smart Evaluation
Offers are evaluated dynamically at each step. UpsellBay's conflict detection ensures that your customers aren't overwhelmed. For example, if a customer accepts a product page add-on, the system intelligently adapts future offers to prevent showing duplicates or conflicting promotions.
## Performance First
Every millisecond counts in e-commerce. UpsellBay is engineered for speed:
- **Target Overhead:** Adds less than 150ms of server processing time.
- **Asset Caching:** Scripts and styling are strictly loaded only on pages where offers are active.
- **No Layout Shifts:** We reserve layout spaces to prevent page jumping during asynchronous loading, protecting your Core Web Vitals.
## Product Page Offer
URL: https://wpanchorbay.github.io/upsellbay/storefront/product-page-offer/
Description: Maximize early touchpoints with companion product recommendations and frequently bought together offers.
## What is a Product Page Offer?
A Product Page Offer is an upsell or cross-sell presented directly on the single product page, typically just below the "Add to Cart" form. It encourages the customer to bundle additional, related items with the main product before they even reach the cart.
## How it Works in UpsellBay
1. **Contextual Evaluation:** When a customer views a product page, UpsellBay checks if there are any active offers specifically targeted at that product or category using Triggers or Rules.
2. **Native Placement:** The offer is seamlessly injected in the "Product page, after add-to-cart form" area by default, feeling like a built-in feature of your theme.
3. **Smart Redundancy Prevention:** UpsellBay automatically prevents an offer from showing on its own product page (e.g., offering a product on its own page). You can also configure the offer to hide if the customer already has the offered item in their cart.
4. **Discount Engine:** You can apply native percentage, fixed amount, or fixed price discounts to incentivize the bundle.
## How to Create a Product Page Offer
Follow these steps to create your first Product Page Offer:
### 1. Core Configuration
Go to **WooCommerce > UpsellBay > Offers** and click **Add Offer**.
- **Offer name:** An internal name to identify the offer in your admin.
- **Offer type:** Select **Product page offer**.
- **Status:** Set to **Active** (or **Draft** if you want to test it first).
- **Offer goal:** Select the intent of your offer (e.g., **Add-on** for a complementary item, or **Upgrade** for a better version).
- **Offer product:** Search and select the exact product you want to recommend to shoppers.
### 2. Triggers and Rules
UpsellBay needs to know *when* to show this offer. You can set this up using basic triggers or advanced rules.
- **Trigger product IDs:** Enter comma-separated product IDs. The offer will only appear if the customer is viewing one of these specific products.
- **Trigger category IDs:** Enter comma-separated category IDs. The offer will appear if the customer is viewing a product from these categories.
For more complex logic, leave triggers empty and use **Rules**:
- **Rule matching:** Choose whether the customer must meet **All rules** or **Any rule**.
- **Rules Builder:** Create conditions like cart subtotals, specific user roles, stock statuses, or customer order counts.
### 3. Display and Content
Customize how the offer looks and feels to the shopper:
- **Headline:** The main title of your offer (e.g., "Frequently Bought Together").
- **Body text:** Optional short description (max 240 characters) shown below the headline.
- **Button text:** The call-to-action on the button (e.g., "Add for $10").
- **Show product image:** Check to display the offered product's thumbnail image.
- **Hide if in cart:** Check this to automatically hide the offer if the customer has already added the offered product to their cart. Uncheck if you want to allow them to add multiple quantities.
### 4. Pricing and Discounts
Incentivize the customer to take action:
- **Discount type:** Choose between No discount, Percentage, Fixed amount off, or Fixed offer price.
- **Discount value:** Enter the numeric value. The live preview will automatically show you the updated price based on your selection.
### 5. Finalizing
- **Priority:** If multiple offers are eligible for the same product page, the one with the lower priority number wins.
- **Start / End date:** Optionally schedule your offer to run during a specific timeframe.
Click **Save offer**. If your status is Active, the offer will immediately start showing on the designated product pages!
## The Sales Psychology
Product Page Offers leverage two core psychological principles:
- **Anticipating Needs:** By offering batteries for a flashlight or a memory card for a camera, you solve a future problem immediately, reducing friction.
- **Perceived Value via Bundling:** Presenting the offer with a targeted discount shifts the customer's mindset from "Should I buy this?" to "Look at the great deal I'm getting."
## What Can Go Wrong
- **Irrelevant Recommendations:** Offering a premium upgrade when the user is looking at a budget option can create cognitive dissonance. Make sure the offer logically matches the original product.
- **Information Overload:** The product page is already full of details, reviews, and specs. Keep your offer concise so it doesn't overwhelm the buyer or clutter the layout.
- **Distracting from the Main Product:** If the offer takes too much attention away from the primary "Add to Cart" button, you risk confusing the buyer and losing the initial sale entirely.
## How This Helps Your Business
Product page offers are fantastic for capturing the customer's attention early in their journey. By showcasing complementary items right at the point of initial intent, you can increase your Average Order Value (AOV) before the customer even reaches the cart, effectively expanding the basket size at the very first touchpoint.
## Thank-You Follow-on Offer
URL: https://wpanchorbay.github.io/upsellbay/storefront/thank-you-offer/
Description: Capitalize on post-purchase euphoria with exclusive, limited-time follow-on offers.
## What is a Thank-You Offer?
A Thank-You Follow-on Offer is presented on the WooCommerce "Order Received" (Thank You) page, immediately after a customer completes their primary purchase.
Unlike pre-purchase offers, the customer has already crossed the finish line. This is a risk-free environment to offer a highly lucrative deal without any fear of causing cart abandonment.
## How it Works
1. **Post-Purchase Evaluation:** Once the primary order is successfully placed, UpsellBay instantly evaluates your active Thank-You offers against the contents of the newly completed order (e.g., checking if the customer just bought a coffee machine).
2. **Safe Environment:** The offer is rendered exclusively on the final Thank-You page. Because the primary transaction is already securely processed and finalized, there is absolutely zero risk to your initial order revenue.
3. **Follow-On Checkout:** If the customer accepts the offer, UpsellBay smoothly initiates a separate, expedited follow-on checkout process for this newly added item.
## How to Create a Thank-You Offer
Follow these steps to create your first Thank-You Offer:
### 1. Core Configuration
Go to **WooCommerce > UpsellBay > Offers** and click **Add Offer**.
- **Offer name:** An internal name to identify the offer in your admin.
- **Offer type:** Select **Thank-you offer**.
- **Status:** Set to **Active** (or **Draft** if you want to test it first).
- **Offer goal:** Select the intent of your offer (e.g., **Add-on** or **Exclusive Deal**).
- **Offer product:** Search and select the exact product you want to recommend to shoppers.
### 2. Triggers and Rules
UpsellBay needs to know *when* to show this offer. You can set this up using basic triggers or advanced rules based on the order that was just placed.
- **Trigger product IDs:** Enter comma-separated product IDs.
- **Trigger category IDs:** Enter comma-separated category IDs.
For more complex logic, leave triggers empty and use **Rules**:
- **Rule matching:** Choose whether the customer must meet **All rules** or **Any rule**.
- **Rules Builder:** Create conditions like order totals, specific user roles, or customer order counts.
### 3. Display and Content
Customize how the offer looks and feels to the shopper:
- **Headline:** The main title of your offer (e.g., "Wait! Add this to your order...").
- **Body text:** Optional short description (max 240 characters) shown below the headline.
- **Button text:** The call-to-action on the button (e.g., "Add for $10").
- **Show product image:** Check to display the offered product's thumbnail image.
- **Hide if in cart:** N/A for Thank-You offers, as the cart is already empty at this stage.
### 4. Pricing and Discounts
Incentivize the customer to take action:
- **Discount type:** Choose between No discount, Percentage, Fixed amount off, or Fixed offer price.
- **Discount value:** Enter the numeric value. The live preview will automatically show you the updated price based on your selection.
### 5. Finalizing
- **Priority:** If multiple offers are eligible, the one with the lower priority number wins.
- **Start / End date:** Optionally schedule your offer to run during a specific timeframe.
Click **Save offer**. If your status is Active, the offer will immediately start showing on the Thank-You page for eligible orders!
## The Sales Psychology
Thank-You offers are incredibly powerful because they leverage **Post-Purchase Euphoria** and **Commitment & Consistency**:
- **Endorphin Rush:** The moment right after a purchase is when a buyer feels the highest level of excitement. They are still actively in a "buying mood."
- **Fear of Missing Out (FOMO):** Presenting this offer as a strict, one-time-only deal (e.g., "Because you just bought X, you can add Y for 40% off right now only") creates compelling urgency that is difficult to ignore.
- **Zero Friction:** Even though it requires a brief follow-on checkout step, the customer's intent and trust levels are so high that the psychological friction is remarkably low.
## What Can Go Wrong
- **Buyer's Remorse:** Pushing an extremely expensive follow-on offer immediately after a large purchase can trigger anxiety and lead the customer to cancel or refund the entire order. Keep it proportional.
- **Confusing Flow:** If it isn't completely clear that this is an *additional* purchase, the customer might think they are paying twice for their original order. The copy must explicitly state the terms.
- **Overpromising:** If the follow-on item delays the shipping of the original purchase, and you don't communicate this clearly, you will create a poor customer experience.
## How This Helps Your Business
Thank-You offers are the holy grail of upselling. They allow you to safely test aggressive offers (like deep discounts on clearance items or subscription upsells) without jeopardizing your core conversion rate. Every dollar generated here is pure, incremental revenue that drastically increases the lifetime value (LTV) of the customer on day one.
## Dashboard
URL: https://wpanchorbay.github.io/upsellbay/usage/dashboard/
Description: Understand the UpsellBay dashboard, store status cards, and performance range summary.
## What The Dashboard Is For
The Dashboard is the quickest place to answer three operational questions:
1. Are offers globally enabled?
2. Are there any active offers?
3. Has UpsellBay generated views, accepts, and attributed revenue recently?
If no active offers exist yet, the dashboard shows an onboarding panel with a direct link to create the first offer.
## Store Offer Status Cards
The top metric cards summarize current store state:
- **Offers enabled**: whether UpsellBay is globally allowed to render live offers
- **Test mode**: whether previews are currently limited to store managers/admins
- **Active offers**: how many offers are currently set to `Active`
- **Recent revenue**: recently attributed revenue from aggregate stats
## Performance Range Controls
The dashboard supports three aggregate date windows:
- `Last 7 days`
- `Last 30 days`
- `Last 90 days`
## Performance Metrics
### Views
How many offer render events were recorded for the selected date range.
### Accepts
How many times shoppers accepted an offer.
### Accept Rate
Accepts divided by views for the selected window.
### Attributed Revenue
Revenue that UpsellBay attributes to accepted offers in the aggregate stats table.
### Dismissals
How many offers were explicitly dismissed.
### Orders
How many orders are included in the attributed analytics summary for the selected window.
### Discount Total
The total discount amount associated with accepted offers in that period.
### Revenue Per Attributed Order
Displayed in the UI as the per-order revenue lift across attributed orders.
## Help & Diagnostics
URL: https://wpanchorbay.github.io/upsellbay/usage/help/
Description: Use the Help page, Tools page, diagnostics, import validation, and logs for support and operations.
## Help Page
The **Help** tab within the UpsellBay plugin (`WooCommerce -> UpsellBay -> Help`) is a lightweight routing page designed to quickly direct merchants to the most useful references and support channels. It features a clean, card-based layout:
### 1. Documentation Card
Provides a quick link to the official documentation site. It includes helpful prompts (such as pointing to the first-offer tutorial) to guide new users, and a direct button to **View Full Documentation**.
### 2. Contact Support Card
Provides direct access to our support team:
- **Visit Support Portal:** A button linking to the official support portal (`https://wpanchorbay.com/support/`).
- **Direct Email:** Provides the support email address (`support@wpanchorbay.com`) for merchants who prefer to email directly.
### 3. Logs & Diagnostics Card
Offers one-click access to system logs for troubleshooting issues or reviewing plugin activity. It includes direct links to:
- **UpsellBay Logs:** The plugin's internal event logs.
- **WooCommerce Logs:** Native WooCommerce status and error logs.
- **WordPress Site Health & Logs:** The native WordPress diagnostics tools.
## Logs
The **Settings -> Logs** section is where you inspect operational records.
### What logs contain
- system events
- API activity
- error details
- related request and response metadata when available
### Common actions
- search log entries
- open a full log detail view
- delete a single log entry
- bulk delete selected log entries
- copy a support-ready log report to the clipboard
## Offers Overview
URL: https://wpanchorbay.github.io/upsellbay/usage/offers/01-overview/
Description: Understand the Offers screen, list table controls, and the lifecycle of an UpsellBay offer.
## What The Offers Screen Does
The **Offers** tab is your central hub for merchandising operations. It provides a comprehensive view of all your upsell campaigns, allowing you to easily:
- **Create and configure** new offers.
- **Search and filter** your existing campaigns.
- **Monitor health and placement** at a glance.
- **Preview** how offers appear directly on the storefront.
- **Manage** offer lifecycles (activate, pause, edit, delete).
## Understanding the Offers Table
The table provides key insights into your active campaigns.
### Offer
Displays the internal title of the offer. Hovering over a row reveals quick actions:
- **Edit**: Opens the visual builder to modify the offer.
- **View Live**: Launches a new tab to preview the offer in its designated storefront location.
- **Delete**: Permanently removes the offer.
### Placement
Indicates the specific storefront location where the offer is designed to render (e.g., Product Page, Cart, Checkout, Thank You).
### Status
Reflects the current operational state of the offer:
- **Draft**: The offer is safely saved but not eligible to be shown.
- **Active**: The offer is live and will render when its targeting rules are met.
- **Paused**: The offer is temporarily disabled without losing its configuration.
### Health
The Health column provides proactive conflict detection to ensure a smooth shopper experience:
- A **green success icon** indicates no known conflicts.
- A **warning icon** indicates potential placement crowding, a priority tie, or funnel overlap. *Note: This is an indicator to review your setup, not a guarantee of failure.*
### Priority
Determines which offer wins when multiple active offers compete for the same placement. **Lower numbers indicate higher priority** (e.g., an offer with priority 1 will display over an offer with priority 10).
### Performance Metrics
Quick-reference metrics to gauge offer success without opening detailed reports:
- **Views**: How many times the offer was rendered.
- **Accepts**: How many times the offer was successfully added to an order.
- **Revenue**: The total attributed revenue generated directly by the offer.
## Navigating and Filtering
Manage large catalogs of offers easily using the table controls:
- **Search**: Find offers by title or key terms.
- **Filters**: Narrow the view by specific Placements, Statuses, or Health states.
- **Sorting**: Click column headers to sort by title, status, priority, views, accepts, or revenue.
## Offer Lifecycle Management
### Draft State
Use **Draft** while you are actively configuring copy, establishing rules, or testing discount logic. Drafts are completely hidden from the storefront.
### Active State
**Active** offers are immediately eligible to render. They will be displayed to shoppers as long as the placement is valid, the targeting rules are met, and the offered product is available.
### Paused State
Use **Paused** to temporarily halt an offer (e.g., seasonal promotions) while retaining all historical analytics and configuration.
## Preview Behavior
Clicking **View Live** utilizes placement-aware preview logic to take you to the exact spot the offer renders:
- **Product offer**: Links directly to the offered product's page.
- **Cart offer**: Links to the cart page.
- **Checkout bump**: Links to the checkout page.
- **Thank-you offer**: Links to the most recent qualifying WooCommerce order receipt (when available).
## Creating an Offer
URL: https://wpanchorbay.github.io/upsellbay/usage/offers/02-create/
Description: Field-by-field guide to the Add Offer and Edit Offer screens in UpsellBay.
## The Add Offer Screen
The Add/Edit Offer screen is organized into sections:
- Required basics
- Targeting rules
- Discount
- Display settings
- Schedule and priority
- Advanced metadata
This page explains every field in the order merchants see it.
Replace with: the full Add Offer screen with all sections expanded.
## Required Basics
### Offer name
Internal name only. Shoppers do not see this.
### Status
- `Draft`: safe working state while building
- `Active`: eligible to show to shoppers
- `Paused`: temporarily disabled without deleting the setup
An offer must be `Active` before shoppers can see it.
### Offer type
Determines where the offer belongs:
- `Checkout bump`
- `Product page offer`
- `Cart offer`
- `Thank-you follow-on offer`
### Offer goal
The goal describes the intent of the offer:
- `Add-on`
- `Upgrade`
- `Protection`
- `Threshold Helper`
- `Follow-on`
It helps with conflict detection and reporting interpretation.
### Offer product
The WooCommerce product shoppers add from the offer.
Important behaviors:
- required for live offers
- must exist, be purchasable, and be in stock
- checkout bump and thank-you offers require a simple product or variation
- subscription products cannot receive UpsellBay discounts
### Reason label
A short supporting label such as `Recommended`, `Exclusive`, or `Most Popular`.
### Section heading
Controls the heading shown above the cart offer list in block and classic checkout. Leave blank to use the default Recommended for you.
### Headline
Primary shopper-facing message. Required for live offers.
### Body text
Optional short description below the headline. Supports limited formatting.
### Button text
The call to action shoppers click. Required for live offers.
## Targeting Rules
### Rule matching
Controls how multiple rules work together:
- `All rules`
- `Any rule`
### Rules
Rules are edited through the visual builder and stored as structured JSON.
When creating rules that target specific products (such as "Cart contains product" or "Viewed product"), you can seamlessly select **multiple products** within a single rule. The dropdown utilizes a native WooCommerce search interface equipped with infinite scrolling, allowing you to easily browse large catalogs. Selected products clearly display their name, ID, and price to ensure accurate targeting.
Full rule types are documented in [Targeting Rules](./04-targeting-rules/).
## Discount
### Discount type
Options:
- `No discount`
- `Percentage`
- `Fixed amount off`
- `Fixed offer price`
Discount math is calculated server-side. Percentage discounts cannot exceed 100.
### Discount value
The numeric input used by the selected discount type.
## Display Settings
### Show product image
Toggles whether UpsellBay should render the WooCommerce product image when available.
### Display position
Each offer type has one expected predefined position:
- Checkout bump -> `before_submit`
- Product page offer -> `after_add_to_cart`
- Cart offer -> `after_cart_table`
- Thank-you offer -> `order_received_actions`
### Advanced JSON
Advanced users can preserve extra placement keys here.
## Schedule and Priority
### Start date
Optional start timestamp.
### End date
Optional end timestamp. End date must be after start date.
### Priority
Lower numbers win when multiple eligible offers compete for the same placement.
## Advanced Metadata
### Performance
Read-only summary after the offer has been saved and starts receiving traffic.
### Trigger product IDs
Comma-separated WooCommerce product IDs used as a direct trigger filter.
### Trigger category IDs
Comma-separated WooCommerce category IDs used as a direct category trigger filter.
### Conflict override
Allows a merchant to bypass conflict prevention. Use only when the overlap is intentional.
### Conflict override reason
Required justification when override is enabled for an active offer.
## Offer Types & Goals
URL: https://wpanchorbay.github.io/upsellbay/usage/offers/03-types/
Description: Choose the right offer type and goal for each stage of the WooCommerce buying journey.
## Placement-Based Offer Types
### Product Page Offer
Displayed immediately after the add-to-cart form on the product page. This placement is ideal for companion recommendations, required accessories, and "frequently bought together" style cross-sells.
[Learn more about Product Page Offers](/upsellbay/storefront/product-page-offer)
### Cart Offer
Displayed within the cart review area. This placement is highly effective for threshold-helper offers (e.g., "Add $5 to get free shipping") or direct cross-sells while the shopper is evaluating their intended purchases.
[Learn more about Cart Offers](/upsellbay/storefront/cart-offer)
### Checkout Bump
Presented seamlessly within the checkout flow, typically right before the final order submission. Best utilized for low-friction, impulse-buy accessories, expedited shipping options, or extended warranties.
[Learn more about Checkout Bumps](/upsellbay/storefront/checkout-bump)
### Thank-You Follow-On Offer
Shown exclusively on the "Order Received" page after the primary checkout is complete. Perfect for capturing post-purchase momentum with exclusive, second-purchase follow-ons without risking the initial sale.
[Learn more about Thank-You Offers](/upsellbay/storefront/thank-you-offer)
## Goal Classifications
Beyond their placement, every offer is assigned a **Goal** classification. While goals do not alter the physical placement of the offer, they are critical for internal organization, smart conflict prevention, and precise reporting interpretation:
- **Add-on**: A complementary item that enhances the main purchase (e.g., batteries, protective case).
- **Upgrade**: A superior or more expensive version of the item the customer is currently considering.
- **Protection**: Warranties, shipping insurance, or extended support plans.
- **Threshold Helper**: Items strategically priced to help a customer cross a promotional boundary (like free shipping or a bulk discount).
- **Follow-on**: A distinct, secondary purchase proposition made after the initial transaction has been secured.
## Targeting Rules
URL: https://wpanchorbay.github.io/upsellbay/usage/offers/04-targeting-rules/
Description: Learn every supported targeting rule in UpsellBay and how rule matching changes eligibility.
## How Rules Work
Rules are evaluated against the current product, cart, and shopper context.
## Rule Matching Modes
### All rules
Every rule must match.
### Any rule
A single matching rule is enough.
## Supported Rule Types
Here is the complete list of supported rule types, their expected values, and supported operators.
| Rule Type | Description | Value Type | Supported Operators |
| --- | --- | --- | --- |
| `cart_product` | Cart contains product | List (Products - Multi-select) | `contains`, `not_in` |
| `cart_category` | Cart contains category | List (Categories - Multi-select) | `contains` |
| `cart_tag` | Cart contains tag | List (Tags - Multi-select) | `contains` |
| `cart_subtotal` | Cart subtotal is | Number | `gt`, `gte`, `lt`, `lte`, `eq`, `neq` |
| `viewed_product` | Currently viewing product | List (Products - Multi-select) | `contains` |
| `user_role` | User role is | List (Roles - Multi-select) | `contains` |
| `customer_order_count` | Customer order count is | Number | `gt`, `gte`, `lt`, `lte`, `eq`, `neq` |
| `customer_lifetime_spend` | Customer lifetime spend is | Number | `gt`, `gte`, `lt`, `lte`, `eq`, `neq` |
| `stock_status` | Offered product stock status is | Stock Status | `eq` |
| `exclude_if_product_in_cart` | Exclude if cart contains product | List (Products - Multi-select) | `not_in` |
*Note: `lifetime_spend` is accepted as an alias for `customer_lifetime_spend`, and `exclude_product_in_cart` is accepted as an alias for `exclude_if_product_in_cart`.*
## Supported Operators and Aliases
The system normalizes operators and accepts various aliases to make API integration easier.
| Canonical Operator | Description | Accepted Aliases |
| --- | --- | --- |
| `eq` | Equals | `is` |
| `neq` | Does not equal | `is_not` |
| `contains` | Contains | `in`, `eq`* |
| `not_in` | Does not contain | `not_contains`, `neq`* |
| `gt` | Greater than | `greater_than`, `>` |
| `gte` | Greater than or equal to | `greater_or_equal`, `>=` |
| `lt` | Less than | `less_than`, `<` |
| `lte` | Less than or equal to | `less_or_equal`, `<=` |
*\*If `eq` is passed for a rule that expects `contains`, it will automatically be normalized to `contains`. The same applies for `neq` mapping to `not_in`.*
## Validation Notes
- Numeric rules (`cart_subtotal`, `customer_order_count`, `customer_lifetime_spend`) require numeric values.
- List rules accept single values or arrays of values. In the visual builder, Product, Category, Tag, and Role rules utilize a multi-select interface with infinite scrolling to easily manage large datasets.
- Unsupported operators are rejected.
- Unsupported stock states are rejected (supported states: `instock`, `outofstock`, `onbackorder`).
- Empty rule values are rejected for active offers.
## Triggers & Advanced Targeting
URL: https://wpanchorbay.github.io/upsellbay/usage/offers/05-triggers/
Description: Use direct trigger IDs, rule combinations, and advanced targeting controls for precise offer eligibility.
## Trigger Product IDs
This field accepts a comma-separated list of WooCommerce product IDs.
Use when:
- the same offer should trigger from a known set of products
- an agency is implementing controlled mappings across a catalog
- you need direct product-level specificity
## Trigger Category IDs
This field accepts a comma-separated list of WooCommerce product category IDs.
Use when:
- the same merchandising logic applies to a full category cluster
- the catalog changes often and category-based grouping is more durable than product-by-product configuration
## Rules vs Trigger IDs
Use the **visual rules builder** for most setups. The visual rules interface seamlessly supports searching and selecting multiple products, categories, or tags with an infinite-scroll dropdown, making it highly intuitive for non-technical store managers.
Use **trigger IDs** primarily when you need to quickly copy-paste large lists of specific IDs, or when technical operators are managing the setup programmatically.
## Display Settings, Schedule & Conflicts
URL: https://wpanchorbay.github.io/upsellbay/usage/offers/06-display-conditions/
Description: Configure how an offer renders, when it runs, and how it behaves around conflicts.
## Display Settings
### Show Product Image
This toggle controls whether the storefront offer includes the WooCommerce product image. Enabling this often increases conversion rates for visual products, while disabling it creates a more compact, text-focused UI.
### Hide If In Cart
This ensures the offer automatically hides if the customer already has the exact offered product in their cart.
- **Leave checked** for generic cross-sells (e.g., an accessory) to avoid confusing duplicates.
- **Uncheck** if you are offering add-ons or selling additional quantities at a discount where having the product in the cart is expected and desired.
### Display Position
UpsellBay validates the saved position against the offer type. Each offer type maps natively to one highly optimized area:
- **Checkout Bump** -> Injected into the checkout area, typically right before the final submission button.
- **Product Page Offer** -> Positioned seamlessly after the add-to-cart form.
- **Cart Offer** -> Displayed prominently in the cart review area.
- **Thank-You Offer** -> Rendered securely on the post-purchase order received page.
## Schedule
### Start Date
Set a timestamp for when the offer should go live. Leave this blank if the offer should be eligible immediately upon activation.
### End Date
Set a timestamp for when the offer should automatically expire. Leave this blank if the offer should remain continuously available until manually paused or deleted.
## Priority & Conflict Resolution
### Priority Configuration
Priority determines which offer wins when multiple active offers qualify for the exact same placement simultaneously.
- **Lower number = stronger priority** (e.g., Priority 1 wins against Priority 5).
- **Higher number = fallback behavior**.
### Smart Conflict Detection
UpsellBay proactively checks active offers to prevent poor customer experiences, flagging issues such as:
- **Placement Crowding**: Too many offers targeting the same page space.
- **Priority Ties**: Multiple offers competing with the exact same priority level.
- **Funnel Overlap**: Conflicting logic that might trap or confuse a shopper.
### Conflict Override
This setting bypasses UpsellBay's built-in conflict prevention logic. **Use this with extreme caution**—it should only be enabled when overlapping offers are strictly intentional. When enabling an override, you must provide a documented reason to maintain a clear audit trail of why the safety check was bypassed.
## Offer Analytics
URL: https://wpanchorbay.github.io/upsellbay/usage/offers/07-analytics/
Description: Review offer-level performance data, aggregate dashboard metrics, and what the numbers mean.
## Where Analytics Appear
UpsellBay surfaces performance data in two convenient locations:
- **Global Dashboard**: Provides aggregate, date-range reporting across all active campaigns to gauge overall plugin impact.
- **Offer Editor**: Displays a read-only performance summary directly within the individual offer configuration screen for quick, contextual insights.
## Metrics Captured
To help you measure ROI accurately, UpsellBay tracks the following metrics for each offer:
- **Views**: The number of times the offer was successfully rendered to a shopper.
- **Accepts**: The number of times the shopper clicked to add the offered item to their cart or order.
- **Dismissals**: The number of times the shopper explicitly clicked the close/dismiss button on the offer.
- **Revenue**: The total monetary value attributed to the offer (calculated from successful checkout completions).
- **Discount Total**: The aggregate value of discounts applied specifically through this offer.
- **Orders**: The total number of unique orders that include this offer.
- **Accept Rate**: The conversion percentage (Accepts divided by Views).
## How To Interpret The Data
Understanding the context behind the numbers helps refine your strategy:
- **High Views + Low Accepts**: Often points to weak product fit, uncompelling copy, or a discount that isn't enticing enough. Consider testing a different offer goal.
- **Low Views**: Usually indicates that the targeting rules are too strict, the trigger products aren't getting traffic, or the placement is currently disabled.
- **High Accept Rate + Low Revenue**: Can still be a major win! If the offer is on a low-traffic product but converts well, it is successfully driving incremental AOV. Leave it active.
## General Settings
URL: https://wpanchorbay.github.io/upsellbay/usage/settings/01-general/
Description: Full reference for the General settings section, including global offer controls, placement limits, and style options.
## What The General Section Controls
Go to **WooCommerce -> UpsellBay -> Settings (-> General)** to manage the controls that affect all storefront offer rendering.
This section combines two kinds of settings:
- operational controls that decide whether UpsellBay is allowed to run
- presentation controls that keep offers visually aligned with the storefront
Use the General section when you need to pause offer rendering, limit where offers can appear, tune how many offers can show at once, or lightly adjust the offer UI without rebuilding your theme.
## Enable Offers
This is the global master switch for shopper-facing UpsellBay offers.
What it means:
- `Enabled` means eligible active offers can render on placements that are also enabled.
- `Disabled` means UpsellBay stops rendering shopper-facing offers across the storefront.
What it does not change:
- it does not delete offers
- it does not change individual offer status
- it does not erase analytics or logs
When to use it:
- before a planned campaign pause
- during theme, checkout, or merchandising maintenance
- while troubleshooting storefront output without editing every offer
## Test Mode
Test Mode is the safest way to review offer behavior before exposing it to live shoppers.
What it means:
- store managers and admins can preview and validate offers
- live shoppers should not see test-only offer behavior while the mode is active
When to use it:
- during first-time setup
- before publishing a new placement
- after changing copy, products, discounts, or targeting rules
- while comparing theme or checkout changes against existing offer layouts
Why it matters:
- it reduces the chance of showing unfinished or misconfigured offers
- it gives you a controlled review path for QA and merchant approvals
- it works well with draft offers and preview testing
## Placements
The placement cards are global gates. An individual offer still needs to be active, eligible, and assigned to the matching placement, but the placement must also be enabled here.
What each placement card includes:
- an on or off toggle for the placement
- a **Max active offers** limit for that placement
If a placement is turned off here, no offer assigned to that placement renders, even if the offer itself is active and otherwise valid.
#### Product page offer
> Use this toggle to allow UpsellBay to render product-page offers near the product form and evaluation flow.
>
> Best for:
>
> - accessories
> - frequently bought together offers
> - setup add-ons
>
> Why use it:
>
> - shoppers are still evaluating the main product
> - this is a natural place to offer complementary items before cart review
> - the offer can feel like a helpful add-on rather than a separate promotion
#### Cart offer
> Use this toggle to allow offers in cart review contexts.
>
> Best for:
>
> - cross-sells
> - bundle completion suggestions
> - threshold-helper offers
>
> Why use it:
>
> - the shopper has already shown purchase intent
> - cart is a strong place to recommend items that complete the order
> - it works well for utility, accessory, or low-risk add-on suggestions
#### Checkout bump
>
> Use this toggle to allow checkout bumps near the order submission step.
>
> Best for:
>
> - one focused add-on
> - low-friction, low-complexity products
>
> Why use it:
>
> - checkout is the strongest place for a single, obvious add-on
> - limiting choice here helps avoid payment-area clutter
> - it keeps the offer native to the existing WooCommerce checkout flow
#### Thank-you offer
> Use this toggle to allow thank-you page follow-on offers after the primary order is complete.
>
> Best for:
>
> - refill offers
> - post-purchase second-order prompts
>
> Why use it:
>
> - the first order is already complete
> - it gives you a safe place to promote a second purchase
> - it works well for replenishment or compatible follow-up items
### Max Active Offers
Each placement card includes a **Max active offers** value. This controls how many eligible offers may appear at the same time in that placement.
What it means:
- lower values keep the storefront focused
- higher values allow more variety but increase the risk of clutter
- if more offers are eligible than the limit allows, offer priority decides which ones win
Recommended starting points:
- product page: `1`
- cart: `1` to `3`
- checkout: `1`
- thank-you: `1`
When to increase it:
- when you have clearly segmented offers with narrow rules
- when the cart placement needs room for more than one relevant recommendation
When to keep it low:
- when the placement is visually tight
- when broad rules could make too many offers compete
- when you want the experience to feel curated rather than promotional
## Accent Color
Accent Color is the global style token used for UpsellBay UI accents.
What it affects:
- visual accents on offers
- highlights that help the offer feel branded without replacing your theme layout
**Legibility & Contrast:** UpsellBay automatically calculates a contrasting text color (either white or dark gray) for elements rendered on top of the accent color background based on its relative luminance. This ensures that text on buttons, badges, and tag elements remains readable regardless of whether you choose a light or dark accent color.
When to use it:
- when the default accent does not fit the storefront
- when you want a light brand alignment without custom CSS
- when you need a cleaner visual match across product, cart, checkout, and thank-you placements
Why it exists:
- it gives stores a safer branding control than fully custom templates
- it helps keep offers native-looking while still recognizable as part of the store design
## Button Style
Button Style controls how UpsellBay action buttons should appear relative to the theme.
Available options:
- `Use theme buttons`
- `Outline`
### Use theme buttons
What it means:
- offer buttons inherit the storefront's normal button style
When to use it:
- when you want the most native-looking experience
- when your theme already has strong accessible button styling
- when you do not want offers to visually compete with the rest of the page
### Outline
What it means:
- offer buttons render with a lighter outline treatment
- by default, outline button text uses the storefront's standard text color instead of the accent color to maintain legibility. On hover, the button fills with the accent color and changes the text color to the dynamically calculated contrasting color.
When to use it:
- when theme buttons are too visually heavy inside offers
- when you want the offer CTA to feel secondary to the page's main purchase action
- when the storefront already has strong color emphasis and the offer should stay visually restrained
## Recommended Defaults
- keep **Enable offers** on only when you are ready for live traffic
- keep **Test mode** on until offer previews are complete
- start with low **Max active offers** values
- use **theme buttons** unless your current theme makes offer CTAs feel too dominant
- change **Accent Color** only when the default clearly clashes with the storefront
## General Section Checklist
Review this section when:
- offers are not showing where you expect
- too many offers are appearing at once
- you need to pause storefront merchandising quickly
- you are preparing a new campaign for review
- offer styling feels out of place with the current theme
## Data Settings
URL: https://wpanchorbay.github.io/upsellbay/usage/settings/02-data/
Description: Full documentation for retention controls, uninstall cleanup, and the destructive reset tools in the Data section.
## What The Data Section Controls
Go to **WooCommerce -> UpsellBay -> Settings -> Data** to manage how long operational data is retained and how aggressively the plugin should clean up stored records.
This section is for store operators who need to balance history, troubleshooting visibility, privacy, and cleanup behavior.
Use it when you need to:
- keep more historical analytics
- reduce how long temporary records stay in the system
- control whether uninstall preserves or removes UpsellBay data
- fully reset the plugin in a staging or rebuild workflow
## Stats Retention Days
This setting controls how long aggregate, non-PII analytics remain available for reporting.
What it covers:
- daily offer performance totals
- summary reporting used by the dashboard and analytics views
- historical trend windows for views, accepts, dismissals, revenue, and discounts
What it does not store:
- customer PII
- raw shopper identities
- private recovery or CRM-style contact history
When to use a longer retention window:
- you compare campaigns over seasons or quarters
- you want longer-term trend analysis
- you report performance back to clients or stakeholders
When to use a shorter retention window:
- you only care about recent campaign windows
- you want to keep reporting history lean
## Session Retention Days
This setting controls how long temporary offer session state is retained.
What it covers:
- interaction state tied to active storefront behavior
- temporary records such as dismissals or session-level offer handling
- shopper-flow state needed for offer experience continuity
Why it matters:
- shorter retention keeps temporary state from lingering longer than necessary
- longer retention may help if your workflow depends on slightly more continuity across shopper sessions
When to keep it conservative:
- on stores where you want short-lived operational state
- when you do not need longer carry-over between visits
## Log Retention Days
This setting controls how long operational logs stay available in **Settings -> Logs**.
What it covers:
- system events
- API activity
- warnings and errors
- support-oriented diagnostic records
When to use a longer retention window:
- support cases often span multiple weeks
- you investigate intermittent issues over time
- agency or operations teams need a wider troubleshooting window
When to use a shorter retention window:
- you want to keep diagnostics tighter
- you do not need old log history once issues are resolved
## Delete Data On Uninstall
This checkbox changes what happens when the plugin is uninstalled.
Disabled means:
- UpsellBay preserves data by default
- offers, settings, and stored records stay in place unless the merchant explicitly chooses cleanup
Enabled means:
- uninstall cleanup is allowed to remove UpsellBay data instead of preserving it
Why this option exists:
- some merchants want safe uninstall with preserved history
- staging or disposable environments may need a true cleanup path
When to enable it:
- when a merchant explicitly wants full removal during uninstall
- when cleaning up a temporary environment
When not to enable it:
- as a routine troubleshooting step
- on production stores unless the merchant fully understands the impact
## Clear All Data
The Data section includes a destructive **Clear All Data** action.
What it does:
- permanently removes UpsellBay records
- resets the plugin toward a fresh-install state
- clears offers, settings, analytics, session-related state, and other stored plugin data
Why it is different from uninstall cleanup:
- uninstall cleanup only applies when the plugin is uninstalled
- **Clear All Data** runs immediately from inside the plugin
When to use it:
- before rebuilding a test environment from scratch
- when intentionally resetting the plugin for a controlled migration
- when a staging environment must be wiped clean
When not to use it:
- for routine diagnostics
- when you only need to pause offers
- when you only need to prune history using retention settings
## Recommended Data Strategy
For most live stores:
- keep enough **Stats retention days** to compare offer performance over meaningful business periods
- keep **Session retention days** modest
- keep **Log retention days** long enough to support real troubleshooting
- leave **Delete data on uninstall** off unless the merchant has explicitly requested cleanup
- treat **Clear All Data** as an intentional reset tool, not a maintenance shortcut
## License Settings
URL: https://wpanchorbay.github.io/upsellbay/usage/settings/03-license/
Description: Full documentation for license status, masked key handling, renewal visibility, and all license actions.
## What The License Section Controls
Go to **WooCommerce -> UpsellBay -> Settings -> License** to manage the commercial connection between this site and your UpsellBay license.
This section does not control how offers look or where they render. It exists so store owners and operators can safely confirm licensing state, renew access, and replace keys without exposing secrets in routine admin workflows.
## Status
The **Status** badge shows the latest local license state known to the plugin.
Why it matters:
- it tells you whether the site is in a healthy update and support state
- it helps you understand whether a renewal, reactivation, or replacement is needed
- it gives support teams a fast first signal when diagnosing license issues
Common states you may see:
- `Active`: the license is connected and currently valid
- `Inactive`: no healthy active state is currently confirmed
- `Expired`: the license term has ended
- `Invalid`: the stored key was rejected or is no longer accepted
- `Dev Mode`: a non-production domain is being treated as a development environment
- `Server Error`: the license server could not be reached recently
- `Unknown`: the plugin does not currently have a confirmed state
When to act:
- if the badge is `Expired`, renew or replace the key
- if it is `Invalid`, confirm the key and activate again
- if it is `Inactive`, run a check or reactivate
- if it is `Server Error`, retry after connectivity is restored
## Current Key
If a key is already stored, UpsellBay shows only a masked version.
What it means:
- the plugin keeps the real key protected
- the Settings UI only shows a safe masked representation
- screenshots and shared admin sessions are less likely to expose secrets
Why it matters:
- you can confirm which key family is attached to the store
- you can verify whether a replacement likely succeeded
- you can share the screen internally without revealing the full key
## Expires
When the license server provides an expiration date, the **Expires** row shows the current term end date.
Why it matters:
- it helps you plan renewals before access becomes a support issue
- it makes it easier to explain status changes to clients or stakeholders
- it confirms whether an expired badge is expected
When to review it:
- before releases or update windows
- when handing over store operations
- during renewal planning
## Plan
If available, the **Plan** row shows the commercial plan associated with the active license.
Why it matters:
- it helps confirm the site is attached to the expected entitlement
- it is useful when agencies or support teams manage multiple license tiers
## Check License
This action performs a fresh check against the licensing service.
Use it when:
- the site has moved domains
- a renewal has just completed
- the status looks stale
- support asks for a fresh validation
Why use it:
- it confirms whether the current local status still matches the remote license record
- it is the least disruptive first step when diagnosing license health
## Reactivate
This action appears when the stored key is not currently in an active or valid state. It retries activation using the key that is already saved locally.
Use it when:
- the key should still be correct
- the domain or activation record may need to be refreshed
- support has asked you to retry activation without replacing the key
Why it matters:
- it avoids retyping the key when the current saved value should still be valid
- it is safer than replacing a key unnecessarily
## Remove License
This action removes the local license association from the site.
What happens after removal:
- this site is disconnected from update and support-related license checks
- live offers continue running
- a new key can be activated later when needed
When to use it:
- before transferring store ownership
- before attaching a different purchased key
- when intentionally moving the license elsewhere
## Activate New Key
This field is used to replace the current stored key with a different one.
Expected format:
`WPAB-XXXXXXXXXXXX-XXXXXXXXXXXX`
What it means:
- leaving the field blank keeps the current key unchanged
- entering a new key attempts activation during save
- invalid formatting is blocked before a malformed request is sent
When to use it:
- replacing an expired license
- moving from an older or wrong key
- switching to a new entitlement or plan
- reattaching the site after a transfer
## When The License Section Should Be Reviewed
Open this section when:
- updates or support access matter for upcoming work
- the site was cloned, migrated, or moved to a new domain
- the stored key may have changed
- the status badge is anything other than healthy
## Important Behavior Notes
- the full license key is not exposed in normal settings output
- non-production domains may be treated differently for activation handling
- transport problems should not immediately disable live offers
- the License section is for commercial state, not storefront merchandising
## Log
URL: https://wpanchorbay.github.io/upsellbay/usage/settings/04-log/
Description: Full documentation for the Settings Logs section, including table fields, filtering, inspection, export, and cleanup workflows.
## What The Log Page Documents
This page documents **WooCommerce -> UpsellBay -> Settings -> Logs**.
Even though the admin section is named **Logs**, this documentation page focuses on the single operational log system that UpsellBay uses for diagnostics and support.
## What The Logs Section Is For
The Logs section is a diagnostic workspace for operators, QA reviewers, agencies, and support teams.
Use it when:
- an offer fails to behave as expected
- you need more context for an internal bug report
- support asks for a sanitized event trail
- a license or API event needs deeper inspection
- you want to remove stale diagnostic entries after an issue is resolved
What it is not for:
- shopper-facing notifications
- marketing messages
- everyday campaign management
## What The Logs System Records
Depending on the event, logs may include:
- title
- log type
- status level
- user reference
- created date
- related object references
- description
- request data
- response data
- metadata
The plugin records diagnostic context so issues can be investigated without exposing the full license key in the normal admin interface.
## Working With The Logs Table
The logs view supports:
- search
- status filtering
- sortable columns
- single-item deletion
- bulk deletion
- opening a detailed log view
- copy-to-clipboard export from individual records
Why this matters:
- you can narrow large log lists quickly
- support teams can focus on a specific status or event family
- stores can keep the diagnostics table useful instead of noisy
## Table Columns
### Title
Short human-readable description of the recorded event.
Use it to quickly spot the event you care about before opening full details.
### Type
The event family or category associated with the log entry.
Use it to separate system, API, license, or other operational activity.
### Status
Severity-style badge that helps you judge urgency at a glance.
Typical statuses include informational and warning states as well as higher-severity error states.
Why it matters:
- errors and warnings usually deserve review first
- informational entries help reconstruct what happened before a failure
### User
Shows the recorded user when one is available.
Use it when you need to know whether an event was triggered by a specific admin action rather than background processing.
### Date
Shows when the event was recorded.
Use it to line events up with support reports, changes, imports, or license actions.
### Actions
Each row can expose actions such as:
- `Copy`
- `Details`
- `Delete`
These are the fastest path for inspection, sharing, and cleanup.
## Log Detail View
The detailed view includes:
- title
- date
- type
- status
- IP address and user ID when recorded
- related object references
- description
- request, response, and metadata payloads when available
Why open the detail view:
- to inspect the full event context
- to confirm what request or response data was captured
- to create a support-ready summary from one specific event
## Support Export
The detail screen includes a copy-to-clipboard report so you can hand a support-ready summary to your team without manually reformatting the event details.
Use it when:
- opening a support ticket
- handing a bug to engineering or QA
- documenting a reproducible issue internally
## Deleting Logs
The Logs section supports both single-item deletion and bulk deletion.
When to delete logs:
- after a support case is resolved
- when old noise is making review harder
- when a staging environment should be cleaned up
When not to delete logs yet:
- before an active issue is fully documented
- while support is still waiting on evidence
## How Logs Relate To Data Retention
The **Data** settings section controls **Log retention days**. That setting decides how long log entries stay available before retention cleanup should remove stale records.
Use the relationship this way:
- retention settings define the default lifecycle
- the Logs page gives you manual inspection and cleanup tools
## Recommended Workflow
For most teams:
- search or filter by severity first
- open the detail view for the most relevant event
- copy the support export before deleting anything
- keep log retention long enough to cover normal troubleshooting windows
## Tools
URL: https://wpanchorbay.github.io/upsellbay/usage/tools/
Description: Easily migrate, backup, and restore your UpsellBay offers and global settings.
The **Tools** tab in UpsellBay provides a robust data migration system. Whether you are moving from a staging site to production, sharing templates between stores, or simply taking a backup, the Tools page handles it all.
## Export Data
The Export tool generates a complete, structured JSON file of your UpsellBay setup.
**What is exported?**
- All Active and Paused Offers (including their rules, discounts, and placement configurations).
- Global Plugin Settings (including placement toggles, limits, and style tokens).
- Note: Analytics, logs, and sensitive data (like license keys) are *not* exported.
To export, simply click **Export Whole Data**. A `.json` file (e.g., `upsellbay-export-YYYY-MM-DD.json`) will be downloaded to your computer.
## Import Data
The Import tool allows you to safely upload an exported `.json` file and restore your setup. The process uses a **two-step preview** system to ensure you have full control before any data is saved to your store.
### Step 1: Upload and Preview
1. Choose the `.json` file you previously exported.
2. Click **Upload and Preview**.
3. UpsellBay will analyze the file and present a summary of what was found (e.g., Global Settings and the number of Offers).
### Step 2: Import Preferences
On the Preview screen, you can configure exactly how the incoming data should be handled:
- **Import global settings**: Checked by default if settings exist in the file. Uncheck this if you only want to import offers without overwriting your store's current styling and configurations.
- **Append "(Import)" to offer titles**: Check this if you want to easily distinguish the newly imported offers from your existing ones.
- **Duplicates Handling**: If an imported offer has the exact same title as an offer already on your store, you can choose a strategy:
- **Create duplicate offers**: Imports the offer alongside the existing one.
- **Skip importing**: Ignores the incoming offer.
- **Overwrite existing**: Updates the existing offer with the incoming configuration.
Once you are satisfied with your preferences, click **Confirm Import** to apply the changes.
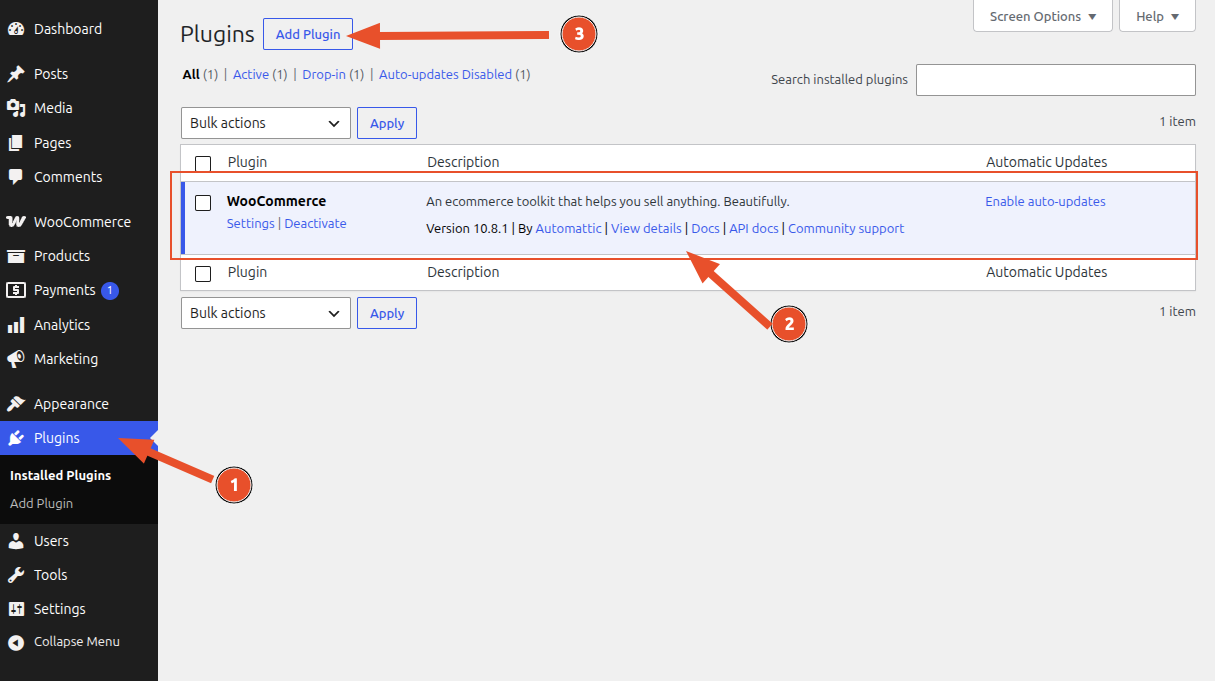 1. In WordPress admin, go to **Plugins**.
2. Make sure you have already installed [WooCommerce](/upsellbay/getting-started/requirements/#woocommerce) and activated it.
3. Click **Add New**.
1. In WordPress admin, go to **Plugins**.
2. Make sure you have already installed [WooCommerce](/upsellbay/getting-started/requirements/#woocommerce) and activated it.
3. Click **Add New**.
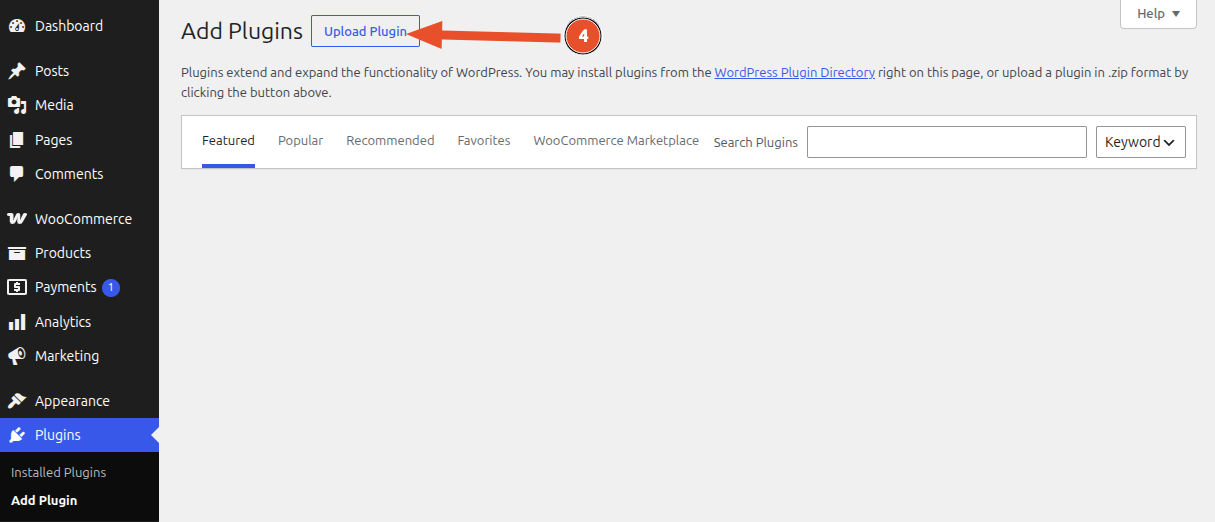 4. Click **Upload Plugin**.
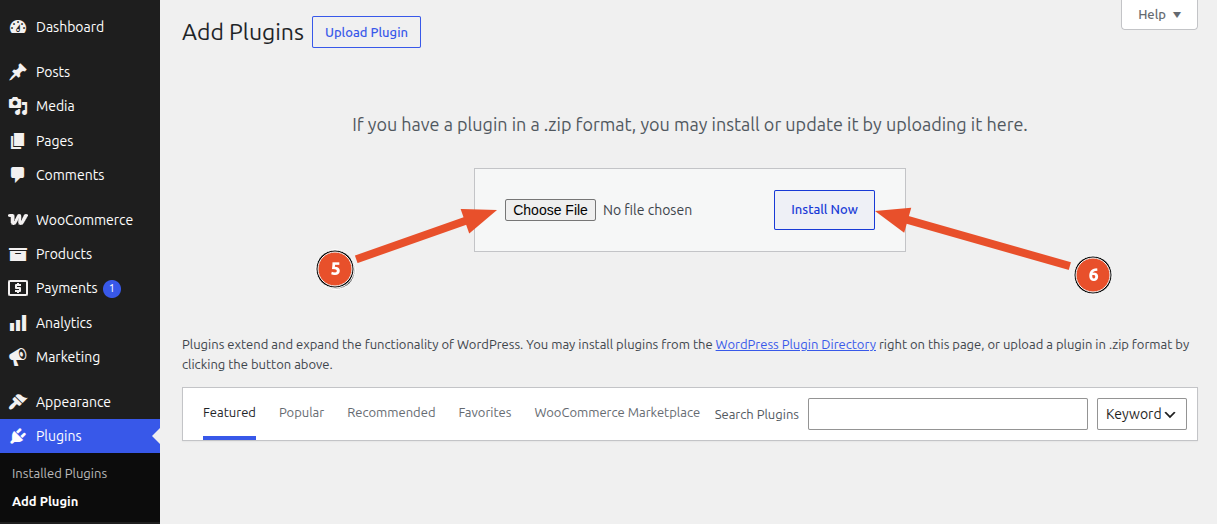 5. Choose the UpsellBay ZIP (`upsellbay.zip`) file.
6. Click **Install Now**.
5. Choose the UpsellBay ZIP (`upsellbay.zip`) file.
6. Click **Install Now**.
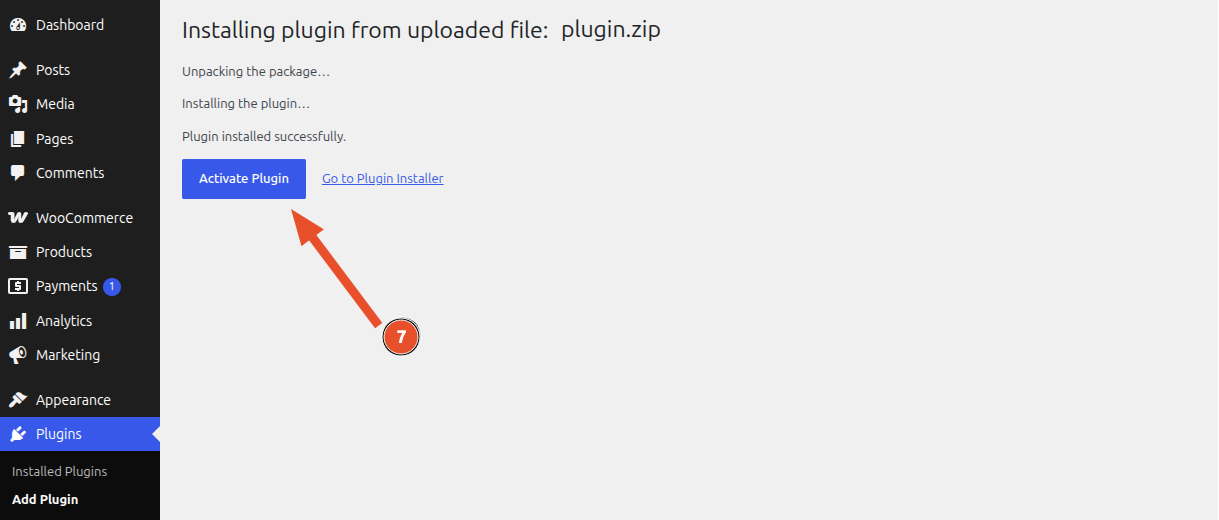 7. Click **Activate Plugin**.
:::note
If WooCommerce is not active, UpsellBay shows an admin notice and does not initialize its recovery runtime.
:::
## After Activation
After plugin activation, UpsellBay creates its default options, registers recovery session statuses, seeds default recovery email content, and schedules recurring Action Scheduler jobs.
You can go to the UpsellBay dashboard by clicking on the **Overview** link on the UpsellBay row of the plugins list.
7. Click **Activate Plugin**.
:::note
If WooCommerce is not active, UpsellBay shows an admin notice and does not initialize its recovery runtime.
:::
## After Activation
After plugin activation, UpsellBay creates its default options, registers recovery session statuses, seeds default recovery email content, and schedules recurring Action Scheduler jobs.
You can go to the UpsellBay dashboard by clicking on the **Overview** link on the UpsellBay row of the plugins list.
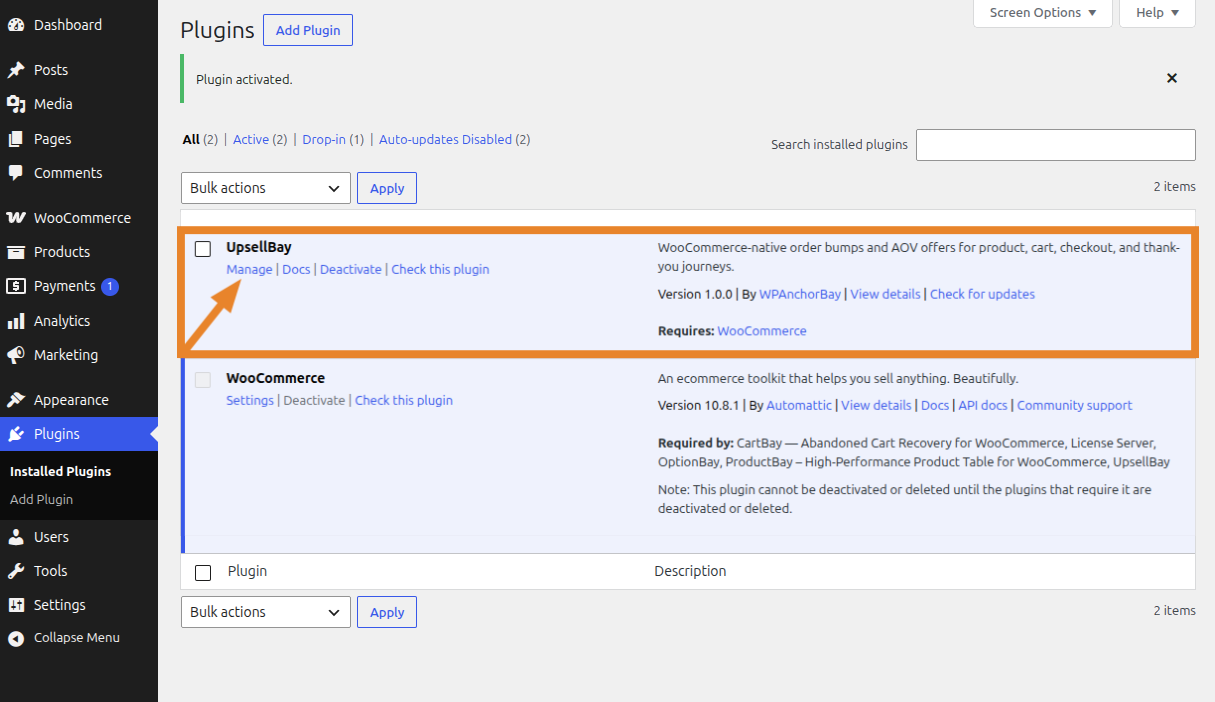 **UpsellBay appears in:**
There are several ways to access UpsellBay:
- **WordPress Admin Direct:** `WooCommerce > UpsellBay`
- **From Plugins Page:** `Plugins > UpsellBay > Manage`
**Verify Installation:**
- Confirm `WooCommerce > UpsellBay`can be found and opens.
- Confirm no WooCommerce-missing notice appears.
- Continue to [Setup Wizard](/upsellbay/getting-started/setup-wizard/).
## Updating UpsellBay
UpsellBay uses a private updater connected to the WPAnchorBay license server. Activate a valid license key to receive continuous updates.
:::note
UpsellBay is not intended for WordPress.org hosting. The private updater and proprietary license metadata are intentional.
:::
## Introduction to UpsellBay
URL: https://wpanchorbay.github.io/upsellbay/getting-started/introduction/
Description: Understand what UpsellBay does, where it fits in WooCommerce, and how it increases AOV without replacing checkout.
## What UpsellBay Is
UpsellBay is a WooCommerce-native offer engine for increasing average order value without replacing your store's checkout flow. It adds targeted offers to four native stages of the buying journey:
- Product page
- Cart
- Checkout
- Thank-you page
UpsellBay is designed for merchants who want higher order values while keeping WooCommerce recognizable and stable.
## What UpsellBay Does
- Creates and stores offers inside a dedicated UpsellBay offer type
- Evaluates targeting rules against the current shopper and cart context
- Renders eligible offers in supported storefront placements
- Tracks aggregate, non-PII performance metrics such as views, accepts, dismissals, revenue, and discounts
- Gives store managers a WooCommerce-native admin workflow for creation, preview, filtering, and diagnostics
## What UpsellBay Does Not Try To Be
- It is not a funnel builder
- It is not a checkout replacement
- It is not an abandoned cart recovery tool
- It does not depend on CartBay
- It does not require you to redesign the storefront just to run one offer
## Main Admin Areas
Inside **WooCommerce -> UpsellBay**, the plugin is organized into a few practical areas:
- **Dashboard** for store status and aggregate performance
- **Offers** for creating, editing, previewing, filtering, and deleting offers
- **Settings** for global behavior, style tokens, license management, data retention, and logs
- **Tools** for masked diagnostics and import validation
- **Help** for documentation and support links
- **Setup Wizard** for creating a safe first draft offer
## Offer Placements
UpsellBay offers can be placed in four different locations:
### Product page offer
Use this when the shopper is evaluating a product and you want to recommend a complementary item before they leave the page.
### Cart offer
Use this when the shopper has already built intent and is reviewing the basket. This is a strong place for cross-sells and threshold-helper style offers.
### Checkout bump
Use this when the shopper is close to ordering and you want to present a single low-friction add-on near the order submission area.
### Thank-you follow-on offer
Use this when you want to promote a second purchase after the order is complete. In the current v1 flow, the shopper is sent to a separate follow-on checkout rather than a tokenized one-click charge.
## How UpsellBay Chooses What To Show
An offer is considered for display only when all of the following line up:
1. UpsellBay is globally enabled in Settings.
2. The placement is globally enabled in Settings.
3. The individual offer is set to `Active`.
4. The offered product is valid, purchasable, and in stock.
5. The placement matches the offer type.
6. The schedule and targeting rules match the current context.
7. The placement limit has not already been filled by higher-priority eligible offers.
## License Activation
URL: https://wpanchorbay.github.io/upsellbay/getting-started/license-activation/
Description: Activate, check, reactivate, remove, and understand your UpsellBay license state.
## Where License Management Lives
Go to **WooCommerce -> UpsellBay -> Settings -> License**.
**UpsellBay appears in:**
There are several ways to access UpsellBay:
- **WordPress Admin Direct:** `WooCommerce > UpsellBay`
- **From Plugins Page:** `Plugins > UpsellBay > Manage`
**Verify Installation:**
- Confirm `WooCommerce > UpsellBay`can be found and opens.
- Confirm no WooCommerce-missing notice appears.
- Continue to [Setup Wizard](/upsellbay/getting-started/setup-wizard/).
## Updating UpsellBay
UpsellBay uses a private updater connected to the WPAnchorBay license server. Activate a valid license key to receive continuous updates.
:::note
UpsellBay is not intended for WordPress.org hosting. The private updater and proprietary license metadata are intentional.
:::
## Introduction to UpsellBay
URL: https://wpanchorbay.github.io/upsellbay/getting-started/introduction/
Description: Understand what UpsellBay does, where it fits in WooCommerce, and how it increases AOV without replacing checkout.
## What UpsellBay Is
UpsellBay is a WooCommerce-native offer engine for increasing average order value without replacing your store's checkout flow. It adds targeted offers to four native stages of the buying journey:
- Product page
- Cart
- Checkout
- Thank-you page
UpsellBay is designed for merchants who want higher order values while keeping WooCommerce recognizable and stable.
## What UpsellBay Does
- Creates and stores offers inside a dedicated UpsellBay offer type
- Evaluates targeting rules against the current shopper and cart context
- Renders eligible offers in supported storefront placements
- Tracks aggregate, non-PII performance metrics such as views, accepts, dismissals, revenue, and discounts
- Gives store managers a WooCommerce-native admin workflow for creation, preview, filtering, and diagnostics
## What UpsellBay Does Not Try To Be
- It is not a funnel builder
- It is not a checkout replacement
- It is not an abandoned cart recovery tool
- It does not depend on CartBay
- It does not require you to redesign the storefront just to run one offer
## Main Admin Areas
Inside **WooCommerce -> UpsellBay**, the plugin is organized into a few practical areas:
- **Dashboard** for store status and aggregate performance
- **Offers** for creating, editing, previewing, filtering, and deleting offers
- **Settings** for global behavior, style tokens, license management, data retention, and logs
- **Tools** for masked diagnostics and import validation
- **Help** for documentation and support links
- **Setup Wizard** for creating a safe first draft offer
## Offer Placements
UpsellBay offers can be placed in four different locations:
### Product page offer
Use this when the shopper is evaluating a product and you want to recommend a complementary item before they leave the page.
### Cart offer
Use this when the shopper has already built intent and is reviewing the basket. This is a strong place for cross-sells and threshold-helper style offers.
### Checkout bump
Use this when the shopper is close to ordering and you want to present a single low-friction add-on near the order submission area.
### Thank-you follow-on offer
Use this when you want to promote a second purchase after the order is complete. In the current v1 flow, the shopper is sent to a separate follow-on checkout rather than a tokenized one-click charge.
## How UpsellBay Chooses What To Show
An offer is considered for display only when all of the following line up:
1. UpsellBay is globally enabled in Settings.
2. The placement is globally enabled in Settings.
3. The individual offer is set to `Active`.
4. The offered product is valid, purchasable, and in stock.
5. The placement matches the offer type.
6. The schedule and targeting rules match the current context.
7. The placement limit has not already been filled by higher-priority eligible offers.
## License Activation
URL: https://wpanchorbay.github.io/upsellbay/getting-started/license-activation/
Description: Activate, check, reactivate, remove, and understand your UpsellBay license state.
## Where License Management Lives
Go to **WooCommerce -> UpsellBay -> Settings -> License**.
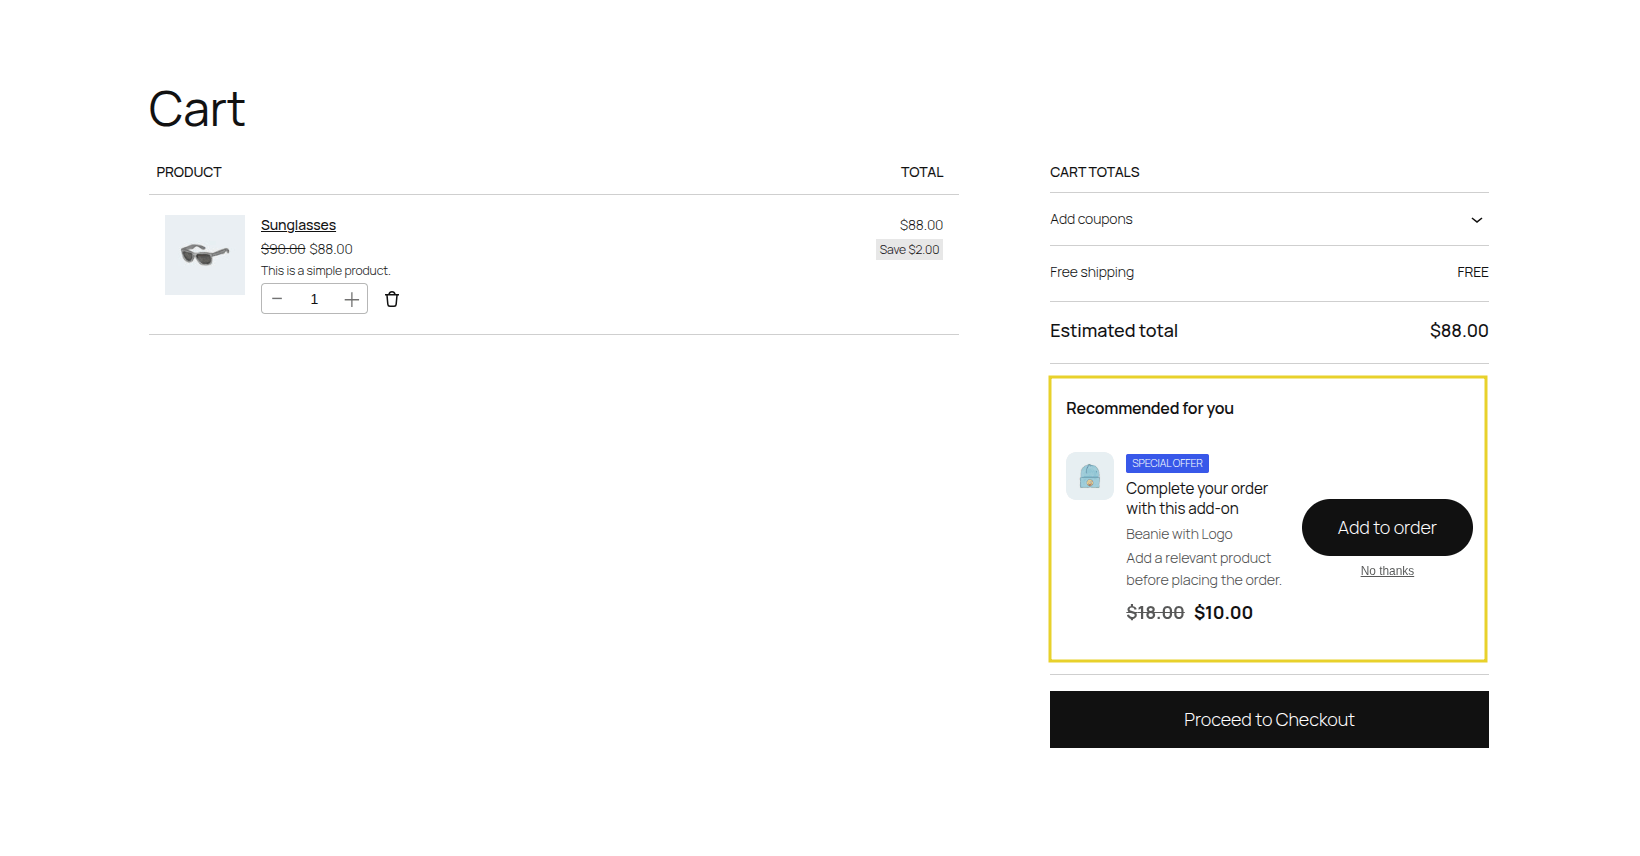 ## What is a Cart Offer?
A Cart Offer is displayed on the main shopping cart page, typically just below the cart items table or near the cart totals. At this stage, the customer is reviewing their intended purchases before proceeding to checkout.
This is the perfect place to present cross-sells or to encourage the customer to spend a little more to reach a specific goal, like free shipping.
## How it Works
1. **Dynamic Recalculation:** As a customer adds, removes, or changes item quantities on the cart page, UpsellBay instantly evaluates the new cart state against your active offer rules.
2. **Threshold Logic:** If an offer is configured to trigger based on a cart subtotal (e.g., "Spend $50, get 10% off Product X"), the offer dynamically appears or disappears as the cart total fluctuates.
3. **Seamless AJAX Updates:** Accepting the offer adds the item via an asynchronous AJAX request. This instantly updates the cart totals without forcing a full page reload, maintaining the customer's momentum and focus.
## How to Create a Cart Offer
Follow these steps to create your first Cart Offer:
### 1. Core Configuration
Go to **WooCommerce > UpsellBay > Offers** and click **Add Offer**.
- **Offer name:** An internal name to identify the offer in your admin.
- **Offer type:** Select **Cart cross-sell**.
- **Status:** Set to **Active** (or **Draft** if you want to test it first).
- **Offer goal:** Select the intent of your offer (e.g., **Cross-sell** or **Threshold Offer**).
- **Offer product:** Search and select the exact product you want to recommend to shoppers.
### 2. Triggers and Rules
UpsellBay needs to know *when* to show this offer. You can set this up using basic triggers or advanced rules.
- **Trigger product IDs:** Enter comma-separated product IDs. The offer will show if any of these products are in the cart.
- **Trigger category IDs:** Enter comma-separated category IDs. The offer will show if a product from these categories is in the cart.
For more complex logic, leave triggers empty and use **Rules**:
- **Rule matching:** Choose whether the customer must meet **All rules** or **Any rule**.
- **Rules Builder:** Create conditions like cart subtotals, specific user roles, or stock statuses.
### 3. Display and Content
Customize how the offer looks and feels to the shopper:
- **Headline:** The main title of your offer.
- **Body text:** Optional short description (max 240 characters) shown below the headline.
- **Button text:** The call-to-action on the button.
- **Show product image:** Check to display the offered product's thumbnail image.
- **Hide if in cart:** Check this to automatically hide the offer if the customer has already added the offered product to their cart.
### 4. Pricing and Discounts
Incentivize the customer to take action:
- **Discount type:** Choose between No discount, Percentage, Fixed amount off, or Fixed offer price.
- **Discount value:** Enter the numeric value. The live preview will automatically show you the updated price based on your selection.
### 5. Finalizing
- **Priority:** If multiple offers are eligible, the one with the lower priority number wins.
- **Start / End date:** Optionally schedule your offer to run during a specific timeframe.
Click **Save offer**. If your status is Active, the cart offer will immediately start showing on the cart page!
## The Sales Psychology
Cart Offers utilize two proven psychological drivers:
- **Goal Gradient Effect:** Humans are highly motivated to complete a goal when they are close to it. If they are $5 away from free shipping, a $10 cart offer feels like a smart financial decision rather than an extra expense.
- **Logical Pairing:** The customer is currently reviewing their intended purchases. Offering a logical pairing at this exact moment ("I bought the shoes, but I need the socks") feels helpful and additive, not pushy.
## What Can Go Wrong
- **Distraction from Checkout:** The primary goal of the cart page is to get the customer to click "Proceed to Checkout." If your cart offer is too large, too loud, or confusing, it can cause the customer to pause, rethink, or abandon their cart.
- **Irrelevant Upsells:** Offering a completely unrelated product here breaks the customer's shopping momentum. The offer must make logical sense based on what is already in their cart.
- **Hidden Totals:** If adding the offer causes the total price to jump unexpectedly without clearly displaying the discount, it can erode trust.
## How This Helps Your Business
Cart offers are exceptional at driving incremental revenue through volume. By strategically pricing cart offers to bump orders just over your free shipping or discount thresholds, you increase AOV while simultaneously making the customer feel like they won a deal.
## Checkout Bump
URL: https://wpanchorbay.github.io/upsellbay/storefront/checkout-bump/
Description: Learn how to effectively use checkout order bumps to increase your average order value.
## What is a Cart Offer?
A Cart Offer is displayed on the main shopping cart page, typically just below the cart items table or near the cart totals. At this stage, the customer is reviewing their intended purchases before proceeding to checkout.
This is the perfect place to present cross-sells or to encourage the customer to spend a little more to reach a specific goal, like free shipping.
## How it Works
1. **Dynamic Recalculation:** As a customer adds, removes, or changes item quantities on the cart page, UpsellBay instantly evaluates the new cart state against your active offer rules.
2. **Threshold Logic:** If an offer is configured to trigger based on a cart subtotal (e.g., "Spend $50, get 10% off Product X"), the offer dynamically appears or disappears as the cart total fluctuates.
3. **Seamless AJAX Updates:** Accepting the offer adds the item via an asynchronous AJAX request. This instantly updates the cart totals without forcing a full page reload, maintaining the customer's momentum and focus.
## How to Create a Cart Offer
Follow these steps to create your first Cart Offer:
### 1. Core Configuration
Go to **WooCommerce > UpsellBay > Offers** and click **Add Offer**.
- **Offer name:** An internal name to identify the offer in your admin.
- **Offer type:** Select **Cart cross-sell**.
- **Status:** Set to **Active** (or **Draft** if you want to test it first).
- **Offer goal:** Select the intent of your offer (e.g., **Cross-sell** or **Threshold Offer**).
- **Offer product:** Search and select the exact product you want to recommend to shoppers.
### 2. Triggers and Rules
UpsellBay needs to know *when* to show this offer. You can set this up using basic triggers or advanced rules.
- **Trigger product IDs:** Enter comma-separated product IDs. The offer will show if any of these products are in the cart.
- **Trigger category IDs:** Enter comma-separated category IDs. The offer will show if a product from these categories is in the cart.
For more complex logic, leave triggers empty and use **Rules**:
- **Rule matching:** Choose whether the customer must meet **All rules** or **Any rule**.
- **Rules Builder:** Create conditions like cart subtotals, specific user roles, or stock statuses.
### 3. Display and Content
Customize how the offer looks and feels to the shopper:
- **Headline:** The main title of your offer.
- **Body text:** Optional short description (max 240 characters) shown below the headline.
- **Button text:** The call-to-action on the button.
- **Show product image:** Check to display the offered product's thumbnail image.
- **Hide if in cart:** Check this to automatically hide the offer if the customer has already added the offered product to their cart.
### 4. Pricing and Discounts
Incentivize the customer to take action:
- **Discount type:** Choose between No discount, Percentage, Fixed amount off, or Fixed offer price.
- **Discount value:** Enter the numeric value. The live preview will automatically show you the updated price based on your selection.
### 5. Finalizing
- **Priority:** If multiple offers are eligible, the one with the lower priority number wins.
- **Start / End date:** Optionally schedule your offer to run during a specific timeframe.
Click **Save offer**. If your status is Active, the cart offer will immediately start showing on the cart page!
## The Sales Psychology
Cart Offers utilize two proven psychological drivers:
- **Goal Gradient Effect:** Humans are highly motivated to complete a goal when they are close to it. If they are $5 away from free shipping, a $10 cart offer feels like a smart financial decision rather than an extra expense.
- **Logical Pairing:** The customer is currently reviewing their intended purchases. Offering a logical pairing at this exact moment ("I bought the shoes, but I need the socks") feels helpful and additive, not pushy.
## What Can Go Wrong
- **Distraction from Checkout:** The primary goal of the cart page is to get the customer to click "Proceed to Checkout." If your cart offer is too large, too loud, or confusing, it can cause the customer to pause, rethink, or abandon their cart.
- **Irrelevant Upsells:** Offering a completely unrelated product here breaks the customer's shopping momentum. The offer must make logical sense based on what is already in their cart.
- **Hidden Totals:** If adding the offer causes the total price to jump unexpectedly without clearly displaying the discount, it can erode trust.
## How This Helps Your Business
Cart offers are exceptional at driving incremental revenue through volume. By strategically pricing cart offers to bump orders just over your free shipping or discount thresholds, you increase AOV while simultaneously making the customer feel like they won a deal.
## Checkout Bump
URL: https://wpanchorbay.github.io/upsellbay/storefront/checkout-bump/
Description: Learn how to effectively use checkout order bumps to increase your average order value.
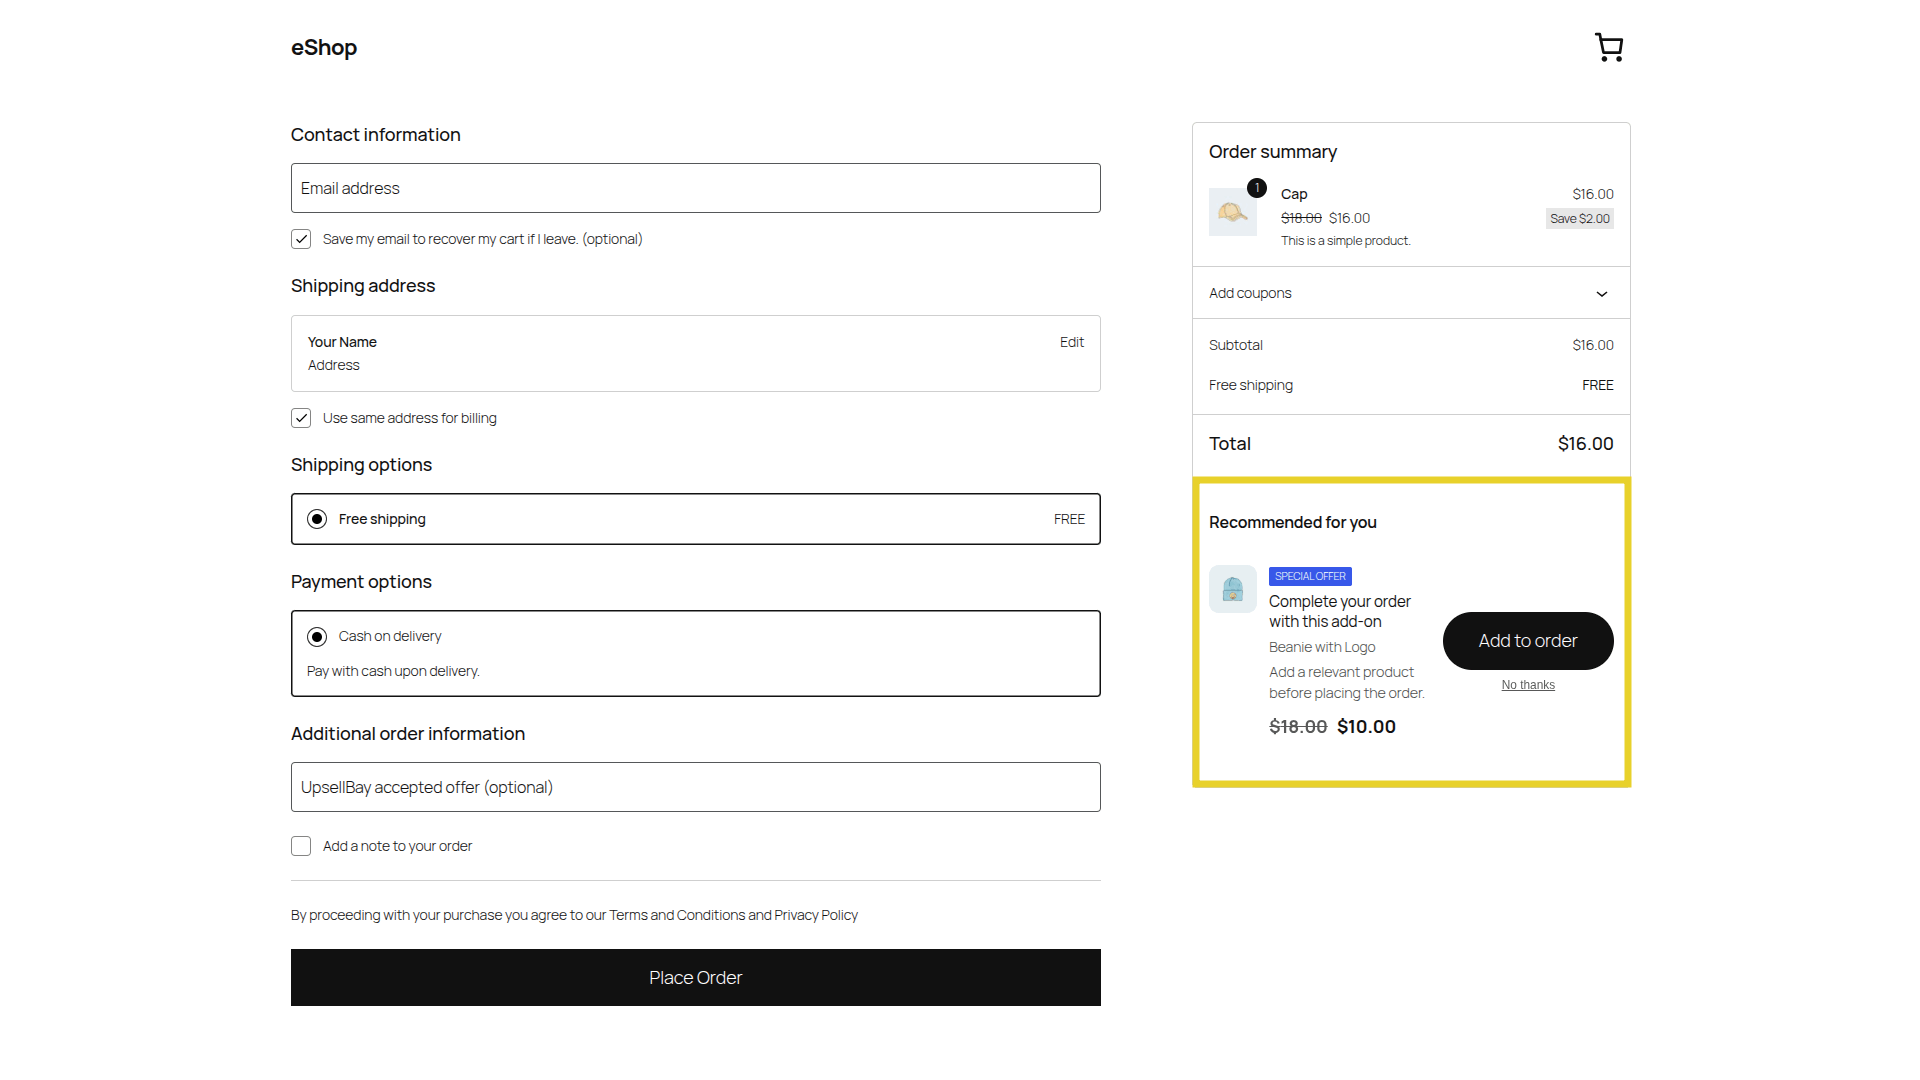 ## What is a Checkout Bump?
A Checkout Bump is a low-friction, impulse-buy offer presented directly on the checkout page, usually right before the "Place Order" button. It consists of a simple checkbox, a compelling headline, and a short description.
Because the customer has already decided to purchase and entered their payment information, adding a checkout bump requires zero extra steps—just a single click.
## How it Works
1. **Eligibility Check:** When the customer reaches the checkout page, UpsellBay instantly evaluates your active bump rules (e.g., minimum cart total, specific products in cart).
2. **Seamless Rendering:** The offer is rendered natively within the WooCommerce checkout flow, inheriting your active theme's styling and typography so it looks like a built-in feature.
3. **Frictionless Addition:** The customer simply checks the box. UpsellBay utilizes an AJAX request to instantly add the product, apply any associated discounts, and recalculate the order total without ever reloading the page.
4. **Single Transaction:** The customer clicks "Place Order," seamlessly purchasing the original cart contents plus the bump item in a single, unified transaction.
## How to Create a Checkout Bump
Follow these steps to create your first Checkout Bump:
### 1. Core Configuration
Go to **WooCommerce > UpsellBay > Offers** and click **Add Offer**.
- **Offer name:** An internal name to identify the offer in your admin.
- **Offer type:** Select **Checkout bump**.
- **Status:** Set to **Active** (or **Draft** if you want to test it first).
- **Offer goal:** Select the intent of your offer (e.g., **Add-on** for a complementary item).
- **Offer product:** Search and select the exact product you want to recommend to shoppers.
### 2. Triggers and Rules
UpsellBay needs to know *when* to show this offer. You can set this up using basic triggers or advanced rules.
- **Trigger product IDs:** Enter comma-separated product IDs.
- **Trigger category IDs:** Enter comma-separated category IDs.
For more complex logic, leave triggers empty and use **Rules**:
- **Rule matching:** Choose whether the customer must meet **All rules** or **Any rule**.
- **Rules Builder:** Create conditions like cart subtotals, specific user roles, stock statuses, or customer order counts.
### 3. Display and Content
Customize how the offer looks and feels to the shopper:
- **Headline:** The main title of your offer.
- **Body text:** Optional short description (max 240 characters) shown below the headline. Keep this punchy for checkout bumps.
- **Button text:** N/A for standard checkbox checkout bumps, but useful if using alternative layouts.
- **Show product image:** Check to display the offered product's thumbnail image inside the bump box.
- **Hide if in cart:** Check this to automatically hide the offer if the customer has already added the offered product to their cart.
### 4. Pricing and Discounts
Incentivize the customer to take action:
- **Discount type:** Choose between No discount, Percentage, Fixed amount off, or Fixed offer price.
- **Discount value:** Enter the numeric value. The live preview will automatically show you the updated price based on your selection.
### 5. Finalizing
- **Priority:** If multiple checkout bumps are eligible, the one with the lower priority number wins.
- **Start / End date:** Optionally schedule your offer to run during a specific timeframe.
Click **Save offer**. If your status is Active, the checkout bump will immediately start showing on the checkout page!
## The Sales Psychology
Checkout bumps operate on the highly effective principles of **Impulse Purchasing** and **Frictionless Buying**:
- **High Intent:** The customer is at the absolute peak of their buying intent. They have their wallet out and are ready to finalize.
- **Low Commitment:** Checkout bumps are most effective when they are inexpensive, "no-brainer" add-ons that require zero additional research or decision-making.
- **The "While I'm At It" Effect:** Framing the offer as an exclusive, one-time convenience ("Add rush processing," "Include a protective case") significantly boosts conversion rates because it leverages the momentum of the primary purchase.
## What Can Go Wrong
- **Too Expensive:** Bumps should generally be 10-20% of the total order value. Offering a $100 bump on a $20 order creates friction and causes cart abandonment.
- **Irrelevant Offers:** Offering a generic product that doesn't complement the main purchase will lead to low conversion rates.
- **Too Much Text:** The checkout page is not the place for long sales letters. If the customer has to stop and read a paragraph, they might rethink their entire purchase. Keep the copy short and punchy.
- **Placement Blindness:** If the bump looks exactly like a standard terms and conditions checkbox, it will be ignored.
## How This Helps Your Business
Checkout bumps have one of the highest conversion rates of any upsell strategy (often 10-30%). Because the customer acquisition cost (CAC) has already been paid to get them to the checkout page, the revenue generated from a checkout bump is almost entirely pure profit, dramatically increasing your Average Order Value (AOV) with minimal effort.
## Checkout Bumps (Classic & Block)
URL: https://wpanchorbay.github.io/upsellbay/storefront/checkout/
Description: Order bumps on classic checkouts and block-based checkout blocks.
## Checkout Integrations
UpsellBay seamlessly integrates with modern WooCommerce architecture without requiring any custom coding or theme modifications.
### Classic Checkout
For stores utilizing the standard WooCommerce checkout shortcode, the offer is elegantly injected directly above the "Place Order" button area using the native `woocommerce_review_order_before_submit` hook. This ensures maximum visibility exactly when the customer is ready to convert.
### Block Checkout
For stores utilizing the modern WooCommerce Cart and Checkout Blocks, UpsellBay integrates using the official Additional Checkout Fields API. The offer is rendered as a clean, native checklist card fully integrated within the block framework, guaranteeing compatibility with modern block themes.
## Accessibility
All checkout toggles support screen readers, label associations, and keyboard navigation.
## Storefront Experience
URL: https://wpanchorbay.github.io/upsellbay/storefront/overview/
Description: Learn how UpsellBay transforms the customer buying journey with high-converting, native-feeling offers.
## The UpsellBay Advantage
UpsellBay is designed to maximize your Average Order Value (AOV) by presenting the right offer at the exact moment your customer is ready to buy. Unlike traditional popups that disrupt the shopping experience, UpsellBay's offers are seamlessly integrated into the WooCommerce flow.
Our storefront layouts follow native WooCommerce structures to feel like a natural part of the buying process:
- **Zero Intrusion:** No full-screen popups, countdown timers, or disruptive modals that annoy customers.
- **Unified Branding:** Offers automatically inherit typography, colors, and margins from your active theme.
- **Frictionless:** One-click additions without page reloads.
## The Shopper Journey
A successful upselling strategy targets different psychological states throughout the buying journey:
```text
Product Page ──> Cart ──> Checkout ──> Thank-You Page
```
UpsellBay allows you to place targeted offers at each of these critical touchpoints:
1. **[Product Page Offers](/upsellbay/storefront/product-page-offer):** Capture attention early with "Frequently Bought Together" or add-on items.
2. **[Cart Offers](/upsellbay/storefront/cart-offer):** Help customers reach thresholds (like free shipping) or cross-sell related products.
3. **[Checkout Bumps](/upsellbay/storefront/checkout-bump):** Low-friction impulse buys presented right before the final purchase decision.
4. **[Thank-You Offers](/upsellbay/storefront/thank-you-offer):** Capitalize on post-purchase euphoria with an exclusive, limited-time follow-on offer.
## Smart Evaluation
Offers are evaluated dynamically at each step. UpsellBay's conflict detection ensures that your customers aren't overwhelmed. For example, if a customer accepts a product page add-on, the system intelligently adapts future offers to prevent showing duplicates or conflicting promotions.
## Performance First
Every millisecond counts in e-commerce. UpsellBay is engineered for speed:
- **Target Overhead:** Adds less than 150ms of server processing time.
- **Asset Caching:** Scripts and styling are strictly loaded only on pages where offers are active.
- **No Layout Shifts:** We reserve layout spaces to prevent page jumping during asynchronous loading, protecting your Core Web Vitals.
## Product Page Offer
URL: https://wpanchorbay.github.io/upsellbay/storefront/product-page-offer/
Description: Maximize early touchpoints with companion product recommendations and frequently bought together offers.
## What is a Checkout Bump?
A Checkout Bump is a low-friction, impulse-buy offer presented directly on the checkout page, usually right before the "Place Order" button. It consists of a simple checkbox, a compelling headline, and a short description.
Because the customer has already decided to purchase and entered their payment information, adding a checkout bump requires zero extra steps—just a single click.
## How it Works
1. **Eligibility Check:** When the customer reaches the checkout page, UpsellBay instantly evaluates your active bump rules (e.g., minimum cart total, specific products in cart).
2. **Seamless Rendering:** The offer is rendered natively within the WooCommerce checkout flow, inheriting your active theme's styling and typography so it looks like a built-in feature.
3. **Frictionless Addition:** The customer simply checks the box. UpsellBay utilizes an AJAX request to instantly add the product, apply any associated discounts, and recalculate the order total without ever reloading the page.
4. **Single Transaction:** The customer clicks "Place Order," seamlessly purchasing the original cart contents plus the bump item in a single, unified transaction.
## How to Create a Checkout Bump
Follow these steps to create your first Checkout Bump:
### 1. Core Configuration
Go to **WooCommerce > UpsellBay > Offers** and click **Add Offer**.
- **Offer name:** An internal name to identify the offer in your admin.
- **Offer type:** Select **Checkout bump**.
- **Status:** Set to **Active** (or **Draft** if you want to test it first).
- **Offer goal:** Select the intent of your offer (e.g., **Add-on** for a complementary item).
- **Offer product:** Search and select the exact product you want to recommend to shoppers.
### 2. Triggers and Rules
UpsellBay needs to know *when* to show this offer. You can set this up using basic triggers or advanced rules.
- **Trigger product IDs:** Enter comma-separated product IDs.
- **Trigger category IDs:** Enter comma-separated category IDs.
For more complex logic, leave triggers empty and use **Rules**:
- **Rule matching:** Choose whether the customer must meet **All rules** or **Any rule**.
- **Rules Builder:** Create conditions like cart subtotals, specific user roles, stock statuses, or customer order counts.
### 3. Display and Content
Customize how the offer looks and feels to the shopper:
- **Headline:** The main title of your offer.
- **Body text:** Optional short description (max 240 characters) shown below the headline. Keep this punchy for checkout bumps.
- **Button text:** N/A for standard checkbox checkout bumps, but useful if using alternative layouts.
- **Show product image:** Check to display the offered product's thumbnail image inside the bump box.
- **Hide if in cart:** Check this to automatically hide the offer if the customer has already added the offered product to their cart.
### 4. Pricing and Discounts
Incentivize the customer to take action:
- **Discount type:** Choose between No discount, Percentage, Fixed amount off, or Fixed offer price.
- **Discount value:** Enter the numeric value. The live preview will automatically show you the updated price based on your selection.
### 5. Finalizing
- **Priority:** If multiple checkout bumps are eligible, the one with the lower priority number wins.
- **Start / End date:** Optionally schedule your offer to run during a specific timeframe.
Click **Save offer**. If your status is Active, the checkout bump will immediately start showing on the checkout page!
## The Sales Psychology
Checkout bumps operate on the highly effective principles of **Impulse Purchasing** and **Frictionless Buying**:
- **High Intent:** The customer is at the absolute peak of their buying intent. They have their wallet out and are ready to finalize.
- **Low Commitment:** Checkout bumps are most effective when they are inexpensive, "no-brainer" add-ons that require zero additional research or decision-making.
- **The "While I'm At It" Effect:** Framing the offer as an exclusive, one-time convenience ("Add rush processing," "Include a protective case") significantly boosts conversion rates because it leverages the momentum of the primary purchase.
## What Can Go Wrong
- **Too Expensive:** Bumps should generally be 10-20% of the total order value. Offering a $100 bump on a $20 order creates friction and causes cart abandonment.
- **Irrelevant Offers:** Offering a generic product that doesn't complement the main purchase will lead to low conversion rates.
- **Too Much Text:** The checkout page is not the place for long sales letters. If the customer has to stop and read a paragraph, they might rethink their entire purchase. Keep the copy short and punchy.
- **Placement Blindness:** If the bump looks exactly like a standard terms and conditions checkbox, it will be ignored.
## How This Helps Your Business
Checkout bumps have one of the highest conversion rates of any upsell strategy (often 10-30%). Because the customer acquisition cost (CAC) has already been paid to get them to the checkout page, the revenue generated from a checkout bump is almost entirely pure profit, dramatically increasing your Average Order Value (AOV) with minimal effort.
## Checkout Bumps (Classic & Block)
URL: https://wpanchorbay.github.io/upsellbay/storefront/checkout/
Description: Order bumps on classic checkouts and block-based checkout blocks.
## Checkout Integrations
UpsellBay seamlessly integrates with modern WooCommerce architecture without requiring any custom coding or theme modifications.
### Classic Checkout
For stores utilizing the standard WooCommerce checkout shortcode, the offer is elegantly injected directly above the "Place Order" button area using the native `woocommerce_review_order_before_submit` hook. This ensures maximum visibility exactly when the customer is ready to convert.
### Block Checkout
For stores utilizing the modern WooCommerce Cart and Checkout Blocks, UpsellBay integrates using the official Additional Checkout Fields API. The offer is rendered as a clean, native checklist card fully integrated within the block framework, guaranteeing compatibility with modern block themes.
## Accessibility
All checkout toggles support screen readers, label associations, and keyboard navigation.
## Storefront Experience
URL: https://wpanchorbay.github.io/upsellbay/storefront/overview/
Description: Learn how UpsellBay transforms the customer buying journey with high-converting, native-feeling offers.
## The UpsellBay Advantage
UpsellBay is designed to maximize your Average Order Value (AOV) by presenting the right offer at the exact moment your customer is ready to buy. Unlike traditional popups that disrupt the shopping experience, UpsellBay's offers are seamlessly integrated into the WooCommerce flow.
Our storefront layouts follow native WooCommerce structures to feel like a natural part of the buying process:
- **Zero Intrusion:** No full-screen popups, countdown timers, or disruptive modals that annoy customers.
- **Unified Branding:** Offers automatically inherit typography, colors, and margins from your active theme.
- **Frictionless:** One-click additions without page reloads.
## The Shopper Journey
A successful upselling strategy targets different psychological states throughout the buying journey:
```text
Product Page ──> Cart ──> Checkout ──> Thank-You Page
```
UpsellBay allows you to place targeted offers at each of these critical touchpoints:
1. **[Product Page Offers](/upsellbay/storefront/product-page-offer):** Capture attention early with "Frequently Bought Together" or add-on items.
2. **[Cart Offers](/upsellbay/storefront/cart-offer):** Help customers reach thresholds (like free shipping) or cross-sell related products.
3. **[Checkout Bumps](/upsellbay/storefront/checkout-bump):** Low-friction impulse buys presented right before the final purchase decision.
4. **[Thank-You Offers](/upsellbay/storefront/thank-you-offer):** Capitalize on post-purchase euphoria with an exclusive, limited-time follow-on offer.
## Smart Evaluation
Offers are evaluated dynamically at each step. UpsellBay's conflict detection ensures that your customers aren't overwhelmed. For example, if a customer accepts a product page add-on, the system intelligently adapts future offers to prevent showing duplicates or conflicting promotions.
## Performance First
Every millisecond counts in e-commerce. UpsellBay is engineered for speed:
- **Target Overhead:** Adds less than 150ms of server processing time.
- **Asset Caching:** Scripts and styling are strictly loaded only on pages where offers are active.
- **No Layout Shifts:** We reserve layout spaces to prevent page jumping during asynchronous loading, protecting your Core Web Vitals.
## Product Page Offer
URL: https://wpanchorbay.github.io/upsellbay/storefront/product-page-offer/
Description: Maximize early touchpoints with companion product recommendations and frequently bought together offers.
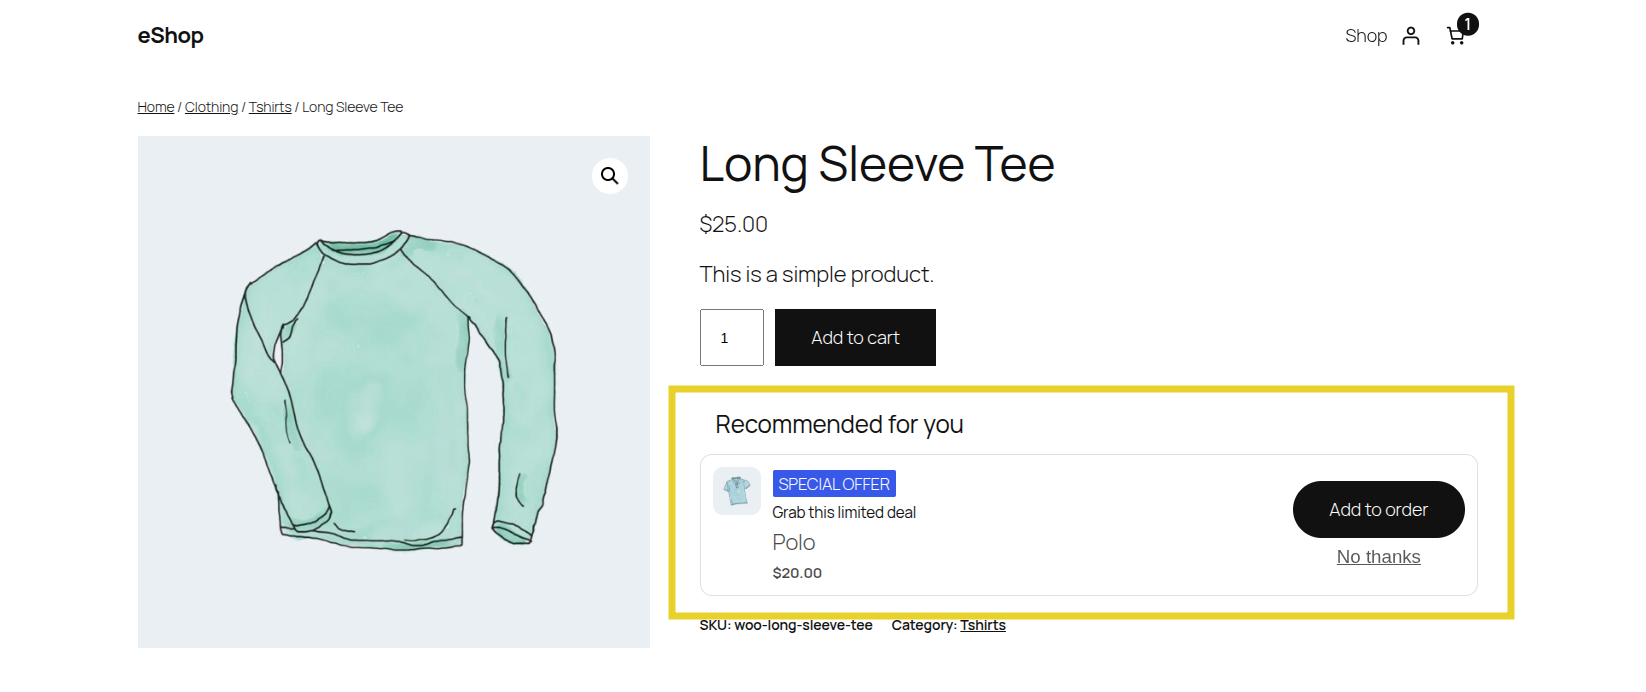 ## What is a Product Page Offer?
A Product Page Offer is an upsell or cross-sell presented directly on the single product page, typically just below the "Add to Cart" form. It encourages the customer to bundle additional, related items with the main product before they even reach the cart.
## How it Works in UpsellBay
1. **Contextual Evaluation:** When a customer views a product page, UpsellBay checks if there are any active offers specifically targeted at that product or category using Triggers or Rules.
2. **Native Placement:** The offer is seamlessly injected in the "Product page, after add-to-cart form" area by default, feeling like a built-in feature of your theme.
3. **Smart Redundancy Prevention:** UpsellBay automatically prevents an offer from showing on its own product page (e.g., offering a product on its own page). You can also configure the offer to hide if the customer already has the offered item in their cart.
4. **Discount Engine:** You can apply native percentage, fixed amount, or fixed price discounts to incentivize the bundle.
## How to Create a Product Page Offer
Follow these steps to create your first Product Page Offer:
### 1. Core Configuration
Go to **WooCommerce > UpsellBay > Offers** and click **Add Offer**.
- **Offer name:** An internal name to identify the offer in your admin.
- **Offer type:** Select **Product page offer**.
- **Status:** Set to **Active** (or **Draft** if you want to test it first).
- **Offer goal:** Select the intent of your offer (e.g., **Add-on** for a complementary item, or **Upgrade** for a better version).
- **Offer product:** Search and select the exact product you want to recommend to shoppers.
### 2. Triggers and Rules
UpsellBay needs to know *when* to show this offer. You can set this up using basic triggers or advanced rules.
- **Trigger product IDs:** Enter comma-separated product IDs. The offer will only appear if the customer is viewing one of these specific products.
- **Trigger category IDs:** Enter comma-separated category IDs. The offer will appear if the customer is viewing a product from these categories.
For more complex logic, leave triggers empty and use **Rules**:
- **Rule matching:** Choose whether the customer must meet **All rules** or **Any rule**.
- **Rules Builder:** Create conditions like cart subtotals, specific user roles, stock statuses, or customer order counts.
### 3. Display and Content
Customize how the offer looks and feels to the shopper:
- **Headline:** The main title of your offer (e.g., "Frequently Bought Together").
- **Body text:** Optional short description (max 240 characters) shown below the headline.
- **Button text:** The call-to-action on the button (e.g., "Add for $10").
- **Show product image:** Check to display the offered product's thumbnail image.
- **Hide if in cart:** Check this to automatically hide the offer if the customer has already added the offered product to their cart. Uncheck if you want to allow them to add multiple quantities.
### 4. Pricing and Discounts
Incentivize the customer to take action:
- **Discount type:** Choose between No discount, Percentage, Fixed amount off, or Fixed offer price.
- **Discount value:** Enter the numeric value. The live preview will automatically show you the updated price based on your selection.
### 5. Finalizing
- **Priority:** If multiple offers are eligible for the same product page, the one with the lower priority number wins.
- **Start / End date:** Optionally schedule your offer to run during a specific timeframe.
Click **Save offer**. If your status is Active, the offer will immediately start showing on the designated product pages!
## The Sales Psychology
Product Page Offers leverage two core psychological principles:
- **Anticipating Needs:** By offering batteries for a flashlight or a memory card for a camera, you solve a future problem immediately, reducing friction.
- **Perceived Value via Bundling:** Presenting the offer with a targeted discount shifts the customer's mindset from "Should I buy this?" to "Look at the great deal I'm getting."
## What Can Go Wrong
- **Irrelevant Recommendations:** Offering a premium upgrade when the user is looking at a budget option can create cognitive dissonance. Make sure the offer logically matches the original product.
- **Information Overload:** The product page is already full of details, reviews, and specs. Keep your offer concise so it doesn't overwhelm the buyer or clutter the layout.
- **Distracting from the Main Product:** If the offer takes too much attention away from the primary "Add to Cart" button, you risk confusing the buyer and losing the initial sale entirely.
## How This Helps Your Business
Product page offers are fantastic for capturing the customer's attention early in their journey. By showcasing complementary items right at the point of initial intent, you can increase your Average Order Value (AOV) before the customer even reaches the cart, effectively expanding the basket size at the very first touchpoint.
## Thank-You Follow-on Offer
URL: https://wpanchorbay.github.io/upsellbay/storefront/thank-you-offer/
Description: Capitalize on post-purchase euphoria with exclusive, limited-time follow-on offers.
## What is a Product Page Offer?
A Product Page Offer is an upsell or cross-sell presented directly on the single product page, typically just below the "Add to Cart" form. It encourages the customer to bundle additional, related items with the main product before they even reach the cart.
## How it Works in UpsellBay
1. **Contextual Evaluation:** When a customer views a product page, UpsellBay checks if there are any active offers specifically targeted at that product or category using Triggers or Rules.
2. **Native Placement:** The offer is seamlessly injected in the "Product page, after add-to-cart form" area by default, feeling like a built-in feature of your theme.
3. **Smart Redundancy Prevention:** UpsellBay automatically prevents an offer from showing on its own product page (e.g., offering a product on its own page). You can also configure the offer to hide if the customer already has the offered item in their cart.
4. **Discount Engine:** You can apply native percentage, fixed amount, or fixed price discounts to incentivize the bundle.
## How to Create a Product Page Offer
Follow these steps to create your first Product Page Offer:
### 1. Core Configuration
Go to **WooCommerce > UpsellBay > Offers** and click **Add Offer**.
- **Offer name:** An internal name to identify the offer in your admin.
- **Offer type:** Select **Product page offer**.
- **Status:** Set to **Active** (or **Draft** if you want to test it first).
- **Offer goal:** Select the intent of your offer (e.g., **Add-on** for a complementary item, or **Upgrade** for a better version).
- **Offer product:** Search and select the exact product you want to recommend to shoppers.
### 2. Triggers and Rules
UpsellBay needs to know *when* to show this offer. You can set this up using basic triggers or advanced rules.
- **Trigger product IDs:** Enter comma-separated product IDs. The offer will only appear if the customer is viewing one of these specific products.
- **Trigger category IDs:** Enter comma-separated category IDs. The offer will appear if the customer is viewing a product from these categories.
For more complex logic, leave triggers empty and use **Rules**:
- **Rule matching:** Choose whether the customer must meet **All rules** or **Any rule**.
- **Rules Builder:** Create conditions like cart subtotals, specific user roles, stock statuses, or customer order counts.
### 3. Display and Content
Customize how the offer looks and feels to the shopper:
- **Headline:** The main title of your offer (e.g., "Frequently Bought Together").
- **Body text:** Optional short description (max 240 characters) shown below the headline.
- **Button text:** The call-to-action on the button (e.g., "Add for $10").
- **Show product image:** Check to display the offered product's thumbnail image.
- **Hide if in cart:** Check this to automatically hide the offer if the customer has already added the offered product to their cart. Uncheck if you want to allow them to add multiple quantities.
### 4. Pricing and Discounts
Incentivize the customer to take action:
- **Discount type:** Choose between No discount, Percentage, Fixed amount off, or Fixed offer price.
- **Discount value:** Enter the numeric value. The live preview will automatically show you the updated price based on your selection.
### 5. Finalizing
- **Priority:** If multiple offers are eligible for the same product page, the one with the lower priority number wins.
- **Start / End date:** Optionally schedule your offer to run during a specific timeframe.
Click **Save offer**. If your status is Active, the offer will immediately start showing on the designated product pages!
## The Sales Psychology
Product Page Offers leverage two core psychological principles:
- **Anticipating Needs:** By offering batteries for a flashlight or a memory card for a camera, you solve a future problem immediately, reducing friction.
- **Perceived Value via Bundling:** Presenting the offer with a targeted discount shifts the customer's mindset from "Should I buy this?" to "Look at the great deal I'm getting."
## What Can Go Wrong
- **Irrelevant Recommendations:** Offering a premium upgrade when the user is looking at a budget option can create cognitive dissonance. Make sure the offer logically matches the original product.
- **Information Overload:** The product page is already full of details, reviews, and specs. Keep your offer concise so it doesn't overwhelm the buyer or clutter the layout.
- **Distracting from the Main Product:** If the offer takes too much attention away from the primary "Add to Cart" button, you risk confusing the buyer and losing the initial sale entirely.
## How This Helps Your Business
Product page offers are fantastic for capturing the customer's attention early in their journey. By showcasing complementary items right at the point of initial intent, you can increase your Average Order Value (AOV) before the customer even reaches the cart, effectively expanding the basket size at the very first touchpoint.
## Thank-You Follow-on Offer
URL: https://wpanchorbay.github.io/upsellbay/storefront/thank-you-offer/
Description: Capitalize on post-purchase euphoria with exclusive, limited-time follow-on offers.
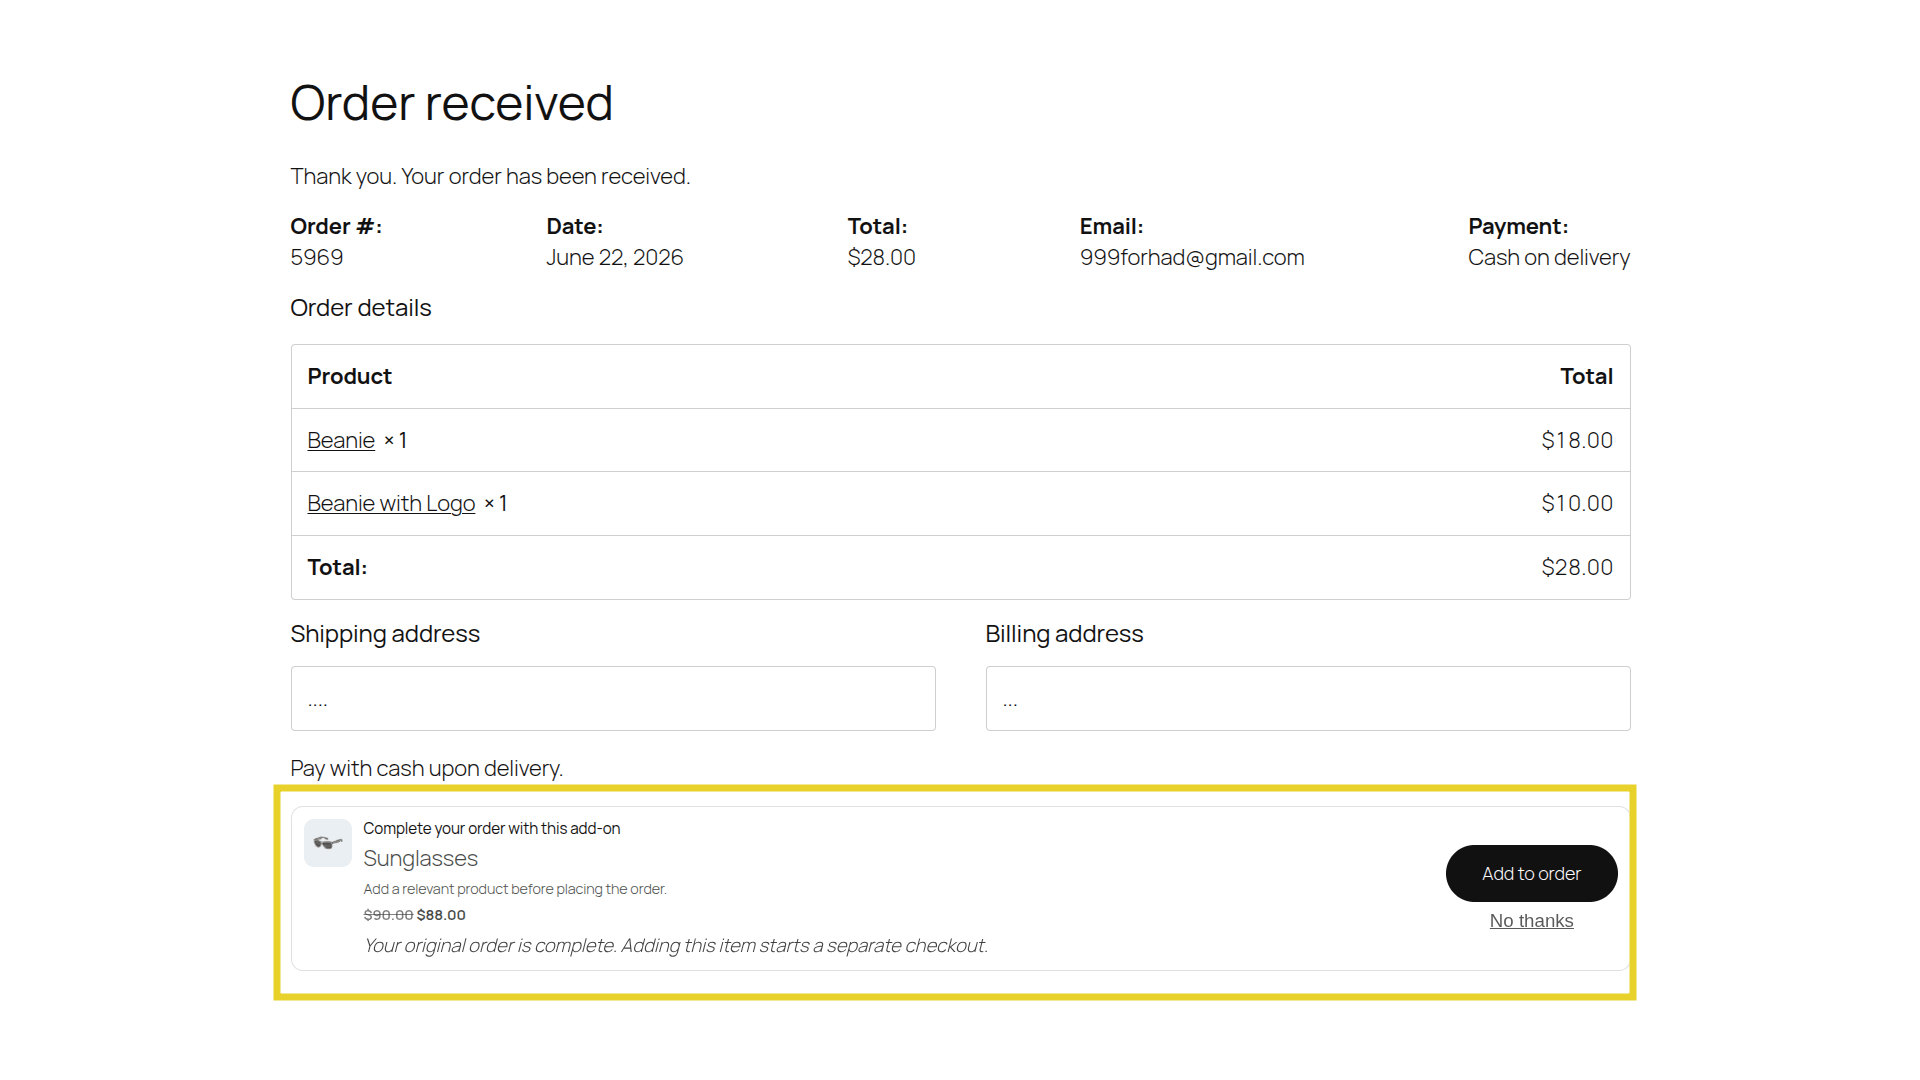 ## What is a Thank-You Offer?
A Thank-You Follow-on Offer is presented on the WooCommerce "Order Received" (Thank You) page, immediately after a customer completes their primary purchase.
Unlike pre-purchase offers, the customer has already crossed the finish line. This is a risk-free environment to offer a highly lucrative deal without any fear of causing cart abandonment.
## How it Works
1. **Post-Purchase Evaluation:** Once the primary order is successfully placed, UpsellBay instantly evaluates your active Thank-You offers against the contents of the newly completed order (e.g., checking if the customer just bought a coffee machine).
2. **Safe Environment:** The offer is rendered exclusively on the final Thank-You page. Because the primary transaction is already securely processed and finalized, there is absolutely zero risk to your initial order revenue.
3. **Follow-On Checkout:** If the customer accepts the offer, UpsellBay smoothly initiates a separate, expedited follow-on checkout process for this newly added item.
## How to Create a Thank-You Offer
Follow these steps to create your first Thank-You Offer:
### 1. Core Configuration
Go to **WooCommerce > UpsellBay > Offers** and click **Add Offer**.
- **Offer name:** An internal name to identify the offer in your admin.
- **Offer type:** Select **Thank-you offer**.
- **Status:** Set to **Active** (or **Draft** if you want to test it first).
- **Offer goal:** Select the intent of your offer (e.g., **Add-on** or **Exclusive Deal**).
- **Offer product:** Search and select the exact product you want to recommend to shoppers.
### 2. Triggers and Rules
UpsellBay needs to know *when* to show this offer. You can set this up using basic triggers or advanced rules based on the order that was just placed.
- **Trigger product IDs:** Enter comma-separated product IDs.
- **Trigger category IDs:** Enter comma-separated category IDs.
For more complex logic, leave triggers empty and use **Rules**:
- **Rule matching:** Choose whether the customer must meet **All rules** or **Any rule**.
- **Rules Builder:** Create conditions like order totals, specific user roles, or customer order counts.
### 3. Display and Content
Customize how the offer looks and feels to the shopper:
- **Headline:** The main title of your offer (e.g., "Wait! Add this to your order...").
- **Body text:** Optional short description (max 240 characters) shown below the headline.
- **Button text:** The call-to-action on the button (e.g., "Add for $10").
- **Show product image:** Check to display the offered product's thumbnail image.
- **Hide if in cart:** N/A for Thank-You offers, as the cart is already empty at this stage.
### 4. Pricing and Discounts
Incentivize the customer to take action:
- **Discount type:** Choose between No discount, Percentage, Fixed amount off, or Fixed offer price.
- **Discount value:** Enter the numeric value. The live preview will automatically show you the updated price based on your selection.
### 5. Finalizing
- **Priority:** If multiple offers are eligible, the one with the lower priority number wins.
- **Start / End date:** Optionally schedule your offer to run during a specific timeframe.
Click **Save offer**. If your status is Active, the offer will immediately start showing on the Thank-You page for eligible orders!
## The Sales Psychology
Thank-You offers are incredibly powerful because they leverage **Post-Purchase Euphoria** and **Commitment & Consistency**:
- **Endorphin Rush:** The moment right after a purchase is when a buyer feels the highest level of excitement. They are still actively in a "buying mood."
- **Fear of Missing Out (FOMO):** Presenting this offer as a strict, one-time-only deal (e.g., "Because you just bought X, you can add Y for 40% off right now only") creates compelling urgency that is difficult to ignore.
- **Zero Friction:** Even though it requires a brief follow-on checkout step, the customer's intent and trust levels are so high that the psychological friction is remarkably low.
## What Can Go Wrong
- **Buyer's Remorse:** Pushing an extremely expensive follow-on offer immediately after a large purchase can trigger anxiety and lead the customer to cancel or refund the entire order. Keep it proportional.
- **Confusing Flow:** If it isn't completely clear that this is an *additional* purchase, the customer might think they are paying twice for their original order. The copy must explicitly state the terms.
- **Overpromising:** If the follow-on item delays the shipping of the original purchase, and you don't communicate this clearly, you will create a poor customer experience.
## How This Helps Your Business
Thank-You offers are the holy grail of upselling. They allow you to safely test aggressive offers (like deep discounts on clearance items or subscription upsells) without jeopardizing your core conversion rate. Every dollar generated here is pure, incremental revenue that drastically increases the lifetime value (LTV) of the customer on day one.
## Dashboard
URL: https://wpanchorbay.github.io/upsellbay/usage/dashboard/
Description: Understand the UpsellBay dashboard, store status cards, and performance range summary.
## What is a Thank-You Offer?
A Thank-You Follow-on Offer is presented on the WooCommerce "Order Received" (Thank You) page, immediately after a customer completes their primary purchase.
Unlike pre-purchase offers, the customer has already crossed the finish line. This is a risk-free environment to offer a highly lucrative deal without any fear of causing cart abandonment.
## How it Works
1. **Post-Purchase Evaluation:** Once the primary order is successfully placed, UpsellBay instantly evaluates your active Thank-You offers against the contents of the newly completed order (e.g., checking if the customer just bought a coffee machine).
2. **Safe Environment:** The offer is rendered exclusively on the final Thank-You page. Because the primary transaction is already securely processed and finalized, there is absolutely zero risk to your initial order revenue.
3. **Follow-On Checkout:** If the customer accepts the offer, UpsellBay smoothly initiates a separate, expedited follow-on checkout process for this newly added item.
## How to Create a Thank-You Offer
Follow these steps to create your first Thank-You Offer:
### 1. Core Configuration
Go to **WooCommerce > UpsellBay > Offers** and click **Add Offer**.
- **Offer name:** An internal name to identify the offer in your admin.
- **Offer type:** Select **Thank-you offer**.
- **Status:** Set to **Active** (or **Draft** if you want to test it first).
- **Offer goal:** Select the intent of your offer (e.g., **Add-on** or **Exclusive Deal**).
- **Offer product:** Search and select the exact product you want to recommend to shoppers.
### 2. Triggers and Rules
UpsellBay needs to know *when* to show this offer. You can set this up using basic triggers or advanced rules based on the order that was just placed.
- **Trigger product IDs:** Enter comma-separated product IDs.
- **Trigger category IDs:** Enter comma-separated category IDs.
For more complex logic, leave triggers empty and use **Rules**:
- **Rule matching:** Choose whether the customer must meet **All rules** or **Any rule**.
- **Rules Builder:** Create conditions like order totals, specific user roles, or customer order counts.
### 3. Display and Content
Customize how the offer looks and feels to the shopper:
- **Headline:** The main title of your offer (e.g., "Wait! Add this to your order...").
- **Body text:** Optional short description (max 240 characters) shown below the headline.
- **Button text:** The call-to-action on the button (e.g., "Add for $10").
- **Show product image:** Check to display the offered product's thumbnail image.
- **Hide if in cart:** N/A for Thank-You offers, as the cart is already empty at this stage.
### 4. Pricing and Discounts
Incentivize the customer to take action:
- **Discount type:** Choose between No discount, Percentage, Fixed amount off, or Fixed offer price.
- **Discount value:** Enter the numeric value. The live preview will automatically show you the updated price based on your selection.
### 5. Finalizing
- **Priority:** If multiple offers are eligible, the one with the lower priority number wins.
- **Start / End date:** Optionally schedule your offer to run during a specific timeframe.
Click **Save offer**. If your status is Active, the offer will immediately start showing on the Thank-You page for eligible orders!
## The Sales Psychology
Thank-You offers are incredibly powerful because they leverage **Post-Purchase Euphoria** and **Commitment & Consistency**:
- **Endorphin Rush:** The moment right after a purchase is when a buyer feels the highest level of excitement. They are still actively in a "buying mood."
- **Fear of Missing Out (FOMO):** Presenting this offer as a strict, one-time-only deal (e.g., "Because you just bought X, you can add Y for 40% off right now only") creates compelling urgency that is difficult to ignore.
- **Zero Friction:** Even though it requires a brief follow-on checkout step, the customer's intent and trust levels are so high that the psychological friction is remarkably low.
## What Can Go Wrong
- **Buyer's Remorse:** Pushing an extremely expensive follow-on offer immediately after a large purchase can trigger anxiety and lead the customer to cancel or refund the entire order. Keep it proportional.
- **Confusing Flow:** If it isn't completely clear that this is an *additional* purchase, the customer might think they are paying twice for their original order. The copy must explicitly state the terms.
- **Overpromising:** If the follow-on item delays the shipping of the original purchase, and you don't communicate this clearly, you will create a poor customer experience.
## How This Helps Your Business
Thank-You offers are the holy grail of upselling. They allow you to safely test aggressive offers (like deep discounts on clearance items or subscription upsells) without jeopardizing your core conversion rate. Every dollar generated here is pure, incremental revenue that drastically increases the lifetime value (LTV) of the customer on day one.
## Dashboard
URL: https://wpanchorbay.github.io/upsellbay/usage/dashboard/
Description: Understand the UpsellBay dashboard, store status cards, and performance range summary.
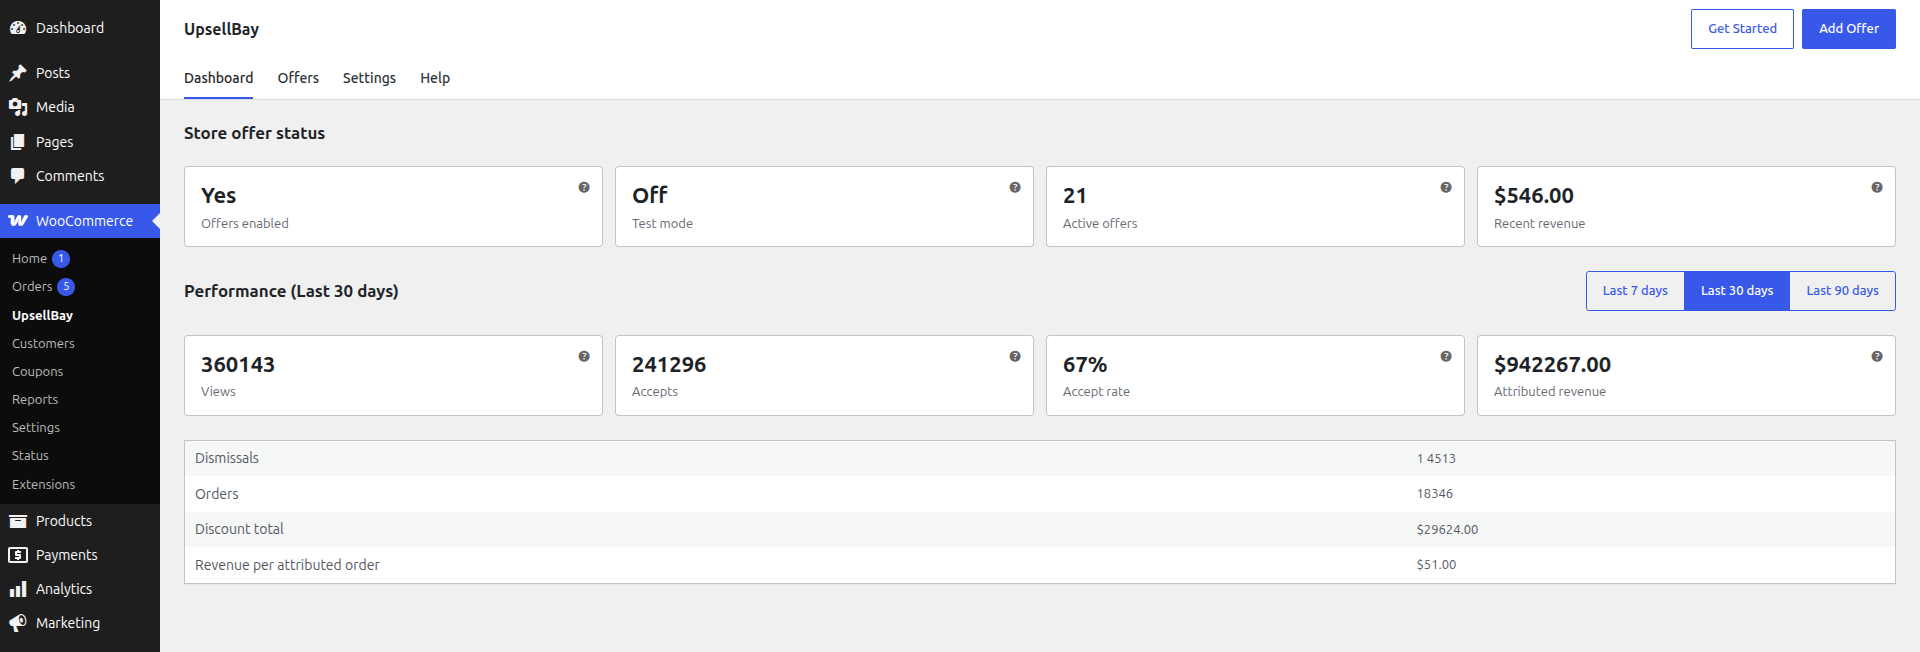 ## What The Dashboard Is For
The Dashboard is the quickest place to answer three operational questions:
1. Are offers globally enabled?
2. Are there any active offers?
3. Has UpsellBay generated views, accepts, and attributed revenue recently?
If no active offers exist yet, the dashboard shows an onboarding panel with a direct link to create the first offer.
## Store Offer Status Cards
The top metric cards summarize current store state:
- **Offers enabled**: whether UpsellBay is globally allowed to render live offers
- **Test mode**: whether previews are currently limited to store managers/admins
- **Active offers**: how many offers are currently set to `Active`
- **Recent revenue**: recently attributed revenue from aggregate stats
## Performance Range Controls
The dashboard supports three aggregate date windows:
- `Last 7 days`
- `Last 30 days`
- `Last 90 days`
## Performance Metrics
### Views
How many offer render events were recorded for the selected date range.
### Accepts
How many times shoppers accepted an offer.
### Accept Rate
Accepts divided by views for the selected window.
### Attributed Revenue
Revenue that UpsellBay attributes to accepted offers in the aggregate stats table.
### Dismissals
How many offers were explicitly dismissed.
### Orders
How many orders are included in the attributed analytics summary for the selected window.
### Discount Total
The total discount amount associated with accepted offers in that period.
### Revenue Per Attributed Order
Displayed in the UI as the per-order revenue lift across attributed orders.
## Help & Diagnostics
URL: https://wpanchorbay.github.io/upsellbay/usage/help/
Description: Use the Help page, Tools page, diagnostics, import validation, and logs for support and operations.
## Help Page
## What The Dashboard Is For
The Dashboard is the quickest place to answer three operational questions:
1. Are offers globally enabled?
2. Are there any active offers?
3. Has UpsellBay generated views, accepts, and attributed revenue recently?
If no active offers exist yet, the dashboard shows an onboarding panel with a direct link to create the first offer.
## Store Offer Status Cards
The top metric cards summarize current store state:
- **Offers enabled**: whether UpsellBay is globally allowed to render live offers
- **Test mode**: whether previews are currently limited to store managers/admins
- **Active offers**: how many offers are currently set to `Active`
- **Recent revenue**: recently attributed revenue from aggregate stats
## Performance Range Controls
The dashboard supports three aggregate date windows:
- `Last 7 days`
- `Last 30 days`
- `Last 90 days`
## Performance Metrics
### Views
How many offer render events were recorded for the selected date range.
### Accepts
How many times shoppers accepted an offer.
### Accept Rate
Accepts divided by views for the selected window.
### Attributed Revenue
Revenue that UpsellBay attributes to accepted offers in the aggregate stats table.
### Dismissals
How many offers were explicitly dismissed.
### Orders
How many orders are included in the attributed analytics summary for the selected window.
### Discount Total
The total discount amount associated with accepted offers in that period.
### Revenue Per Attributed Order
Displayed in the UI as the per-order revenue lift across attributed orders.
## Help & Diagnostics
URL: https://wpanchorbay.github.io/upsellbay/usage/help/
Description: Use the Help page, Tools page, diagnostics, import validation, and logs for support and operations.
## Help Page
 The **Help** tab within the UpsellBay plugin (`WooCommerce -> UpsellBay -> Help`) is a lightweight routing page designed to quickly direct merchants to the most useful references and support channels. It features a clean, card-based layout:
### 1. Documentation Card
Provides a quick link to the official documentation site. It includes helpful prompts (such as pointing to the first-offer tutorial) to guide new users, and a direct button to **View Full Documentation**.
### 2. Contact Support Card
Provides direct access to our support team:
- **Visit Support Portal:** A button linking to the official support portal (`https://wpanchorbay.com/support/`).
- **Direct Email:** Provides the support email address (`support@wpanchorbay.com`) for merchants who prefer to email directly.
### 3. Logs & Diagnostics Card
Offers one-click access to system logs for troubleshooting issues or reviewing plugin activity. It includes direct links to:
- **UpsellBay Logs:** The plugin's internal event logs.
- **WooCommerce Logs:** Native WooCommerce status and error logs.
- **WordPress Site Health & Logs:** The native WordPress diagnostics tools.
## Logs
The **Settings -> Logs** section is where you inspect operational records.
### What logs contain
- system events
- API activity
- error details
- related request and response metadata when available
### Common actions
- search log entries
- open a full log detail view
- delete a single log entry
- bulk delete selected log entries
- copy a support-ready log report to the clipboard
## Offers Overview
URL: https://wpanchorbay.github.io/upsellbay/usage/offers/01-overview/
Description: Understand the Offers screen, list table controls, and the lifecycle of an UpsellBay offer.
## What The Offers Screen Does
The **Help** tab within the UpsellBay plugin (`WooCommerce -> UpsellBay -> Help`) is a lightweight routing page designed to quickly direct merchants to the most useful references and support channels. It features a clean, card-based layout:
### 1. Documentation Card
Provides a quick link to the official documentation site. It includes helpful prompts (such as pointing to the first-offer tutorial) to guide new users, and a direct button to **View Full Documentation**.
### 2. Contact Support Card
Provides direct access to our support team:
- **Visit Support Portal:** A button linking to the official support portal (`https://wpanchorbay.com/support/`).
- **Direct Email:** Provides the support email address (`support@wpanchorbay.com`) for merchants who prefer to email directly.
### 3. Logs & Diagnostics Card
Offers one-click access to system logs for troubleshooting issues or reviewing plugin activity. It includes direct links to:
- **UpsellBay Logs:** The plugin's internal event logs.
- **WooCommerce Logs:** Native WooCommerce status and error logs.
- **WordPress Site Health & Logs:** The native WordPress diagnostics tools.
## Logs
The **Settings -> Logs** section is where you inspect operational records.
### What logs contain
- system events
- API activity
- error details
- related request and response metadata when available
### Common actions
- search log entries
- open a full log detail view
- delete a single log entry
- bulk delete selected log entries
- copy a support-ready log report to the clipboard
## Offers Overview
URL: https://wpanchorbay.github.io/upsellbay/usage/offers/01-overview/
Description: Understand the Offers screen, list table controls, and the lifecycle of an UpsellBay offer.
## What The Offers Screen Does
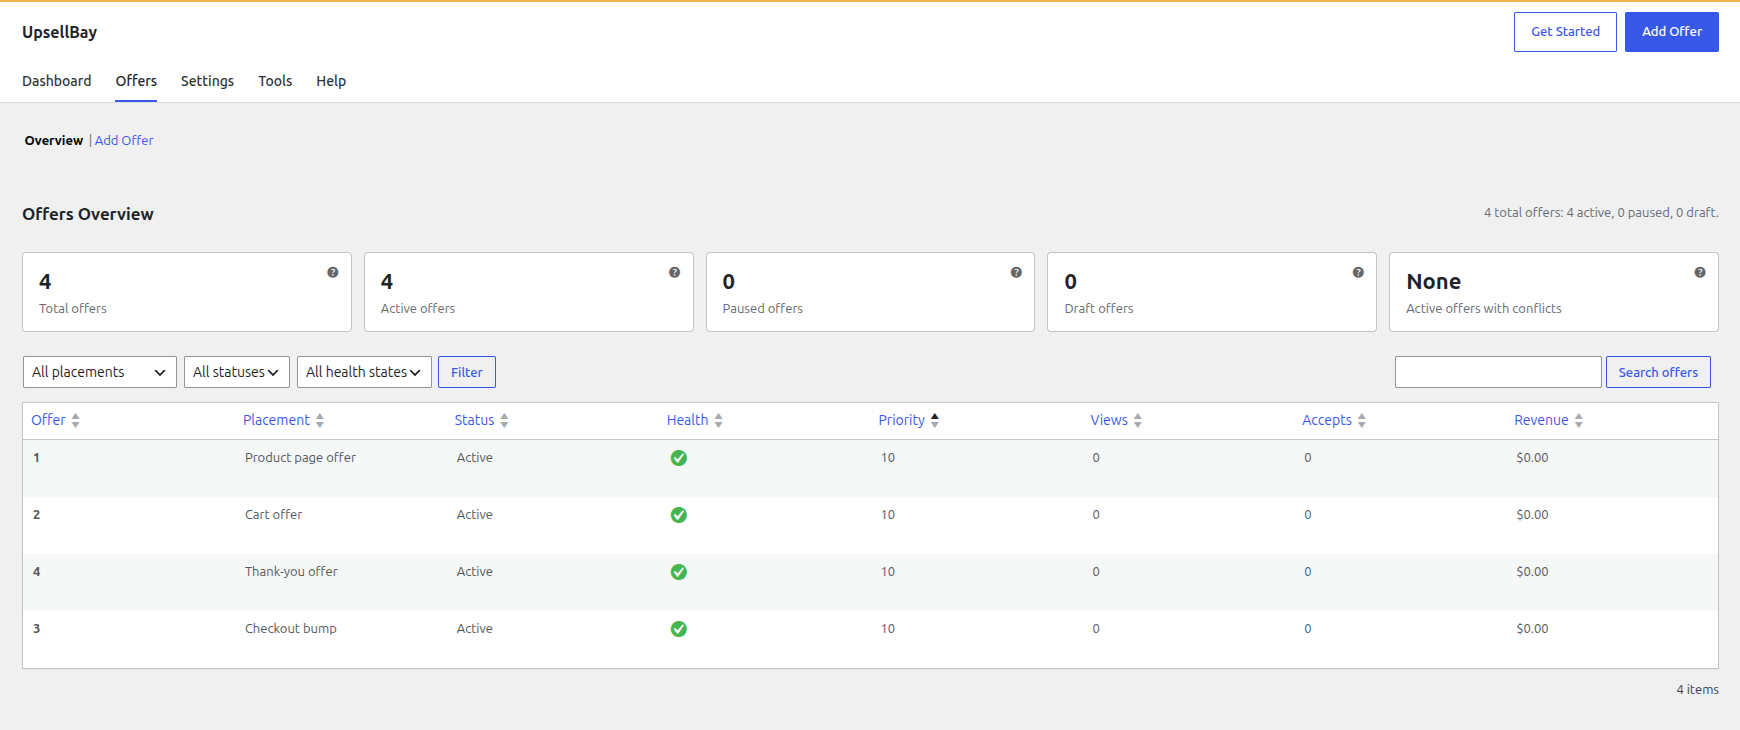 The **Offers** tab is your central hub for merchandising operations. It provides a comprehensive view of all your upsell campaigns, allowing you to easily:
- **Create and configure** new offers.
- **Search and filter** your existing campaigns.
- **Monitor health and placement** at a glance.
- **Preview** how offers appear directly on the storefront.
- **Manage** offer lifecycles (activate, pause, edit, delete).
## Understanding the Offers Table
The table provides key insights into your active campaigns.
### Offer
Displays the internal title of the offer. Hovering over a row reveals quick actions:
- **Edit**: Opens the visual builder to modify the offer.
- **View Live**: Launches a new tab to preview the offer in its designated storefront location.
- **Delete**: Permanently removes the offer.
### Placement
Indicates the specific storefront location where the offer is designed to render (e.g., Product Page, Cart, Checkout, Thank You).
### Status
Reflects the current operational state of the offer:
- **Draft**: The offer is safely saved but not eligible to be shown.
- **Active**: The offer is live and will render when its targeting rules are met.
- **Paused**: The offer is temporarily disabled without losing its configuration.
### Health
The Health column provides proactive conflict detection to ensure a smooth shopper experience:
- A **green success icon** indicates no known conflicts.
- A **warning icon** indicates potential placement crowding, a priority tie, or funnel overlap. *Note: This is an indicator to review your setup, not a guarantee of failure.*
### Priority
Determines which offer wins when multiple active offers compete for the same placement. **Lower numbers indicate higher priority** (e.g., an offer with priority 1 will display over an offer with priority 10).
### Performance Metrics
Quick-reference metrics to gauge offer success without opening detailed reports:
- **Views**: How many times the offer was rendered.
- **Accepts**: How many times the offer was successfully added to an order.
- **Revenue**: The total attributed revenue generated directly by the offer.
## Navigating and Filtering
Manage large catalogs of offers easily using the table controls:
- **Search**: Find offers by title or key terms.
- **Filters**: Narrow the view by specific Placements, Statuses, or Health states.
- **Sorting**: Click column headers to sort by title, status, priority, views, accepts, or revenue.
## Offer Lifecycle Management
### Draft State
Use **Draft** while you are actively configuring copy, establishing rules, or testing discount logic. Drafts are completely hidden from the storefront.
### Active State
**Active** offers are immediately eligible to render. They will be displayed to shoppers as long as the placement is valid, the targeting rules are met, and the offered product is available.
### Paused State
Use **Paused** to temporarily halt an offer (e.g., seasonal promotions) while retaining all historical analytics and configuration.
## Preview Behavior
Clicking **View Live** utilizes placement-aware preview logic to take you to the exact spot the offer renders:
- **Product offer**: Links directly to the offered product's page.
- **Cart offer**: Links to the cart page.
- **Checkout bump**: Links to the checkout page.
- **Thank-you offer**: Links to the most recent qualifying WooCommerce order receipt (when available).
## Creating an Offer
URL: https://wpanchorbay.github.io/upsellbay/usage/offers/02-create/
Description: Field-by-field guide to the Add Offer and Edit Offer screens in UpsellBay.
## The Add Offer Screen
The Add/Edit Offer screen is organized into sections:
- Required basics
- Targeting rules
- Discount
- Display settings
- Schedule and priority
- Advanced metadata
This page explains every field in the order merchants see it.
Replace with: the full Add Offer screen with all sections expanded.
## Required Basics
The **Offers** tab is your central hub for merchandising operations. It provides a comprehensive view of all your upsell campaigns, allowing you to easily:
- **Create and configure** new offers.
- **Search and filter** your existing campaigns.
- **Monitor health and placement** at a glance.
- **Preview** how offers appear directly on the storefront.
- **Manage** offer lifecycles (activate, pause, edit, delete).
## Understanding the Offers Table
The table provides key insights into your active campaigns.
### Offer
Displays the internal title of the offer. Hovering over a row reveals quick actions:
- **Edit**: Opens the visual builder to modify the offer.
- **View Live**: Launches a new tab to preview the offer in its designated storefront location.
- **Delete**: Permanently removes the offer.
### Placement
Indicates the specific storefront location where the offer is designed to render (e.g., Product Page, Cart, Checkout, Thank You).
### Status
Reflects the current operational state of the offer:
- **Draft**: The offer is safely saved but not eligible to be shown.
- **Active**: The offer is live and will render when its targeting rules are met.
- **Paused**: The offer is temporarily disabled without losing its configuration.
### Health
The Health column provides proactive conflict detection to ensure a smooth shopper experience:
- A **green success icon** indicates no known conflicts.
- A **warning icon** indicates potential placement crowding, a priority tie, or funnel overlap. *Note: This is an indicator to review your setup, not a guarantee of failure.*
### Priority
Determines which offer wins when multiple active offers compete for the same placement. **Lower numbers indicate higher priority** (e.g., an offer with priority 1 will display over an offer with priority 10).
### Performance Metrics
Quick-reference metrics to gauge offer success without opening detailed reports:
- **Views**: How many times the offer was rendered.
- **Accepts**: How many times the offer was successfully added to an order.
- **Revenue**: The total attributed revenue generated directly by the offer.
## Navigating and Filtering
Manage large catalogs of offers easily using the table controls:
- **Search**: Find offers by title or key terms.
- **Filters**: Narrow the view by specific Placements, Statuses, or Health states.
- **Sorting**: Click column headers to sort by title, status, priority, views, accepts, or revenue.
## Offer Lifecycle Management
### Draft State
Use **Draft** while you are actively configuring copy, establishing rules, or testing discount logic. Drafts are completely hidden from the storefront.
### Active State
**Active** offers are immediately eligible to render. They will be displayed to shoppers as long as the placement is valid, the targeting rules are met, and the offered product is available.
### Paused State
Use **Paused** to temporarily halt an offer (e.g., seasonal promotions) while retaining all historical analytics and configuration.
## Preview Behavior
Clicking **View Live** utilizes placement-aware preview logic to take you to the exact spot the offer renders:
- **Product offer**: Links directly to the offered product's page.
- **Cart offer**: Links to the cart page.
- **Checkout bump**: Links to the checkout page.
- **Thank-you offer**: Links to the most recent qualifying WooCommerce order receipt (when available).
## Creating an Offer
URL: https://wpanchorbay.github.io/upsellbay/usage/offers/02-create/
Description: Field-by-field guide to the Add Offer and Edit Offer screens in UpsellBay.
## The Add Offer Screen
The Add/Edit Offer screen is organized into sections:
- Required basics
- Targeting rules
- Discount
- Display settings
- Schedule and priority
- Advanced metadata
This page explains every field in the order merchants see it.
Replace with: the full Add Offer screen with all sections expanded.
## Required Basics
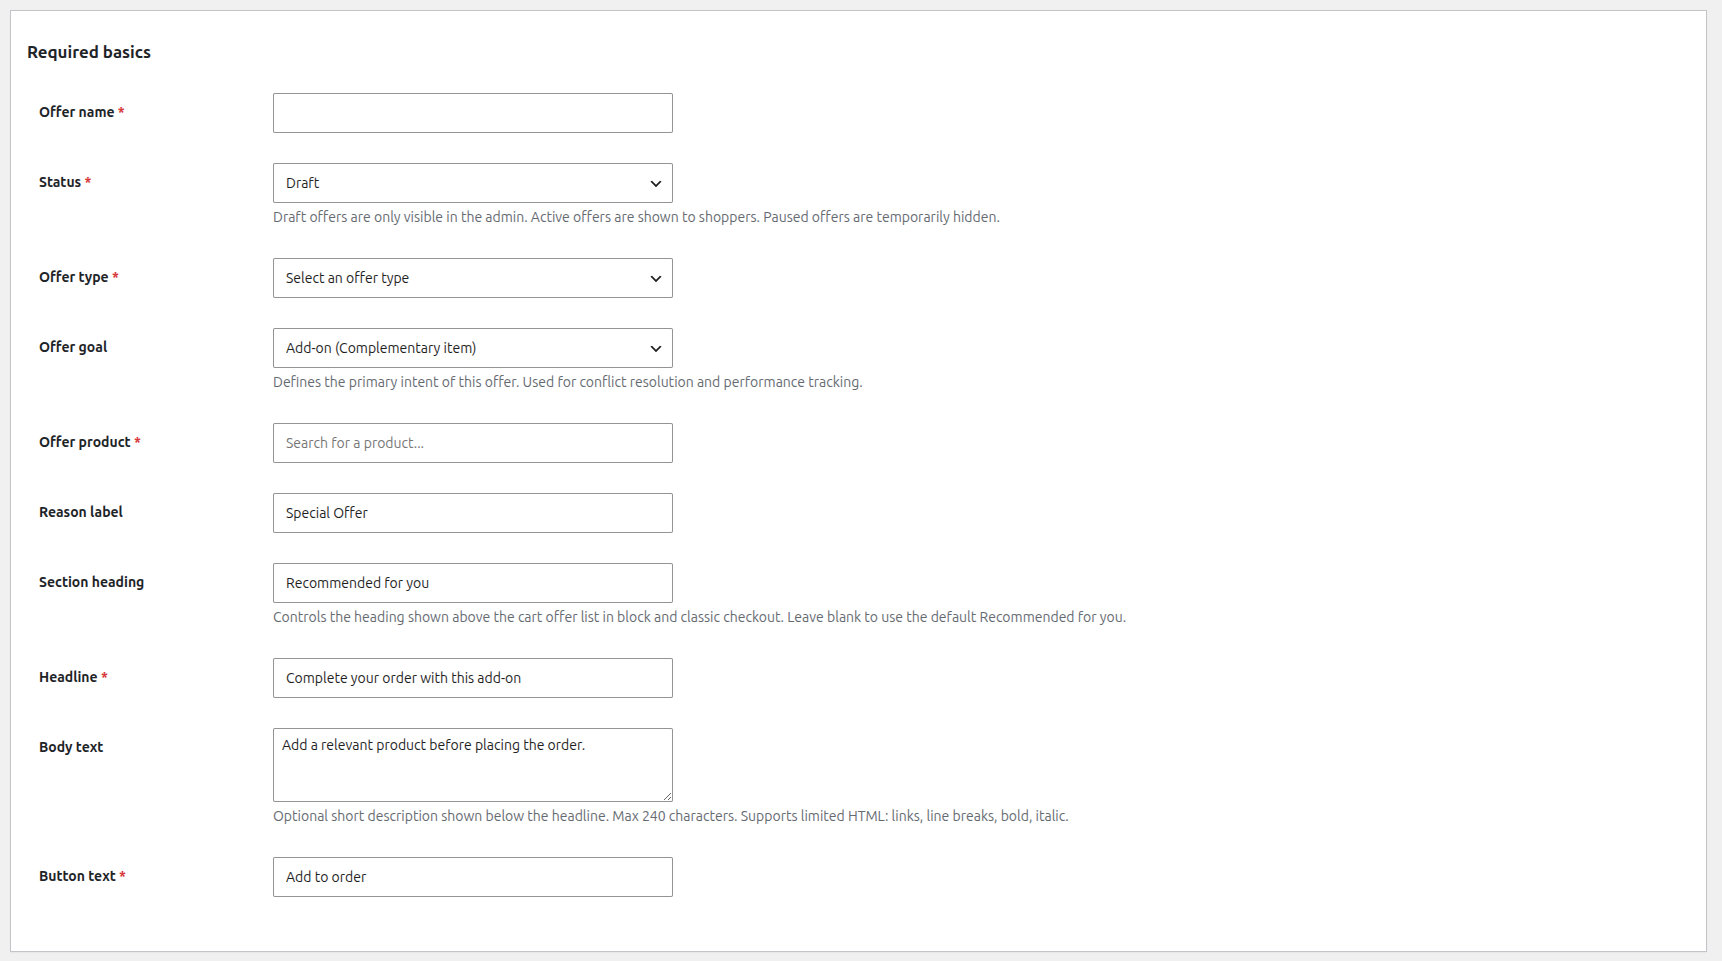 ### Offer name
Internal name only. Shoppers do not see this.
### Status
- `Draft`: safe working state while building
- `Active`: eligible to show to shoppers
- `Paused`: temporarily disabled without deleting the setup
An offer must be `Active` before shoppers can see it.
### Offer type
Determines where the offer belongs:
- `Checkout bump`
- `Product page offer`
- `Cart offer`
- `Thank-you follow-on offer`
### Offer goal
The goal describes the intent of the offer:
- `Add-on`
- `Upgrade`
- `Protection`
- `Threshold Helper`
- `Follow-on`
It helps with conflict detection and reporting interpretation.
### Offer product
The WooCommerce product shoppers add from the offer.
Important behaviors:
- required for live offers
- must exist, be purchasable, and be in stock
- checkout bump and thank-you offers require a simple product or variation
- subscription products cannot receive UpsellBay discounts
### Reason label
A short supporting label such as `Recommended`, `Exclusive`, or `Most Popular`.
### Section heading
Controls the heading shown above the cart offer list in block and classic checkout. Leave blank to use the default Recommended for you.
### Headline
Primary shopper-facing message. Required for live offers.
### Body text
Optional short description below the headline. Supports limited formatting.
### Button text
The call to action shoppers click. Required for live offers.
## Targeting Rules
### Offer name
Internal name only. Shoppers do not see this.
### Status
- `Draft`: safe working state while building
- `Active`: eligible to show to shoppers
- `Paused`: temporarily disabled without deleting the setup
An offer must be `Active` before shoppers can see it.
### Offer type
Determines where the offer belongs:
- `Checkout bump`
- `Product page offer`
- `Cart offer`
- `Thank-you follow-on offer`
### Offer goal
The goal describes the intent of the offer:
- `Add-on`
- `Upgrade`
- `Protection`
- `Threshold Helper`
- `Follow-on`
It helps with conflict detection and reporting interpretation.
### Offer product
The WooCommerce product shoppers add from the offer.
Important behaviors:
- required for live offers
- must exist, be purchasable, and be in stock
- checkout bump and thank-you offers require a simple product or variation
- subscription products cannot receive UpsellBay discounts
### Reason label
A short supporting label such as `Recommended`, `Exclusive`, or `Most Popular`.
### Section heading
Controls the heading shown above the cart offer list in block and classic checkout. Leave blank to use the default Recommended for you.
### Headline
Primary shopper-facing message. Required for live offers.
### Body text
Optional short description below the headline. Supports limited formatting.
### Button text
The call to action shoppers click. Required for live offers.
## Targeting Rules
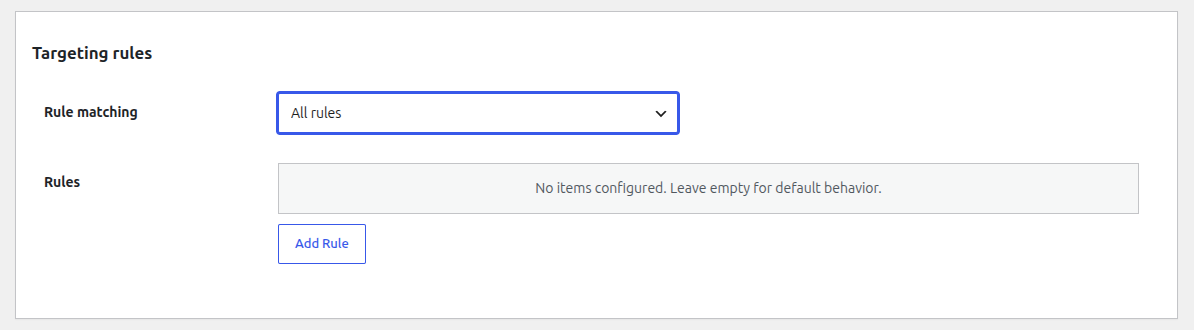 ### Rule matching
Controls how multiple rules work together:
- `All rules`
- `Any rule`
### Rules
Rules are edited through the visual builder and stored as structured JSON.
When creating rules that target specific products (such as "Cart contains product" or "Viewed product"), you can seamlessly select **multiple products** within a single rule. The dropdown utilizes a native WooCommerce search interface equipped with infinite scrolling, allowing you to easily browse large catalogs. Selected products clearly display their name, ID, and price to ensure accurate targeting.
Full rule types are documented in [Targeting Rules](./04-targeting-rules/).
## Discount
### Rule matching
Controls how multiple rules work together:
- `All rules`
- `Any rule`
### Rules
Rules are edited through the visual builder and stored as structured JSON.
When creating rules that target specific products (such as "Cart contains product" or "Viewed product"), you can seamlessly select **multiple products** within a single rule. The dropdown utilizes a native WooCommerce search interface equipped with infinite scrolling, allowing you to easily browse large catalogs. Selected products clearly display their name, ID, and price to ensure accurate targeting.
Full rule types are documented in [Targeting Rules](./04-targeting-rules/).
## Discount
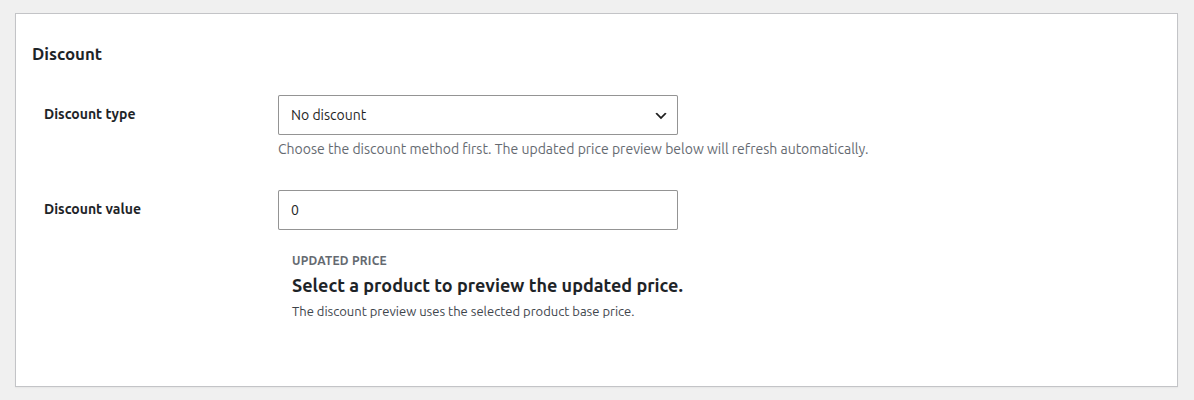 ### Discount type
Options:
- `No discount`
- `Percentage`
- `Fixed amount off`
- `Fixed offer price`
Discount math is calculated server-side. Percentage discounts cannot exceed 100.
### Discount value
The numeric input used by the selected discount type.
## Display Settings
### Discount type
Options:
- `No discount`
- `Percentage`
- `Fixed amount off`
- `Fixed offer price`
Discount math is calculated server-side. Percentage discounts cannot exceed 100.
### Discount value
The numeric input used by the selected discount type.
## Display Settings
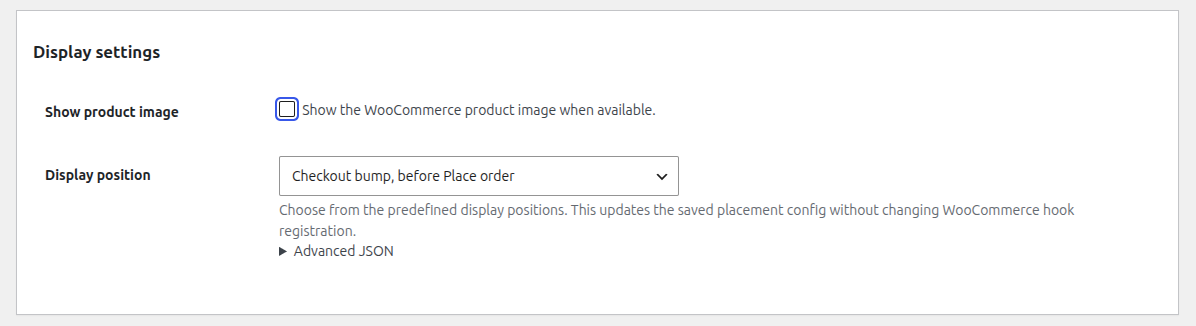 ### Show product image
Toggles whether UpsellBay should render the WooCommerce product image when available.
### Display position
Each offer type has one expected predefined position:
- Checkout bump -> `before_submit`
- Product page offer -> `after_add_to_cart`
- Cart offer -> `after_cart_table`
- Thank-you offer -> `order_received_actions`
### Advanced JSON
Advanced users can preserve extra placement keys here.
## Schedule and Priority
### Show product image
Toggles whether UpsellBay should render the WooCommerce product image when available.
### Display position
Each offer type has one expected predefined position:
- Checkout bump -> `before_submit`
- Product page offer -> `after_add_to_cart`
- Cart offer -> `after_cart_table`
- Thank-you offer -> `order_received_actions`
### Advanced JSON
Advanced users can preserve extra placement keys here.
## Schedule and Priority
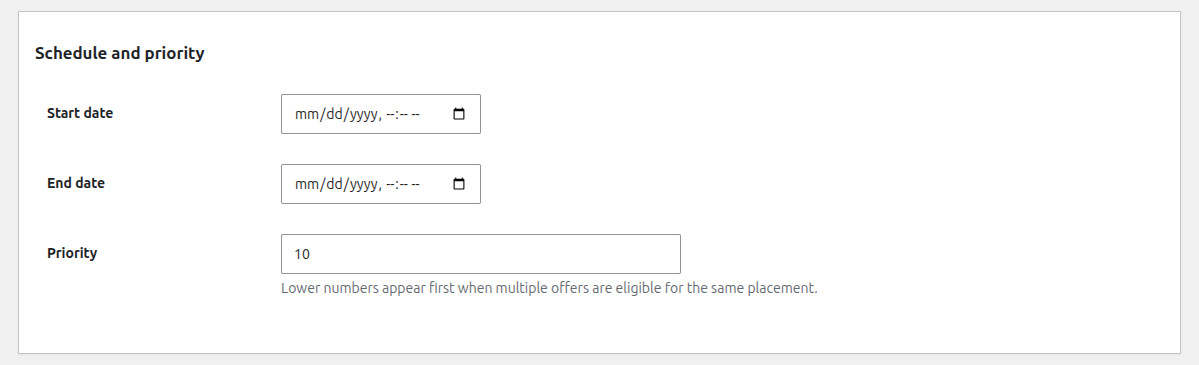 ### Start date
Optional start timestamp.
### End date
Optional end timestamp. End date must be after start date.
### Priority
Lower numbers win when multiple eligible offers compete for the same placement.
## Advanced Metadata
### Start date
Optional start timestamp.
### End date
Optional end timestamp. End date must be after start date.
### Priority
Lower numbers win when multiple eligible offers compete for the same placement.
## Advanced Metadata
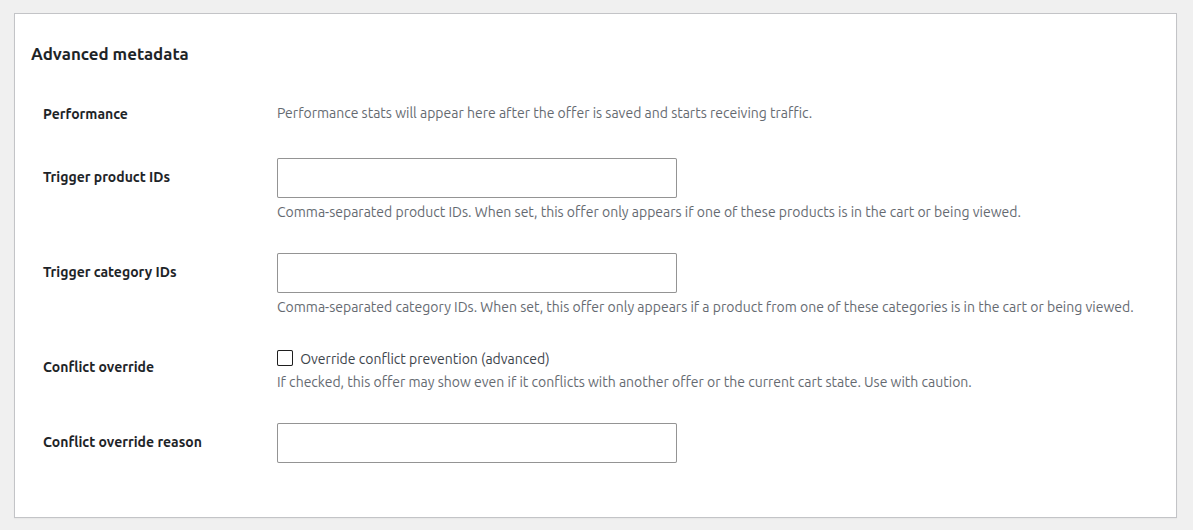 ### Performance
Read-only summary after the offer has been saved and starts receiving traffic.
### Trigger product IDs
Comma-separated WooCommerce product IDs used as a direct trigger filter.
### Trigger category IDs
Comma-separated WooCommerce category IDs used as a direct category trigger filter.
### Conflict override
Allows a merchant to bypass conflict prevention. Use only when the overlap is intentional.
### Conflict override reason
Required justification when override is enabled for an active offer.
## Offer Types & Goals
URL: https://wpanchorbay.github.io/upsellbay/usage/offers/03-types/
Description: Choose the right offer type and goal for each stage of the WooCommerce buying journey.
## Placement-Based Offer Types
### Performance
Read-only summary after the offer has been saved and starts receiving traffic.
### Trigger product IDs
Comma-separated WooCommerce product IDs used as a direct trigger filter.
### Trigger category IDs
Comma-separated WooCommerce category IDs used as a direct category trigger filter.
### Conflict override
Allows a merchant to bypass conflict prevention. Use only when the overlap is intentional.
### Conflict override reason
Required justification when override is enabled for an active offer.
## Offer Types & Goals
URL: https://wpanchorbay.github.io/upsellbay/usage/offers/03-types/
Description: Choose the right offer type and goal for each stage of the WooCommerce buying journey.
## Placement-Based Offer Types
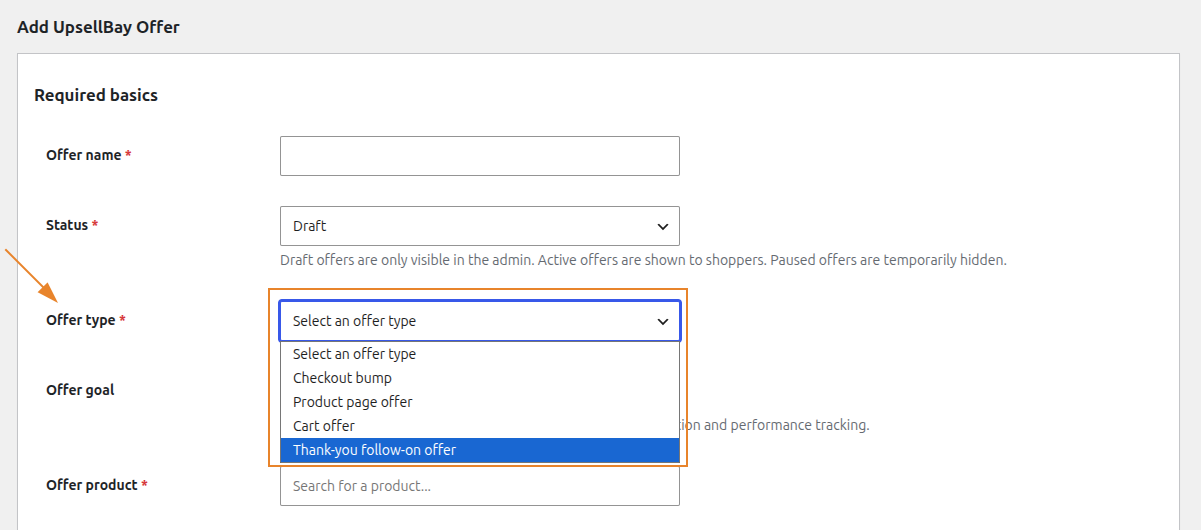 ### Product Page Offer
Displayed immediately after the add-to-cart form on the product page. This placement is ideal for companion recommendations, required accessories, and "frequently bought together" style cross-sells.
[Learn more about Product Page Offers](/upsellbay/storefront/product-page-offer)
### Cart Offer
Displayed within the cart review area. This placement is highly effective for threshold-helper offers (e.g., "Add $5 to get free shipping") or direct cross-sells while the shopper is evaluating their intended purchases.
[Learn more about Cart Offers](/upsellbay/storefront/cart-offer)
### Checkout Bump
Presented seamlessly within the checkout flow, typically right before the final order submission. Best utilized for low-friction, impulse-buy accessories, expedited shipping options, or extended warranties.
[Learn more about Checkout Bumps](/upsellbay/storefront/checkout-bump)
### Thank-You Follow-On Offer
Shown exclusively on the "Order Received" page after the primary checkout is complete. Perfect for capturing post-purchase momentum with exclusive, second-purchase follow-ons without risking the initial sale.
[Learn more about Thank-You Offers](/upsellbay/storefront/thank-you-offer)
## Goal Classifications
Beyond their placement, every offer is assigned a **Goal** classification. While goals do not alter the physical placement of the offer, they are critical for internal organization, smart conflict prevention, and precise reporting interpretation:
- **Add-on**: A complementary item that enhances the main purchase (e.g., batteries, protective case).
- **Upgrade**: A superior or more expensive version of the item the customer is currently considering.
- **Protection**: Warranties, shipping insurance, or extended support plans.
- **Threshold Helper**: Items strategically priced to help a customer cross a promotional boundary (like free shipping or a bulk discount).
- **Follow-on**: A distinct, secondary purchase proposition made after the initial transaction has been secured.
## Targeting Rules
URL: https://wpanchorbay.github.io/upsellbay/usage/offers/04-targeting-rules/
Description: Learn every supported targeting rule in UpsellBay and how rule matching changes eligibility.
## How Rules Work
Rules are evaluated against the current product, cart, and shopper context.
## Rule Matching Modes
### Product Page Offer
Displayed immediately after the add-to-cart form on the product page. This placement is ideal for companion recommendations, required accessories, and "frequently bought together" style cross-sells.
[Learn more about Product Page Offers](/upsellbay/storefront/product-page-offer)
### Cart Offer
Displayed within the cart review area. This placement is highly effective for threshold-helper offers (e.g., "Add $5 to get free shipping") or direct cross-sells while the shopper is evaluating their intended purchases.
[Learn more about Cart Offers](/upsellbay/storefront/cart-offer)
### Checkout Bump
Presented seamlessly within the checkout flow, typically right before the final order submission. Best utilized for low-friction, impulse-buy accessories, expedited shipping options, or extended warranties.
[Learn more about Checkout Bumps](/upsellbay/storefront/checkout-bump)
### Thank-You Follow-On Offer
Shown exclusively on the "Order Received" page after the primary checkout is complete. Perfect for capturing post-purchase momentum with exclusive, second-purchase follow-ons without risking the initial sale.
[Learn more about Thank-You Offers](/upsellbay/storefront/thank-you-offer)
## Goal Classifications
Beyond their placement, every offer is assigned a **Goal** classification. While goals do not alter the physical placement of the offer, they are critical for internal organization, smart conflict prevention, and precise reporting interpretation:
- **Add-on**: A complementary item that enhances the main purchase (e.g., batteries, protective case).
- **Upgrade**: A superior or more expensive version of the item the customer is currently considering.
- **Protection**: Warranties, shipping insurance, or extended support plans.
- **Threshold Helper**: Items strategically priced to help a customer cross a promotional boundary (like free shipping or a bulk discount).
- **Follow-on**: A distinct, secondary purchase proposition made after the initial transaction has been secured.
## Targeting Rules
URL: https://wpanchorbay.github.io/upsellbay/usage/offers/04-targeting-rules/
Description: Learn every supported targeting rule in UpsellBay and how rule matching changes eligibility.
## How Rules Work
Rules are evaluated against the current product, cart, and shopper context.
## Rule Matching Modes
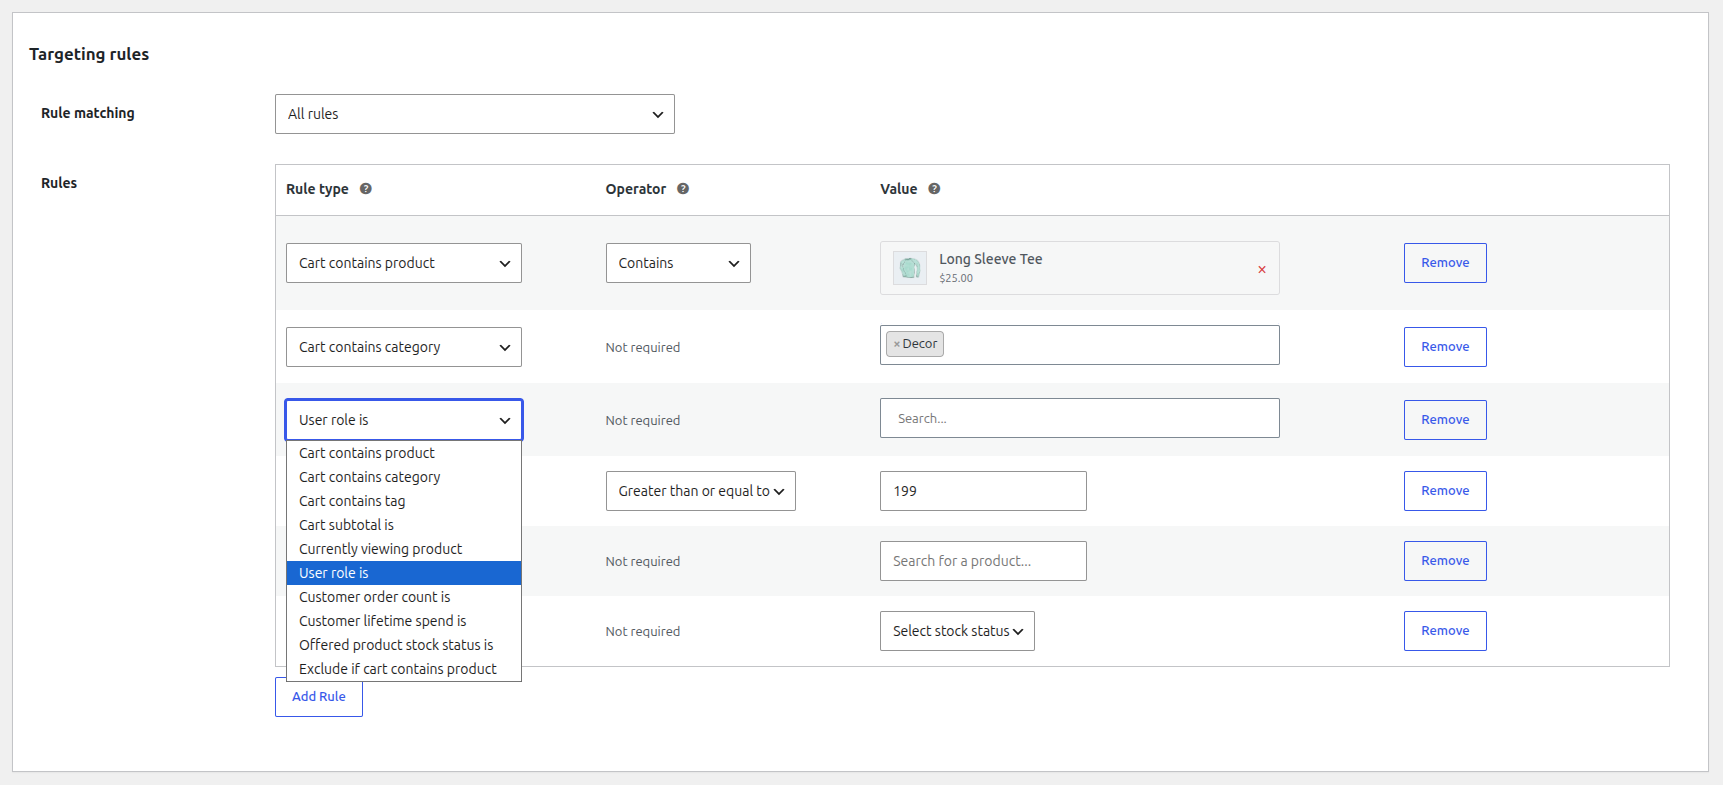 ### All rules
Every rule must match.
### Any rule
A single matching rule is enough.
## Supported Rule Types
Here is the complete list of supported rule types, their expected values, and supported operators.
| Rule Type | Description | Value Type | Supported Operators |
| --- | --- | --- | --- |
| `cart_product` | Cart contains product | List (Products - Multi-select) | `contains`, `not_in` |
| `cart_category` | Cart contains category | List (Categories - Multi-select) | `contains` |
| `cart_tag` | Cart contains tag | List (Tags - Multi-select) | `contains` |
| `cart_subtotal` | Cart subtotal is | Number | `gt`, `gte`, `lt`, `lte`, `eq`, `neq` |
| `viewed_product` | Currently viewing product | List (Products - Multi-select) | `contains` |
| `user_role` | User role is | List (Roles - Multi-select) | `contains` |
| `customer_order_count` | Customer order count is | Number | `gt`, `gte`, `lt`, `lte`, `eq`, `neq` |
| `customer_lifetime_spend` | Customer lifetime spend is | Number | `gt`, `gte`, `lt`, `lte`, `eq`, `neq` |
| `stock_status` | Offered product stock status is | Stock Status | `eq` |
| `exclude_if_product_in_cart` | Exclude if cart contains product | List (Products - Multi-select) | `not_in` |
*Note: `lifetime_spend` is accepted as an alias for `customer_lifetime_spend`, and `exclude_product_in_cart` is accepted as an alias for `exclude_if_product_in_cart`.*
## Supported Operators and Aliases
The system normalizes operators and accepts various aliases to make API integration easier.
| Canonical Operator | Description | Accepted Aliases |
| --- | --- | --- |
| `eq` | Equals | `is` |
| `neq` | Does not equal | `is_not` |
| `contains` | Contains | `in`, `eq`* |
| `not_in` | Does not contain | `not_contains`, `neq`* |
| `gt` | Greater than | `greater_than`, `>` |
| `gte` | Greater than or equal to | `greater_or_equal`, `>=` |
| `lt` | Less than | `less_than`, `<` |
| `lte` | Less than or equal to | `less_or_equal`, `<=` |
*\*If `eq` is passed for a rule that expects `contains`, it will automatically be normalized to `contains`. The same applies for `neq` mapping to `not_in`.*
## Validation Notes
- Numeric rules (`cart_subtotal`, `customer_order_count`, `customer_lifetime_spend`) require numeric values.
- List rules accept single values or arrays of values. In the visual builder, Product, Category, Tag, and Role rules utilize a multi-select interface with infinite scrolling to easily manage large datasets.
- Unsupported operators are rejected.
- Unsupported stock states are rejected (supported states: `instock`, `outofstock`, `onbackorder`).
- Empty rule values are rejected for active offers.
## Triggers & Advanced Targeting
URL: https://wpanchorbay.github.io/upsellbay/usage/offers/05-triggers/
Description: Use direct trigger IDs, rule combinations, and advanced targeting controls for precise offer eligibility.
## Trigger Product IDs
This field accepts a comma-separated list of WooCommerce product IDs.
Use when:
- the same offer should trigger from a known set of products
- an agency is implementing controlled mappings across a catalog
- you need direct product-level specificity
## Trigger Category IDs
This field accepts a comma-separated list of WooCommerce product category IDs.
Use when:
- the same merchandising logic applies to a full category cluster
- the catalog changes often and category-based grouping is more durable than product-by-product configuration
## Rules vs Trigger IDs
Use the **visual rules builder** for most setups. The visual rules interface seamlessly supports searching and selecting multiple products, categories, or tags with an infinite-scroll dropdown, making it highly intuitive for non-technical store managers.
Use **trigger IDs** primarily when you need to quickly copy-paste large lists of specific IDs, or when technical operators are managing the setup programmatically.
## Display Settings, Schedule & Conflicts
URL: https://wpanchorbay.github.io/upsellbay/usage/offers/06-display-conditions/
Description: Configure how an offer renders, when it runs, and how it behaves around conflicts.
## Display Settings
### Show Product Image
This toggle controls whether the storefront offer includes the WooCommerce product image. Enabling this often increases conversion rates for visual products, while disabling it creates a more compact, text-focused UI.
### Hide If In Cart
This ensures the offer automatically hides if the customer already has the exact offered product in their cart.
- **Leave checked** for generic cross-sells (e.g., an accessory) to avoid confusing duplicates.
- **Uncheck** if you are offering add-ons or selling additional quantities at a discount where having the product in the cart is expected and desired.
### Display Position
UpsellBay validates the saved position against the offer type. Each offer type maps natively to one highly optimized area:
- **Checkout Bump** -> Injected into the checkout area, typically right before the final submission button.
- **Product Page Offer** -> Positioned seamlessly after the add-to-cart form.
- **Cart Offer** -> Displayed prominently in the cart review area.
- **Thank-You Offer** -> Rendered securely on the post-purchase order received page.
## Schedule
### Start Date
Set a timestamp for when the offer should go live. Leave this blank if the offer should be eligible immediately upon activation.
### End Date
Set a timestamp for when the offer should automatically expire. Leave this blank if the offer should remain continuously available until manually paused or deleted.
## Priority & Conflict Resolution
### Priority Configuration
Priority determines which offer wins when multiple active offers qualify for the exact same placement simultaneously.
- **Lower number = stronger priority** (e.g., Priority 1 wins against Priority 5).
- **Higher number = fallback behavior**.
### Smart Conflict Detection
UpsellBay proactively checks active offers to prevent poor customer experiences, flagging issues such as:
- **Placement Crowding**: Too many offers targeting the same page space.
- **Priority Ties**: Multiple offers competing with the exact same priority level.
- **Funnel Overlap**: Conflicting logic that might trap or confuse a shopper.
### Conflict Override
This setting bypasses UpsellBay's built-in conflict prevention logic. **Use this with extreme caution**—it should only be enabled when overlapping offers are strictly intentional. When enabling an override, you must provide a documented reason to maintain a clear audit trail of why the safety check was bypassed.
## Offer Analytics
URL: https://wpanchorbay.github.io/upsellbay/usage/offers/07-analytics/
Description: Review offer-level performance data, aggregate dashboard metrics, and what the numbers mean.
## Where Analytics Appear
UpsellBay surfaces performance data in two convenient locations:
- **Global Dashboard**: Provides aggregate, date-range reporting across all active campaigns to gauge overall plugin impact.
- **Offer Editor**: Displays a read-only performance summary directly within the individual offer configuration screen for quick, contextual insights.
## Metrics Captured
To help you measure ROI accurately, UpsellBay tracks the following metrics for each offer:
- **Views**: The number of times the offer was successfully rendered to a shopper.
- **Accepts**: The number of times the shopper clicked to add the offered item to their cart or order.
- **Dismissals**: The number of times the shopper explicitly clicked the close/dismiss button on the offer.
- **Revenue**: The total monetary value attributed to the offer (calculated from successful checkout completions).
- **Discount Total**: The aggregate value of discounts applied specifically through this offer.
- **Orders**: The total number of unique orders that include this offer.
- **Accept Rate**: The conversion percentage (Accepts divided by Views).
## How To Interpret The Data
Understanding the context behind the numbers helps refine your strategy:
- **High Views + Low Accepts**: Often points to weak product fit, uncompelling copy, or a discount that isn't enticing enough. Consider testing a different offer goal.
- **Low Views**: Usually indicates that the targeting rules are too strict, the trigger products aren't getting traffic, or the placement is currently disabled.
- **High Accept Rate + Low Revenue**: Can still be a major win! If the offer is on a low-traffic product but converts well, it is successfully driving incremental AOV. Leave it active.
## General Settings
URL: https://wpanchorbay.github.io/upsellbay/usage/settings/01-general/
Description: Full reference for the General settings section, including global offer controls, placement limits, and style options.
### All rules
Every rule must match.
### Any rule
A single matching rule is enough.
## Supported Rule Types
Here is the complete list of supported rule types, their expected values, and supported operators.
| Rule Type | Description | Value Type | Supported Operators |
| --- | --- | --- | --- |
| `cart_product` | Cart contains product | List (Products - Multi-select) | `contains`, `not_in` |
| `cart_category` | Cart contains category | List (Categories - Multi-select) | `contains` |
| `cart_tag` | Cart contains tag | List (Tags - Multi-select) | `contains` |
| `cart_subtotal` | Cart subtotal is | Number | `gt`, `gte`, `lt`, `lte`, `eq`, `neq` |
| `viewed_product` | Currently viewing product | List (Products - Multi-select) | `contains` |
| `user_role` | User role is | List (Roles - Multi-select) | `contains` |
| `customer_order_count` | Customer order count is | Number | `gt`, `gte`, `lt`, `lte`, `eq`, `neq` |
| `customer_lifetime_spend` | Customer lifetime spend is | Number | `gt`, `gte`, `lt`, `lte`, `eq`, `neq` |
| `stock_status` | Offered product stock status is | Stock Status | `eq` |
| `exclude_if_product_in_cart` | Exclude if cart contains product | List (Products - Multi-select) | `not_in` |
*Note: `lifetime_spend` is accepted as an alias for `customer_lifetime_spend`, and `exclude_product_in_cart` is accepted as an alias for `exclude_if_product_in_cart`.*
## Supported Operators and Aliases
The system normalizes operators and accepts various aliases to make API integration easier.
| Canonical Operator | Description | Accepted Aliases |
| --- | --- | --- |
| `eq` | Equals | `is` |
| `neq` | Does not equal | `is_not` |
| `contains` | Contains | `in`, `eq`* |
| `not_in` | Does not contain | `not_contains`, `neq`* |
| `gt` | Greater than | `greater_than`, `>` |
| `gte` | Greater than or equal to | `greater_or_equal`, `>=` |
| `lt` | Less than | `less_than`, `<` |
| `lte` | Less than or equal to | `less_or_equal`, `<=` |
*\*If `eq` is passed for a rule that expects `contains`, it will automatically be normalized to `contains`. The same applies for `neq` mapping to `not_in`.*
## Validation Notes
- Numeric rules (`cart_subtotal`, `customer_order_count`, `customer_lifetime_spend`) require numeric values.
- List rules accept single values or arrays of values. In the visual builder, Product, Category, Tag, and Role rules utilize a multi-select interface with infinite scrolling to easily manage large datasets.
- Unsupported operators are rejected.
- Unsupported stock states are rejected (supported states: `instock`, `outofstock`, `onbackorder`).
- Empty rule values are rejected for active offers.
## Triggers & Advanced Targeting
URL: https://wpanchorbay.github.io/upsellbay/usage/offers/05-triggers/
Description: Use direct trigger IDs, rule combinations, and advanced targeting controls for precise offer eligibility.
## Trigger Product IDs
This field accepts a comma-separated list of WooCommerce product IDs.
Use when:
- the same offer should trigger from a known set of products
- an agency is implementing controlled mappings across a catalog
- you need direct product-level specificity
## Trigger Category IDs
This field accepts a comma-separated list of WooCommerce product category IDs.
Use when:
- the same merchandising logic applies to a full category cluster
- the catalog changes often and category-based grouping is more durable than product-by-product configuration
## Rules vs Trigger IDs
Use the **visual rules builder** for most setups. The visual rules interface seamlessly supports searching and selecting multiple products, categories, or tags with an infinite-scroll dropdown, making it highly intuitive for non-technical store managers.
Use **trigger IDs** primarily when you need to quickly copy-paste large lists of specific IDs, or when technical operators are managing the setup programmatically.
## Display Settings, Schedule & Conflicts
URL: https://wpanchorbay.github.io/upsellbay/usage/offers/06-display-conditions/
Description: Configure how an offer renders, when it runs, and how it behaves around conflicts.
## Display Settings
### Show Product Image
This toggle controls whether the storefront offer includes the WooCommerce product image. Enabling this often increases conversion rates for visual products, while disabling it creates a more compact, text-focused UI.
### Hide If In Cart
This ensures the offer automatically hides if the customer already has the exact offered product in their cart.
- **Leave checked** for generic cross-sells (e.g., an accessory) to avoid confusing duplicates.
- **Uncheck** if you are offering add-ons or selling additional quantities at a discount where having the product in the cart is expected and desired.
### Display Position
UpsellBay validates the saved position against the offer type. Each offer type maps natively to one highly optimized area:
- **Checkout Bump** -> Injected into the checkout area, typically right before the final submission button.
- **Product Page Offer** -> Positioned seamlessly after the add-to-cart form.
- **Cart Offer** -> Displayed prominently in the cart review area.
- **Thank-You Offer** -> Rendered securely on the post-purchase order received page.
## Schedule
### Start Date
Set a timestamp for when the offer should go live. Leave this blank if the offer should be eligible immediately upon activation.
### End Date
Set a timestamp for when the offer should automatically expire. Leave this blank if the offer should remain continuously available until manually paused or deleted.
## Priority & Conflict Resolution
### Priority Configuration
Priority determines which offer wins when multiple active offers qualify for the exact same placement simultaneously.
- **Lower number = stronger priority** (e.g., Priority 1 wins against Priority 5).
- **Higher number = fallback behavior**.
### Smart Conflict Detection
UpsellBay proactively checks active offers to prevent poor customer experiences, flagging issues such as:
- **Placement Crowding**: Too many offers targeting the same page space.
- **Priority Ties**: Multiple offers competing with the exact same priority level.
- **Funnel Overlap**: Conflicting logic that might trap or confuse a shopper.
### Conflict Override
This setting bypasses UpsellBay's built-in conflict prevention logic. **Use this with extreme caution**—it should only be enabled when overlapping offers are strictly intentional. When enabling an override, you must provide a documented reason to maintain a clear audit trail of why the safety check was bypassed.
## Offer Analytics
URL: https://wpanchorbay.github.io/upsellbay/usage/offers/07-analytics/
Description: Review offer-level performance data, aggregate dashboard metrics, and what the numbers mean.
## Where Analytics Appear
UpsellBay surfaces performance data in two convenient locations:
- **Global Dashboard**: Provides aggregate, date-range reporting across all active campaigns to gauge overall plugin impact.
- **Offer Editor**: Displays a read-only performance summary directly within the individual offer configuration screen for quick, contextual insights.
## Metrics Captured
To help you measure ROI accurately, UpsellBay tracks the following metrics for each offer:
- **Views**: The number of times the offer was successfully rendered to a shopper.
- **Accepts**: The number of times the shopper clicked to add the offered item to their cart or order.
- **Dismissals**: The number of times the shopper explicitly clicked the close/dismiss button on the offer.
- **Revenue**: The total monetary value attributed to the offer (calculated from successful checkout completions).
- **Discount Total**: The aggregate value of discounts applied specifically through this offer.
- **Orders**: The total number of unique orders that include this offer.
- **Accept Rate**: The conversion percentage (Accepts divided by Views).
## How To Interpret The Data
Understanding the context behind the numbers helps refine your strategy:
- **High Views + Low Accepts**: Often points to weak product fit, uncompelling copy, or a discount that isn't enticing enough. Consider testing a different offer goal.
- **Low Views**: Usually indicates that the targeting rules are too strict, the trigger products aren't getting traffic, or the placement is currently disabled.
- **High Accept Rate + Low Revenue**: Can still be a major win! If the offer is on a low-traffic product but converts well, it is successfully driving incremental AOV. Leave it active.
## General Settings
URL: https://wpanchorbay.github.io/upsellbay/usage/settings/01-general/
Description: Full reference for the General settings section, including global offer controls, placement limits, and style options.
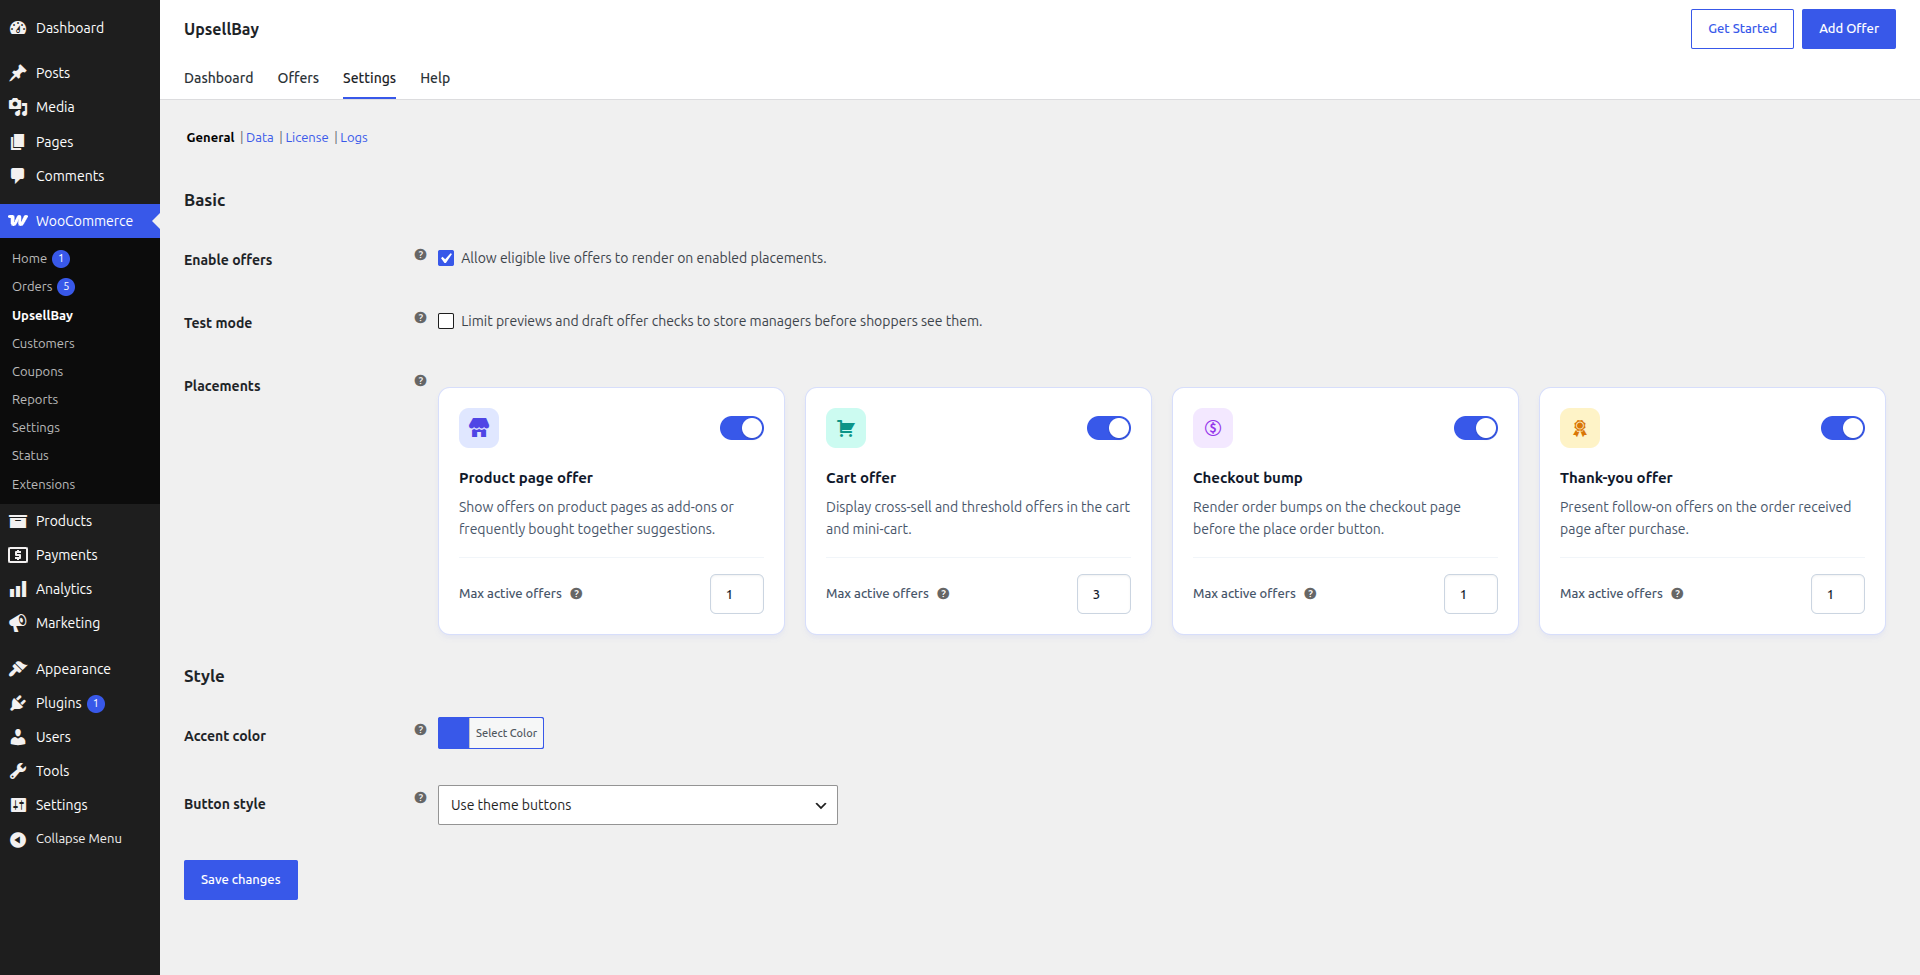 ## What The General Section Controls
Go to **WooCommerce -> UpsellBay -> Settings (-> General)** to manage the controls that affect all storefront offer rendering.
This section combines two kinds of settings:
- operational controls that decide whether UpsellBay is allowed to run
- presentation controls that keep offers visually aligned with the storefront
Use the General section when you need to pause offer rendering, limit where offers can appear, tune how many offers can show at once, or lightly adjust the offer UI without rebuilding your theme.
## Enable Offers
This is the global master switch for shopper-facing UpsellBay offers.
What it means:
- `Enabled` means eligible active offers can render on placements that are also enabled.
- `Disabled` means UpsellBay stops rendering shopper-facing offers across the storefront.
What it does not change:
- it does not delete offers
- it does not change individual offer status
- it does not erase analytics or logs
When to use it:
- before a planned campaign pause
- during theme, checkout, or merchandising maintenance
- while troubleshooting storefront output without editing every offer
## Test Mode
Test Mode is the safest way to review offer behavior before exposing it to live shoppers.
What it means:
- store managers and admins can preview and validate offers
- live shoppers should not see test-only offer behavior while the mode is active
When to use it:
- during first-time setup
- before publishing a new placement
- after changing copy, products, discounts, or targeting rules
- while comparing theme or checkout changes against existing offer layouts
Why it matters:
- it reduces the chance of showing unfinished or misconfigured offers
- it gives you a controlled review path for QA and merchant approvals
- it works well with draft offers and preview testing
## Placements
The placement cards are global gates. An individual offer still needs to be active, eligible, and assigned to the matching placement, but the placement must also be enabled here.
What each placement card includes:
- an on or off toggle for the placement
- a **Max active offers** limit for that placement
If a placement is turned off here, no offer assigned to that placement renders, even if the offer itself is active and otherwise valid.
#### Product page offer
> Use this toggle to allow UpsellBay to render product-page offers near the product form and evaluation flow.
>
> Best for:
>
> - accessories
> - frequently bought together offers
> - setup add-ons
>
> Why use it:
>
> - shoppers are still evaluating the main product
> - this is a natural place to offer complementary items before cart review
> - the offer can feel like a helpful add-on rather than a separate promotion
#### Cart offer
> Use this toggle to allow offers in cart review contexts.
>
> Best for:
>
> - cross-sells
> - bundle completion suggestions
> - threshold-helper offers
>
> Why use it:
>
> - the shopper has already shown purchase intent
> - cart is a strong place to recommend items that complete the order
> - it works well for utility, accessory, or low-risk add-on suggestions
#### Checkout bump
>
> Use this toggle to allow checkout bumps near the order submission step.
>
> Best for:
>
> - one focused add-on
> - low-friction, low-complexity products
>
> Why use it:
>
> - checkout is the strongest place for a single, obvious add-on
> - limiting choice here helps avoid payment-area clutter
> - it keeps the offer native to the existing WooCommerce checkout flow
#### Thank-you offer
> Use this toggle to allow thank-you page follow-on offers after the primary order is complete.
>
> Best for:
>
> - refill offers
> - post-purchase second-order prompts
>
> Why use it:
>
> - the first order is already complete
> - it gives you a safe place to promote a second purchase
> - it works well for replenishment or compatible follow-up items
### Max Active Offers
Each placement card includes a **Max active offers** value. This controls how many eligible offers may appear at the same time in that placement.
What it means:
- lower values keep the storefront focused
- higher values allow more variety but increase the risk of clutter
- if more offers are eligible than the limit allows, offer priority decides which ones win
Recommended starting points:
- product page: `1`
- cart: `1` to `3`
- checkout: `1`
- thank-you: `1`
When to increase it:
- when you have clearly segmented offers with narrow rules
- when the cart placement needs room for more than one relevant recommendation
When to keep it low:
- when the placement is visually tight
- when broad rules could make too many offers compete
- when you want the experience to feel curated rather than promotional
## Accent Color
Accent Color is the global style token used for UpsellBay UI accents.
What it affects:
- visual accents on offers
- highlights that help the offer feel branded without replacing your theme layout
**Legibility & Contrast:** UpsellBay automatically calculates a contrasting text color (either white or dark gray) for elements rendered on top of the accent color background based on its relative luminance. This ensures that text on buttons, badges, and tag elements remains readable regardless of whether you choose a light or dark accent color.
When to use it:
- when the default accent does not fit the storefront
- when you want a light brand alignment without custom CSS
- when you need a cleaner visual match across product, cart, checkout, and thank-you placements
Why it exists:
- it gives stores a safer branding control than fully custom templates
- it helps keep offers native-looking while still recognizable as part of the store design
## Button Style
Button Style controls how UpsellBay action buttons should appear relative to the theme.
Available options:
- `Use theme buttons`
- `Outline`
### Use theme buttons
## What The General Section Controls
Go to **WooCommerce -> UpsellBay -> Settings (-> General)** to manage the controls that affect all storefront offer rendering.
This section combines two kinds of settings:
- operational controls that decide whether UpsellBay is allowed to run
- presentation controls that keep offers visually aligned with the storefront
Use the General section when you need to pause offer rendering, limit where offers can appear, tune how many offers can show at once, or lightly adjust the offer UI without rebuilding your theme.
## Enable Offers
This is the global master switch for shopper-facing UpsellBay offers.
What it means:
- `Enabled` means eligible active offers can render on placements that are also enabled.
- `Disabled` means UpsellBay stops rendering shopper-facing offers across the storefront.
What it does not change:
- it does not delete offers
- it does not change individual offer status
- it does not erase analytics or logs
When to use it:
- before a planned campaign pause
- during theme, checkout, or merchandising maintenance
- while troubleshooting storefront output without editing every offer
## Test Mode
Test Mode is the safest way to review offer behavior before exposing it to live shoppers.
What it means:
- store managers and admins can preview and validate offers
- live shoppers should not see test-only offer behavior while the mode is active
When to use it:
- during first-time setup
- before publishing a new placement
- after changing copy, products, discounts, or targeting rules
- while comparing theme or checkout changes against existing offer layouts
Why it matters:
- it reduces the chance of showing unfinished or misconfigured offers
- it gives you a controlled review path for QA and merchant approvals
- it works well with draft offers and preview testing
## Placements
The placement cards are global gates. An individual offer still needs to be active, eligible, and assigned to the matching placement, but the placement must also be enabled here.
What each placement card includes:
- an on or off toggle for the placement
- a **Max active offers** limit for that placement
If a placement is turned off here, no offer assigned to that placement renders, even if the offer itself is active and otherwise valid.
#### Product page offer
> Use this toggle to allow UpsellBay to render product-page offers near the product form and evaluation flow.
>
> Best for:
>
> - accessories
> - frequently bought together offers
> - setup add-ons
>
> Why use it:
>
> - shoppers are still evaluating the main product
> - this is a natural place to offer complementary items before cart review
> - the offer can feel like a helpful add-on rather than a separate promotion
#### Cart offer
> Use this toggle to allow offers in cart review contexts.
>
> Best for:
>
> - cross-sells
> - bundle completion suggestions
> - threshold-helper offers
>
> Why use it:
>
> - the shopper has already shown purchase intent
> - cart is a strong place to recommend items that complete the order
> - it works well for utility, accessory, or low-risk add-on suggestions
#### Checkout bump
>
> Use this toggle to allow checkout bumps near the order submission step.
>
> Best for:
>
> - one focused add-on
> - low-friction, low-complexity products
>
> Why use it:
>
> - checkout is the strongest place for a single, obvious add-on
> - limiting choice here helps avoid payment-area clutter
> - it keeps the offer native to the existing WooCommerce checkout flow
#### Thank-you offer
> Use this toggle to allow thank-you page follow-on offers after the primary order is complete.
>
> Best for:
>
> - refill offers
> - post-purchase second-order prompts
>
> Why use it:
>
> - the first order is already complete
> - it gives you a safe place to promote a second purchase
> - it works well for replenishment or compatible follow-up items
### Max Active Offers
Each placement card includes a **Max active offers** value. This controls how many eligible offers may appear at the same time in that placement.
What it means:
- lower values keep the storefront focused
- higher values allow more variety but increase the risk of clutter
- if more offers are eligible than the limit allows, offer priority decides which ones win
Recommended starting points:
- product page: `1`
- cart: `1` to `3`
- checkout: `1`
- thank-you: `1`
When to increase it:
- when you have clearly segmented offers with narrow rules
- when the cart placement needs room for more than one relevant recommendation
When to keep it low:
- when the placement is visually tight
- when broad rules could make too many offers compete
- when you want the experience to feel curated rather than promotional
## Accent Color
Accent Color is the global style token used for UpsellBay UI accents.
What it affects:
- visual accents on offers
- highlights that help the offer feel branded without replacing your theme layout
**Legibility & Contrast:** UpsellBay automatically calculates a contrasting text color (either white or dark gray) for elements rendered on top of the accent color background based on its relative luminance. This ensures that text on buttons, badges, and tag elements remains readable regardless of whether you choose a light or dark accent color.
When to use it:
- when the default accent does not fit the storefront
- when you want a light brand alignment without custom CSS
- when you need a cleaner visual match across product, cart, checkout, and thank-you placements
Why it exists:
- it gives stores a safer branding control than fully custom templates
- it helps keep offers native-looking while still recognizable as part of the store design
## Button Style
Button Style controls how UpsellBay action buttons should appear relative to the theme.
Available options:
- `Use theme buttons`
- `Outline`
### Use theme buttons
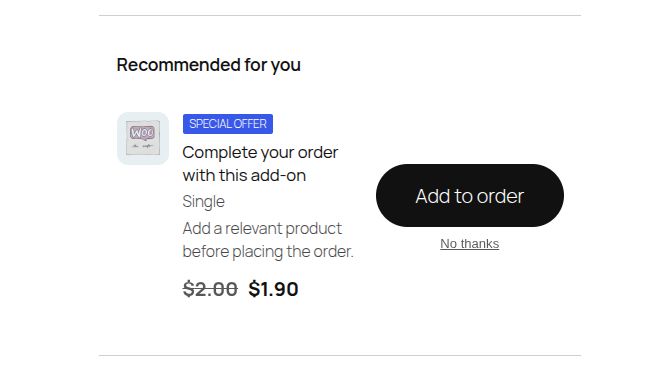 What it means:
- offer buttons inherit the storefront's normal button style
When to use it:
- when you want the most native-looking experience
- when your theme already has strong accessible button styling
- when you do not want offers to visually compete with the rest of the page
### Outline
What it means:
- offer buttons inherit the storefront's normal button style
When to use it:
- when you want the most native-looking experience
- when your theme already has strong accessible button styling
- when you do not want offers to visually compete with the rest of the page
### Outline
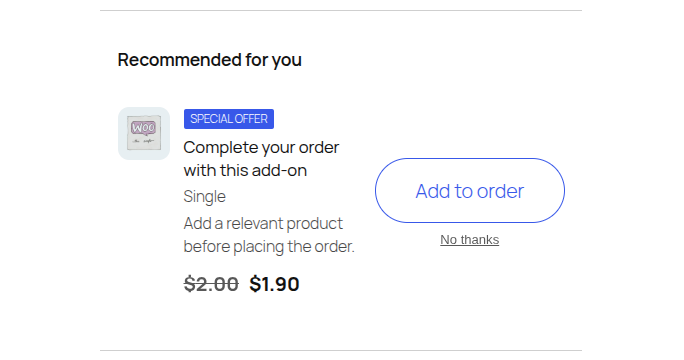 What it means:
- offer buttons render with a lighter outline treatment
- by default, outline button text uses the storefront's standard text color instead of the accent color to maintain legibility. On hover, the button fills with the accent color and changes the text color to the dynamically calculated contrasting color.
When to use it:
- when theme buttons are too visually heavy inside offers
- when you want the offer CTA to feel secondary to the page's main purchase action
- when the storefront already has strong color emphasis and the offer should stay visually restrained
## Recommended Defaults
- keep **Enable offers** on only when you are ready for live traffic
- keep **Test mode** on until offer previews are complete
- start with low **Max active offers** values
- use **theme buttons** unless your current theme makes offer CTAs feel too dominant
- change **Accent Color** only when the default clearly clashes with the storefront
## General Section Checklist
Review this section when:
- offers are not showing where you expect
- too many offers are appearing at once
- you need to pause storefront merchandising quickly
- you are preparing a new campaign for review
- offer styling feels out of place with the current theme
## Data Settings
URL: https://wpanchorbay.github.io/upsellbay/usage/settings/02-data/
Description: Full documentation for retention controls, uninstall cleanup, and the destructive reset tools in the Data section.
What it means:
- offer buttons render with a lighter outline treatment
- by default, outline button text uses the storefront's standard text color instead of the accent color to maintain legibility. On hover, the button fills with the accent color and changes the text color to the dynamically calculated contrasting color.
When to use it:
- when theme buttons are too visually heavy inside offers
- when you want the offer CTA to feel secondary to the page's main purchase action
- when the storefront already has strong color emphasis and the offer should stay visually restrained
## Recommended Defaults
- keep **Enable offers** on only when you are ready for live traffic
- keep **Test mode** on until offer previews are complete
- start with low **Max active offers** values
- use **theme buttons** unless your current theme makes offer CTAs feel too dominant
- change **Accent Color** only when the default clearly clashes with the storefront
## General Section Checklist
Review this section when:
- offers are not showing where you expect
- too many offers are appearing at once
- you need to pause storefront merchandising quickly
- you are preparing a new campaign for review
- offer styling feels out of place with the current theme
## Data Settings
URL: https://wpanchorbay.github.io/upsellbay/usage/settings/02-data/
Description: Full documentation for retention controls, uninstall cleanup, and the destructive reset tools in the Data section.
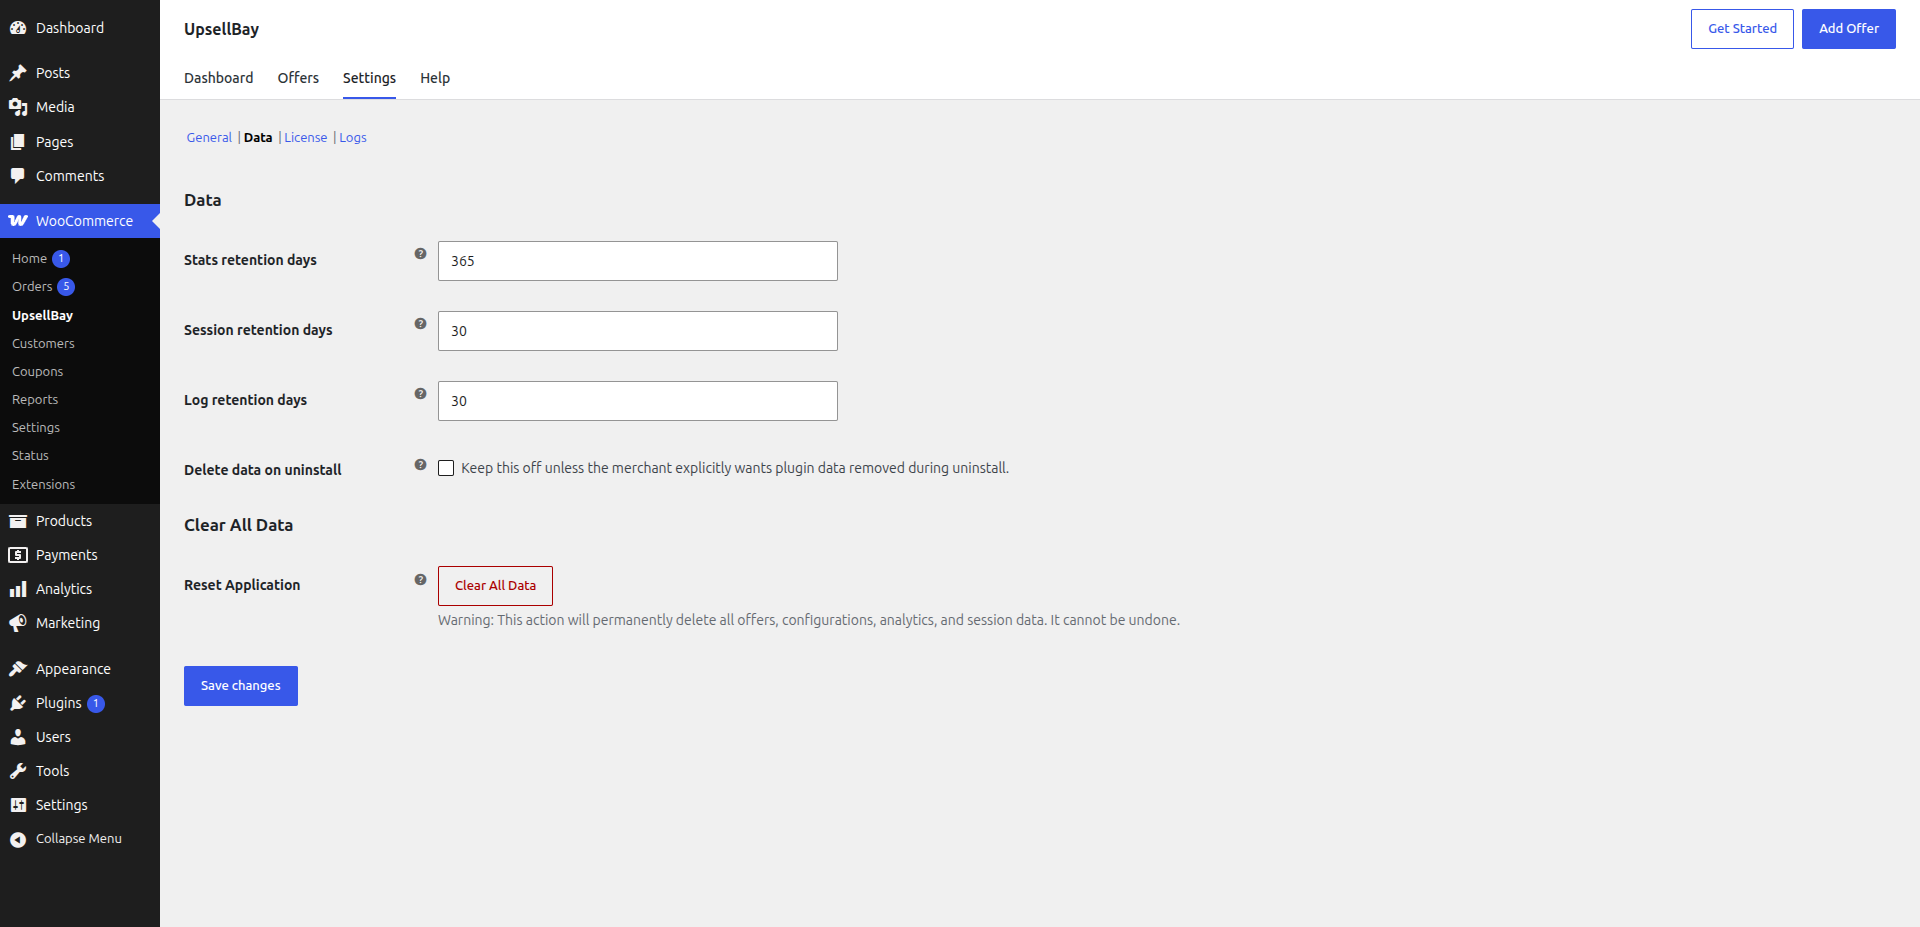 ## What The Data Section Controls
Go to **WooCommerce -> UpsellBay -> Settings -> Data** to manage how long operational data is retained and how aggressively the plugin should clean up stored records.
This section is for store operators who need to balance history, troubleshooting visibility, privacy, and cleanup behavior.
Use it when you need to:
- keep more historical analytics
- reduce how long temporary records stay in the system
- control whether uninstall preserves or removes UpsellBay data
- fully reset the plugin in a staging or rebuild workflow
## Stats Retention Days
This setting controls how long aggregate, non-PII analytics remain available for reporting.
What it covers:
- daily offer performance totals
- summary reporting used by the dashboard and analytics views
- historical trend windows for views, accepts, dismissals, revenue, and discounts
What it does not store:
- customer PII
- raw shopper identities
- private recovery or CRM-style contact history
When to use a longer retention window:
- you compare campaigns over seasons or quarters
- you want longer-term trend analysis
- you report performance back to clients or stakeholders
When to use a shorter retention window:
- you only care about recent campaign windows
- you want to keep reporting history lean
## Session Retention Days
This setting controls how long temporary offer session state is retained.
What it covers:
- interaction state tied to active storefront behavior
- temporary records such as dismissals or session-level offer handling
- shopper-flow state needed for offer experience continuity
Why it matters:
- shorter retention keeps temporary state from lingering longer than necessary
- longer retention may help if your workflow depends on slightly more continuity across shopper sessions
When to keep it conservative:
- on stores where you want short-lived operational state
- when you do not need longer carry-over between visits
## Log Retention Days
This setting controls how long operational logs stay available in **Settings -> Logs**.
What it covers:
- system events
- API activity
- warnings and errors
- support-oriented diagnostic records
When to use a longer retention window:
- support cases often span multiple weeks
- you investigate intermittent issues over time
- agency or operations teams need a wider troubleshooting window
When to use a shorter retention window:
- you want to keep diagnostics tighter
- you do not need old log history once issues are resolved
## Delete Data On Uninstall
This checkbox changes what happens when the plugin is uninstalled.
Disabled means:
- UpsellBay preserves data by default
- offers, settings, and stored records stay in place unless the merchant explicitly chooses cleanup
Enabled means:
- uninstall cleanup is allowed to remove UpsellBay data instead of preserving it
Why this option exists:
- some merchants want safe uninstall with preserved history
- staging or disposable environments may need a true cleanup path
When to enable it:
- when a merchant explicitly wants full removal during uninstall
- when cleaning up a temporary environment
When not to enable it:
- as a routine troubleshooting step
- on production stores unless the merchant fully understands the impact
## Clear All Data
The Data section includes a destructive **Clear All Data** action.
What it does:
- permanently removes UpsellBay records
- resets the plugin toward a fresh-install state
- clears offers, settings, analytics, session-related state, and other stored plugin data
Why it is different from uninstall cleanup:
- uninstall cleanup only applies when the plugin is uninstalled
- **Clear All Data** runs immediately from inside the plugin
When to use it:
- before rebuilding a test environment from scratch
- when intentionally resetting the plugin for a controlled migration
- when a staging environment must be wiped clean
When not to use it:
- for routine diagnostics
- when you only need to pause offers
- when you only need to prune history using retention settings
## Recommended Data Strategy
For most live stores:
- keep enough **Stats retention days** to compare offer performance over meaningful business periods
- keep **Session retention days** modest
- keep **Log retention days** long enough to support real troubleshooting
- leave **Delete data on uninstall** off unless the merchant has explicitly requested cleanup
- treat **Clear All Data** as an intentional reset tool, not a maintenance shortcut
## License Settings
URL: https://wpanchorbay.github.io/upsellbay/usage/settings/03-license/
Description: Full documentation for license status, masked key handling, renewal visibility, and all license actions.
## What The Data Section Controls
Go to **WooCommerce -> UpsellBay -> Settings -> Data** to manage how long operational data is retained and how aggressively the plugin should clean up stored records.
This section is for store operators who need to balance history, troubleshooting visibility, privacy, and cleanup behavior.
Use it when you need to:
- keep more historical analytics
- reduce how long temporary records stay in the system
- control whether uninstall preserves or removes UpsellBay data
- fully reset the plugin in a staging or rebuild workflow
## Stats Retention Days
This setting controls how long aggregate, non-PII analytics remain available for reporting.
What it covers:
- daily offer performance totals
- summary reporting used by the dashboard and analytics views
- historical trend windows for views, accepts, dismissals, revenue, and discounts
What it does not store:
- customer PII
- raw shopper identities
- private recovery or CRM-style contact history
When to use a longer retention window:
- you compare campaigns over seasons or quarters
- you want longer-term trend analysis
- you report performance back to clients or stakeholders
When to use a shorter retention window:
- you only care about recent campaign windows
- you want to keep reporting history lean
## Session Retention Days
This setting controls how long temporary offer session state is retained.
What it covers:
- interaction state tied to active storefront behavior
- temporary records such as dismissals or session-level offer handling
- shopper-flow state needed for offer experience continuity
Why it matters:
- shorter retention keeps temporary state from lingering longer than necessary
- longer retention may help if your workflow depends on slightly more continuity across shopper sessions
When to keep it conservative:
- on stores where you want short-lived operational state
- when you do not need longer carry-over between visits
## Log Retention Days
This setting controls how long operational logs stay available in **Settings -> Logs**.
What it covers:
- system events
- API activity
- warnings and errors
- support-oriented diagnostic records
When to use a longer retention window:
- support cases often span multiple weeks
- you investigate intermittent issues over time
- agency or operations teams need a wider troubleshooting window
When to use a shorter retention window:
- you want to keep diagnostics tighter
- you do not need old log history once issues are resolved
## Delete Data On Uninstall
This checkbox changes what happens when the plugin is uninstalled.
Disabled means:
- UpsellBay preserves data by default
- offers, settings, and stored records stay in place unless the merchant explicitly chooses cleanup
Enabled means:
- uninstall cleanup is allowed to remove UpsellBay data instead of preserving it
Why this option exists:
- some merchants want safe uninstall with preserved history
- staging or disposable environments may need a true cleanup path
When to enable it:
- when a merchant explicitly wants full removal during uninstall
- when cleaning up a temporary environment
When not to enable it:
- as a routine troubleshooting step
- on production stores unless the merchant fully understands the impact
## Clear All Data
The Data section includes a destructive **Clear All Data** action.
What it does:
- permanently removes UpsellBay records
- resets the plugin toward a fresh-install state
- clears offers, settings, analytics, session-related state, and other stored plugin data
Why it is different from uninstall cleanup:
- uninstall cleanup only applies when the plugin is uninstalled
- **Clear All Data** runs immediately from inside the plugin
When to use it:
- before rebuilding a test environment from scratch
- when intentionally resetting the plugin for a controlled migration
- when a staging environment must be wiped clean
When not to use it:
- for routine diagnostics
- when you only need to pause offers
- when you only need to prune history using retention settings
## Recommended Data Strategy
For most live stores:
- keep enough **Stats retention days** to compare offer performance over meaningful business periods
- keep **Session retention days** modest
- keep **Log retention days** long enough to support real troubleshooting
- leave **Delete data on uninstall** off unless the merchant has explicitly requested cleanup
- treat **Clear All Data** as an intentional reset tool, not a maintenance shortcut
## License Settings
URL: https://wpanchorbay.github.io/upsellbay/usage/settings/03-license/
Description: Full documentation for license status, masked key handling, renewal visibility, and all license actions.
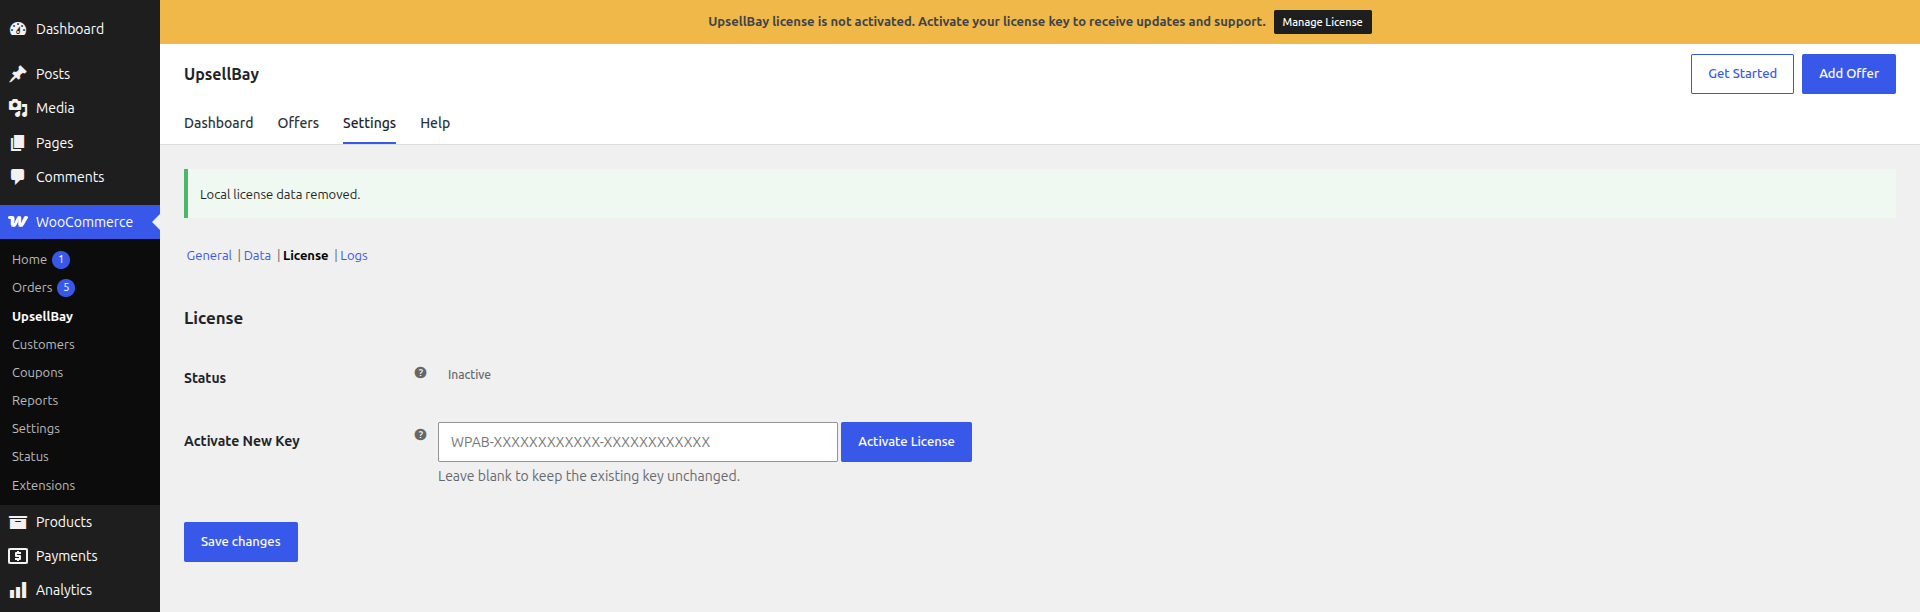 ## What The License Section Controls
Go to **WooCommerce -> UpsellBay -> Settings -> License** to manage the commercial connection between this site and your UpsellBay license.
This section does not control how offers look or where they render. It exists so store owners and operators can safely confirm licensing state, renew access, and replace keys without exposing secrets in routine admin workflows.
## Status
The **Status** badge shows the latest local license state known to the plugin.
Why it matters:
- it tells you whether the site is in a healthy update and support state
- it helps you understand whether a renewal, reactivation, or replacement is needed
- it gives support teams a fast first signal when diagnosing license issues
Common states you may see:
- `Active`: the license is connected and currently valid
- `Inactive`: no healthy active state is currently confirmed
- `Expired`: the license term has ended
- `Invalid`: the stored key was rejected or is no longer accepted
- `Dev Mode`: a non-production domain is being treated as a development environment
- `Server Error`: the license server could not be reached recently
- `Unknown`: the plugin does not currently have a confirmed state
When to act:
- if the badge is `Expired`, renew or replace the key
- if it is `Invalid`, confirm the key and activate again
- if it is `Inactive`, run a check or reactivate
- if it is `Server Error`, retry after connectivity is restored
## Current Key
If a key is already stored, UpsellBay shows only a masked version.
What it means:
- the plugin keeps the real key protected
- the Settings UI only shows a safe masked representation
- screenshots and shared admin sessions are less likely to expose secrets
Why it matters:
- you can confirm which key family is attached to the store
- you can verify whether a replacement likely succeeded
- you can share the screen internally without revealing the full key
## Expires
When the license server provides an expiration date, the **Expires** row shows the current term end date.
Why it matters:
- it helps you plan renewals before access becomes a support issue
- it makes it easier to explain status changes to clients or stakeholders
- it confirms whether an expired badge is expected
When to review it:
- before releases or update windows
- when handing over store operations
- during renewal planning
## Plan
If available, the **Plan** row shows the commercial plan associated with the active license.
Why it matters:
- it helps confirm the site is attached to the expected entitlement
- it is useful when agencies or support teams manage multiple license tiers
## Check License
This action performs a fresh check against the licensing service.
Use it when:
- the site has moved domains
- a renewal has just completed
- the status looks stale
- support asks for a fresh validation
Why use it:
- it confirms whether the current local status still matches the remote license record
- it is the least disruptive first step when diagnosing license health
## Reactivate
This action appears when the stored key is not currently in an active or valid state. It retries activation using the key that is already saved locally.
Use it when:
- the key should still be correct
- the domain or activation record may need to be refreshed
- support has asked you to retry activation without replacing the key
Why it matters:
- it avoids retyping the key when the current saved value should still be valid
- it is safer than replacing a key unnecessarily
## Remove License
This action removes the local license association from the site.
What happens after removal:
- this site is disconnected from update and support-related license checks
- live offers continue running
- a new key can be activated later when needed
When to use it:
- before transferring store ownership
- before attaching a different purchased key
- when intentionally moving the license elsewhere
## Activate New Key
This field is used to replace the current stored key with a different one.
Expected format:
`WPAB-XXXXXXXXXXXX-XXXXXXXXXXXX`
What it means:
- leaving the field blank keeps the current key unchanged
- entering a new key attempts activation during save
- invalid formatting is blocked before a malformed request is sent
When to use it:
- replacing an expired license
- moving from an older or wrong key
- switching to a new entitlement or plan
- reattaching the site after a transfer
## What The License Section Controls
Go to **WooCommerce -> UpsellBay -> Settings -> License** to manage the commercial connection between this site and your UpsellBay license.
This section does not control how offers look or where they render. It exists so store owners and operators can safely confirm licensing state, renew access, and replace keys without exposing secrets in routine admin workflows.
## Status
The **Status** badge shows the latest local license state known to the plugin.
Why it matters:
- it tells you whether the site is in a healthy update and support state
- it helps you understand whether a renewal, reactivation, or replacement is needed
- it gives support teams a fast first signal when diagnosing license issues
Common states you may see:
- `Active`: the license is connected and currently valid
- `Inactive`: no healthy active state is currently confirmed
- `Expired`: the license term has ended
- `Invalid`: the stored key was rejected or is no longer accepted
- `Dev Mode`: a non-production domain is being treated as a development environment
- `Server Error`: the license server could not be reached recently
- `Unknown`: the plugin does not currently have a confirmed state
When to act:
- if the badge is `Expired`, renew or replace the key
- if it is `Invalid`, confirm the key and activate again
- if it is `Inactive`, run a check or reactivate
- if it is `Server Error`, retry after connectivity is restored
## Current Key
If a key is already stored, UpsellBay shows only a masked version.
What it means:
- the plugin keeps the real key protected
- the Settings UI only shows a safe masked representation
- screenshots and shared admin sessions are less likely to expose secrets
Why it matters:
- you can confirm which key family is attached to the store
- you can verify whether a replacement likely succeeded
- you can share the screen internally without revealing the full key
## Expires
When the license server provides an expiration date, the **Expires** row shows the current term end date.
Why it matters:
- it helps you plan renewals before access becomes a support issue
- it makes it easier to explain status changes to clients or stakeholders
- it confirms whether an expired badge is expected
When to review it:
- before releases or update windows
- when handing over store operations
- during renewal planning
## Plan
If available, the **Plan** row shows the commercial plan associated with the active license.
Why it matters:
- it helps confirm the site is attached to the expected entitlement
- it is useful when agencies or support teams manage multiple license tiers
## Check License
This action performs a fresh check against the licensing service.
Use it when:
- the site has moved domains
- a renewal has just completed
- the status looks stale
- support asks for a fresh validation
Why use it:
- it confirms whether the current local status still matches the remote license record
- it is the least disruptive first step when diagnosing license health
## Reactivate
This action appears when the stored key is not currently in an active or valid state. It retries activation using the key that is already saved locally.
Use it when:
- the key should still be correct
- the domain or activation record may need to be refreshed
- support has asked you to retry activation without replacing the key
Why it matters:
- it avoids retyping the key when the current saved value should still be valid
- it is safer than replacing a key unnecessarily
## Remove License
This action removes the local license association from the site.
What happens after removal:
- this site is disconnected from update and support-related license checks
- live offers continue running
- a new key can be activated later when needed
When to use it:
- before transferring store ownership
- before attaching a different purchased key
- when intentionally moving the license elsewhere
## Activate New Key
This field is used to replace the current stored key with a different one.
Expected format:
`WPAB-XXXXXXXXXXXX-XXXXXXXXXXXX`
What it means:
- leaving the field blank keeps the current key unchanged
- entering a new key attempts activation during save
- invalid formatting is blocked before a malformed request is sent
When to use it:
- replacing an expired license
- moving from an older or wrong key
- switching to a new entitlement or plan
- reattaching the site after a transfer
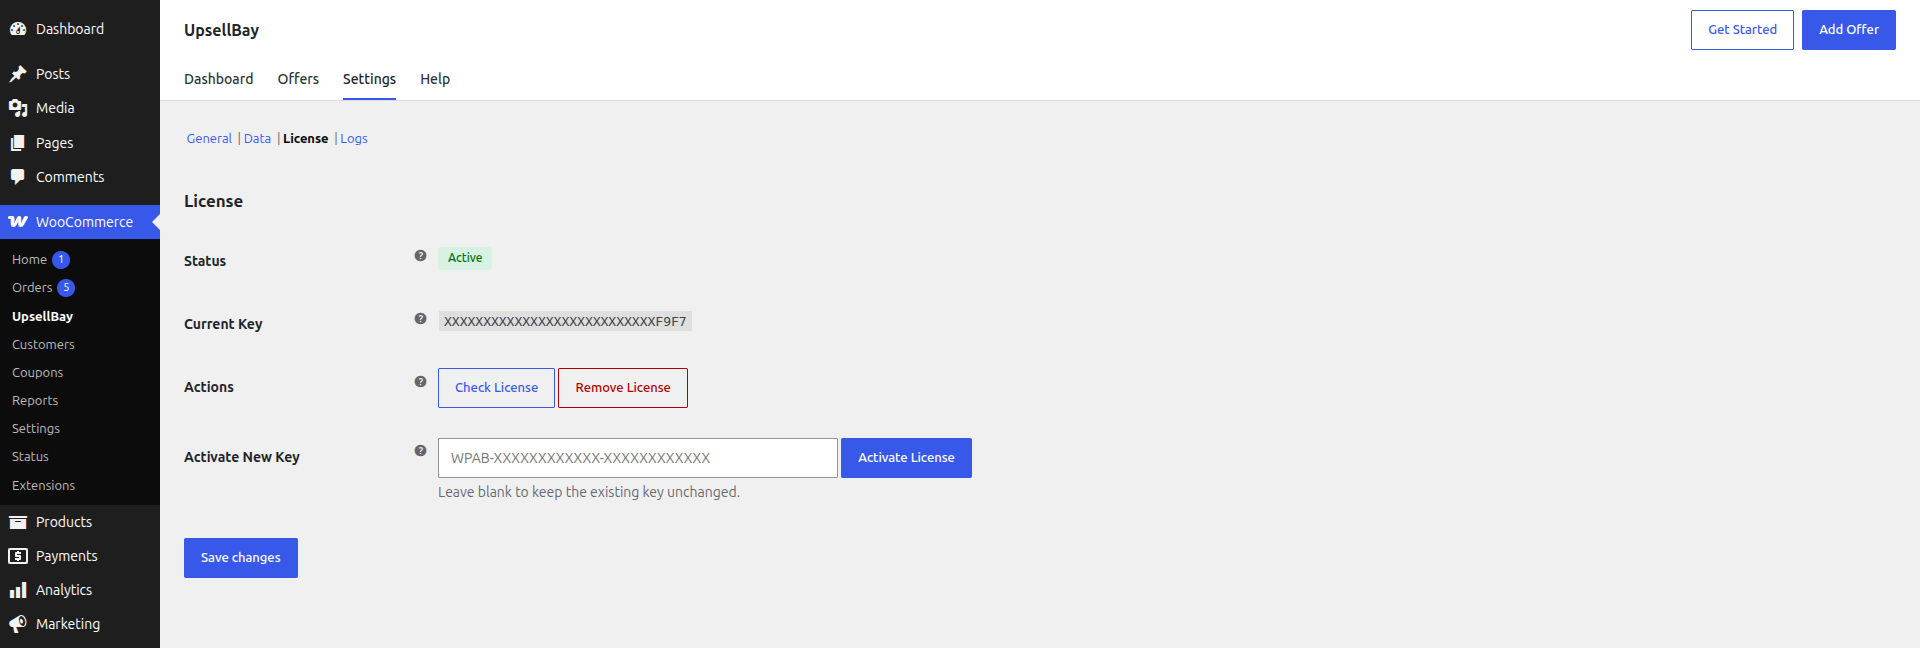 ## When The License Section Should Be Reviewed
Open this section when:
- updates or support access matter for upcoming work
- the site was cloned, migrated, or moved to a new domain
- the stored key may have changed
- the status badge is anything other than healthy
## Important Behavior Notes
- the full license key is not exposed in normal settings output
- non-production domains may be treated differently for activation handling
- transport problems should not immediately disable live offers
- the License section is for commercial state, not storefront merchandising
## Log
URL: https://wpanchorbay.github.io/upsellbay/usage/settings/04-log/
Description: Full documentation for the Settings Logs section, including table fields, filtering, inspection, export, and cleanup workflows.
## When The License Section Should Be Reviewed
Open this section when:
- updates or support access matter for upcoming work
- the site was cloned, migrated, or moved to a new domain
- the stored key may have changed
- the status badge is anything other than healthy
## Important Behavior Notes
- the full license key is not exposed in normal settings output
- non-production domains may be treated differently for activation handling
- transport problems should not immediately disable live offers
- the License section is for commercial state, not storefront merchandising
## Log
URL: https://wpanchorbay.github.io/upsellbay/usage/settings/04-log/
Description: Full documentation for the Settings Logs section, including table fields, filtering, inspection, export, and cleanup workflows.
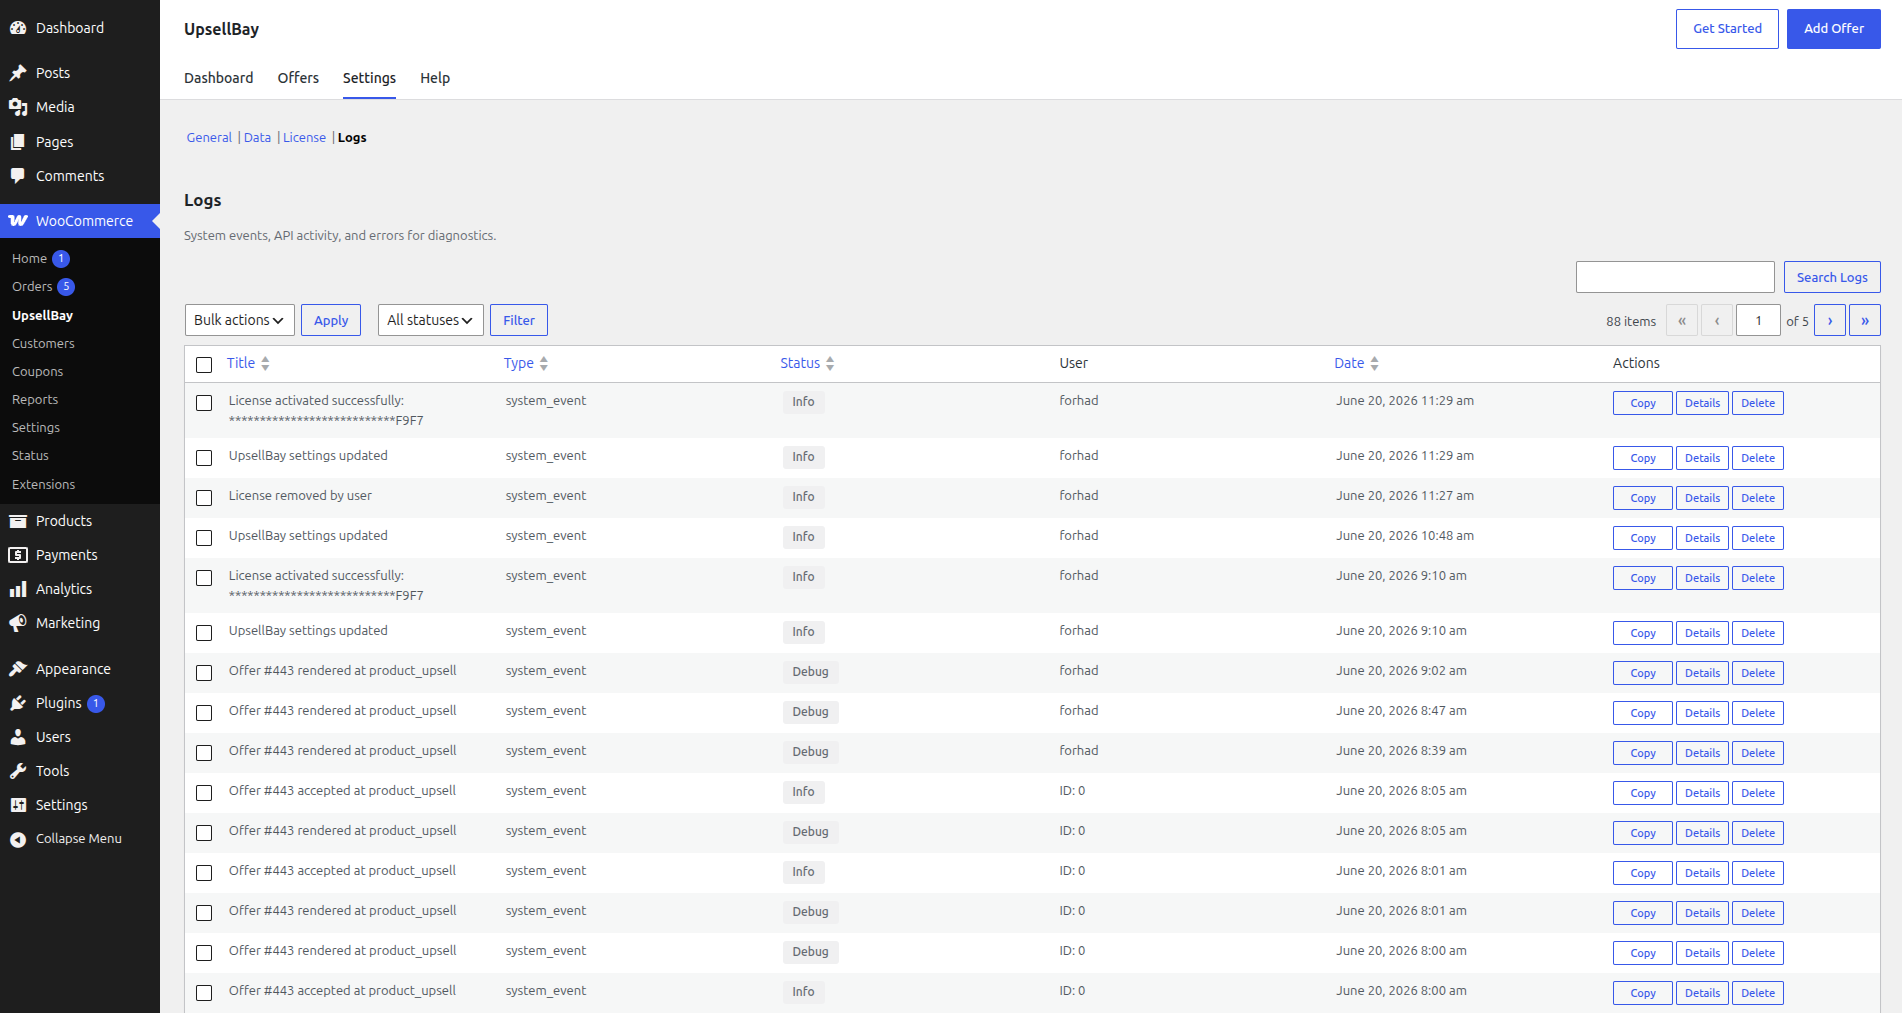 ## What The Log Page Documents
This page documents **WooCommerce -> UpsellBay -> Settings -> Logs**.
Even though the admin section is named **Logs**, this documentation page focuses on the single operational log system that UpsellBay uses for diagnostics and support.
## What The Logs Section Is For
The Logs section is a diagnostic workspace for operators, QA reviewers, agencies, and support teams.
Use it when:
- an offer fails to behave as expected
- you need more context for an internal bug report
- support asks for a sanitized event trail
- a license or API event needs deeper inspection
- you want to remove stale diagnostic entries after an issue is resolved
What it is not for:
- shopper-facing notifications
- marketing messages
- everyday campaign management
## What The Logs System Records
Depending on the event, logs may include:
- title
- log type
- status level
- user reference
- created date
- related object references
- description
- request data
- response data
- metadata
The plugin records diagnostic context so issues can be investigated without exposing the full license key in the normal admin interface.
## Working With The Logs Table
The logs view supports:
- search
- status filtering
- sortable columns
- single-item deletion
- bulk deletion
- opening a detailed log view
- copy-to-clipboard export from individual records
Why this matters:
- you can narrow large log lists quickly
- support teams can focus on a specific status or event family
- stores can keep the diagnostics table useful instead of noisy
## Table Columns
### Title
Short human-readable description of the recorded event.
Use it to quickly spot the event you care about before opening full details.
### Type
The event family or category associated with the log entry.
Use it to separate system, API, license, or other operational activity.
### Status
Severity-style badge that helps you judge urgency at a glance.
Typical statuses include informational and warning states as well as higher-severity error states.
Why it matters:
- errors and warnings usually deserve review first
- informational entries help reconstruct what happened before a failure
### User
Shows the recorded user when one is available.
Use it when you need to know whether an event was triggered by a specific admin action rather than background processing.
### Date
Shows when the event was recorded.
Use it to line events up with support reports, changes, imports, or license actions.
### Actions
Each row can expose actions such as:
- `Copy`
- `Details`
- `Delete`
These are the fastest path for inspection, sharing, and cleanup.
## Log Detail View
The detailed view includes:
- title
- date
- type
- status
- IP address and user ID when recorded
- related object references
- description
- request, response, and metadata payloads when available
Why open the detail view:
- to inspect the full event context
- to confirm what request or response data was captured
- to create a support-ready summary from one specific event
## Support Export
The detail screen includes a copy-to-clipboard report so you can hand a support-ready summary to your team without manually reformatting the event details.
Use it when:
- opening a support ticket
- handing a bug to engineering or QA
- documenting a reproducible issue internally
## Deleting Logs
The Logs section supports both single-item deletion and bulk deletion.
When to delete logs:
- after a support case is resolved
- when old noise is making review harder
- when a staging environment should be cleaned up
When not to delete logs yet:
- before an active issue is fully documented
- while support is still waiting on evidence
## How Logs Relate To Data Retention
The **Data** settings section controls **Log retention days**. That setting decides how long log entries stay available before retention cleanup should remove stale records.
Use the relationship this way:
- retention settings define the default lifecycle
- the Logs page gives you manual inspection and cleanup tools
## Recommended Workflow
For most teams:
- search or filter by severity first
- open the detail view for the most relevant event
- copy the support export before deleting anything
- keep log retention long enough to cover normal troubleshooting windows
## Tools
URL: https://wpanchorbay.github.io/upsellbay/usage/tools/
Description: Easily migrate, backup, and restore your UpsellBay offers and global settings.
## What The Log Page Documents
This page documents **WooCommerce -> UpsellBay -> Settings -> Logs**.
Even though the admin section is named **Logs**, this documentation page focuses on the single operational log system that UpsellBay uses for diagnostics and support.
## What The Logs Section Is For
The Logs section is a diagnostic workspace for operators, QA reviewers, agencies, and support teams.
Use it when:
- an offer fails to behave as expected
- you need more context for an internal bug report
- support asks for a sanitized event trail
- a license or API event needs deeper inspection
- you want to remove stale diagnostic entries after an issue is resolved
What it is not for:
- shopper-facing notifications
- marketing messages
- everyday campaign management
## What The Logs System Records
Depending on the event, logs may include:
- title
- log type
- status level
- user reference
- created date
- related object references
- description
- request data
- response data
- metadata
The plugin records diagnostic context so issues can be investigated without exposing the full license key in the normal admin interface.
## Working With The Logs Table
The logs view supports:
- search
- status filtering
- sortable columns
- single-item deletion
- bulk deletion
- opening a detailed log view
- copy-to-clipboard export from individual records
Why this matters:
- you can narrow large log lists quickly
- support teams can focus on a specific status or event family
- stores can keep the diagnostics table useful instead of noisy
## Table Columns
### Title
Short human-readable description of the recorded event.
Use it to quickly spot the event you care about before opening full details.
### Type
The event family or category associated with the log entry.
Use it to separate system, API, license, or other operational activity.
### Status
Severity-style badge that helps you judge urgency at a glance.
Typical statuses include informational and warning states as well as higher-severity error states.
Why it matters:
- errors and warnings usually deserve review first
- informational entries help reconstruct what happened before a failure
### User
Shows the recorded user when one is available.
Use it when you need to know whether an event was triggered by a specific admin action rather than background processing.
### Date
Shows when the event was recorded.
Use it to line events up with support reports, changes, imports, or license actions.
### Actions
Each row can expose actions such as:
- `Copy`
- `Details`
- `Delete`
These are the fastest path for inspection, sharing, and cleanup.
## Log Detail View
The detailed view includes:
- title
- date
- type
- status
- IP address and user ID when recorded
- related object references
- description
- request, response, and metadata payloads when available
Why open the detail view:
- to inspect the full event context
- to confirm what request or response data was captured
- to create a support-ready summary from one specific event
## Support Export
The detail screen includes a copy-to-clipboard report so you can hand a support-ready summary to your team without manually reformatting the event details.
Use it when:
- opening a support ticket
- handing a bug to engineering or QA
- documenting a reproducible issue internally
## Deleting Logs
The Logs section supports both single-item deletion and bulk deletion.
When to delete logs:
- after a support case is resolved
- when old noise is making review harder
- when a staging environment should be cleaned up
When not to delete logs yet:
- before an active issue is fully documented
- while support is still waiting on evidence
## How Logs Relate To Data Retention
The **Data** settings section controls **Log retention days**. That setting decides how long log entries stay available before retention cleanup should remove stale records.
Use the relationship this way:
- retention settings define the default lifecycle
- the Logs page gives you manual inspection and cleanup tools
## Recommended Workflow
For most teams:
- search or filter by severity first
- open the detail view for the most relevant event
- copy the support export before deleting anything
- keep log retention long enough to cover normal troubleshooting windows
## Tools
URL: https://wpanchorbay.github.io/upsellbay/usage/tools/
Description: Easily migrate, backup, and restore your UpsellBay offers and global settings.
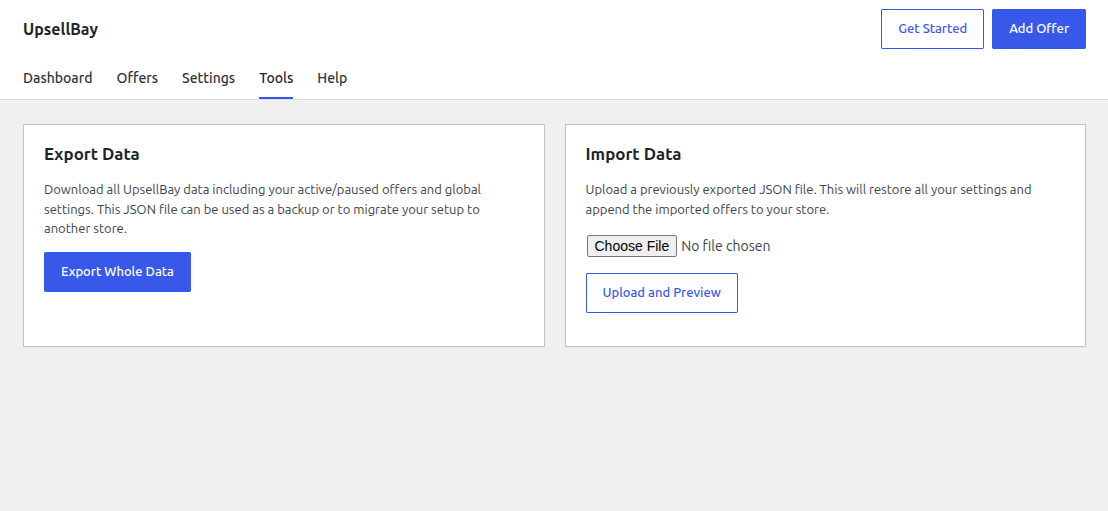 The **Tools** tab in UpsellBay provides a robust data migration system. Whether you are moving from a staging site to production, sharing templates between stores, or simply taking a backup, the Tools page handles it all.
## Export Data
The Export tool generates a complete, structured JSON file of your UpsellBay setup.
**What is exported?**
- All Active and Paused Offers (including their rules, discounts, and placement configurations).
- Global Plugin Settings (including placement toggles, limits, and style tokens).
- Note: Analytics, logs, and sensitive data (like license keys) are *not* exported.
To export, simply click **Export Whole Data**. A `.json` file (e.g., `upsellbay-export-YYYY-MM-DD.json`) will be downloaded to your computer.
## Import Data
The Import tool allows you to safely upload an exported `.json` file and restore your setup. The process uses a **two-step preview** system to ensure you have full control before any data is saved to your store.
### Step 1: Upload and Preview
1. Choose the `.json` file you previously exported.
2. Click **Upload and Preview**.
3. UpsellBay will analyze the file and present a summary of what was found (e.g., Global Settings and the number of Offers).
### Step 2: Import Preferences
On the Preview screen, you can configure exactly how the incoming data should be handled:
- **Import global settings**: Checked by default if settings exist in the file. Uncheck this if you only want to import offers without overwriting your store's current styling and configurations.
- **Append "(Import)" to offer titles**: Check this if you want to easily distinguish the newly imported offers from your existing ones.
- **Duplicates Handling**: If an imported offer has the exact same title as an offer already on your store, you can choose a strategy:
- **Create duplicate offers**: Imports the offer alongside the existing one.
- **Skip importing**: Ignores the incoming offer.
- **Overwrite existing**: Updates the existing offer with the incoming configuration.
Once you are satisfied with your preferences, click **Confirm Import** to apply the changes.
The **Tools** tab in UpsellBay provides a robust data migration system. Whether you are moving from a staging site to production, sharing templates between stores, or simply taking a backup, the Tools page handles it all.
## Export Data
The Export tool generates a complete, structured JSON file of your UpsellBay setup.
**What is exported?**
- All Active and Paused Offers (including their rules, discounts, and placement configurations).
- Global Plugin Settings (including placement toggles, limits, and style tokens).
- Note: Analytics, logs, and sensitive data (like license keys) are *not* exported.
To export, simply click **Export Whole Data**. A `.json` file (e.g., `upsellbay-export-YYYY-MM-DD.json`) will be downloaded to your computer.
## Import Data
The Import tool allows you to safely upload an exported `.json` file and restore your setup. The process uses a **two-step preview** system to ensure you have full control before any data is saved to your store.
### Step 1: Upload and Preview
1. Choose the `.json` file you previously exported.
2. Click **Upload and Preview**.
3. UpsellBay will analyze the file and present a summary of what was found (e.g., Global Settings and the number of Offers).
### Step 2: Import Preferences
On the Preview screen, you can configure exactly how the incoming data should be handled:
- **Import global settings**: Checked by default if settings exist in the file. Uncheck this if you only want to import offers without overwriting your store's current styling and configurations.
- **Append "(Import)" to offer titles**: Check this if you want to easily distinguish the newly imported offers from your existing ones.
- **Duplicates Handling**: If an imported offer has the exact same title as an offer already on your store, you can choose a strategy:
- **Create duplicate offers**: Imports the offer alongside the existing one.
- **Skip importing**: Ignores the incoming offer.
- **Overwrite existing**: Updates the existing offer with the incoming configuration.
Once you are satisfied with your preferences, click **Confirm Import** to apply the changes.