# License Server Documentation
Canonical: https://wpanchorbay.github.io/pointbay/
This file contains the main public documentation content in a machine-readable text format.
## Welcome to PointBay Docs
URL: https://wpanchorbay.github.io/pointbay/
Description: Documentation for PointBay - WooCommerce Loyalty & Rewards Points System.
import { CardGrid } from '@astrojs/starlight/components';
import Card from '../../components/starlight/Card.astro';
import WPAnchorBayFooter from '../../components/WPAnchorBayFooter.astro';
Reward customers with points automatically on their purchases, and optionally for signing up or leaving a product review. You choose the rate and when points are awarded.
Let customers turn points into a discount right at checkout with a slider on both the Block and Classic checkout. You set the point value and minimum to redeem.
Reward your best buyers with membership tiers that earn points faster. Set your own tier names, thresholds, and multipliers. Included in PointBay Pro.
Turn customers into advocates with personal referral links and a first-purchase bonus for the referrer built into the free plugin. PointBay Pro adds an optional welcome bonus for the new customer too.
## Manual Adjustments
URL: https://wpanchorbay.github.io/pointbay/admin/manual-adjustments/
Description: How to manually credit or debit a customer's loyalty points from the admin.
Automatic rules can't cover every situation sometimes you need to reward a customer for something that happened outside the store, or fix a balance that an automated rule got wrong. Manual Adjustments let you credit or debit any customer's points by hand from **WooCommerce → Points History**, and every adjustment is recorded exactly like an automatic one, so you always have a full audit trail.
---
## Walkthrough: Adjust a Customer's Points
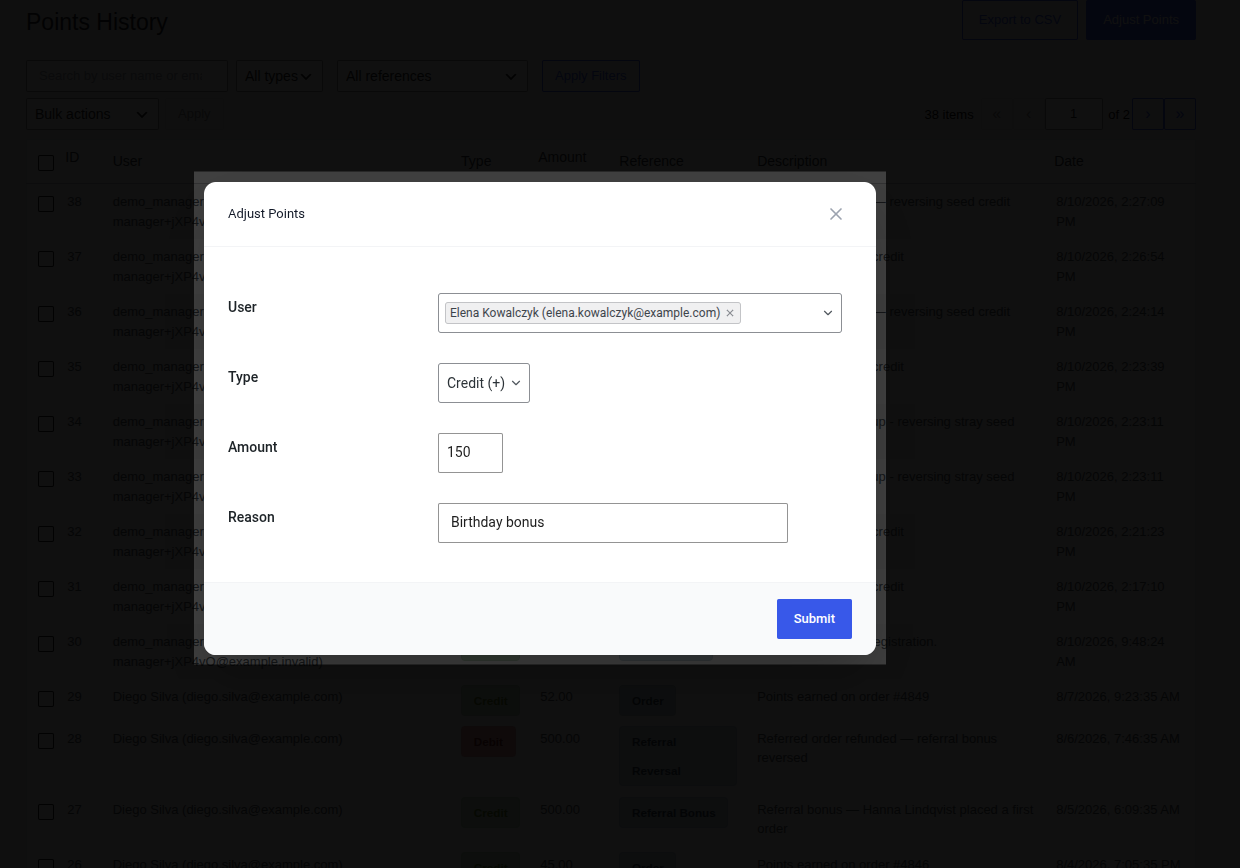
1. Go to **WooCommerce → Points History** and click **Adjust Points** at the top of the page.
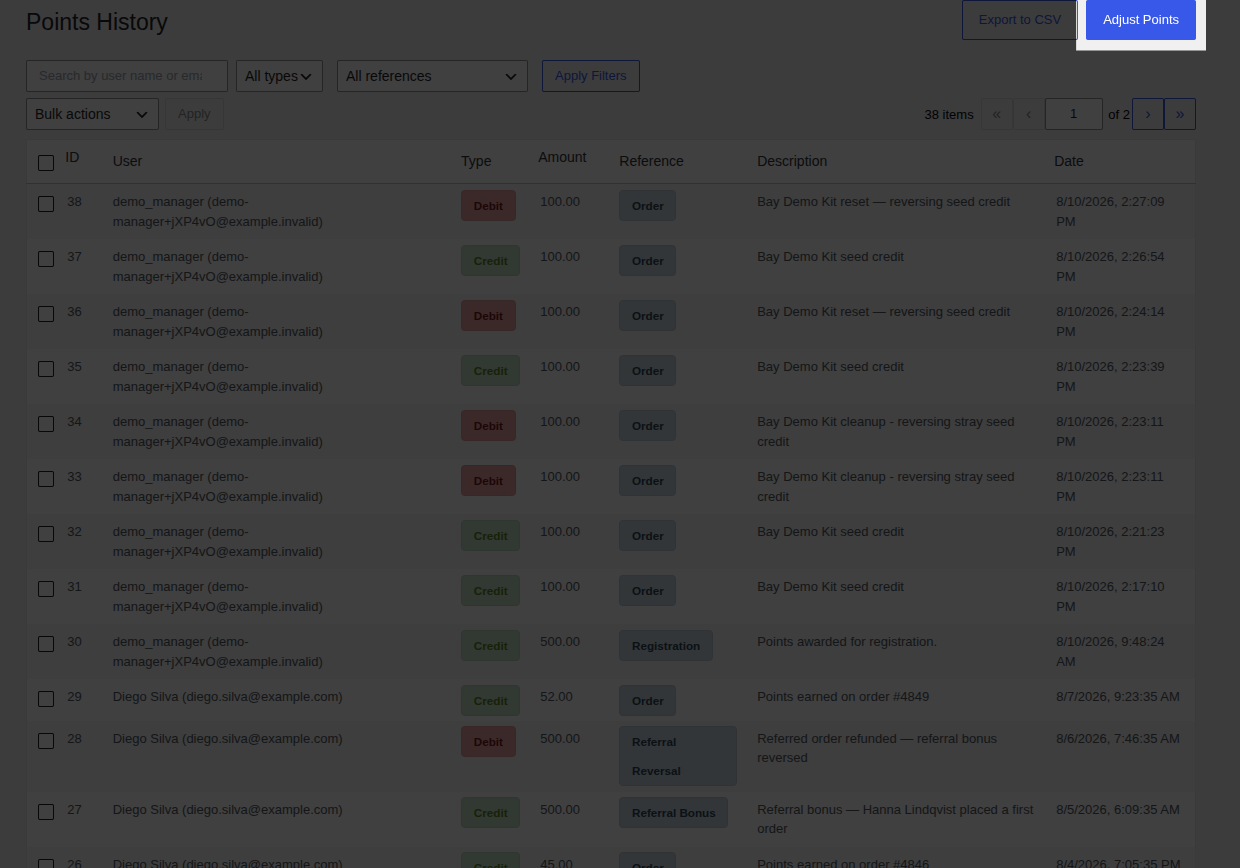
2. In the **Adjust Points** dialog that opens, fill in each field:
- **User** search for the customer by name or email and select them from the dropdown.
- **Type** choose **Credit (+)** to add points or **Debit (-)** to remove them.
- **Amount** the number of points to adjust (at least 1).
- **Reason** why you're making the adjustment. This field is required, and it's visible to the customer on their own dashboard, so write it the way you'd want a customer to read it.
3. Click **Submit**.
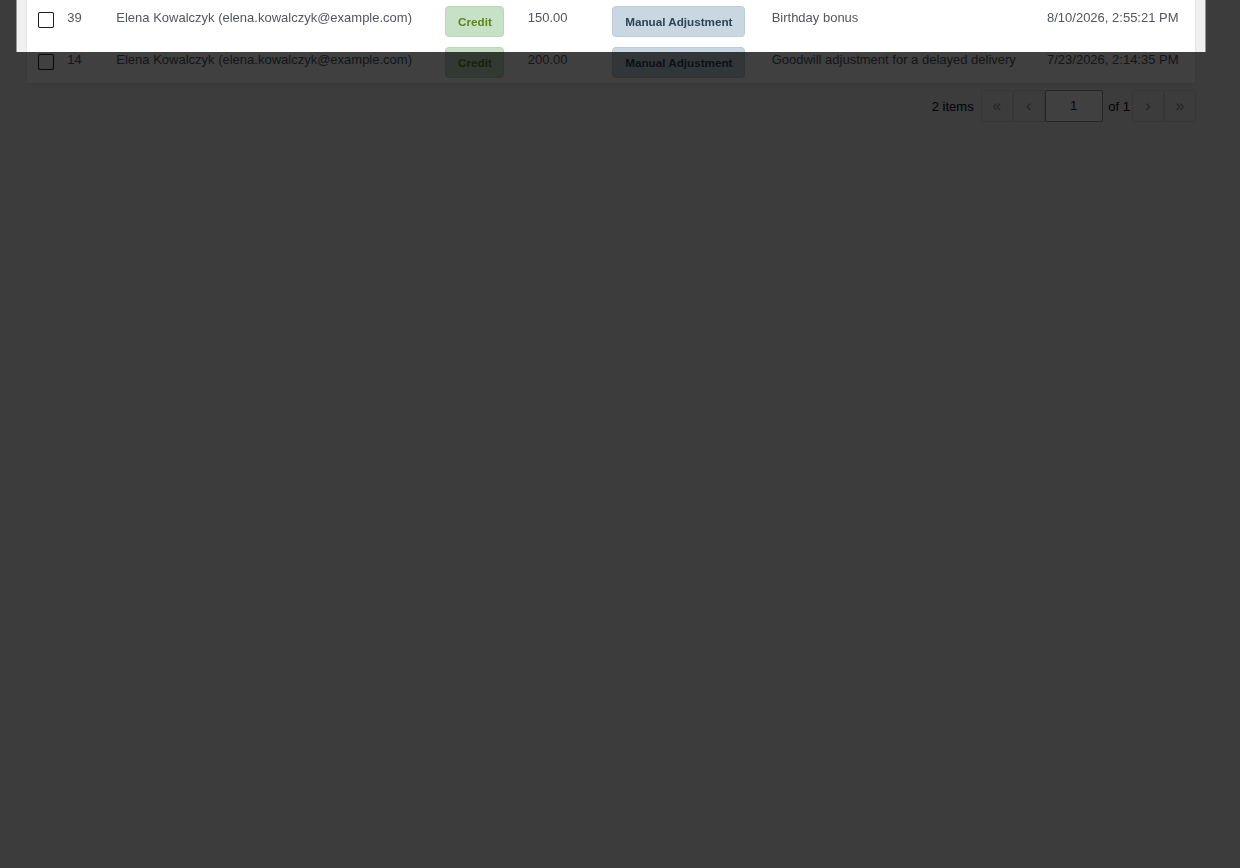
4. **Verify it worked:** the dialog closes and a new row appears at the top of the Points History table with Reference **Manual Adjustment**, showing your entered amount and reason.
---
## Common Uses
- **Goodwill** award points to make up for a shipping delay or a product issue, without waiting on a refund process.
- **Offline campaigns** credit points for activity outside the store, like following a social account or attending an event.
- **Corrections** fix a balance if a customer was mistakenly missed by an automated rule (for example, an order was manually marked Completed outside the normal workflow and points were never triggered).
- **Enforcement** debit points if a customer abused the review or referral programs.
---
## Worked Example
A customer's order shipped a week late. Rather than issue a refund, you decide to credit them 200 goodwill points:
1. Open **Adjust Points**, search for the customer, select **Credit (+)**, enter `200` as the Amount, and write "Goodwill credit for a delayed delivery" as the Reason.
2. Submit. The customer's balance increases by 200 points immediately, and they'll see "Goodwill credit for a delayed delivery" the next time they check their [Customer Dashboard](/pointbay/features/customer-dashboard/).
---
## Audit Trail
Every manual adjustment appears in [Points History](/pointbay/admin/points-history/) with Reference **Manual Adjustment** and the Reason you entered, permanently. Because that reason is also shown to the customer, keep it clear and customer-friendly rather than an internal shorthand note.
---
## Who Can Make Adjustments
Only users who can manage PointBay administrators by default can view Points History and make adjustments. To give other roles (such as shop managers) access, grant them the PointBay management permission with a WordPress user-role plugin.
---
## Troubleshooting
- **Submit does nothing** confirm **Reason** isn't blank; it's a required field and the form won't submit without it.
- **You can't find the customer in the User search** search by their exact registered name or email; the search doesn't match on partial order numbers or usernames.
See [Troubleshooting](/pointbay/resources/troubleshooting/) for more general issues.
## Related
- [Points History](/pointbay/admin/points-history/)
- [Earning Points](/pointbay/features/earning-points/)
## Points History
URL: https://wpanchorbay.github.io/pointbay/admin/points-history/
Description: View, filter, and export every loyalty points transaction in your store.
Points History is your complete, permanent record of points activity every time a customer earns or spends points, for any reason, a row is added here. It's the first place to look whenever a customer asks "why is my balance what it is," and it's also where you export data for accounting. Open it from **WooCommerce → Points History**.
---
## The History Table
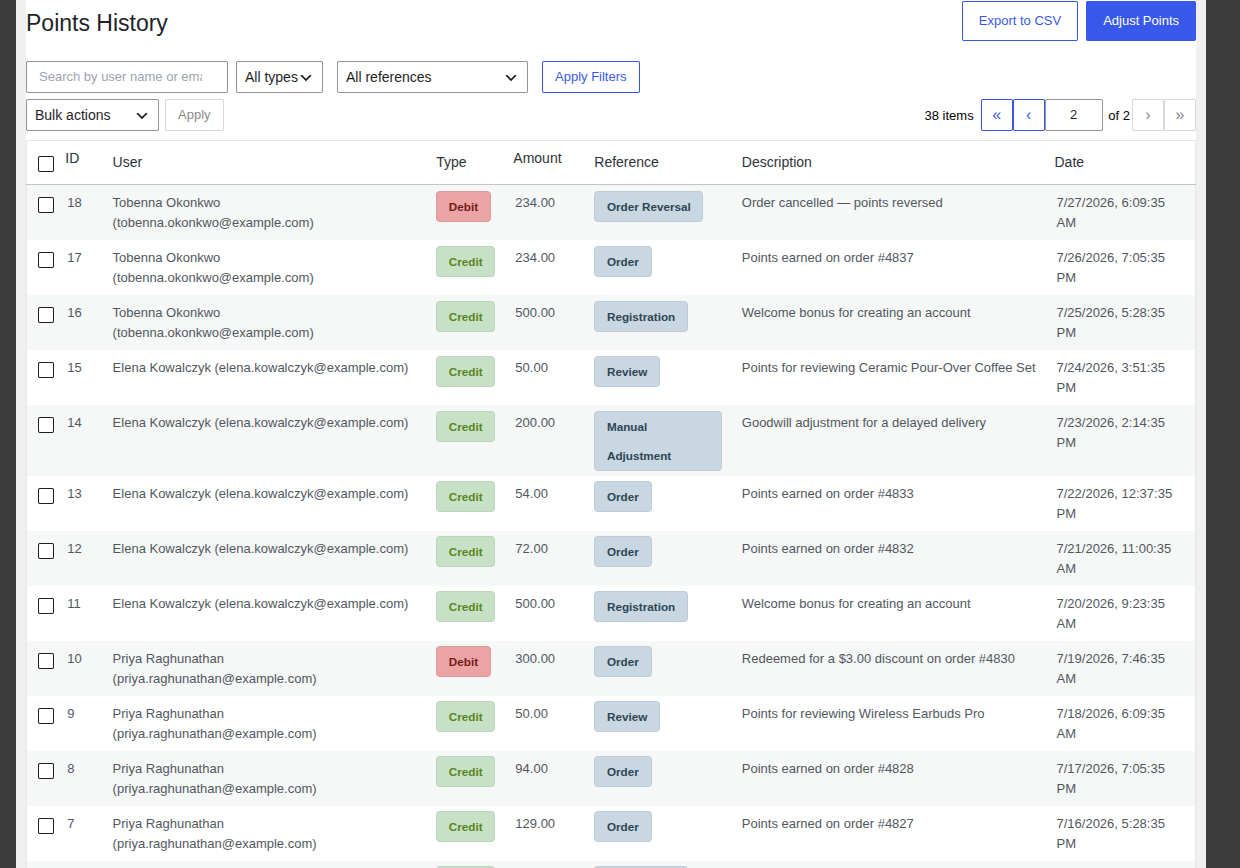
Each row shows:
- **ID** the transaction number.
- **User** the customer's name and email.
- **Type** a **Credit** badge for points added, or a **Debit** badge for points removed.
- **Amount** how many points were added or removed.
- **Reference** what caused it. See the full list of reference types below.
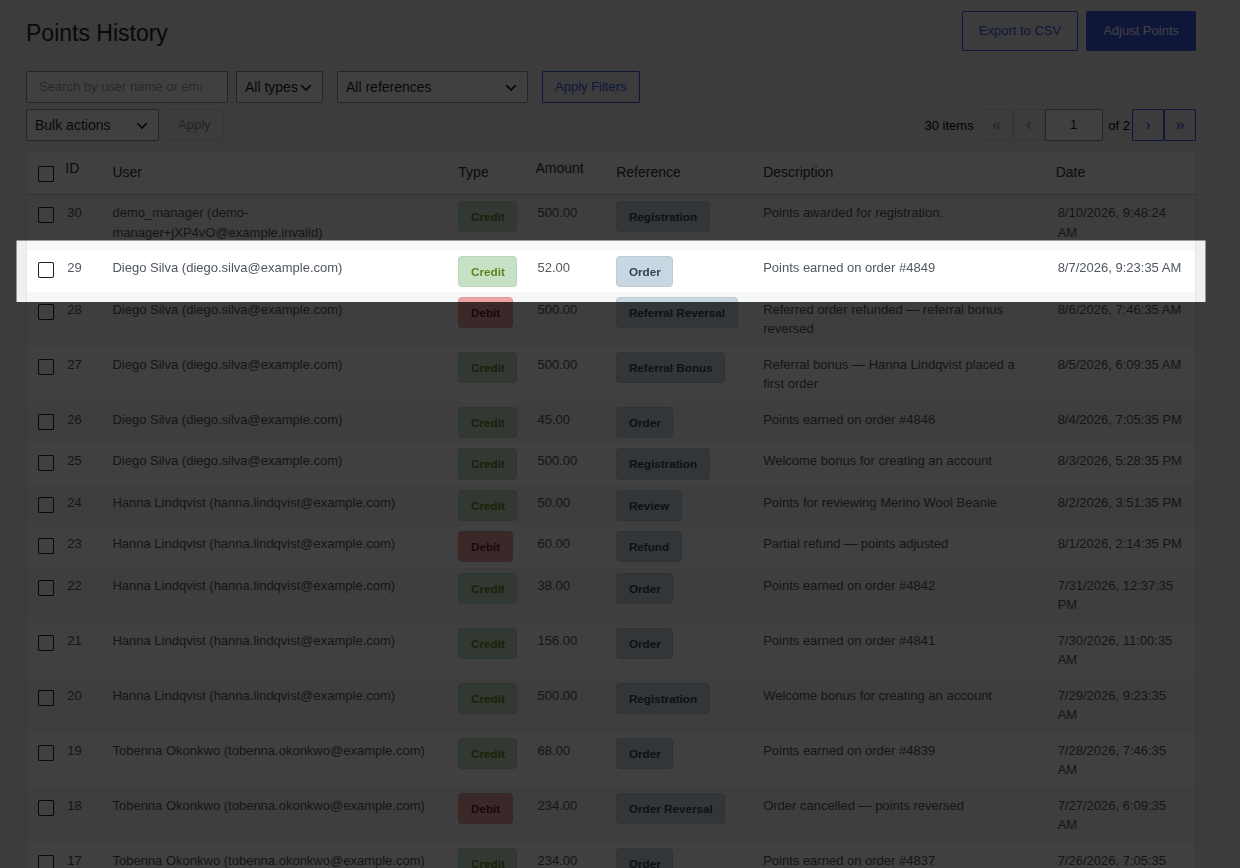
- **Description** a plain-language explanation, such as "Points earned on order #4849."
- **Date** when it happened.
You can sort by **ID**, **Amount**, or **Date** by clicking that column's header.
---
## Common Tasks
### Find a specific customer's history
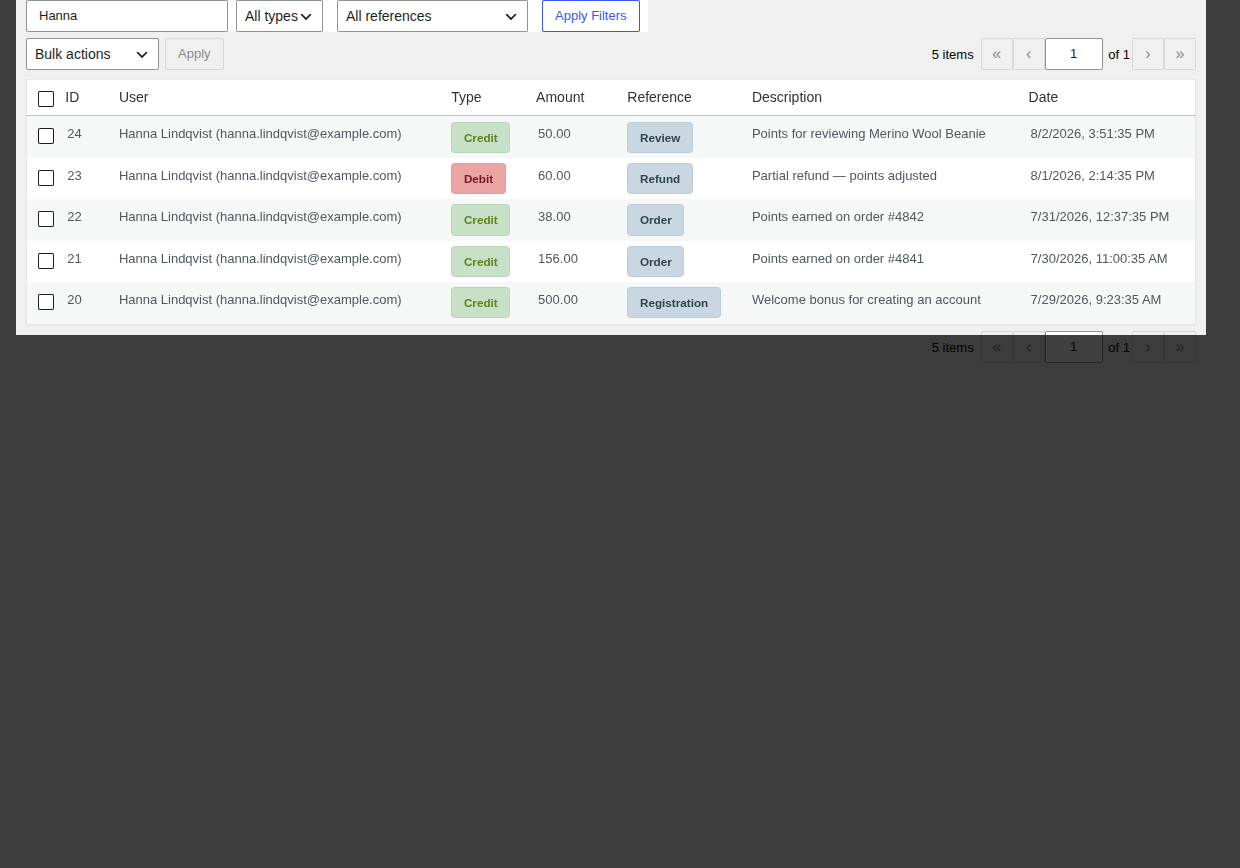
1. Type their name or email into the **Search Ledger** box.
2. Press Enter or click **Apply Filters**.
### Narrow down by transaction type or cause
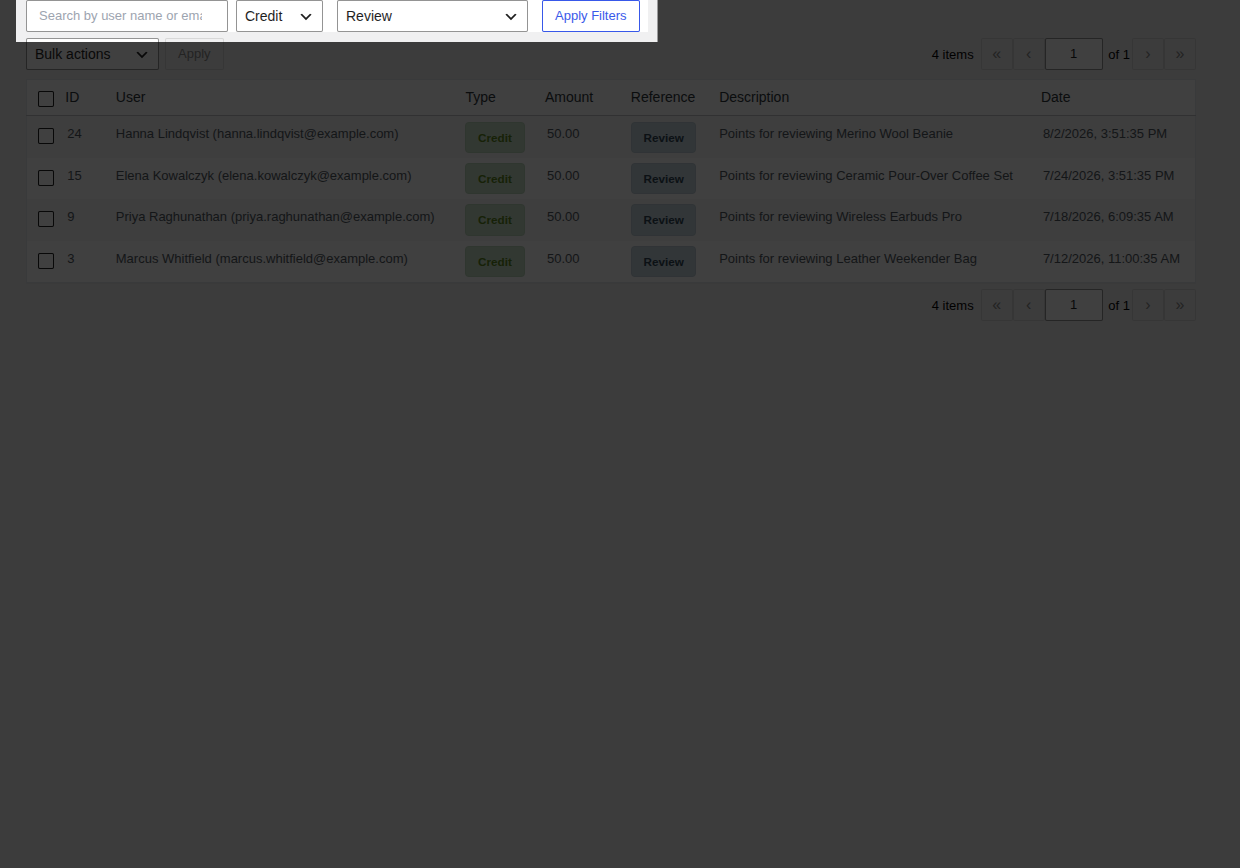
1. Use **Filter by type** to show only **Credit** or only **Debit** rows.
2. Use **Filter by reference** to show only one kind of event the available reference types are **Order**, **Order Reversal**, **Refund**, **Review**, **Referral Bonus**, **Referral Reversal**, **Manual Adjustment**, **Referral Signup Bonus**, and **Referral Signup Reversal**.
3. Click **Apply Filters**.
### Export records for accounting
- Click **Export to CSV** (top of the page) to download the full, currently filtered list, or
- Select specific rows with their checkboxes, choose **Export Selected** from **Bulk actions**, then click **Apply** to export just those rows.
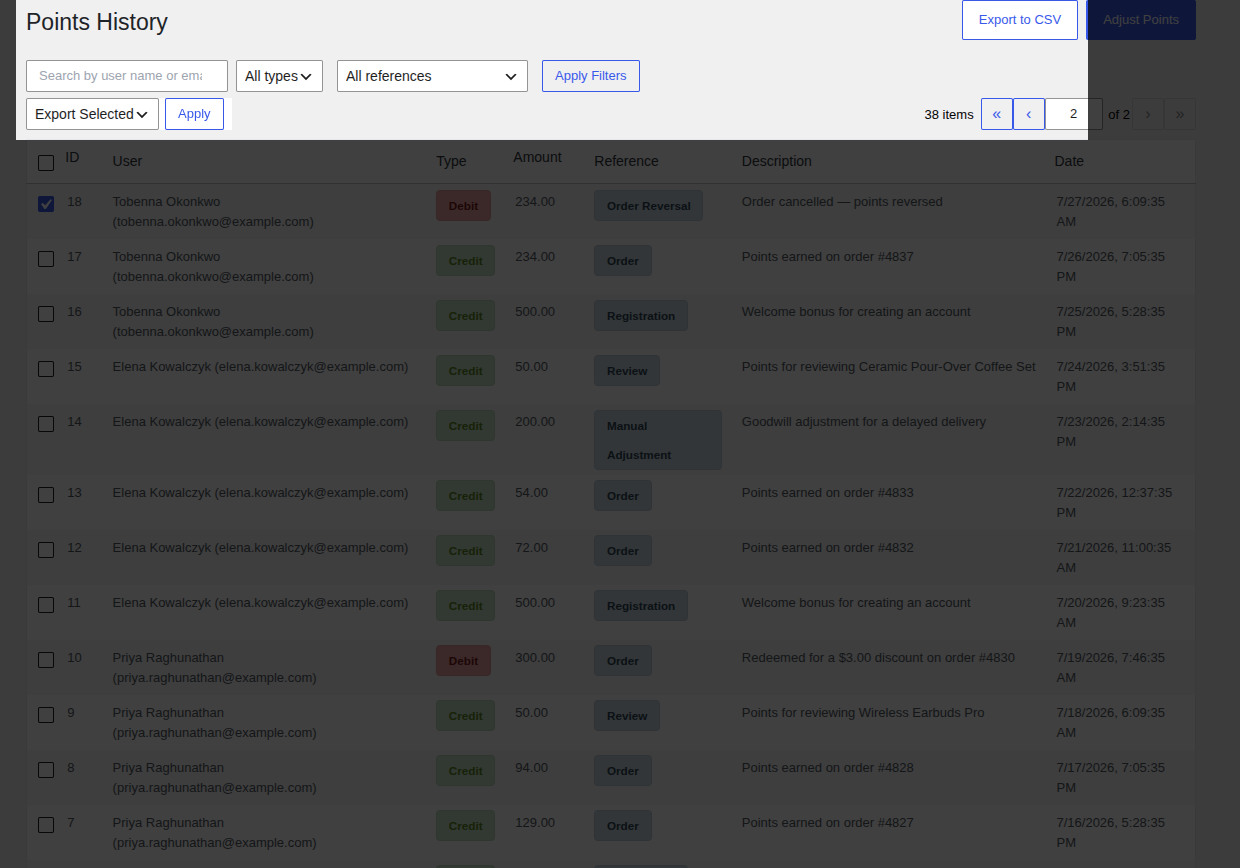
The file downloads as `pointbay_ledger_export_.csv` and includes the user, type, amount, reference, description, and date for every exported row.
### Credit or debit a customer by hand
Click **Adjust Points** (top of the page) to open the manual adjustment form. See the full walkthrough on [Manual Adjustments](/pointbay/admin/manual-adjustments/).
---
## Reading a Real Ledger
A typical customer's history tells a story if you read it top to bottom. For example, a sequence like:
| Type | Amount | Reference | Description |
|---|---|---|---|
| Credit | 500.00 | Registration | Welcome bonus for creating an account |
| Credit | 38.00 | Order | Points earned on order #4842 |
| Debit | 60.00 | Refund | Partial refund points adjusted |
| Credit | 500.00 | Referral Bonus | Referral bonus a friend placed a first order |
| Debit | 500.00 | Referral Reversal | Referred order refunded referral bonus reversed |
...shows a customer who signed up, made a purchase that was later partly refunded, successfully referred a friend, and then had that referral reversed when the friend's order fell through all without you needing to reconstruct any of it from order records.
---
## Troubleshooting
- **A customer's balance doesn't match what they expect** filter their history by their name/email and read every row chronologically; the balance is always the sum of every credit and debit shown.
- **Export downloads an empty or unexpected file** the CSV export respects whatever filters are currently applied; clear filters first if you meant to export everything.
See [Troubleshooting](/pointbay/resources/troubleshooting/) for more general issues.
## Related
- [Manual Adjustments](/pointbay/admin/manual-adjustments/)
- [Earning Points](/pointbay/features/earning-points/)
- [Redeeming Points](/pointbay/features/redeeming-points/)
## Settings Reference
URL: https://wpanchorbay.github.io/pointbay/admin/settings-reference/
Description: Every PointBay setting what it's called on screen, its default value, and exactly what it controls.
This page is the complete reference for every PointBay setting. Every other page in this documentation links back here instead of re-explaining a setting from scratch, so if you only remember one page for "what does this field do," make it this one.
All settings live in one place: **WooCommerce → Settings → Loyalty Points**. In the WordPress admin sidebar this same screen is also reachable from the shorter **Loyalty** menu link under WooCommerce. The free plugin shows four fully working groups on this screen **Earning Points**, **Redemption Rules**, **Referrals**, and **Display & System** plus a locked preview of the two Pro-only groups, **VIP Tiers** and **License Settings**, each marked with a **PRO** badge and a lock icon you can hover for a link to buy Pro. With **PointBay Pro** active, those two groups unlock, and one extra field (**New Customer Bonus Points**) is added inside the existing Referrals group. There is no separate "save" per group one **Save changes** button at the bottom of the page saves everything on the screen at once.
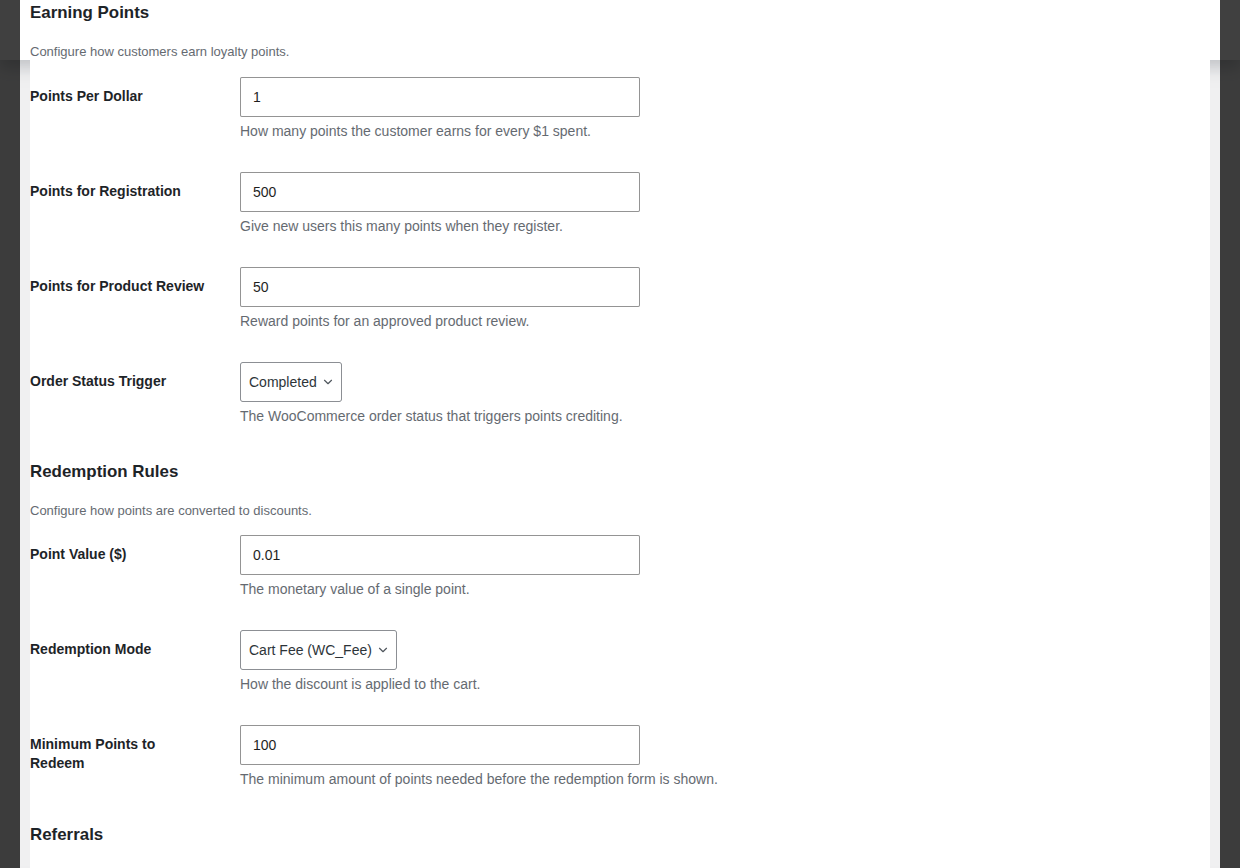
The screenshot above is what free-plugin users see for these two groups every field is visible but disabled, so you know exactly what Pro adds before buying.
---
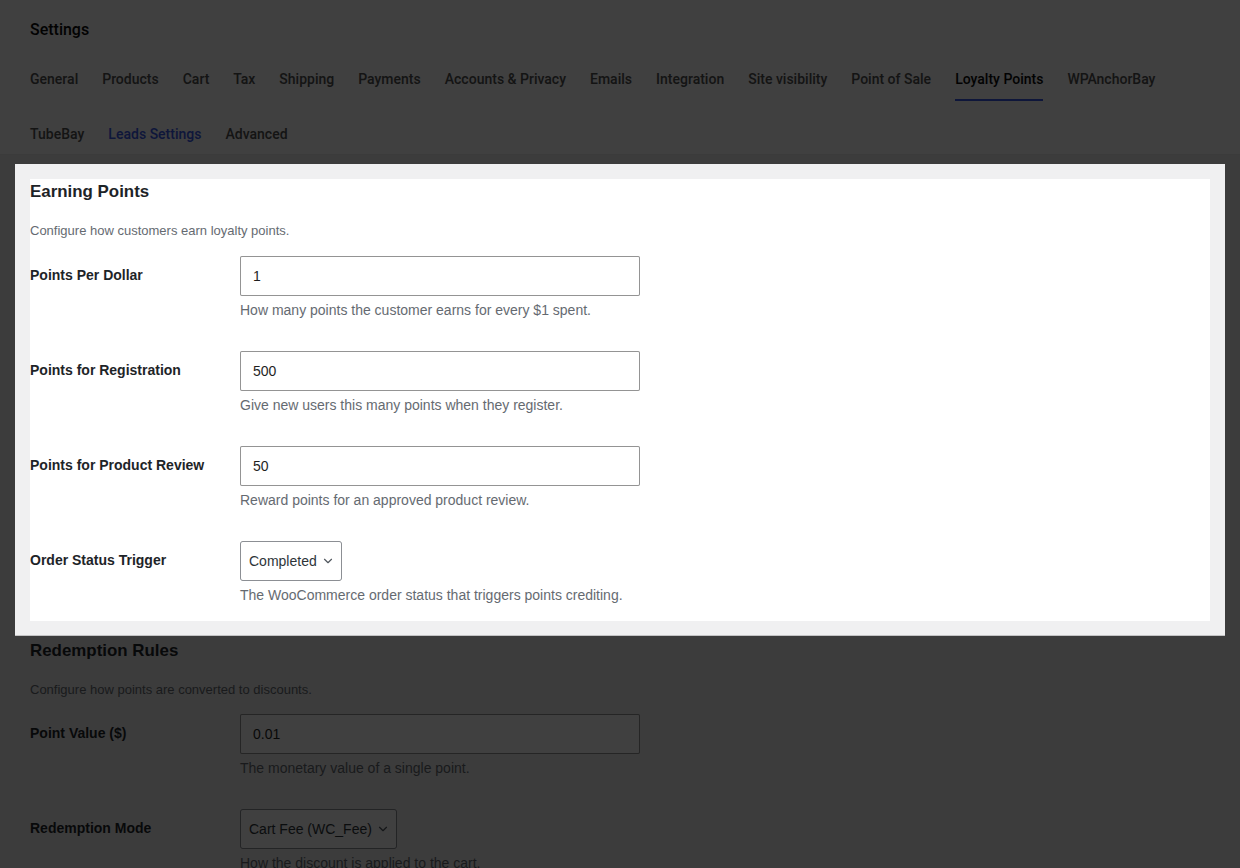
## Earning Points
Controls how customers accumulate points in the first place.
| Setting | Default | What it does | Valid values |
|---|---|---|---|
| **Points Per Dollar** | `1` | How many points a customer earns for every $1 of order subtotal (tax and shipping excluded). | Any whole number, `0` or higher. |
| **Points for Registration** | `0` | A one-time bonus credited when someone creates an account. | Any whole number. `0` turns the bonus off. |
| **Points for Product Review** | `0` | Points credited when a customer's product review is approved by a store manager. | Any whole number. `0` turns the bonus off. |
| **Order Status Trigger** | `Completed` | The WooCommerce order status that has to be reached before purchase points are credited. | `Completed`, `Processing`, or `On Hold`. |
See the full walkthrough on [Earning Points](/pointbay/features/earning-points/).
---
## Redemption Rules
Controls how accumulated points convert into a discount at checkout.
| Setting | Default | What it does | Valid values |
|---|---|---|---|
| **Point Value ($)** | `0.01` | The monetary value of a single point when redeemed. At the default, 100 points = $1.00 off. | Any decimal amount greater than `0`. |
| **Redemption Mode** | `Cart Fee` | How the discount is applied to the cart. On screen this option is still labeled **Cart Fee (WC_Fee)** the `(WC_Fee)` is an internal WooCommerce class name, not something you need to know; think of it simply as "Cart Fee." | **Cart Fee** (a negative line-item fee is added to the cart) or **Virtual Coupon** (a single-use coupon is generated and applied automatically). |
| **Minimum Points to Redeem** | `100` | The balance a customer must have before the redemption option appears at checkout. | Any whole number, `0` or higher. |
See the full walkthrough on [Redeeming Points](/pointbay/features/redeeming-points/).
---
## Referrals
:::note
This group is part of the **free plugin**. The first two settings work without Pro; **New Customer Bonus Points** only appears with **PointBay Pro** active.
:::
Controls the refer-a-friend program, split across two settings owned by the free plugin and one owned by Pro.
| Setting | Default | What it does | Valid values |
|---|---|---|---|
| **Enable Referrals** | `Off` | Turns the referral program on. When off, no referral links or bonuses are generated anywhere on the site. | On / Off. |
| **Referral Bonus Points** | `1000` | Points credited to the *referrer* after the friend they referred completes their first order. | Any whole number, `0` or higher. |
| **New Customer Bonus Points** | `100` | A separate welcome bonus credited to the *new customer* (the person who was referred) after their own first purchase. This is a distinct field from Referral Bonus Points the referrer and the new customer are each rewarded independently. | Any whole number. `0` skips this bonus, so only the referrer is rewarded. |
See the full walkthrough on [Referral Program](/pointbay/features/referral-program/).
---
## Display & System
Options that don't change how points are earned or redeemed, but affect what shoppers see and how the plugin behaves behind the scenes.
| Setting | Default | What it does | Valid values |
|---|---|---|---|
| **Guest Notice** | `On` | Shows a login/register prompt at checkout to logged-out shoppers, reminding them they could be earning points. | On / Off. |
| **Delete Data on Uninstall** | `Off` | When on, deleting the plugin permanently erases every customer's points ledger, balances, and referral data. This cannot be undone. | On / Off. |
| **Debug Logging** | `Off` | Writes diagnostic messages about PointBay's own activity into WooCommerce's logging system, viewable under **WooCommerce → Status → Logs** (filed under the `pointbay` source). Leave this off unless you're troubleshooting an issue with support. | On / Off. |
:::caution
Turning on **Delete Data on Uninstall** is irreversible once the plugin is actually deleted every point balance and history record is gone for good. Leave this off unless you're certain you want a clean slate.
:::
---
## VIP Tiers
:::note[Pro feature]
Functional only with **PointBay Pro** active. Without Pro, this group still appears but as a locked preview every field is visible and disabled, with a **PRO** badge and a link to buy Pro.
:::
Groups customers into membership tiers that multiply how many points they earn, based on how many points they've accumulated in the last 12 months.
| Setting | Default | What it does | Valid values |
|---|---|---|---|
| **Enable VIP Tiers** | `Off` | Turns on tier grouping and daily automatic tier recalculation. | On / Off. |
| **Tiers Configuration** | Bronze (0 pts, 1.0×) · Silver (500 pts, 1.2×) · Gold (2000 pts, 1.5×) | The tier editor itself, right here in this settings group (it appears once **Enable VIP Tiers** is on). Each row defines a **Tier Name**, a **Points Threshold** (annual points needed to reach that tier), and a **Multiplier** applied to every point a member of that tier earns. The separate **Referrals & Tiers** admin page is a read-only summary of this configuration, not an editor. | Any number of tiers; threshold and multiplier accept any positive number. |
:::note
The tier editor rows currently show placeholder text inside each field rather than a persistent column header above the whole table. If you're not sure which field is which while editing, the order is always **Name → Threshold → Multiplier**, left to right.
:::
See the full walkthrough on [VIP Tiers](/pointbay/features/vip-tiers/).
---
## License Settings
:::note[Pro feature]
Functional only with **PointBay Pro** active. Without Pro, this group still appears but as a locked preview every field is visible and disabled, with a **PRO** badge and a link to buy Pro.
:::
| Setting | What it does |
|---|---|
| **License Status** | Read-only. Shows **Active**, **Inactive**, or **Invalid** depending on whether your license key has been accepted. |
| **License Key** | Your WPAnchorBay license key, in the format `WPAB-XXXXX-XXXXX-XXXXX`. Paste it in and click **Activate** to unlock automatic updates and support. Once active, the field is locked and a **Deactivate** button appears in its place, letting you free up the license (for example, to move it to a different site). |
See [Installation & Licensing](/pointbay/getting-started/installation/) for the full activation walkthrough.
## Customer Dashboard
URL: https://wpanchorbay.github.io/pointbay/features/customer-dashboard/
Description: The customer-facing loyalty rewards page in the WooCommerce My Account area.
Every other page in this section covers something you configure this one covers what your customers actually see. PointBay adds a rewards page to each customer's WooCommerce **My Account** area, called **My Rewards**, where they can check their points balance and history, plus their personal referral link if referrals are enabled and, with PointBay Pro, their VIP tier progress too. It's worth reviewing yourself so you know exactly what your customers experience.
---
## How It Works
When PointBay is active, a **My Rewards** link appears in the customer's My Account menu, right after Orders, at a URL like `https://yourstore.com/my-account/my-rewards/`. The page is only visible to logged-in customers; a guest who follows the link is sent to the usual WooCommerce login screen first. The page itself is headed **My Loyalty Rewards**.
---
## Walkthrough: See What a Customer Sees
1. Log in as (or impersonate) a customer account, and go to **My Account → My Rewards**.
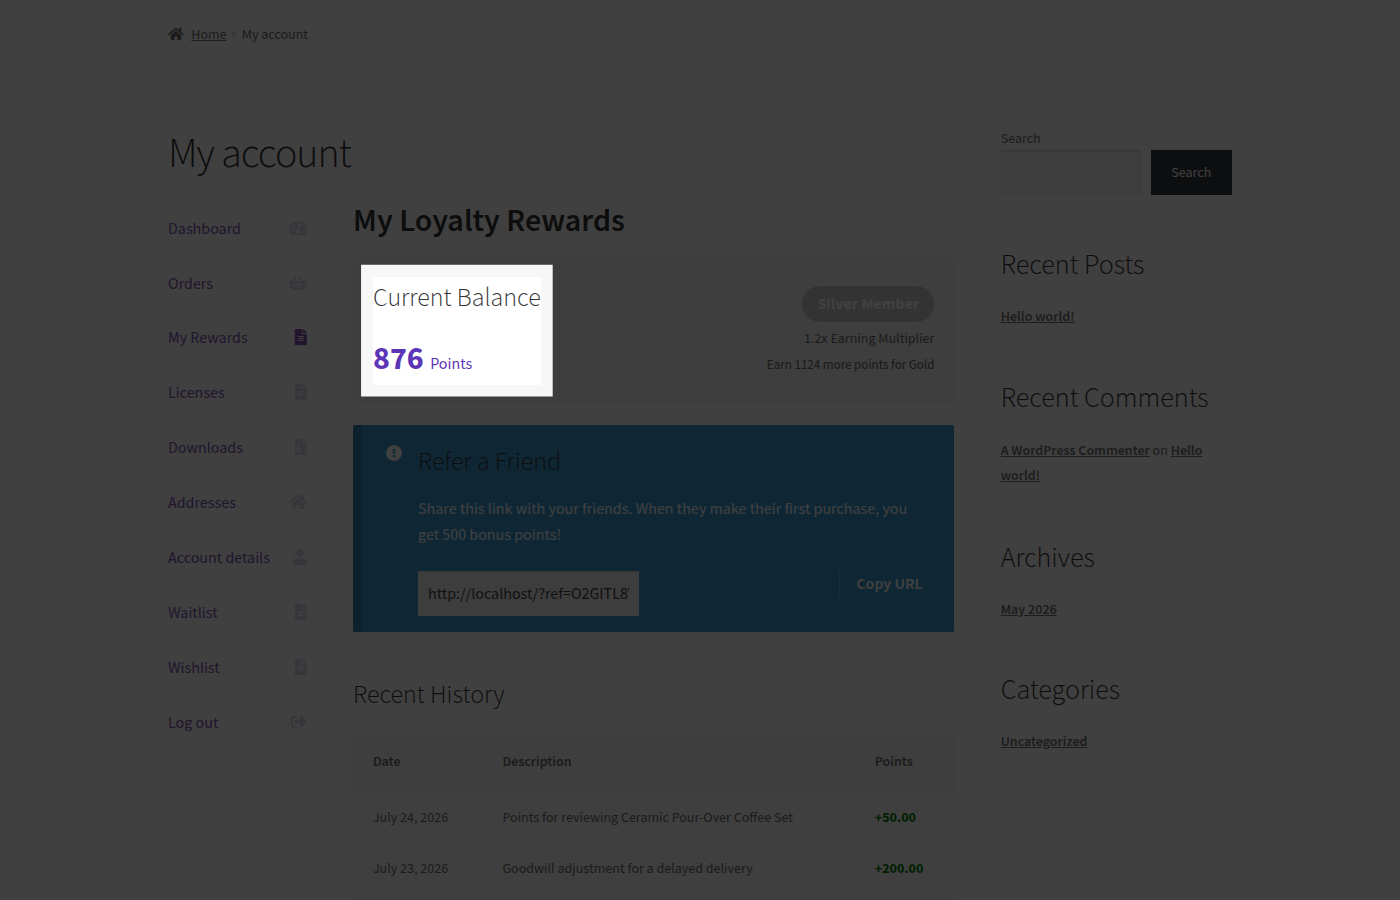
2. Check the **Current Balance** card it shows the customer's available points as a large number.
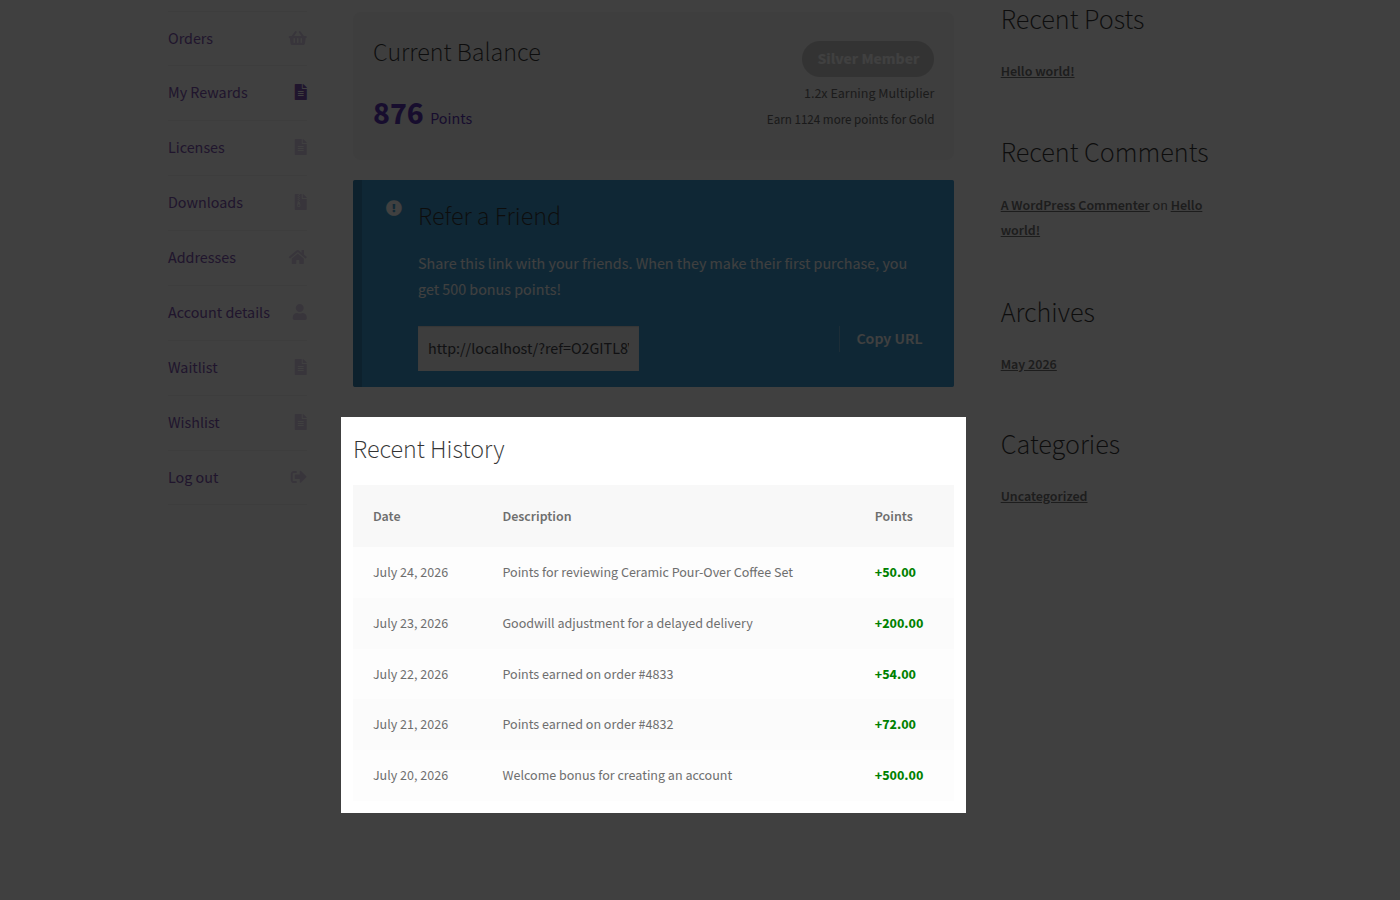
3. Check the **Recent History** table it lists the customer's latest points activity with **Date**, **Description**, and **Points** columns; credits are shown with a `+` and debits with a `-`. A brand-new customer with no activity yet simply sees "No activity yet."
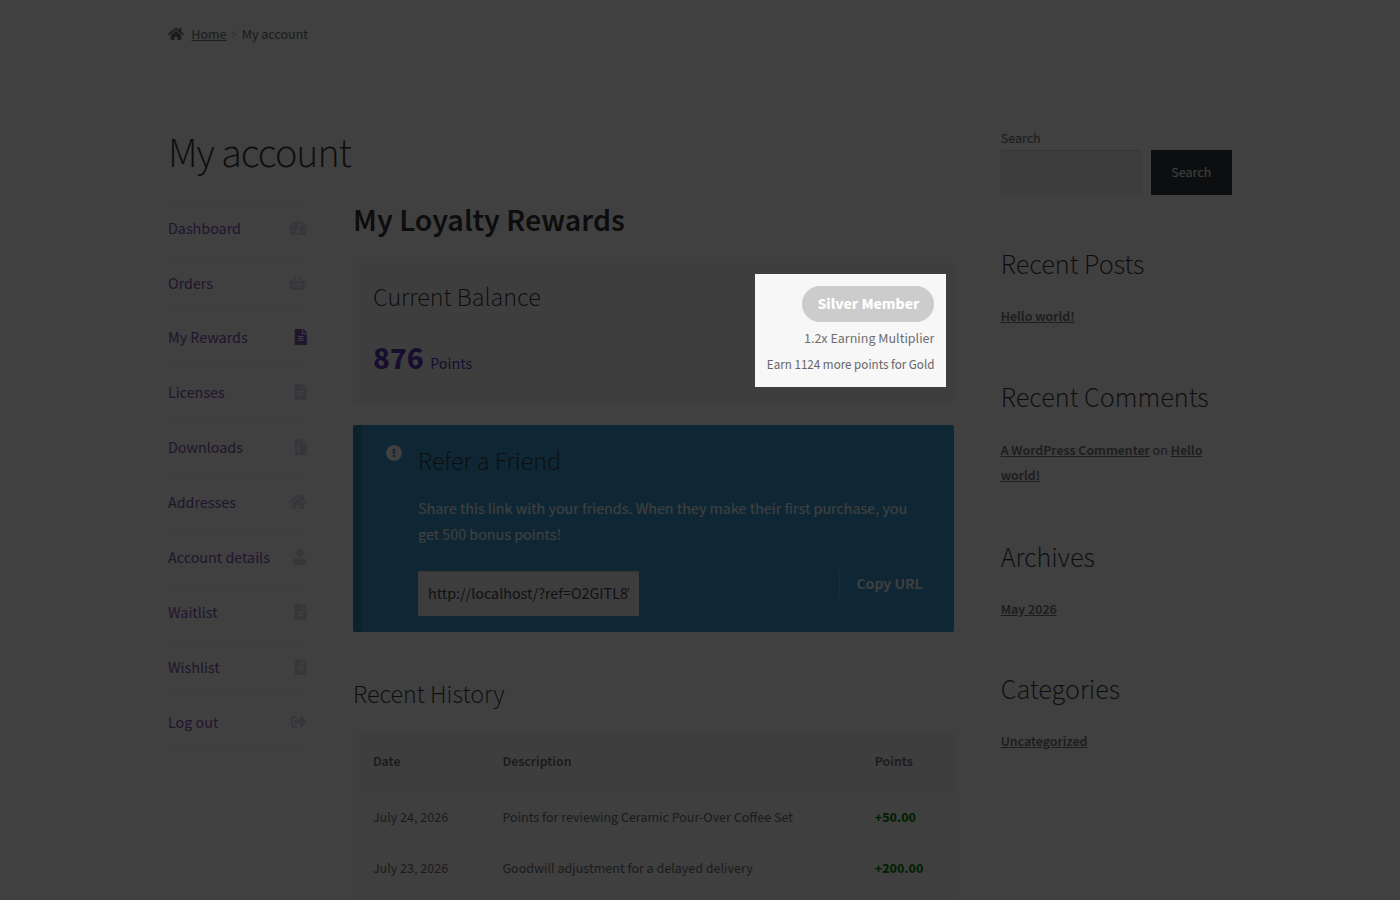
4. If [VIP Tiers](/pointbay/features/vip-tiers/) are enabled, check the tier badge and multiplier shown below the balance.
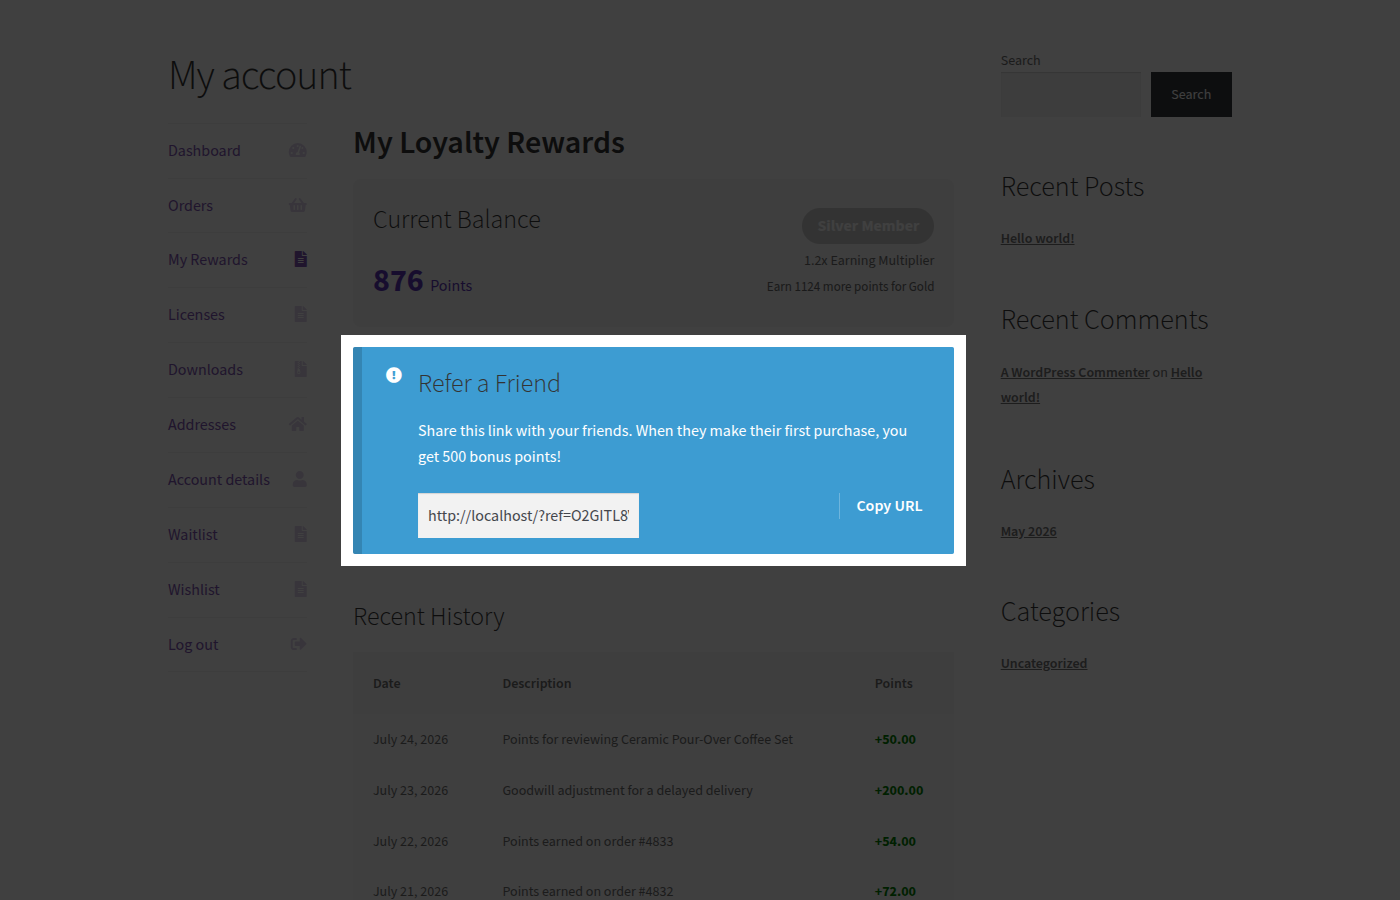
5. If the [Referral Program](/pointbay/features/referral-program/) is enabled, check the **Refer a Friend** card and confirm the referral link and bonus amount are correct.
---
## What Customers See
### Current balance
A **Current Balance** card shows the customer's available points as a large figure, always up to date with the latest earn, redeem, or reversal.
### Recent history
A **Recent History** table lists the customer's latest points activity. New customers with no activity yet see "No activity yet." instead of an empty table.
### VIP tier progress
:::note[Pro feature]
The tier badge appears only when [VIP Tiers](/pointbay/features/vip-tiers/) are enabled in **PointBay Pro**.
:::
Members see a tier badge (for example, "Gold Member"), their earning multiplier (for example, "1.5× Earning Multiplier"), and a hint showing how many more points they need to reach the next tier.
### Refer-a-friend card
:::note
The **Refer a Friend** card is a free-plugin feature it appears whenever **Enable Referrals** is turned on in [Referral Program](/pointbay/features/referral-program/) settings, with or without Pro active.
:::
Customers get their personal referral link in a read-only field with a one-click **Copy URL** button to share with friends. The card's message updates itself to match your settings it reads "Share this link with your friends. When they make their first purchase, you get **N** bonus points!" where N is whatever you've set **Referral Bonus Points** to, so you never need to edit this copy by hand.
---
## Edge Cases & Interactions
- A customer with a negative balance (from a reversal exceeding their remaining points see [Earning Points](/pointbay/features/earning-points/#refunds-and-reversals)) sees that negative number plainly on their Current Balance card, not zero.
- The dashboard reflects manual adjustments made from [Manual Adjustments](/pointbay/admin/manual-adjustments/) the same way it reflects automatic activity customers can't tell the difference from their side.
---
## Troubleshooting
- **A customer says they don't see "My Rewards" in their account menu** confirm they're logged in; logged-out visitors don't see any account menu items at all, loyalty-related or otherwise.
- **The tier badge or referral card is missing** confirm the corresponding setting (**Enable VIP Tiers**, Pro-only, or **Enable Referrals**, free) is actually turned on; both cards hide themselves entirely when their feature is off rather than showing an empty state.
See [Troubleshooting](/pointbay/resources/troubleshooting/) for more general issues.
## Related
- [Earning Points](/pointbay/features/earning-points/)
- [VIP Tiers](/pointbay/features/vip-tiers/)
- [Referral Program](/pointbay/features/referral-program/)
## Earning Points
URL: https://wpanchorbay.github.io/pointbay/features/earning-points/
Description: How customers earn loyalty points for purchases, registrations, and reviews, and how refunds reverse them.
Points are the currency your customers build up every time they shop with you, and Earning Points is where you decide how they get them. Customers earn points automatically on purchases, and you can optionally reward them for creating an account or leaving a product review both are quick, low-cost ways to nudge shoppers toward the actions that grow your store.
Everything on this page is configured at **WooCommerce → Settings → Loyalty Points**, under the **Earning Points** group. Full field-by-field details are in the [Settings Reference](/pointbay/admin/settings-reference/#earning-points).
---
## How It Works
There are three independent ways a customer can earn points, and you can enable any combination of them:
- **Purchases** points are awarded automatically once an order reaches the status you choose (Completed by default).
- **Account registration** an optional one-time bonus the moment someone creates an account, even before their first order.
- **Product reviews** an optional bonus when a logged-in customer's product review is approved by you.
You can also credit points to any customer by hand at any time see [Manual Adjustments](/pointbay/admin/manual-adjustments/) for goodwill credits, corrections, or promotions that don't fit the automatic rules.
---
## Walkthrough: Turn On All Three Earning Methods
1. Go to **WooCommerce → Settings → Loyalty Points** (or click **Loyalty** in the WooCommerce admin menu).
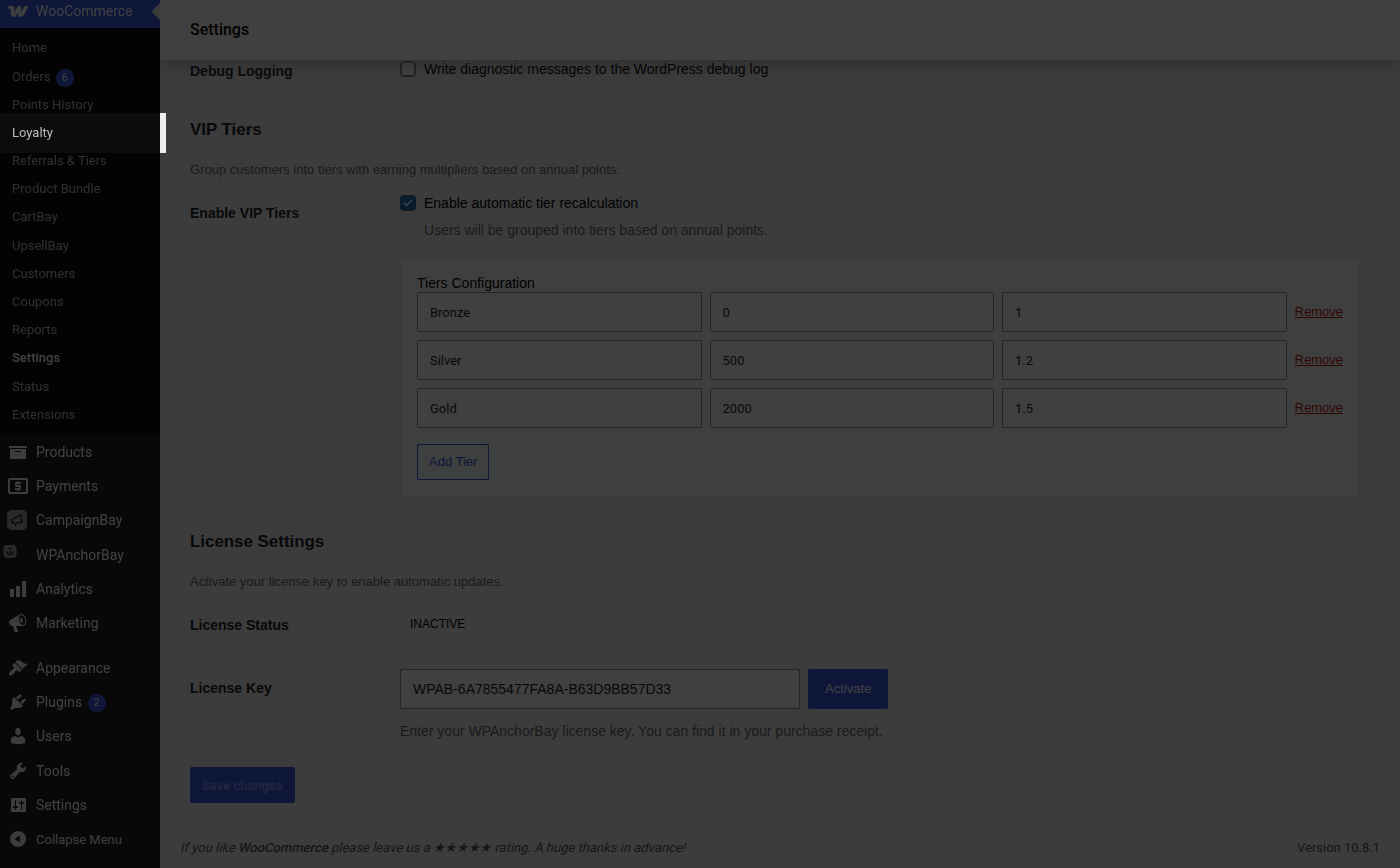
2. In the **Earning Points** group, confirm **Points Per Dollar** is set to the rate you want (the default is `1`).
3. Set **Points for Registration** to a nonzero value, for example `50`, to reward new accounts.
4. Set **Points for Product Review** to a nonzero value, for example `20`, to reward approved reviews.
5. Check **Order Status Trigger** matches how your store actually processes orders if you ship immediately on payment, `Processing` credits points sooner than the default `Completed`.
6. Click **Save changes** at the bottom of the page.
7. **Verify it worked:** place a small test order (or create a test account) and check [Points History](/pointbay/admin/points-history/) for a new **Order** or **Registration** entry crediting the expected amount.
---
## How Points Are Calculated
Purchase points are based on the **item subtotal** after any coupon discounts, but before shipping and tax. Shipping charges, tax, and any points redeemed on the same order are never counted toward how many points that order earns.
**Example 1 a standard purchase.** A customer buys $110 worth of products (already net of a $10 coupon), plus $15 shipping and $10 tax, for an order total of $135. At the default rate of 1 point per $1 of subtotal, they earn **110 points** the shipping and tax are ignored entirely, even though the customer paid $135.
**Example 2 a refund claws points back.** That same customer later returns half their order and receives a $55 refund. Because the refund is 50% of the $110 subtotal that earned points, PointBay automatically removes 50% of the 110 points earned **55 points** are debited from their balance. See [Refunds and Reversals](#refunds-and-reversals) below for how this plays out when points have already been spent.
:::note[Pro feature]
With **PointBay Pro**, [VIP Tiers](/pointbay/features/vip-tiers/) can multiply every purchase this way. A member in the default Gold tier (1.5× multiplier) would earn 165 points on the same $110 order instead of 110.
:::
---
## The Checkout Earn Notice
At the cart and checkout, PointBay shows shoppers how many points their order will earn a small, motivating reminder that completing the purchase pays them back. Logged-in shoppers see a message telling them how many points this order will earn; logged-out shoppers see a prompt to log in or register instead, so they don't complete a purchase without realizing they missed out on points.
You can turn the guest-facing prompt on or off with the **Guest Notice** option under **Display & System** see [Settings Reference](/pointbay/admin/settings-reference/#display--system).
---
## Refunds and Reversals
If an order that earned points is later refunded, PointBay automatically takes those points back so customers can't keep points for merchandise they returned:
- **Full refund** every point earned on the order is removed.
- **Partial refund** points are removed in proportion to the amount refunded (see Example 2 above).
If the customer has already spent the points being clawed back, their balance can go **negative**. They aren't blocked from shopping they simply need to earn their way back to a positive balance before they can redeem points again. Points are also reversed automatically if a cash-on-delivery order is cancelled or fails before payment completes.
Every credit and every reversal is recorded as its own line in [Points History](/pointbay/admin/points-history/), so you can always see exactly why a customer's balance changed.
---
## Troubleshooting
- **Points weren't awarded on a completed order** check that **Order Status Trigger** matches the status the order actually reached. If your store's workflow ends at "Processing" rather than "Completed," orders will never trigger points unless the trigger is set to match.
- **Review bonus wasn't given** only a customer's *first* approved review of a given product counts, and reviews from logged-out guests never qualify.
- **Registration bonus wasn't given** confirm **Points for Registration** isn't still `0`, which is the default (off) state.
- **A refunded order's points didn't reverse** reversals are triggered by WooCommerce's own refund process; a manual balance edit outside WooCommerce (e.g. directly in the database) won't trigger one. Use [Manual Adjustments](/pointbay/admin/manual-adjustments/) to correct balances by hand instead.
See [Troubleshooting](/pointbay/resources/troubleshooting/) for more general issues.
## Related
- [Redeeming Points](/pointbay/features/redeeming-points/)
- [VIP Tiers](/pointbay/features/vip-tiers/)
- [Manual Adjustments](/pointbay/admin/manual-adjustments/)
- [Settings Reference](/pointbay/admin/settings-reference/)
## Redeeming Points
URL: https://wpanchorbay.github.io/pointbay/features/redeeming-points/
Description: How customers turn loyalty points into a discount at checkout, and the settings that control it.
Earning points only pays off if customers can actually spend them redemption is where their balance turns into real money off their next order. PointBay works with both the modern WooCommerce **Block** checkout and the **Classic** checkout, and the discount updates the order total in place as soon as it's applied.
Everything on this page is configured at **WooCommerce → Settings → Loyalty Points**, under the **Redemption Rules** group. Full field-by-field details are in the [Settings Reference](/pointbay/admin/settings-reference/#redemption-rules).
---
## How It Works
1. **The redeem panel appears.** A logged-in customer whose balance meets your minimum sees a **Redeem Loyalty Points** panel at checkout.
2. **They choose an amount.** Using the slider or number field, the customer picks how many points to apply and sees a live discount preview update as they move it.
3. **They apply it.** Clicking **Apply Discount** updates the order total immediately. A confirmation shows how many points were redeemed and the discount given, with an option to **Remove** them and start over.
4. **The order is placed.** When the order goes through, the points are deducted from the customer's balance and recorded as a debit in [Points History](/pointbay/admin/points-history/).
Points can never be spent twice even if a customer opens several tabs and tries to check out at once, PointBay ensures the same points are only ever used on one order.
---
## Walkthrough: Set a Redemption Rate and Test It
1. Go to **WooCommerce → Settings → Loyalty Points**, in the **Redemption Rules** group.
2. Set **Point Value ($)** to what one point should be worth the default is `$0.01`.
3. Set **Minimum Points to Redeem** to the smallest balance a customer should be allowed to cash in, for example `100`.
4. Leave **Redemption Mode** on **Cart Fee** unless you have a reason to switch it (see below).
5. Click **Save changes**.
6. **Verify it worked:** log in as a test customer who has at least the minimum balance, go to checkout, and confirm the **Redeem Loyalty Points** panel appears and correctly discounts the order total.
---
## Worked Examples
**Example 1 a simple redemption.** At the default $0.01 per point and a 100-point minimum, a customer with 350 points redeems all of them: 350 × $0.01 = a **$3.50 discount** on their order.
**Example 2 the discount can't exceed the order.** A customer with 5,000 points tries to redeem all of them ($50.00 worth) on a $30 order. PointBay caps the discount at the order total, so the discount applied is **$30.00**, not $50.00 the customer's remaining points stay in their balance for next time rather than being wasted.
---
## Redemption Mode: Cart Fee vs. Virtual Coupon
Both modes give the customer the exact same discount amount the difference is purely how it's applied under the hood:
- **Cart Fee** (default) applies the discount as a negative line-item fee on the cart. This is the simplest option and works correctly for the vast majority of stores. On the settings screen this option is labeled **Cart Fee (WC_Fee)** the `(WC_Fee)` part is an internal WooCommerce class name you can ignore.
- **Virtual Coupon** applies the discount as an automatically generated, single-use coupon instead. Choose this if you use an automated tax service (such as TaxJar or Avalara) and notice incorrect tax totals when points are redeemed, since coupon-based discounts are handled natively by WooCommerce's own tax calculation.
:::tip
If redeeming points ever produces incorrect tax totals at checkout, switch **Redemption Mode** from Cart Fee to Virtual Coupon and re-test. See [Troubleshooting](/pointbay/resources/troubleshooting/) for more.
:::
---
## Classic vs. Block Checkout
The redeem experience is identical on both checkout types a **Redeem Loyalty Points** panel with a slider and an **Apply Discount** button so there's nothing extra to configure for either one. Only logged-in customers who meet the minimum-points threshold see the panel at all; guests and customers below the minimum see no redemption UI.
---
## Troubleshooting
- **The redeem panel doesn't appear** confirm the customer is logged in and their balance meets **Minimum Points to Redeem**. Guests never see the panel regardless of balance.
- **The discount looks right but taxes are wrong** switch **Redemption Mode** to **Virtual Coupon**; see above.
- **A customer says they redeemed points but their order shows no discount** check [Points History](/pointbay/admin/points-history/) for a matching debit; if none exists, the redemption likely wasn't completed (e.g. the order was abandoned before payment).
See [Troubleshooting](/pointbay/resources/troubleshooting/) for more general issues.
## Related
- [Earning Points](/pointbay/features/earning-points/)
- [Points History](/pointbay/admin/points-history/)
- [Settings Reference](/pointbay/admin/settings-reference/)
## Referral Program
URL: https://wpanchorbay.github.io/pointbay/features/referral-program/
Description: Reward customers for referring friends to your store with the built-in refer-a-friend program.
:::note
The core Referral Program referral links, the referrer's bonus, and the Refer a Friend card on the customer dashboard is **built into the free plugin**. **PointBay Pro** adds one thing on top: an optional welcome bonus paid to the *new* customer who was referred.
:::
The Referral Program turns your existing customers into advocates for your store. Each customer gets a personal referral link to share; when a friend uses it to sign up and place their first order, the referring customer earns bonus points and you can optionally reward the new customer too, giving both sides a reason to make the introduction happen.
The **Enable Referrals** toggle and the referrer's bonus amount live at **WooCommerce → Settings → Loyalty Points**, under the **Referrals** group (this group is shared with the free plugin, which owns the referrer-side settings). Full field details are in the [Settings Reference](/pointbay/admin/settings-reference/#referrals).
---
## How It Works
1. **Share** a logged-in customer copies their referral link from the **Refer a Friend** card on their [Customer Dashboard](/pointbay/features/customer-dashboard/).
2. **Visit** a friend clicks the link and arrives at your store. PointBay remembers the referral for 30 days, even if the friend doesn't buy immediately.
3. **Register** the friend creates an account.
4. **Purchase** the friend completes their first order.
5. **Reward** the referring customer receives their **Referral Bonus Points**, and the new customer receives their own **New Customer Bonus Points** welcome bonus, if you've set one above `0`.
Rewards are paid out **once per referred customer**, on their first completed order only later orders from the same friend don't earn the referrer any more points.
---
## Walkthrough: Turn On Referrals
1. Go to **WooCommerce → Settings → Loyalty Points**, in the **Referrals** group.
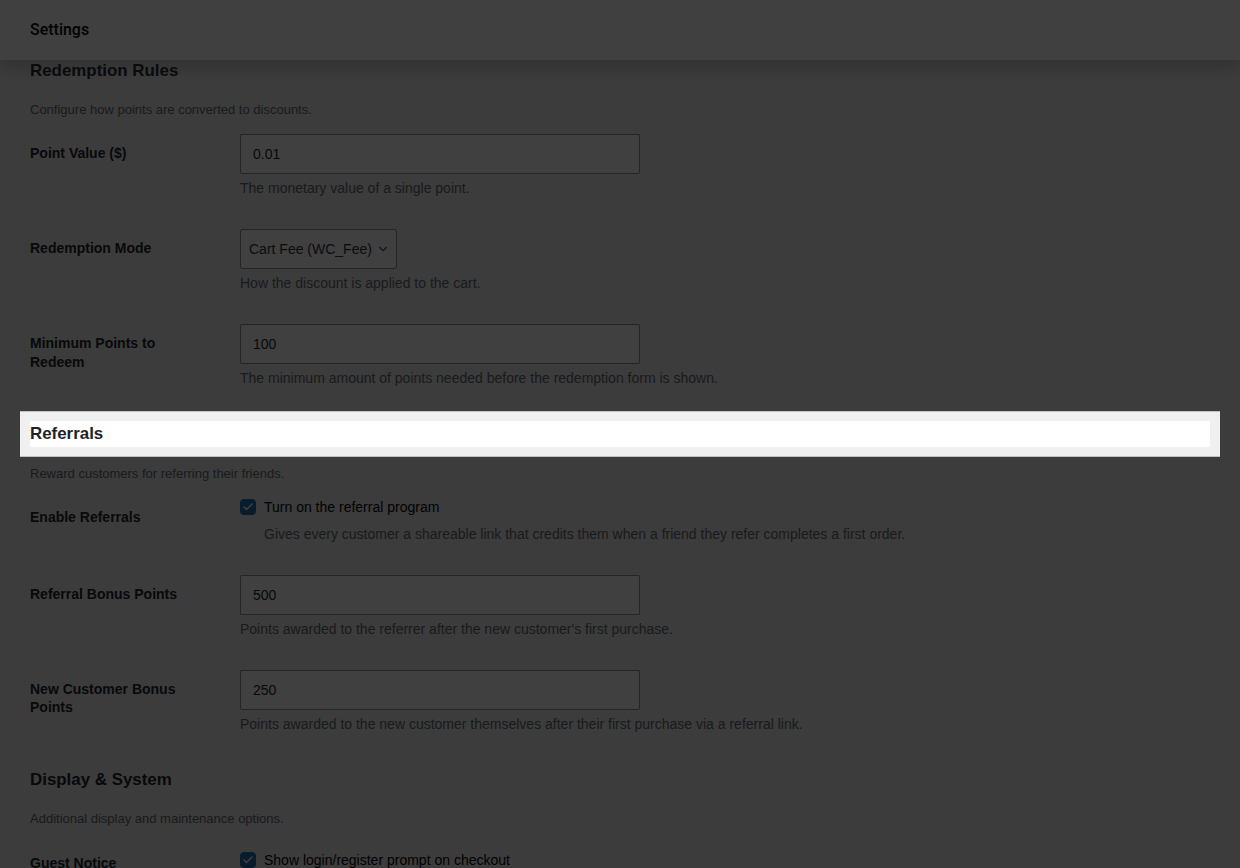
2. Turn on **Enable Referrals**.
3. Set **Referral Bonus Points** to what you want the referrer to earn (the default is `1000`).
4. With **PointBay Pro** active, also set **New Customer Bonus Points** to what the new customer should earn as a welcome bonus (the default is `100`) or leave it at `0` to reward only the referrer. This field doesn't appear at all without Pro.
5. Click **Save changes**.
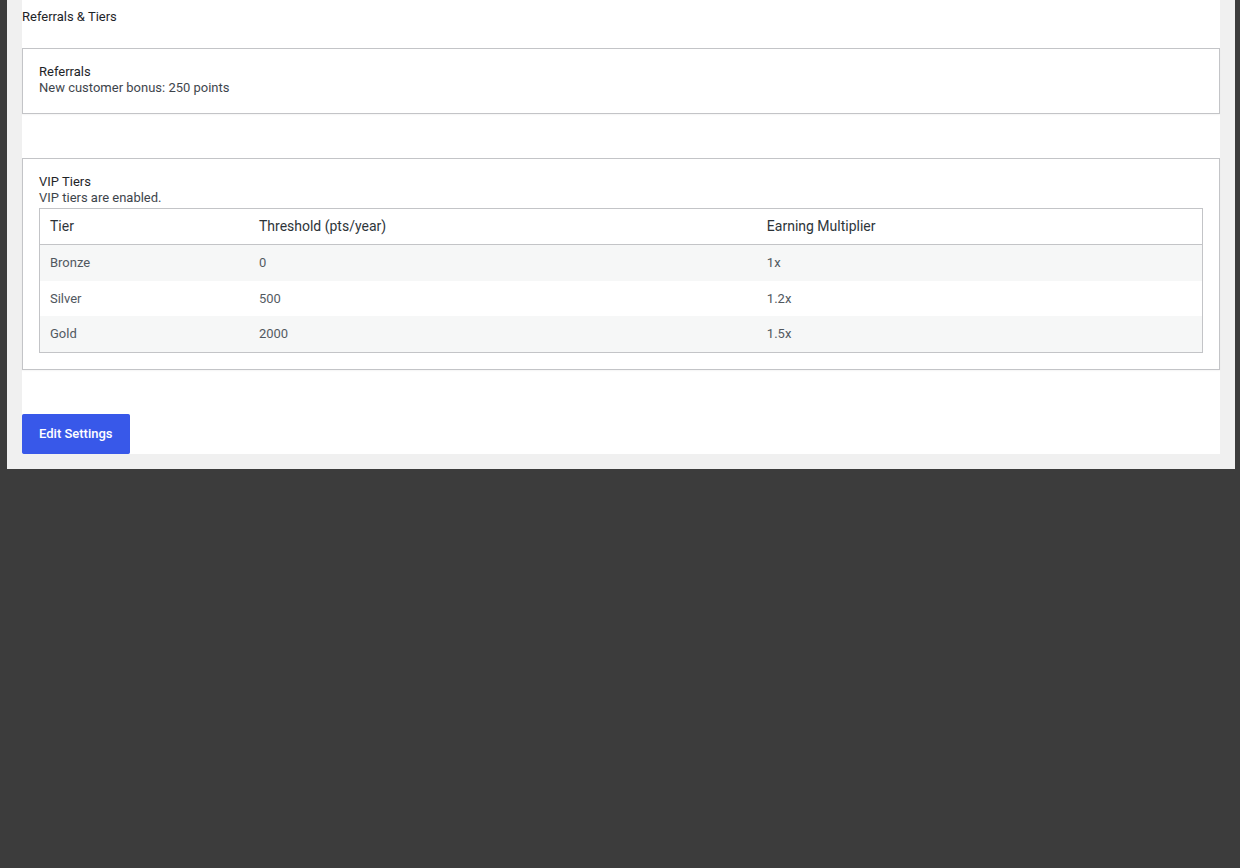
6. **Verify it worked:** with Pro active, go to **WooCommerce → Referrals & Tiers** and confirm the page reflects your configured new-customer bonus amount.
---
## Worked Examples
**Example 1 a successful referral, defaults.** Priya shares her referral link. Her friend Marcus clicks it, registers, and places his first order two weeks later. PointBay credits Priya **1,000 points** (Referral Bonus Points) and Marcus **100 points** (New Customer Bonus Points) both the moment Marcus's order is completed.
**Example 2 a referred order is refunded.** If Marcus's qualifying order is fully refunded before or after the bonuses were paid, PointBay automatically reverses **both** bonuses: Priya's 1,000 points and Marcus's 100 points are debited back out, each recorded as its own reversal entry in Points History.
---
## Reward Rules
- **One reward per friend.** A referrer is rewarded only on a referred friend's *first* completed order never on that friend's later purchases.
- **No self-referrals.** A customer can't earn a bonus by using their own referral link.
- **Reversals.** If the qualifying first order is later cancelled, fails, or is fully refunded, both the referrer's bonus and the new customer's welcome bonus are automatically taken back. **Partial** refunds, unlike with regular purchase points, don't affect the referral reward it's all-or-nothing based on whether the order is still a completed, non-refunded order.
All referral rewards and reversals appear in [Points History](/pointbay/admin/points-history/), labeled **Referral Bonus** / **Referral Reversal** for the referrer's side and **Referral Signup Bonus** / **Referral Signup Reversal** for the new customer's welcome bonus.
---
## Overview Page
With Pro active, **WooCommerce → Referrals & Tiers** gives you a read-only summary of your referral and tier setup at a glance including the current new-customer bonus amount and whether VIP Tiers are enabled with an **Edit Settings** link that takes you back to the settings screen to make changes.
---
## Troubleshooting
- **A referral link didn't credit anyone** confirm the friend actually completed checkout, not just visited; no order means no reward. Also confirm the 30-day tracking window hadn't already expired.
- **The referrer wasn't rewarded but the friend definitely bought something** check whether this was that friend's first order ever, since only a first order qualifies.
- **Both bonuses vanished after a refund** this is expected: a full refund on the qualifying order reverses both sides of the referral reward.
See [Troubleshooting](/pointbay/resources/troubleshooting/) for more general issues.
## Related
- [Customer Dashboard](/pointbay/features/customer-dashboard/)
- [VIP Tiers](/pointbay/features/vip-tiers/)
- [Points History](/pointbay/admin/points-history/)
- [Settings Reference](/pointbay/admin/settings-reference/)
## VIP Tiers
URL: https://wpanchorbay.github.io/pointbay/features/vip-tiers/
Description: Reward your most loyal customers with membership tiers that earn points faster.
:::note[Pro feature]
VIP Tiers are part of **PointBay Pro**. You'll need the Pro add-on active to configure tiers and give members a faster earning rate.
:::
VIP Tiers let you group customers into membership levels for example Bronze, Silver, and Gold and reward your most loyal shoppers with an **earning multiplier** that makes every purchase they make earn points faster. It's a way to give your best customers a visible reason to keep coming back instead of shopping elsewhere. Customers move up (and, if they go quiet, back down) automatically, with no manual work on your part.
The **Enable VIP Tiers** toggle and the tier editor both live at **WooCommerce → Settings → Loyalty Points**, under the **VIP Tiers** group turning the toggle on reveals the editor right there on the same page. The separate **Referrals & Tiers** admin page only shows a read-only summary of your configured tiers, with a link back to this settings screen to make changes. Full field details are in the [Settings Reference](/pointbay/admin/settings-reference/#vip-tiers).
---
## How It Works
- **Qualifying for a tier.** A customer's tier is based on the points they've **earned in the last 365 days** a rolling window, not their current spendable balance. This means members need to stay active to keep their status: points earned more than a year ago stop counting toward their tier, even if they haven't spent them.
- **Earning faster.** When a member makes a purchase, their tier's multiplier is applied on top of the normal Points Per Dollar rate.
- **Automatic updates.** A customer is promoted the moment they cross a threshold. Every customer's tier is also re-checked automatically once a day, so members who drop below a threshold because their older points aged out of the 365-day window are moved down to the correct tier without you having to intervene.
---
## Walkthrough: Turn On Tiers and Set Your Thresholds
1. Go to **WooCommerce → Settings → Loyalty Points**, in the **VIP Tiers** group.
2. Turn on **Enable VIP Tiers** the tier editor appears directly below the toggle, pre-filled with three starter tiers.
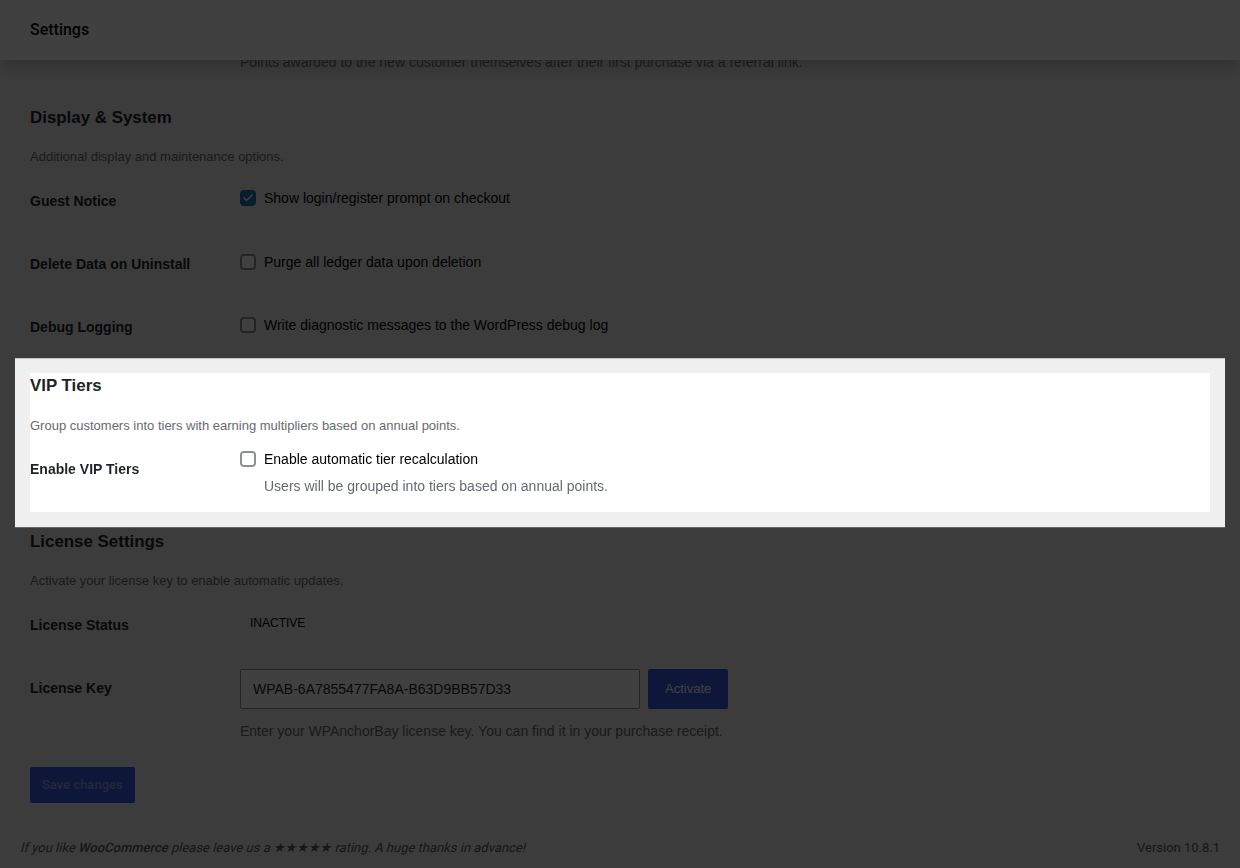
3. Each row is one tier with three fields, in this order: **Tier Name**, **Points Threshold** (points per year needed to reach it), and **Multiplier**. The rows don't have a persistent column header above them only placeholder text inside each empty field so remember the order is always Name → Threshold → Multiplier.
4. Edit the starter tiers to match your program, or use **Add Tier** / **Remove** to change how many tiers you offer.
5. Click **Save changes** at the bottom of the page there's no separate save for this group.
6. **Verify it worked:** place a test order as a customer who qualifies for a non-Bronze tier and confirm in [Points History](/pointbay/admin/points-history/) that the multiplier was applied to the credited amount. You can also check **WooCommerce → Referrals & Tiers** for a read-only summary of your configured tiers.
---
## Starter Tiers
PointBay Pro ships with a ready-to-use set of three tiers that you're free to rename, re-threshold, remove, or add to:
| Tier | Points needed (per year) | Earning multiplier |
|---|---|---|
| **Bronze** | 0 | 1.0× (standard rate) |
| **Silver** | 500 | 1.2× (20% faster) |
| **Gold** | 2,000 | 1.5× (50% faster) |
---
## Worked Examples
**Example 1 a Gold member's purchase.** A **Gold** member (1.5×) places a $100 order at the default rate of 1 point per $1. Instead of the standard 100 points, they earn **150 points**.
**Example 2 a member drops a tier.** A Silver member (1.2×) earned 600 points 13 months ago and nothing since. Because those points have aged out of the 365-day qualifying window, the next daily tier check moves them back down to Bronze (1.0×) until they earn again.
---
## Edge Cases & Interactions
- Tier multipliers apply only to **purchase** points (see [Earning Points](/pointbay/features/earning-points/)) registration and review bonuses are always credited at their flat configured amount, unaffected by tier.
- If a purchase that benefited from a multiplier is later refunded, the reversal removes exactly what was credited (the multiplied amount), not a recalculated non-multiplied amount.
- Customers see their current tier and progress toward the next one on their [Customer Dashboard](/pointbay/features/customer-dashboard/).
---
## Troubleshooting
- **A customer's tier didn't update after a big purchase** tier promotions on crossing a threshold are immediate, but if it still looks wrong, confirm **Enable VIP Tiers** is actually on; the setting can be saved off after testing and forgotten.
- **A loyal customer got demoted unexpectedly** check whether their qualifying points simply aged out of the 365-day window; this is expected behavior, not a bug.
- **The tier editor rows are confusing** remember the fixed left-to-right order: Name, Threshold, Multiplier.
See [Troubleshooting](/pointbay/resources/troubleshooting/) for more general issues.
## Related
- [Earning Points](/pointbay/features/earning-points/)
- [Referral Program](/pointbay/features/referral-program/)
- [Customer Dashboard](/pointbay/features/customer-dashboard/)
- [Settings Reference](/pointbay/admin/settings-reference/)
## Installation & Licensing
URL: https://wpanchorbay.github.io/pointbay/getting-started/installation/
Description: Install PointBay, see what it adds to your store, and activate your PointBay Pro license.
This is the first stop before you can reward a single point it covers installing PointBay, confirming it took hold in your store, and, if you're using PointBay Pro, activating your license so it keeps itself updated.
---
## Prerequisites
Before you install, make sure your store meets these minimums:
- **WordPress** 6.8 or higher
- **WooCommerce** 6.1 or higher (required PointBay is a WooCommerce extension and won't do anything without it active)
- **PHP** 7.0 or higher (8.0+ recommended for best performance)
- **MySQL** 5.6+ or **MariaDB** 10.1+ using the InnoDB storage engine (the modern default on virtually every host)
If you're using PointBay Pro, have your license key ready you'll find it in your purchase receipt, in the format `WPAB-XXXXX-XXXXX-XXXXX`.
---
## Walkthrough: Install the Plugin
Choose whichever method matches how you normally manage plugins on this site.
### Option A: Upload in WordPress (recommended)
1. Download the plugin `.zip` file from your account.
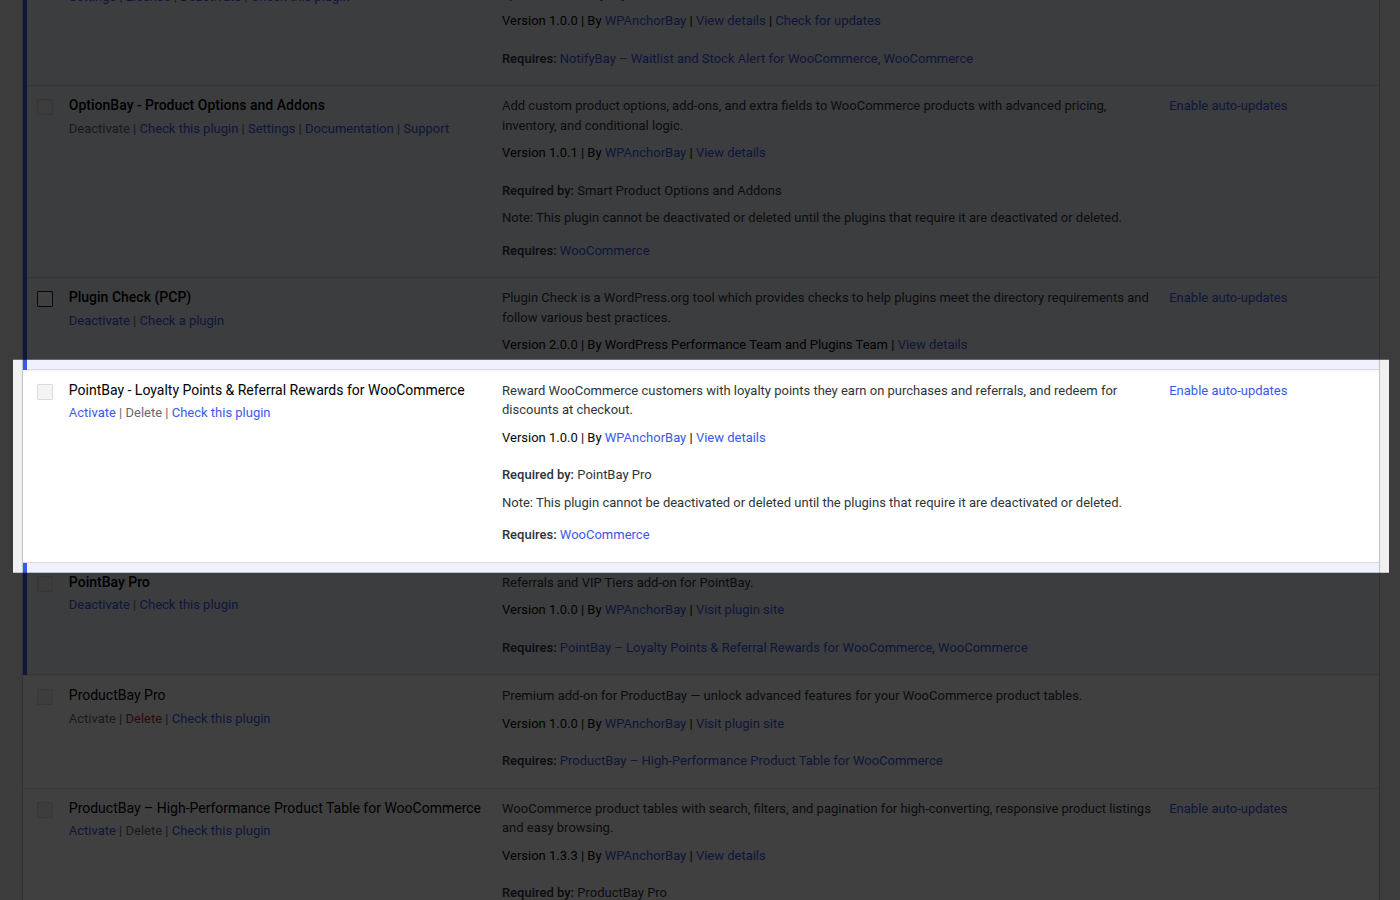
2. In your WordPress admin, go to **Plugins → Add New** and click **Upload Plugin**.
3. Click **Choose File**, select the `.zip` you downloaded, and click **Install Now**.
4. When the upload finishes, click **Activate Plugin**.
### Option B: Upload by FTP
Use this if your host limits web-based uploads (some shared-hosting plans do):
1. Unzip the download on your computer to get the plugin folder.
2. Connect to your server with an FTP/SFTP client and open `/wp-content/plugins/`.
3. Upload the plugin folder there.
4. In WordPress, go to **Plugins → Installed Plugins**, find PointBay in the list, and click **Activate**.
---
## Verify It Worked
Once activation finishes, everything PointBay adds lives under the **WooCommerce** menu in your admin sidebar:
- **WooCommerce → Settings → Loyalty Points** the settings screen where you configure the whole program. This same screen is also reachable via the shorter **Loyalty** link that appears directly under the WooCommerce menu.
- **WooCommerce → Points History** the full record of every points transaction, and where you can make manual adjustments.
- A **My Rewards** page inside every customer's **My Account** area, showing their balance and history.
If you see the **Loyalty** and **Points History** links in the WooCommerce menu, installation succeeded and you're ready to configure the plugin see [Quick Setup](/pointbay/getting-started/quick-setup/).
---
## Activating Your Pro License
:::note[Pro feature]
Licensing applies to **PointBay Pro** only. The free plugin doesn't require a license at all.
:::
Activating your license unlocks automatic updates for PointBay Pro, so you don't have to manually reinstall it every time a new version ships.
1. Go to **WooCommerce → Settings → Loyalty Points** and scroll to the **License Settings** group.
2. Paste in your license key (`WPAB-XXXXX-XXXXX-XXXXX`).
3. Click **Activate**.
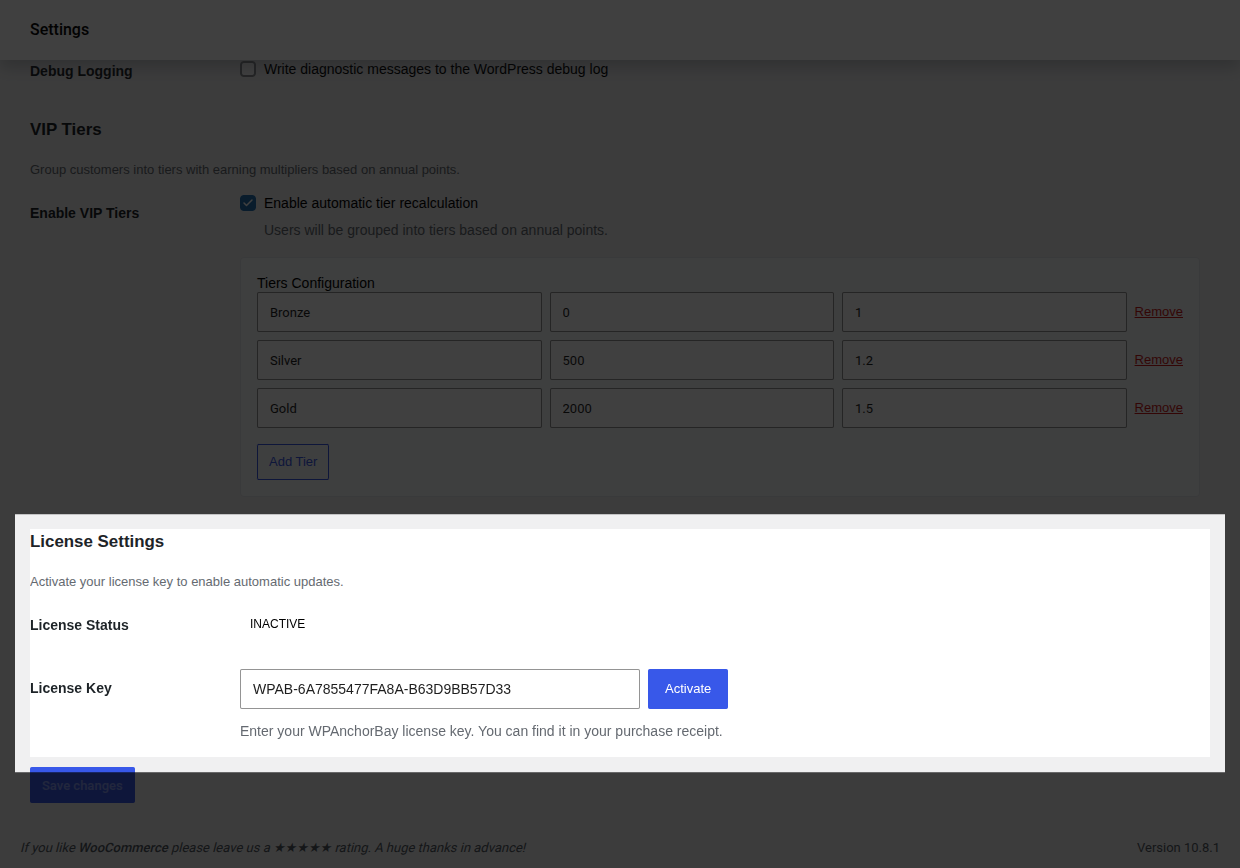
4. **Verify it worked:** confirm **License Status** now reads **Active**. The key field locks and a **Deactivate** button appears in its place.
To move the license to a different site later, come back to this screen and click **Deactivate** first a license can only be active on one site at a time.
:::caution
If **License Status** shows **Invalid** instead of **Active**, double-check the key for typos before contacting support a mistyped character is the most common cause.
:::
## What's Next
Head to [Quick Setup](/pointbay/getting-started/quick-setup/) to configure your first earning and redemption rules.
## Quick Setup
URL: https://wpanchorbay.github.io/pointbay/getting-started/quick-setup/
Description: Configure PointBay and test earning and redeeming points in a few minutes.
This is the fastest path to a working loyalty program enough to have customers earning and redeeming points today. It assumes PointBay is already installed and active; if it isn't yet, start with [Installation & Licensing](/pointbay/getting-started/installation/) first.
---
## Prerequisites
- PointBay is installed and active (see [Installation & Licensing](/pointbay/getting-started/installation/)).
- WooCommerce is set up with at least one purchasable product, so you can place a real test order.
- A test customer account you can log into separately from your admin account you'll need to check out as a customer, not as the store owner.
---
## Walkthrough: Configure and Test Your Program
All settings below are at **WooCommerce → Settings → Loyalty Points**, and every group is saved together with WooCommerce's own **Save changes** button at the bottom of the page there's no separate save per section.
### Step 1: Set your earning rate
1. In the **Earning Points** group, set **Points Per Dollar** how many points a customer earns for each $1 of order subtotal. The default is `1`.
2. Optionally set **Points for Registration** and **Points for Product Review** to reward those actions too (both default to `0`, which turns them off).
3. Choose the **Order Status Trigger** the order status that awards purchase points. The default is **Completed**.
4. Click **Save changes**.
Full details on every field: [Settings Reference → Earning Points](/pointbay/admin/settings-reference/#earning-points).
### Step 2: Set your redemption rules
1. In the **Redemption Rules** group, set **Point Value ($)** what one point is worth as a discount. The default is `0.01` (100 points = $1.00 off).
2. Choose a **Redemption Mode** **Cart Fee** or **Virtual Coupon**. Cart Fee is the simpler default; switch to Virtual Coupon only if an automated tax service reports incorrect totals once redemption is live.
3. Set **Minimum Points to Redeem** the balance a customer needs before the redeem option appears at checkout (default `100`).
4. Click **Save changes**.
Full details on every field: [Settings Reference → Redemption Rules](/pointbay/admin/settings-reference/#redemption-rules).
### Step 3: Test earning
1. In an incognito window (or logged in as a separate test customer), buy a product and complete checkout.
2. In the admin, go to **WooCommerce → Orders** and set that order to your trigger status (for example, **Completed**), if it isn't already.
3. Open **WooCommerce → Points History** you should see a new **Credit** entry for that customer, referencing the order number.
### Step 4: Test redeeming
1. Make sure your test customer's balance is at or above your **Minimum Points to Redeem**.
2. As that customer, add items to the cart and go to checkout.
3. In the **Redeem Loyalty Points** panel, choose an amount and click **Apply Discount** the order total should drop by the corresponding amount.
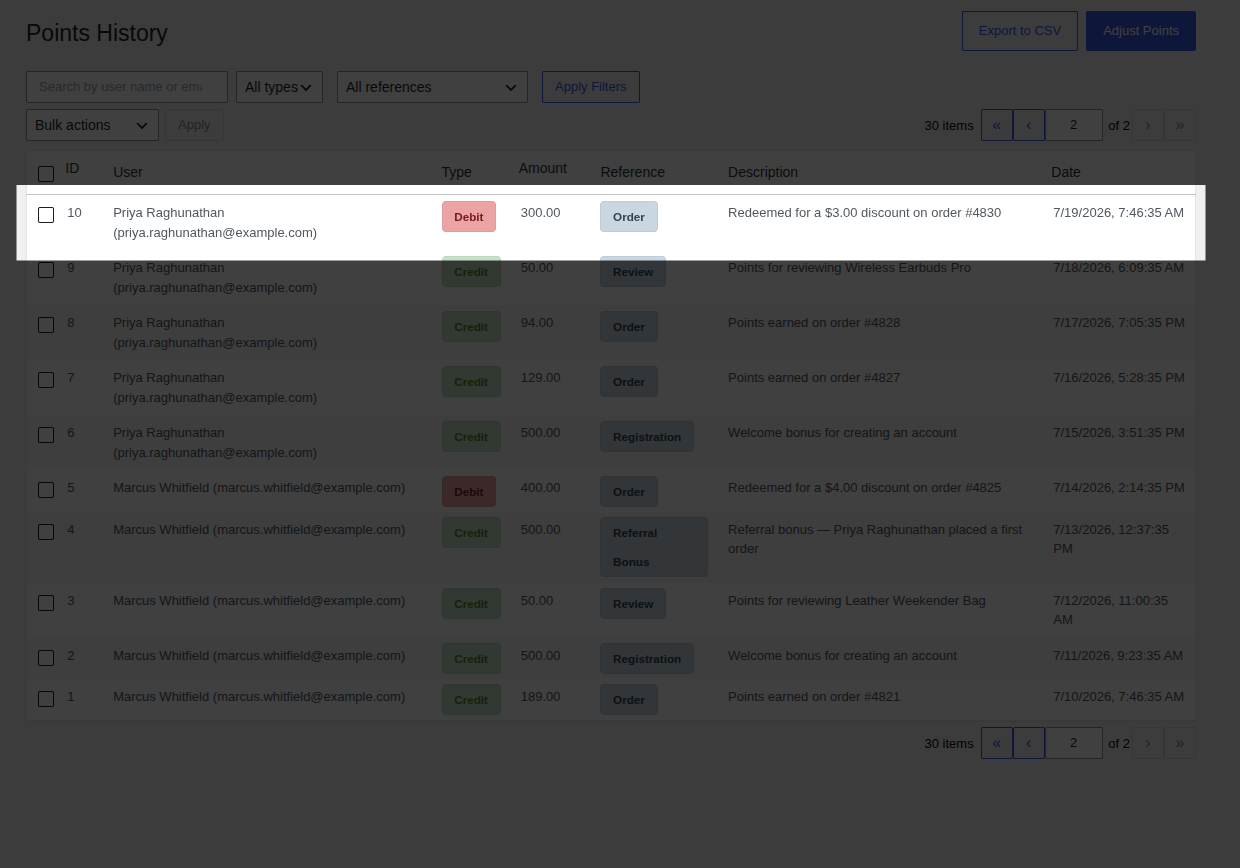
4. Place the order, then check **Points History** again for the matching **Debit** entry.
---
## Verify It Worked
If Step 3 produced a Credit and Step 4 produced a Debit in Points History, matching the order and amount you'd expect, your program is fully wired up end to end earning and redeeming both work.
## What's Next
Your basic program is live. To go further:
- [Earning Points](/pointbay/features/earning-points/) the full detail on how points are calculated, including refunds.
- [Redeeming Points](/pointbay/features/redeeming-points/) checkout behavior, Cart Fee vs. Virtual Coupon, and edge cases.
With **PointBay Pro** active, you can also layer on:
- [VIP Tiers](/pointbay/features/vip-tiers/) reward repeat customers with a faster earning rate.
- [Referral Program](/pointbay/features/referral-program/) turn customers into advocates with a refer-a-friend link.
## Meta files and discovery endpoints
URL: https://wpanchorbay.github.io/pointbay/others/ai-crawler/
Description: Machine-readable files that help crawlers and AI agents discover the PointBay documentation.
These public machine-readable files help crawlers, agents, and automation discover the docs and related integration metadata:
- [robots.txt](../../robots.txt) for crawler policy and the sitemap reference.
- [llms.txt](../../llms.txt) for the concise LLM-friendly overview of the documentation set. This endpoint is also advertised with a site-wide `` tag.
- [llms-full.txt](../../llms-full.txt) for the expanded plain-text export of the docs corpus. This endpoint is also advertised with a site-wide `` tag.
- Per-page Markdown/MDX source exports under `/markdown/` (`/markdown/.md`), for example [markdown/index.md](../../markdown/index.md) or [markdown/others/ai-crawler.md](../../markdown/others/ai-crawler.md). Each documentation page advertises its own export with a page-specific `` tag.
- [sitemap-index.xml](../../sitemap-index.xml) for the top-level sitemap index.
- [sitemap-0.xml](../../sitemap-0.xml) for the generated URL list currently referenced by the sitemap index.
- [.well-known/mcp.json](../../.well-known/mcp.json) for MCP discovery metadata related to the public documentation site.
## Changelog
URL: https://wpanchorbay.github.io/pointbay/resources/changelog/
Description: Version release history for the PointBay WooCommerce plugin.
This page logs the updates, features, and fixes released for the PointBay plugin.
---
## v1.0.0 Initial Release
Released on June 17, 2026.
### Features
* **Earning points**:
* Automatic points on order completion, at the order status you choose.
* Optional bonuses for account registration and approved product reviews.
* Automatic reversals when orders are refunded, cancelled, or fail.
* **Redeeming points**:
* Points slider and number input at checkout, for both Block and Classic checkout.
* Cart Fee and Virtual Coupon redemption modes.
* Minimum-points threshold, with discounts capped at the order total.
* Protection against spending the same points twice.
* **Admin tools**:
* Points History with search, sorting, and filtering.
* One-click manual credits and debits with a required reason.
* CSV export of the transaction records.
* **Customer dashboard**:
* A "My Rewards" page in My Account showing balance and transaction history.
* **PointBay Pro**:
* VIP Tiers with customizable thresholds and earning multipliers.
* Refer-a-friend program with personal referral links and first-order rewards.
* Tier badge and referral link added to the customer dashboard.
## FAQ
URL: https://wpanchorbay.github.io/pointbay/resources/faq/
Description: Frequently asked questions about the PointBay WooCommerce loyalty plugin.
Answers to the most common questions about setting up and using PointBay. If your question isn't here, check [Troubleshooting](/pointbay/resources/troubleshooting/) for issue-specific fixes.
---
## General
### What is PointBay?
PointBay is a customer rewards plugin for WooCommerce. Customers earn points for purchases and optionally for registering or leaving reviews and redeem those points for discounts at checkout.
### What's the difference between the free plugin and PointBay Pro?
The free plugin covers everything needed to run a points program: earning points, redeeming them at checkout, the customer dashboard, Points History, manual adjustments, and the full [Referral Program](/pointbay/features/referral-program/) (referral links and the referrer's bonus). **PointBay Pro** adds [VIP Tiers](/pointbay/features/vip-tiers/) (membership levels that earn points faster) and a welcome bonus for the new customer on top of the free referral program. Pro requires the free plugin to be active alongside it.
| Capability | Free | Pro |
|---|---|---|
| Earning points (purchases, registration, reviews) | ✅ | ✅ |
| Redeeming points at checkout (Classic + Block) | ✅ | ✅ |
| Customer Dashboard (My Rewards: balance, history) | ✅ | ✅ |
| Points History ledger, CSV export, manual adjustments | ✅ | ✅ |
| Referral links + referrer's bonus | ✅ | ✅ |
| Welcome bonus for the *new* (referred) customer | | ✅ |
| VIP Tiers (membership levels, earning multipliers) | | ✅ |
| Automatic update notifications (license) | | ✅ |
### Where do I find the settings?
Everything is under the **WooCommerce** menu: settings at **WooCommerce → Settings → Loyalty Points** (also reachable via the shorter **Loyalty** link), and the full transaction record at **WooCommerce → Points History**. See the [Settings Reference](/pointbay/admin/settings-reference/) for every field.
### Does it work with the WooCommerce Block Checkout?
Yes PointBay works identically with both the modern Block checkout and the traditional Classic checkout, with no extra configuration needed for either.
### Does it support guest checkout?
Customers need a registered account to earn or redeem points. Guests can't earn points, but PointBay shows them a notice at checkout encouraging them to create an account so they don't miss out you can turn this notice on or off with the **Guest Notice** setting.
---
## Earning Points
### When are points credited?
Automatically, when an order reaches the status you've chosen in **Order Status Trigger** **Completed** by default, or **Processing** if you'd rather award points as soon as payment is taken instead of waiting for fulfillment.
### What happens if an order is refunded?
The points earned on that order are automatically taken back fully for a full refund, or proportionally for a partial refund. If the customer already spent those points, their balance can go negative until they earn their way back to positive. See [Earning Points](/pointbay/features/earning-points/#refunds-and-reversals) for the full math.
### Why didn't a customer get their review bonus?
Only a customer's *first* approved review of a given product earns points, and reviews left by guests never qualify.
---
## Redeeming Points
### How do customers redeem points?
Logged-in customers who meet the minimum balance see a **Redeem Loyalty Points** panel at checkout. They choose how many points to apply, see a live discount preview, and click **Apply Discount**.
### What's the difference between Cart Fee and Virtual Coupon modes?
**Cart Fee** applies the discount as a negative line on the cart clean and simple, and the default. **Virtual Coupon** applies it as an automatically generated coupon instead, which works more reliably with automated tax services like TaxJar or Avalara. If your tax totals look wrong after a redemption, switch to Virtual Coupon.
### Can customers redeem only part of their balance?
Yes. Customers choose exactly how many points to apply, up to whichever is lower: their balance, or the order total.
---
## VIP Tiers (Pro)
### How is a customer's tier calculated?
By the points they've **earned in the last 365 days** a rolling window, not their all-time total or current spendable balance. Points earned more than a year ago stop counting toward tier status.
### Why did a loyal customer's tier drop?
Their qualifying points likely aged out of the 365-day window since their last purchase. Tiers are re-checked automatically once a day, so a quiet customer will eventually be moved down this is expected, not a bug.
---
## Referral Program
### Do referrers get rewarded more than once for the same friend?
No. A referrer is rewarded only on their referred friend's *first* completed order later purchases by that same friend don't earn any additional bonus.
### What happens if a referred order is refunded?
If the friend's qualifying first order is fully refunded, cancelled, or fails, both the referrer's bonus and the new customer's welcome bonus are automatically reversed. Partial refunds don't trigger a referral reversal.
---
## Data
### Is my data deleted when I uninstall the plugin?
No your data is kept by default. It's only permanently removed if you turn on **Delete Data on Uninstall** in **Display & System** settings before deleting the plugin, and that action can't be undone.
## Troubleshooting
URL: https://wpanchorbay.github.io/pointbay/resources/troubleshooting/
Description: Solutions to common PointBay configuration and display issues.
Solutions to the issues store owners run into most often, grouped by area. If your issue isn't listed here, check the [FAQ](/pointbay/resources/faq/) or contact support.
---
## Earning Points
### Points aren't being awarded on purchases
1. **Check the order status.** Points are only awarded when an order reaches your **Order Status Trigger** (Completed by default). Orders still in Processing or Pending won't earn points until they reach that status.
2. **Confirm the customer is registered.** Guests can't earn points check that the order was placed by a logged-in customer.
3. **Check for a duplicate.** Look in [Points History](/pointbay/admin/points-history/). If points were already awarded for that order, PointBay won't award them a second time.
### A review didn't earn its bonus
1. **Confirm the review was approved.** Pending reviews don't count.
2. **Confirm it's the customer's first review of that product.** Only one review per product, per customer, earns points repeat reviews of the same product don't.
3. **Confirm the reviewer was logged in.** Guest reviews never qualify.
---
## Redeeming Points
### The redeem panel doesn't appear at checkout
1. **The customer must be logged in.** Guests can't redeem points.
2. **Check the balance against the minimum.** The customer's balance must be at or above your **Minimum Points to Redeem** setting (default `100`).
3. **Check your theme.** A heavily customized checkout can hide the panel. Try switching to the WooCommerce Block checkout, which PointBay integrates with directly.
### Tax totals are wrong when points are redeemed
Some automated tax services (such as TaxJar or Avalara) don't account for a discount applied as a cart fee.
- **Fix:** Change **Redemption Mode** from **Cart Fee** to **Virtual Coupon** in the Redemption Rules settings. In Virtual Coupon mode the discount is handled as a standard WooCommerce coupon, which tax services support natively.
---
## VIP Tiers (Pro)
### A customer's tier isn't updating
1. **Confirm Enable VIP Tiers is actually on.** It's easy to leave this off after testing.
2. **Remember tiers are based on a rolling 365-day window,** not lifetime points a customer's tier can legitimately drop if their qualifying points have aged out, even without any error.
3. **Wait for the daily recalculation.** Promotions on crossing a threshold are immediate, but demotions from aged-out points are only caught by the once-daily automatic check.
---
## Referral Program
### A referral didn't pay out
1. **Confirm the friend placed an order, not just visited.** A click alone never triggers a reward.
2. **Confirm it was that friend's first order.** Only a first order qualifies later orders from the same referred customer don't trigger anything.
3. **Check the 30-day tracking window.** If the friend visited the link long before finally purchasing, the referral may have expired before they checked out.
---
## Admin Screens
### The settings or Points History screen is blank
1. **Look for browser errors.** Right-click the page, choose **Inspect**, and open the **Console** tab to see if anything failed to load.
2. **Check your security plugin.** PointBay's admin screens load their data through the WordPress REST API. Security plugins and firewalls (such as Wordfence) sometimes block those requests check whether one is interfering.
3. **Check for a conflict.** Temporarily switching to a default theme, or disabling other plugins one at a time, can help pinpoint a conflict.
### Getting diagnostic info for support
If support needs more detail on a hard-to-reproduce issue, turn on **Debug Logging** under **Display & System** in Settings. This writes PointBay's own diagnostic messages into WooCommerce's logging system check **WooCommerce → Status → Logs** and look for entries filed under the `pointbay` source. Turn it back off once you're done; it's not meant to stay on during normal use.
---
## Still Stuck?
If you hit an error you can't explain, contact support with a description of what you were doing and any message you saw. Turning on **Debug Logging** (see above) before reproducing the issue gives support a log they can work from.
 3. Click **Submit**.
4. **Verify it worked:** the dialog closes and a new row appears at the top of the Points History table with Reference **Manual Adjustment**, showing your entered amount and reason.

---
## Common Uses
- **Goodwill** award points to make up for a shipping delay or a product issue, without waiting on a refund process.
- **Offline campaigns** credit points for activity outside the store, like following a social account or attending an event.
- **Corrections** fix a balance if a customer was mistakenly missed by an automated rule (for example, an order was manually marked Completed outside the normal workflow and points were never triggered).
- **Enforcement** debit points if a customer abused the review or referral programs.
---
## Worked Example
A customer's order shipped a week late. Rather than issue a refund, you decide to credit them 200 goodwill points:
1. Open **Adjust Points**, search for the customer, select **Credit (+)**, enter `200` as the Amount, and write "Goodwill credit for a delayed delivery" as the Reason.
2. Submit. The customer's balance increases by 200 points immediately, and they'll see "Goodwill credit for a delayed delivery" the next time they check their [Customer Dashboard](/pointbay/features/customer-dashboard/).
---
## Audit Trail
Every manual adjustment appears in [Points History](/pointbay/admin/points-history/) with Reference **Manual Adjustment** and the Reason you entered, permanently. Because that reason is also shown to the customer, keep it clear and customer-friendly rather than an internal shorthand note.
---
## Who Can Make Adjustments
Only users who can manage PointBay administrators by default can view Points History and make adjustments. To give other roles (such as shop managers) access, grant them the PointBay management permission with a WordPress user-role plugin.
---
## Troubleshooting
- **Submit does nothing** confirm **Reason** isn't blank; it's a required field and the form won't submit without it.
- **You can't find the customer in the User search** search by their exact registered name or email; the search doesn't match on partial order numbers or usernames.
See [Troubleshooting](/pointbay/resources/troubleshooting/) for more general issues.
## Related
- [Points History](/pointbay/admin/points-history/)
- [Earning Points](/pointbay/features/earning-points/)
## Points History
URL: https://wpanchorbay.github.io/pointbay/admin/points-history/
Description: View, filter, and export every loyalty points transaction in your store.
Points History is your complete, permanent record of points activity every time a customer earns or spends points, for any reason, a row is added here. It's the first place to look whenever a customer asks "why is my balance what it is," and it's also where you export data for accounting. Open it from **WooCommerce → Points History**.
3. Click **Submit**.
4. **Verify it worked:** the dialog closes and a new row appears at the top of the Points History table with Reference **Manual Adjustment**, showing your entered amount and reason.

---
## Common Uses
- **Goodwill** award points to make up for a shipping delay or a product issue, without waiting on a refund process.
- **Offline campaigns** credit points for activity outside the store, like following a social account or attending an event.
- **Corrections** fix a balance if a customer was mistakenly missed by an automated rule (for example, an order was manually marked Completed outside the normal workflow and points were never triggered).
- **Enforcement** debit points if a customer abused the review or referral programs.
---
## Worked Example
A customer's order shipped a week late. Rather than issue a refund, you decide to credit them 200 goodwill points:
1. Open **Adjust Points**, search for the customer, select **Credit (+)**, enter `200` as the Amount, and write "Goodwill credit for a delayed delivery" as the Reason.
2. Submit. The customer's balance increases by 200 points immediately, and they'll see "Goodwill credit for a delayed delivery" the next time they check their [Customer Dashboard](/pointbay/features/customer-dashboard/).
---
## Audit Trail
Every manual adjustment appears in [Points History](/pointbay/admin/points-history/) with Reference **Manual Adjustment** and the Reason you entered, permanently. Because that reason is also shown to the customer, keep it clear and customer-friendly rather than an internal shorthand note.
---
## Who Can Make Adjustments
Only users who can manage PointBay administrators by default can view Points History and make adjustments. To give other roles (such as shop managers) access, grant them the PointBay management permission with a WordPress user-role plugin.
---
## Troubleshooting
- **Submit does nothing** confirm **Reason** isn't blank; it's a required field and the form won't submit without it.
- **You can't find the customer in the User search** search by their exact registered name or email; the search doesn't match on partial order numbers or usernames.
See [Troubleshooting](/pointbay/resources/troubleshooting/) for more general issues.
## Related
- [Points History](/pointbay/admin/points-history/)
- [Earning Points](/pointbay/features/earning-points/)
## Points History
URL: https://wpanchorbay.github.io/pointbay/admin/points-history/
Description: View, filter, and export every loyalty points transaction in your store.
Points History is your complete, permanent record of points activity every time a customer earns or spends points, for any reason, a row is added here. It's the first place to look whenever a customer asks "why is my balance what it is," and it's also where you export data for accounting. Open it from **WooCommerce → Points History**.
 ---
## The History Table
Each row shows:
- **ID** the transaction number.
- **User** the customer's name and email.
- **Type** a **Credit** badge for points added, or a **Debit** badge for points removed.
- **Amount** how many points were added or removed.
- **Reference** what caused it. See the full list of reference types below.
- **Description** a plain-language explanation, such as "Points earned on order #4849."
- **Date** when it happened.
You can sort by **ID**, **Amount**, or **Date** by clicking that column's header.
---
## Common Tasks
### Find a specific customer's history
1. Type their name or email into the **Search Ledger** box.
2. Press Enter or click **Apply Filters**.

### Narrow down by transaction type or cause
1. Use **Filter by type** to show only **Credit** or only **Debit** rows.
2. Use **Filter by reference** to show only one kind of event the available reference types are **Order**, **Order Reversal**, **Refund**, **Review**, **Referral Bonus**, **Referral Reversal**, **Manual Adjustment**, **Referral Signup Bonus**, and **Referral Signup Reversal**.
3. Click **Apply Filters**.
---
## The History Table
Each row shows:
- **ID** the transaction number.
- **User** the customer's name and email.
- **Type** a **Credit** badge for points added, or a **Debit** badge for points removed.
- **Amount** how many points were added or removed.
- **Reference** what caused it. See the full list of reference types below.
- **Description** a plain-language explanation, such as "Points earned on order #4849."
- **Date** when it happened.
You can sort by **ID**, **Amount**, or **Date** by clicking that column's header.
---
## Common Tasks
### Find a specific customer's history
1. Type their name or email into the **Search Ledger** box.
2. Press Enter or click **Apply Filters**.

### Narrow down by transaction type or cause
1. Use **Filter by type** to show only **Credit** or only **Debit** rows.
2. Use **Filter by reference** to show only one kind of event the available reference types are **Order**, **Order Reversal**, **Refund**, **Review**, **Referral Bonus**, **Referral Reversal**, **Manual Adjustment**, **Referral Signup Bonus**, and **Referral Signup Reversal**.
3. Click **Apply Filters**.
 ### Export records for accounting
- Click **Export to CSV** (top of the page) to download the full, currently filtered list, or
- Select specific rows with their checkboxes, choose **Export Selected** from **Bulk actions**, then click **Apply** to export just those rows.

The file downloads as `pointbay_ledger_export_
### Export records for accounting
- Click **Export to CSV** (top of the page) to download the full, currently filtered list, or
- Select specific rows with their checkboxes, choose **Export Selected** from **Bulk actions**, then click **Apply** to export just those rows.

The file downloads as `pointbay_ledger_export_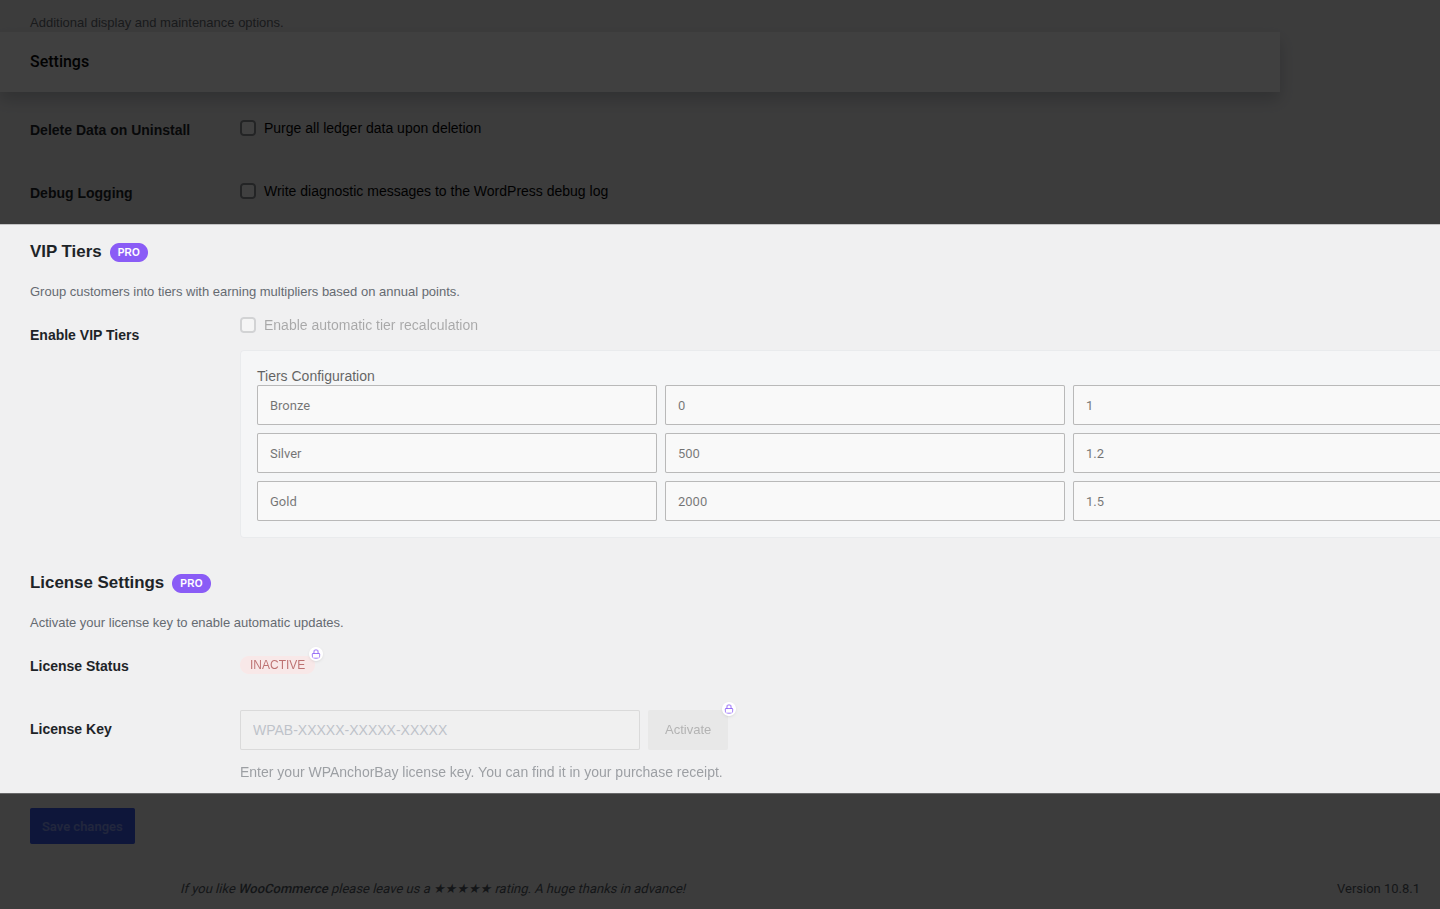 The screenshot above is what free-plugin users see for these two groups every field is visible but disabled, so you know exactly what Pro adds before buying.
 ---
## Earning Points
Controls how customers accumulate points in the first place.
| Setting | Default | What it does | Valid values |
|---|---|---|---|
| **Points Per Dollar** | `1` | How many points a customer earns for every $1 of order subtotal (tax and shipping excluded). | Any whole number, `0` or higher. |
| **Points for Registration** | `0` | A one-time bonus credited when someone creates an account. | Any whole number. `0` turns the bonus off. |
| **Points for Product Review** | `0` | Points credited when a customer's product review is approved by a store manager. | Any whole number. `0` turns the bonus off. |
| **Order Status Trigger** | `Completed` | The WooCommerce order status that has to be reached before purchase points are credited. | `Completed`, `Processing`, or `On Hold`. |
---
## Earning Points
Controls how customers accumulate points in the first place.
| Setting | Default | What it does | Valid values |
|---|---|---|---|
| **Points Per Dollar** | `1` | How many points a customer earns for every $1 of order subtotal (tax and shipping excluded). | Any whole number, `0` or higher. |
| **Points for Registration** | `0` | A one-time bonus credited when someone creates an account. | Any whole number. `0` turns the bonus off. |
| **Points for Product Review** | `0` | Points credited when a customer's product review is approved by a store manager. | Any whole number. `0` turns the bonus off. |
| **Order Status Trigger** | `Completed` | The WooCommerce order status that has to be reached before purchase points are credited. | `Completed`, `Processing`, or `On Hold`. |
 See the full walkthrough on [Earning Points](/pointbay/features/earning-points/).
---
## Redemption Rules
Controls how accumulated points convert into a discount at checkout.
| Setting | Default | What it does | Valid values |
|---|---|---|---|
| **Point Value ($)** | `0.01` | The monetary value of a single point when redeemed. At the default, 100 points = $1.00 off. | Any decimal amount greater than `0`. |
| **Redemption Mode** | `Cart Fee` | How the discount is applied to the cart. On screen this option is still labeled **Cart Fee (WC_Fee)** the `(WC_Fee)` is an internal WooCommerce class name, not something you need to know; think of it simply as "Cart Fee." | **Cart Fee** (a negative line-item fee is added to the cart) or **Virtual Coupon** (a single-use coupon is generated and applied automatically). |
| **Minimum Points to Redeem** | `100` | The balance a customer must have before the redemption option appears at checkout. | Any whole number, `0` or higher. |
See the full walkthrough on [Earning Points](/pointbay/features/earning-points/).
---
## Redemption Rules
Controls how accumulated points convert into a discount at checkout.
| Setting | Default | What it does | Valid values |
|---|---|---|---|
| **Point Value ($)** | `0.01` | The monetary value of a single point when redeemed. At the default, 100 points = $1.00 off. | Any decimal amount greater than `0`. |
| **Redemption Mode** | `Cart Fee` | How the discount is applied to the cart. On screen this option is still labeled **Cart Fee (WC_Fee)** the `(WC_Fee)` is an internal WooCommerce class name, not something you need to know; think of it simply as "Cart Fee." | **Cart Fee** (a negative line-item fee is added to the cart) or **Virtual Coupon** (a single-use coupon is generated and applied automatically). |
| **Minimum Points to Redeem** | `100` | The balance a customer must have before the redemption option appears at checkout. | Any whole number, `0` or higher. |
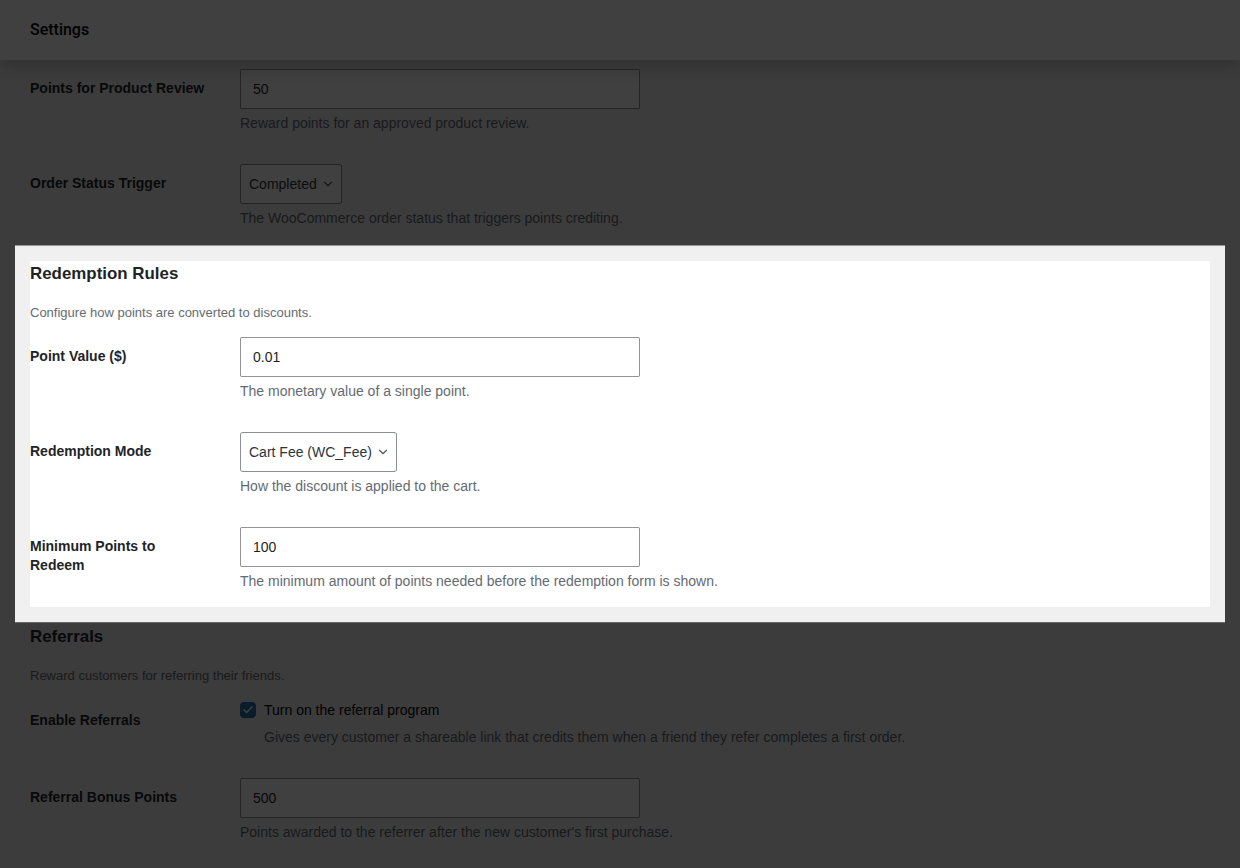 See the full walkthrough on [Redeeming Points](/pointbay/features/redeeming-points/).
---
## Referrals
:::note
This group is part of the **free plugin**. The first two settings work without Pro; **New Customer Bonus Points** only appears with **PointBay Pro** active.
:::
Controls the refer-a-friend program, split across two settings owned by the free plugin and one owned by Pro.
| Setting | Default | What it does | Valid values |
|---|---|---|---|
| **Enable Referrals** | `Off` | Turns the referral program on. When off, no referral links or bonuses are generated anywhere on the site. | On / Off. |
| **Referral Bonus Points** | `1000` | Points credited to the *referrer* after the friend they referred completes their first order. | Any whole number, `0` or higher. |
| **New Customer Bonus Points** | `100` | A separate welcome bonus credited to the *new customer* (the person who was referred) after their own first purchase. This is a distinct field from Referral Bonus Points the referrer and the new customer are each rewarded independently. | Any whole number. `0` skips this bonus, so only the referrer is rewarded. |
See the full walkthrough on [Redeeming Points](/pointbay/features/redeeming-points/).
---
## Referrals
:::note
This group is part of the **free plugin**. The first two settings work without Pro; **New Customer Bonus Points** only appears with **PointBay Pro** active.
:::
Controls the refer-a-friend program, split across two settings owned by the free plugin and one owned by Pro.
| Setting | Default | What it does | Valid values |
|---|---|---|---|
| **Enable Referrals** | `Off` | Turns the referral program on. When off, no referral links or bonuses are generated anywhere on the site. | On / Off. |
| **Referral Bonus Points** | `1000` | Points credited to the *referrer* after the friend they referred completes their first order. | Any whole number, `0` or higher. |
| **New Customer Bonus Points** | `100` | A separate welcome bonus credited to the *new customer* (the person who was referred) after their own first purchase. This is a distinct field from Referral Bonus Points the referrer and the new customer are each rewarded independently. | Any whole number. `0` skips this bonus, so only the referrer is rewarded. |
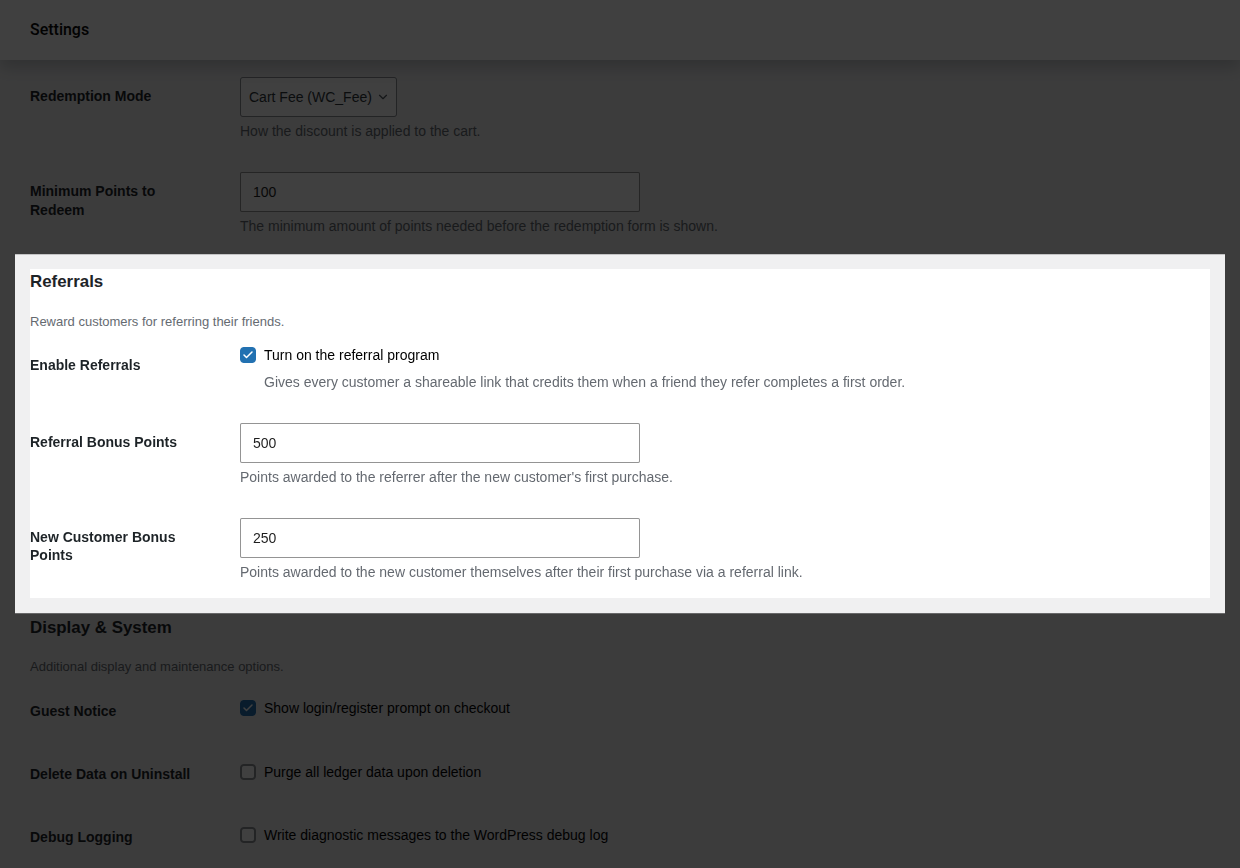 See the full walkthrough on [Referral Program](/pointbay/features/referral-program/).
---
## Display & System
Options that don't change how points are earned or redeemed, but affect what shoppers see and how the plugin behaves behind the scenes.
| Setting | Default | What it does | Valid values |
|---|---|---|---|
| **Guest Notice** | `On` | Shows a login/register prompt at checkout to logged-out shoppers, reminding them they could be earning points. | On / Off. |
| **Delete Data on Uninstall** | `Off` | When on, deleting the plugin permanently erases every customer's points ledger, balances, and referral data. This cannot be undone. | On / Off. |
| **Debug Logging** | `Off` | Writes diagnostic messages about PointBay's own activity into WooCommerce's logging system, viewable under **WooCommerce → Status → Logs** (filed under the `pointbay` source). Leave this off unless you're troubleshooting an issue with support. | On / Off. |
See the full walkthrough on [Referral Program](/pointbay/features/referral-program/).
---
## Display & System
Options that don't change how points are earned or redeemed, but affect what shoppers see and how the plugin behaves behind the scenes.
| Setting | Default | What it does | Valid values |
|---|---|---|---|
| **Guest Notice** | `On` | Shows a login/register prompt at checkout to logged-out shoppers, reminding them they could be earning points. | On / Off. |
| **Delete Data on Uninstall** | `Off` | When on, deleting the plugin permanently erases every customer's points ledger, balances, and referral data. This cannot be undone. | On / Off. |
| **Debug Logging** | `Off` | Writes diagnostic messages about PointBay's own activity into WooCommerce's logging system, viewable under **WooCommerce → Status → Logs** (filed under the `pointbay` source). Leave this off unless you're troubleshooting an issue with support. | On / Off. |
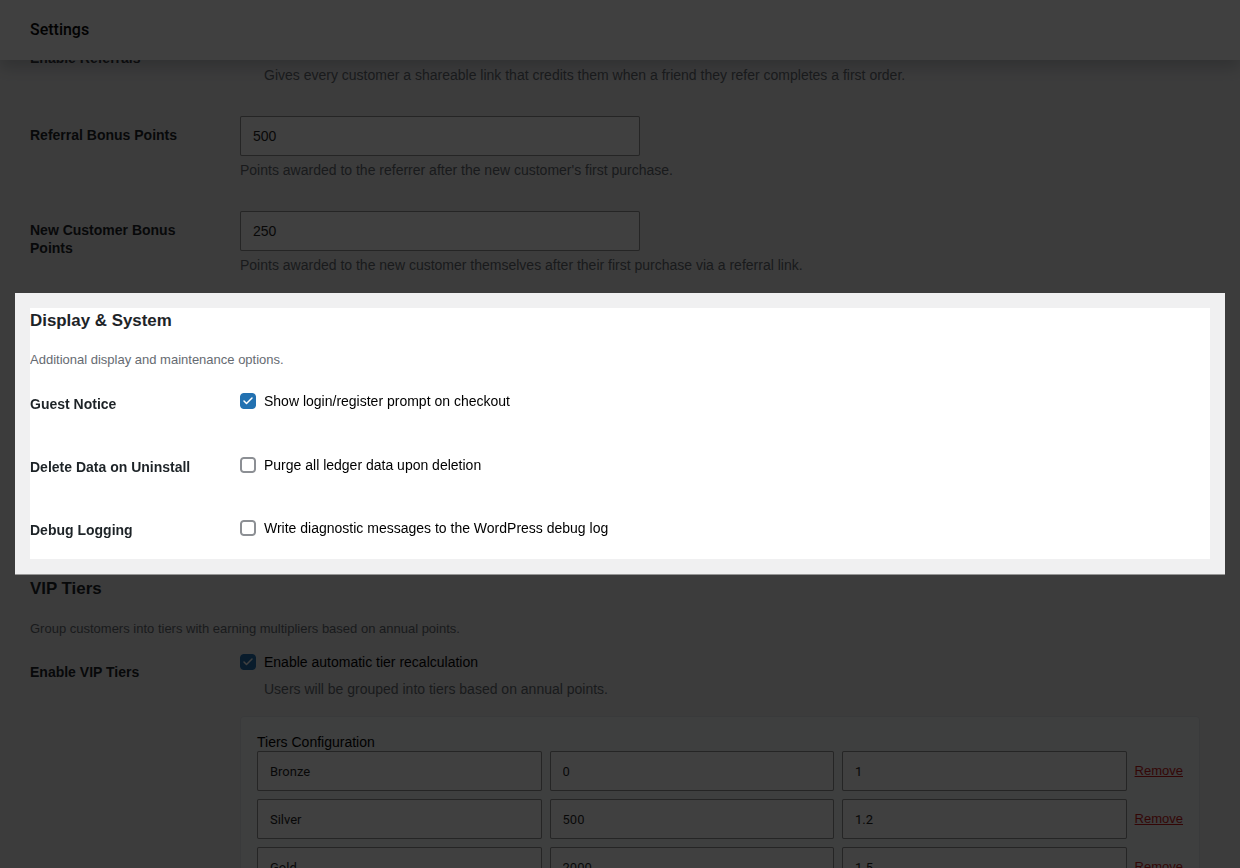 :::caution
Turning on **Delete Data on Uninstall** is irreversible once the plugin is actually deleted every point balance and history record is gone for good. Leave this off unless you're certain you want a clean slate.
:::
---
## VIP Tiers
:::note[Pro feature]
Functional only with **PointBay Pro** active. Without Pro, this group still appears but as a locked preview every field is visible and disabled, with a **PRO** badge and a link to buy Pro.
:::
Groups customers into membership tiers that multiply how many points they earn, based on how many points they've accumulated in the last 12 months.
| Setting | Default | What it does | Valid values |
|---|---|---|---|
| **Enable VIP Tiers** | `Off` | Turns on tier grouping and daily automatic tier recalculation. | On / Off. |
| **Tiers Configuration** | Bronze (0 pts, 1.0×) · Silver (500 pts, 1.2×) · Gold (2000 pts, 1.5×) | The tier editor itself, right here in this settings group (it appears once **Enable VIP Tiers** is on). Each row defines a **Tier Name**, a **Points Threshold** (annual points needed to reach that tier), and a **Multiplier** applied to every point a member of that tier earns. The separate **Referrals & Tiers** admin page is a read-only summary of this configuration, not an editor. | Any number of tiers; threshold and multiplier accept any positive number. |
:::caution
Turning on **Delete Data on Uninstall** is irreversible once the plugin is actually deleted every point balance and history record is gone for good. Leave this off unless you're certain you want a clean slate.
:::
---
## VIP Tiers
:::note[Pro feature]
Functional only with **PointBay Pro** active. Without Pro, this group still appears but as a locked preview every field is visible and disabled, with a **PRO** badge and a link to buy Pro.
:::
Groups customers into membership tiers that multiply how many points they earn, based on how many points they've accumulated in the last 12 months.
| Setting | Default | What it does | Valid values |
|---|---|---|---|
| **Enable VIP Tiers** | `Off` | Turns on tier grouping and daily automatic tier recalculation. | On / Off. |
| **Tiers Configuration** | Bronze (0 pts, 1.0×) · Silver (500 pts, 1.2×) · Gold (2000 pts, 1.5×) | The tier editor itself, right here in this settings group (it appears once **Enable VIP Tiers** is on). Each row defines a **Tier Name**, a **Points Threshold** (annual points needed to reach that tier), and a **Multiplier** applied to every point a member of that tier earns. The separate **Referrals & Tiers** admin page is a read-only summary of this configuration, not an editor. | Any number of tiers; threshold and multiplier accept any positive number. |
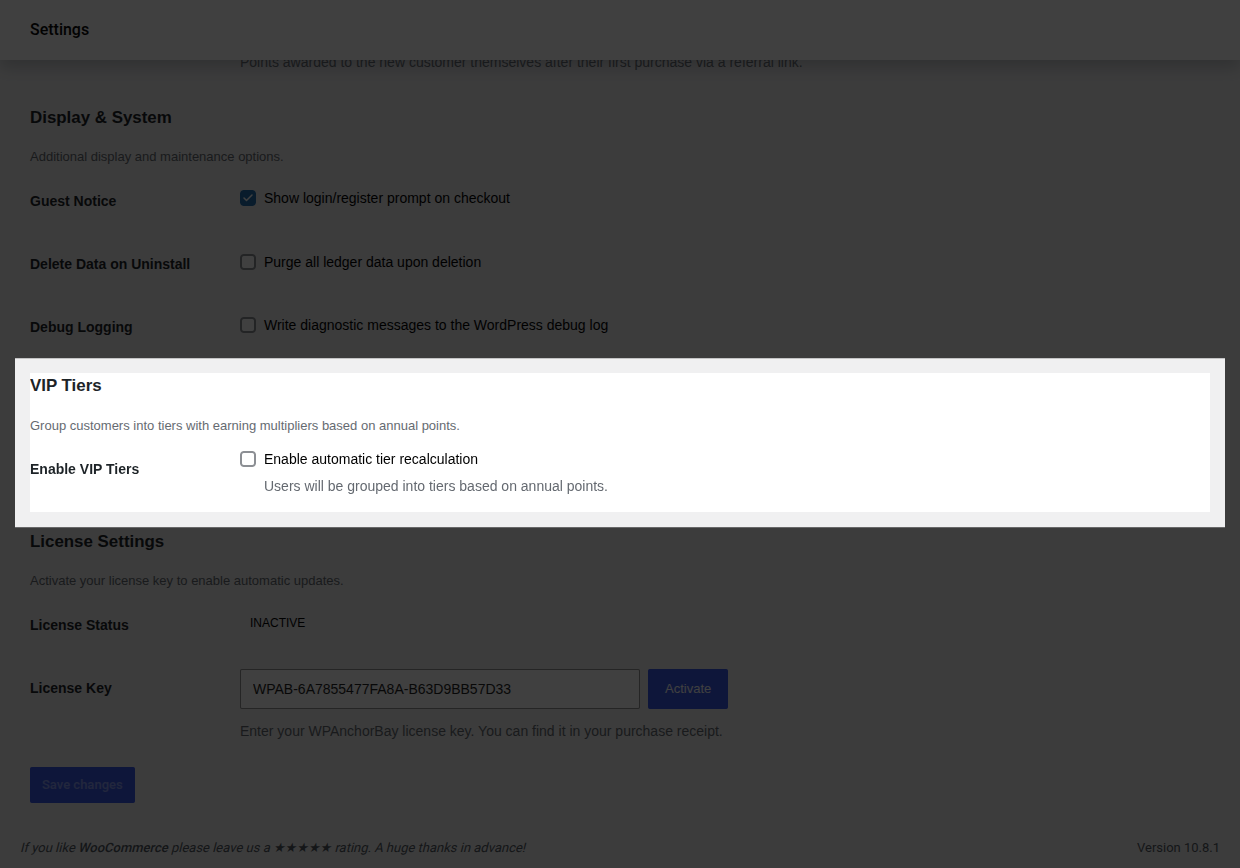 :::note
The tier editor rows currently show placeholder text inside each field rather than a persistent column header above the whole table. If you're not sure which field is which while editing, the order is always **Name → Threshold → Multiplier**, left to right.
:::
See the full walkthrough on [VIP Tiers](/pointbay/features/vip-tiers/).
---
## License Settings
:::note[Pro feature]
Functional only with **PointBay Pro** active. Without Pro, this group still appears but as a locked preview every field is visible and disabled, with a **PRO** badge and a link to buy Pro.
:::
| Setting | What it does |
|---|---|
| **License Status** | Read-only. Shows **Active**, **Inactive**, or **Invalid** depending on whether your license key has been accepted. |
| **License Key** | Your WPAnchorBay license key, in the format `WPAB-XXXXX-XXXXX-XXXXX`. Paste it in and click **Activate** to unlock automatic updates and support. Once active, the field is locked and a **Deactivate** button appears in its place, letting you free up the license (for example, to move it to a different site). |
:::note
The tier editor rows currently show placeholder text inside each field rather than a persistent column header above the whole table. If you're not sure which field is which while editing, the order is always **Name → Threshold → Multiplier**, left to right.
:::
See the full walkthrough on [VIP Tiers](/pointbay/features/vip-tiers/).
---
## License Settings
:::note[Pro feature]
Functional only with **PointBay Pro** active. Without Pro, this group still appears but as a locked preview every field is visible and disabled, with a **PRO** badge and a link to buy Pro.
:::
| Setting | What it does |
|---|---|
| **License Status** | Read-only. Shows **Active**, **Inactive**, or **Invalid** depending on whether your license key has been accepted. |
| **License Key** | Your WPAnchorBay license key, in the format `WPAB-XXXXX-XXXXX-XXXXX`. Paste it in and click **Activate** to unlock automatic updates and support. Once active, the field is locked and a **Deactivate** button appears in its place, letting you free up the license (for example, to move it to a different site). |
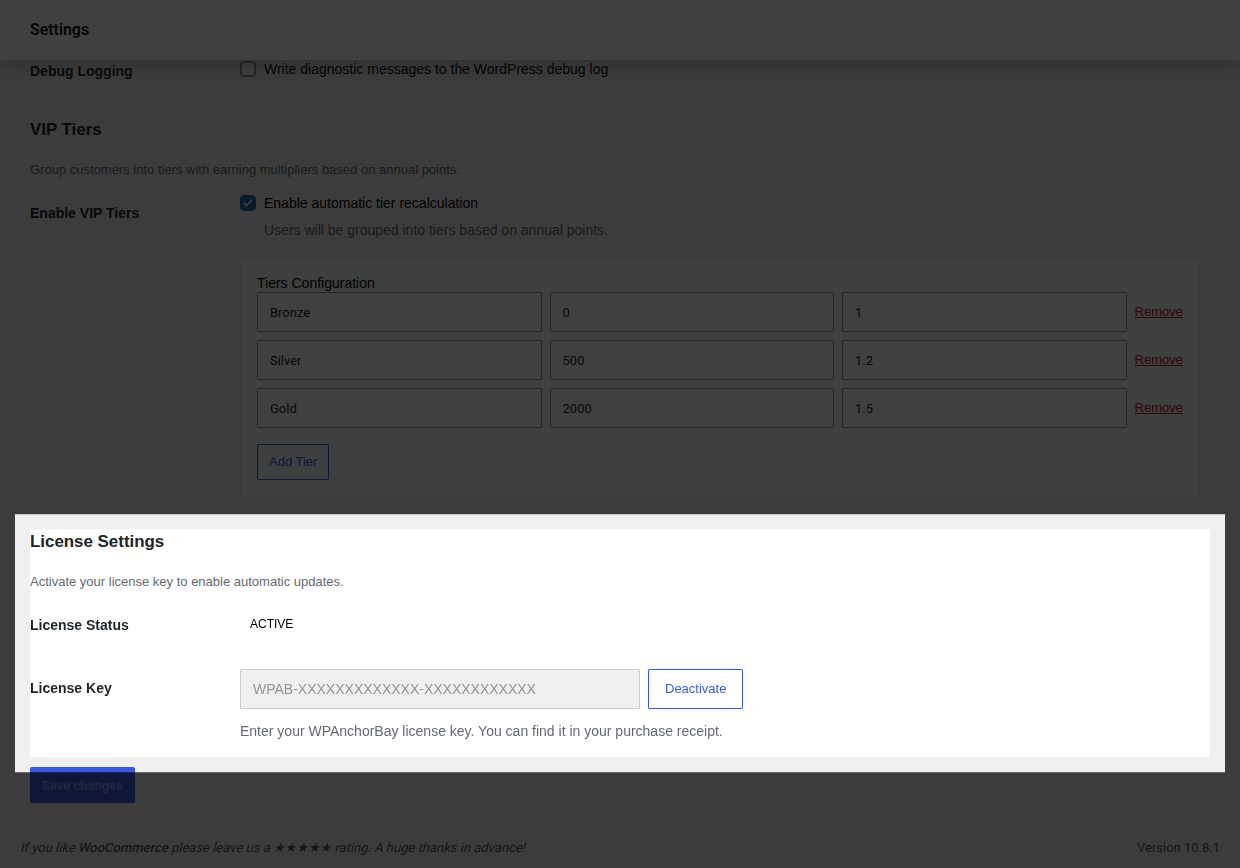 See [Installation & Licensing](/pointbay/getting-started/installation/) for the full activation walkthrough.
## Customer Dashboard
URL: https://wpanchorbay.github.io/pointbay/features/customer-dashboard/
Description: The customer-facing loyalty rewards page in the WooCommerce My Account area.
Every other page in this section covers something you configure this one covers what your customers actually see. PointBay adds a rewards page to each customer's WooCommerce **My Account** area, called **My Rewards**, where they can check their points balance and history, plus their personal referral link if referrals are enabled and, with PointBay Pro, their VIP tier progress too. It's worth reviewing yourself so you know exactly what your customers experience.
---
## How It Works
When PointBay is active, a **My Rewards** link appears in the customer's My Account menu, right after Orders, at a URL like `https://yourstore.com/my-account/my-rewards/`. The page is only visible to logged-in customers; a guest who follows the link is sent to the usual WooCommerce login screen first. The page itself is headed **My Loyalty Rewards**.
See [Installation & Licensing](/pointbay/getting-started/installation/) for the full activation walkthrough.
## Customer Dashboard
URL: https://wpanchorbay.github.io/pointbay/features/customer-dashboard/
Description: The customer-facing loyalty rewards page in the WooCommerce My Account area.
Every other page in this section covers something you configure this one covers what your customers actually see. PointBay adds a rewards page to each customer's WooCommerce **My Account** area, called **My Rewards**, where they can check their points balance and history, plus their personal referral link if referrals are enabled and, with PointBay Pro, their VIP tier progress too. It's worth reviewing yourself so you know exactly what your customers experience.
---
## How It Works
When PointBay is active, a **My Rewards** link appears in the customer's My Account menu, right after Orders, at a URL like `https://yourstore.com/my-account/my-rewards/`. The page is only visible to logged-in customers; a guest who follows the link is sent to the usual WooCommerce login screen first. The page itself is headed **My Loyalty Rewards**.
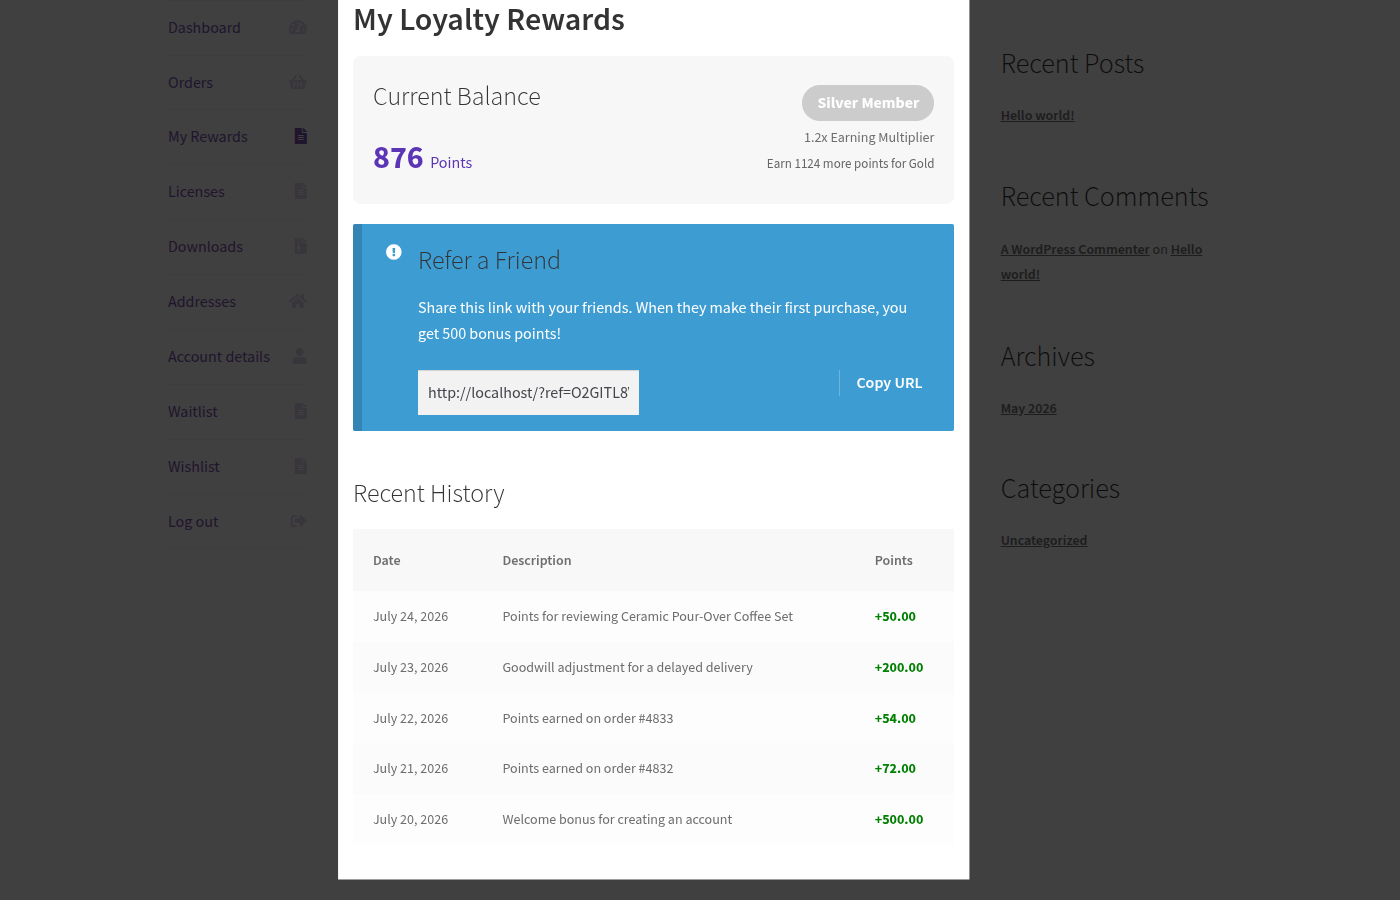 ---
## Walkthrough: See What a Customer Sees
1. Log in as (or impersonate) a customer account, and go to **My Account → My Rewards**.
2. Check the **Current Balance** card it shows the customer's available points as a large number.

3. Check the **Recent History** table it lists the customer's latest points activity with **Date**, **Description**, and **Points** columns; credits are shown with a `+` and debits with a `-`. A brand-new customer with no activity yet simply sees "No activity yet."

4. If [VIP Tiers](/pointbay/features/vip-tiers/) are enabled, check the tier badge and multiplier shown below the balance.

5. If the [Referral Program](/pointbay/features/referral-program/) is enabled, check the **Refer a Friend** card and confirm the referral link and bonus amount are correct.

---
## What Customers See
### Current balance
A **Current Balance** card shows the customer's available points as a large figure, always up to date with the latest earn, redeem, or reversal.
### Recent history
A **Recent History** table lists the customer's latest points activity. New customers with no activity yet see "No activity yet." instead of an empty table.
### VIP tier progress
:::note[Pro feature]
The tier badge appears only when [VIP Tiers](/pointbay/features/vip-tiers/) are enabled in **PointBay Pro**.
:::
Members see a tier badge (for example, "Gold Member"), their earning multiplier (for example, "1.5× Earning Multiplier"), and a hint showing how many more points they need to reach the next tier.
### Refer-a-friend card
:::note
The **Refer a Friend** card is a free-plugin feature it appears whenever **Enable Referrals** is turned on in [Referral Program](/pointbay/features/referral-program/) settings, with or without Pro active.
:::
Customers get their personal referral link in a read-only field with a one-click **Copy URL** button to share with friends. The card's message updates itself to match your settings it reads "Share this link with your friends. When they make their first purchase, you get **N** bonus points!" where N is whatever you've set **Referral Bonus Points** to, so you never need to edit this copy by hand.
---
## Edge Cases & Interactions
- A customer with a negative balance (from a reversal exceeding their remaining points see [Earning Points](/pointbay/features/earning-points/#refunds-and-reversals)) sees that negative number plainly on their Current Balance card, not zero.
- The dashboard reflects manual adjustments made from [Manual Adjustments](/pointbay/admin/manual-adjustments/) the same way it reflects automatic activity customers can't tell the difference from their side.
---
## Troubleshooting
- **A customer says they don't see "My Rewards" in their account menu** confirm they're logged in; logged-out visitors don't see any account menu items at all, loyalty-related or otherwise.
- **The tier badge or referral card is missing** confirm the corresponding setting (**Enable VIP Tiers**, Pro-only, or **Enable Referrals**, free) is actually turned on; both cards hide themselves entirely when their feature is off rather than showing an empty state.
See [Troubleshooting](/pointbay/resources/troubleshooting/) for more general issues.
## Related
- [Earning Points](/pointbay/features/earning-points/)
- [VIP Tiers](/pointbay/features/vip-tiers/)
- [Referral Program](/pointbay/features/referral-program/)
## Earning Points
URL: https://wpanchorbay.github.io/pointbay/features/earning-points/
Description: How customers earn loyalty points for purchases, registrations, and reviews, and how refunds reverse them.
Points are the currency your customers build up every time they shop with you, and Earning Points is where you decide how they get them. Customers earn points automatically on purchases, and you can optionally reward them for creating an account or leaving a product review both are quick, low-cost ways to nudge shoppers toward the actions that grow your store.
Everything on this page is configured at **WooCommerce → Settings → Loyalty Points**, under the **Earning Points** group. Full field-by-field details are in the [Settings Reference](/pointbay/admin/settings-reference/#earning-points).
---
## How It Works
There are three independent ways a customer can earn points, and you can enable any combination of them:
- **Purchases** points are awarded automatically once an order reaches the status you choose (Completed by default).
- **Account registration** an optional one-time bonus the moment someone creates an account, even before their first order.
- **Product reviews** an optional bonus when a logged-in customer's product review is approved by you.
You can also credit points to any customer by hand at any time see [Manual Adjustments](/pointbay/admin/manual-adjustments/) for goodwill credits, corrections, or promotions that don't fit the automatic rules.
---
## Walkthrough: Turn On All Three Earning Methods
1. Go to **WooCommerce → Settings → Loyalty Points** (or click **Loyalty** in the WooCommerce admin menu).

2. In the **Earning Points** group, confirm **Points Per Dollar** is set to the rate you want (the default is `1`).
3. Set **Points for Registration** to a nonzero value, for example `50`, to reward new accounts.
4. Set **Points for Product Review** to a nonzero value, for example `20`, to reward approved reviews.
5. Check **Order Status Trigger** matches how your store actually processes orders if you ship immediately on payment, `Processing` credits points sooner than the default `Completed`.
---
## Walkthrough: See What a Customer Sees
1. Log in as (or impersonate) a customer account, and go to **My Account → My Rewards**.
2. Check the **Current Balance** card it shows the customer's available points as a large number.

3. Check the **Recent History** table it lists the customer's latest points activity with **Date**, **Description**, and **Points** columns; credits are shown with a `+` and debits with a `-`. A brand-new customer with no activity yet simply sees "No activity yet."

4. If [VIP Tiers](/pointbay/features/vip-tiers/) are enabled, check the tier badge and multiplier shown below the balance.

5. If the [Referral Program](/pointbay/features/referral-program/) is enabled, check the **Refer a Friend** card and confirm the referral link and bonus amount are correct.

---
## What Customers See
### Current balance
A **Current Balance** card shows the customer's available points as a large figure, always up to date with the latest earn, redeem, or reversal.
### Recent history
A **Recent History** table lists the customer's latest points activity. New customers with no activity yet see "No activity yet." instead of an empty table.
### VIP tier progress
:::note[Pro feature]
The tier badge appears only when [VIP Tiers](/pointbay/features/vip-tiers/) are enabled in **PointBay Pro**.
:::
Members see a tier badge (for example, "Gold Member"), their earning multiplier (for example, "1.5× Earning Multiplier"), and a hint showing how many more points they need to reach the next tier.
### Refer-a-friend card
:::note
The **Refer a Friend** card is a free-plugin feature it appears whenever **Enable Referrals** is turned on in [Referral Program](/pointbay/features/referral-program/) settings, with or without Pro active.
:::
Customers get their personal referral link in a read-only field with a one-click **Copy URL** button to share with friends. The card's message updates itself to match your settings it reads "Share this link with your friends. When they make their first purchase, you get **N** bonus points!" where N is whatever you've set **Referral Bonus Points** to, so you never need to edit this copy by hand.
---
## Edge Cases & Interactions
- A customer with a negative balance (from a reversal exceeding their remaining points see [Earning Points](/pointbay/features/earning-points/#refunds-and-reversals)) sees that negative number plainly on their Current Balance card, not zero.
- The dashboard reflects manual adjustments made from [Manual Adjustments](/pointbay/admin/manual-adjustments/) the same way it reflects automatic activity customers can't tell the difference from their side.
---
## Troubleshooting
- **A customer says they don't see "My Rewards" in their account menu** confirm they're logged in; logged-out visitors don't see any account menu items at all, loyalty-related or otherwise.
- **The tier badge or referral card is missing** confirm the corresponding setting (**Enable VIP Tiers**, Pro-only, or **Enable Referrals**, free) is actually turned on; both cards hide themselves entirely when their feature is off rather than showing an empty state.
See [Troubleshooting](/pointbay/resources/troubleshooting/) for more general issues.
## Related
- [Earning Points](/pointbay/features/earning-points/)
- [VIP Tiers](/pointbay/features/vip-tiers/)
- [Referral Program](/pointbay/features/referral-program/)
## Earning Points
URL: https://wpanchorbay.github.io/pointbay/features/earning-points/
Description: How customers earn loyalty points for purchases, registrations, and reviews, and how refunds reverse them.
Points are the currency your customers build up every time they shop with you, and Earning Points is where you decide how they get them. Customers earn points automatically on purchases, and you can optionally reward them for creating an account or leaving a product review both are quick, low-cost ways to nudge shoppers toward the actions that grow your store.
Everything on this page is configured at **WooCommerce → Settings → Loyalty Points**, under the **Earning Points** group. Full field-by-field details are in the [Settings Reference](/pointbay/admin/settings-reference/#earning-points).
---
## How It Works
There are three independent ways a customer can earn points, and you can enable any combination of them:
- **Purchases** points are awarded automatically once an order reaches the status you choose (Completed by default).
- **Account registration** an optional one-time bonus the moment someone creates an account, even before their first order.
- **Product reviews** an optional bonus when a logged-in customer's product review is approved by you.
You can also credit points to any customer by hand at any time see [Manual Adjustments](/pointbay/admin/manual-adjustments/) for goodwill credits, corrections, or promotions that don't fit the automatic rules.
---
## Walkthrough: Turn On All Three Earning Methods
1. Go to **WooCommerce → Settings → Loyalty Points** (or click **Loyalty** in the WooCommerce admin menu).

2. In the **Earning Points** group, confirm **Points Per Dollar** is set to the rate you want (the default is `1`).
3. Set **Points for Registration** to a nonzero value, for example `50`, to reward new accounts.
4. Set **Points for Product Review** to a nonzero value, for example `20`, to reward approved reviews.
5. Check **Order Status Trigger** matches how your store actually processes orders if you ship immediately on payment, `Processing` credits points sooner than the default `Completed`.
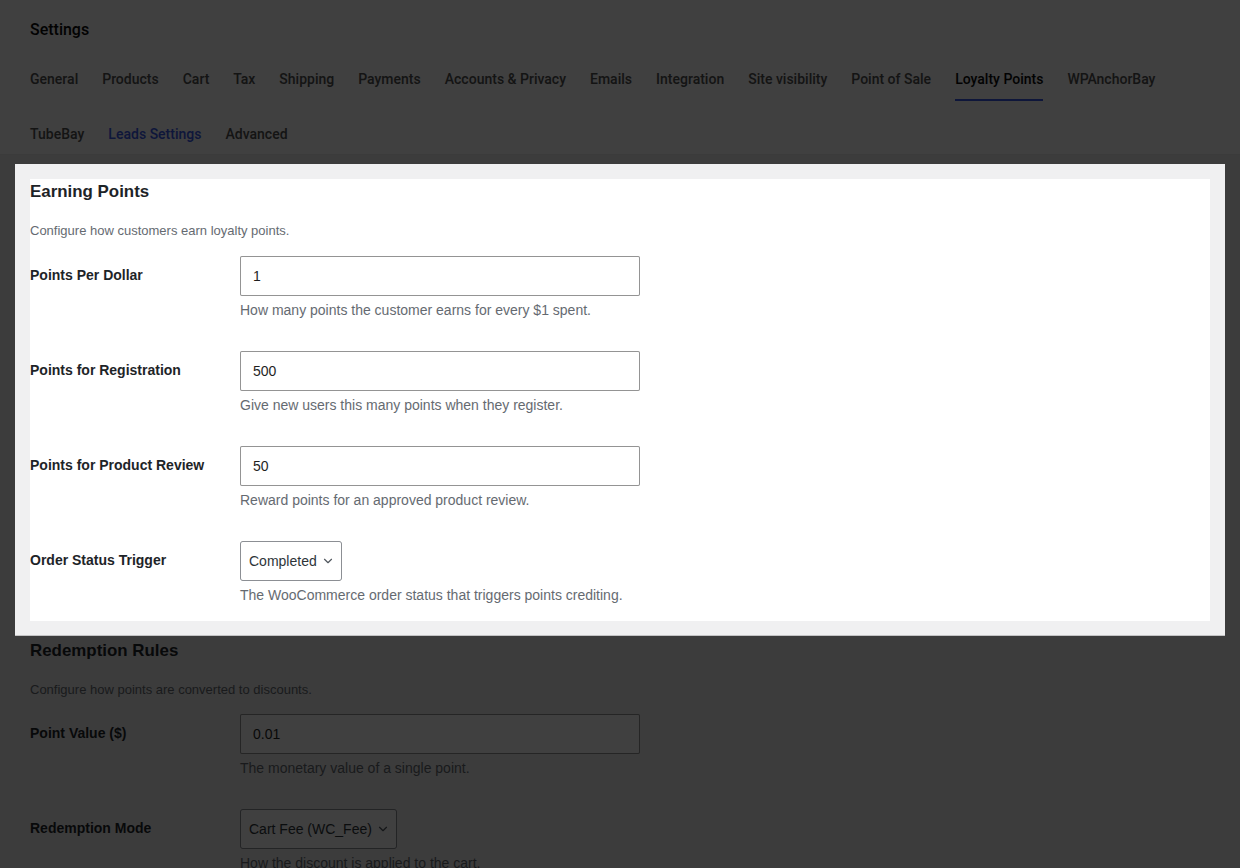 6. Click **Save changes** at the bottom of the page.
7. **Verify it worked:** place a small test order (or create a test account) and check [Points History](/pointbay/admin/points-history/) for a new **Order** or **Registration** entry crediting the expected amount.
---
## How Points Are Calculated
Purchase points are based on the **item subtotal** after any coupon discounts, but before shipping and tax. Shipping charges, tax, and any points redeemed on the same order are never counted toward how many points that order earns.
**Example 1 a standard purchase.** A customer buys $110 worth of products (already net of a $10 coupon), plus $15 shipping and $10 tax, for an order total of $135. At the default rate of 1 point per $1 of subtotal, they earn **110 points** the shipping and tax are ignored entirely, even though the customer paid $135.
**Example 2 a refund claws points back.** That same customer later returns half their order and receives a $55 refund. Because the refund is 50% of the $110 subtotal that earned points, PointBay automatically removes 50% of the 110 points earned **55 points** are debited from their balance. See [Refunds and Reversals](#refunds-and-reversals) below for how this plays out when points have already been spent.
:::note[Pro feature]
With **PointBay Pro**, [VIP Tiers](/pointbay/features/vip-tiers/) can multiply every purchase this way. A member in the default Gold tier (1.5× multiplier) would earn 165 points on the same $110 order instead of 110.
:::
---
## The Checkout Earn Notice
At the cart and checkout, PointBay shows shoppers how many points their order will earn a small, motivating reminder that completing the purchase pays them back. Logged-in shoppers see a message telling them how many points this order will earn; logged-out shoppers see a prompt to log in or register instead, so they don't complete a purchase without realizing they missed out on points.
6. Click **Save changes** at the bottom of the page.
7. **Verify it worked:** place a small test order (or create a test account) and check [Points History](/pointbay/admin/points-history/) for a new **Order** or **Registration** entry crediting the expected amount.
---
## How Points Are Calculated
Purchase points are based on the **item subtotal** after any coupon discounts, but before shipping and tax. Shipping charges, tax, and any points redeemed on the same order are never counted toward how many points that order earns.
**Example 1 a standard purchase.** A customer buys $110 worth of products (already net of a $10 coupon), plus $15 shipping and $10 tax, for an order total of $135. At the default rate of 1 point per $1 of subtotal, they earn **110 points** the shipping and tax are ignored entirely, even though the customer paid $135.
**Example 2 a refund claws points back.** That same customer later returns half their order and receives a $55 refund. Because the refund is 50% of the $110 subtotal that earned points, PointBay automatically removes 50% of the 110 points earned **55 points** are debited from their balance. See [Refunds and Reversals](#refunds-and-reversals) below for how this plays out when points have already been spent.
:::note[Pro feature]
With **PointBay Pro**, [VIP Tiers](/pointbay/features/vip-tiers/) can multiply every purchase this way. A member in the default Gold tier (1.5× multiplier) would earn 165 points on the same $110 order instead of 110.
:::
---
## The Checkout Earn Notice
At the cart and checkout, PointBay shows shoppers how many points their order will earn a small, motivating reminder that completing the purchase pays them back. Logged-in shoppers see a message telling them how many points this order will earn; logged-out shoppers see a prompt to log in or register instead, so they don't complete a purchase without realizing they missed out on points.
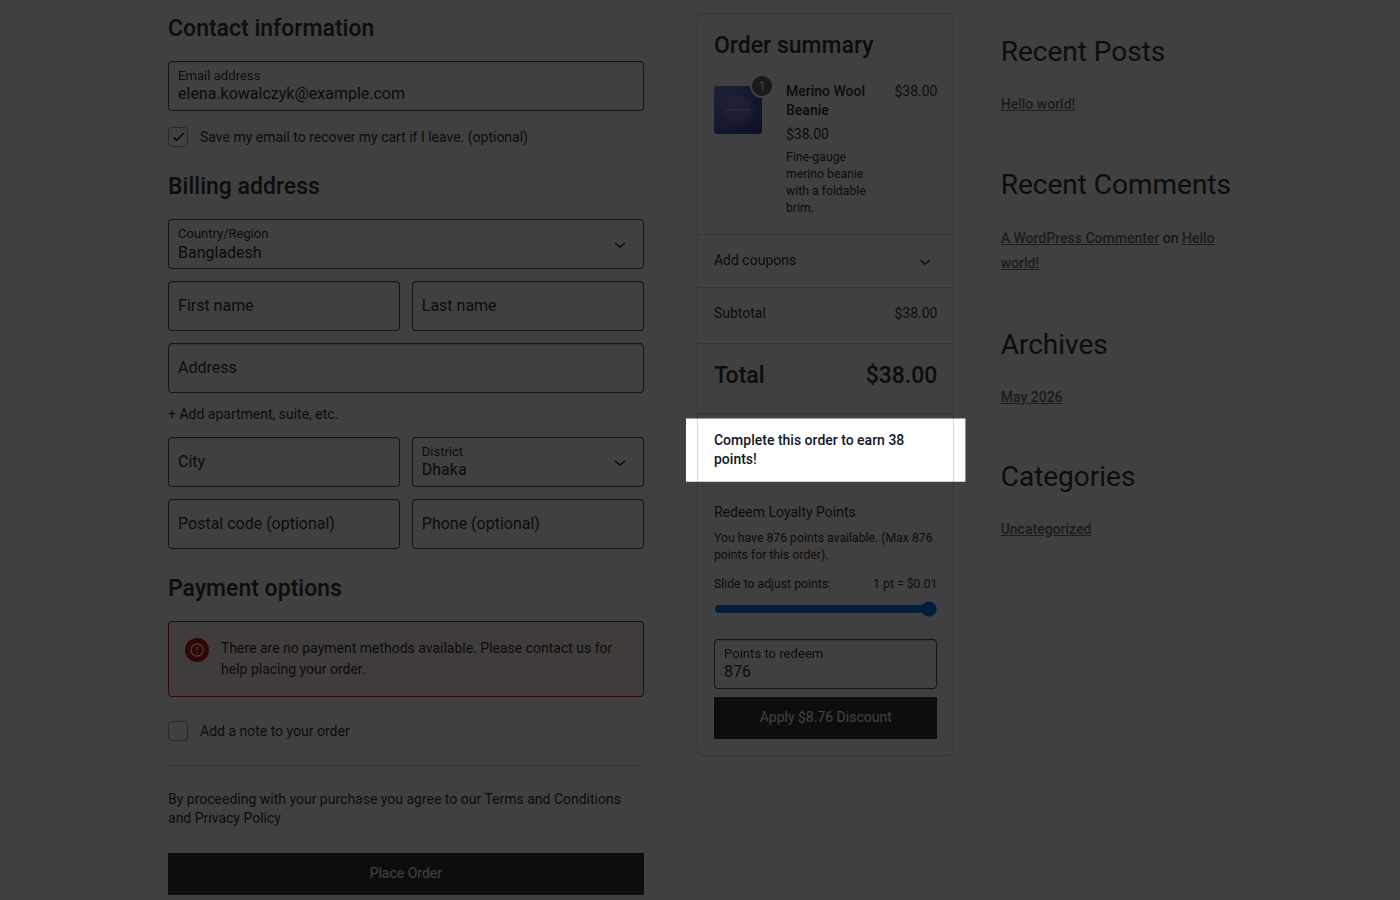
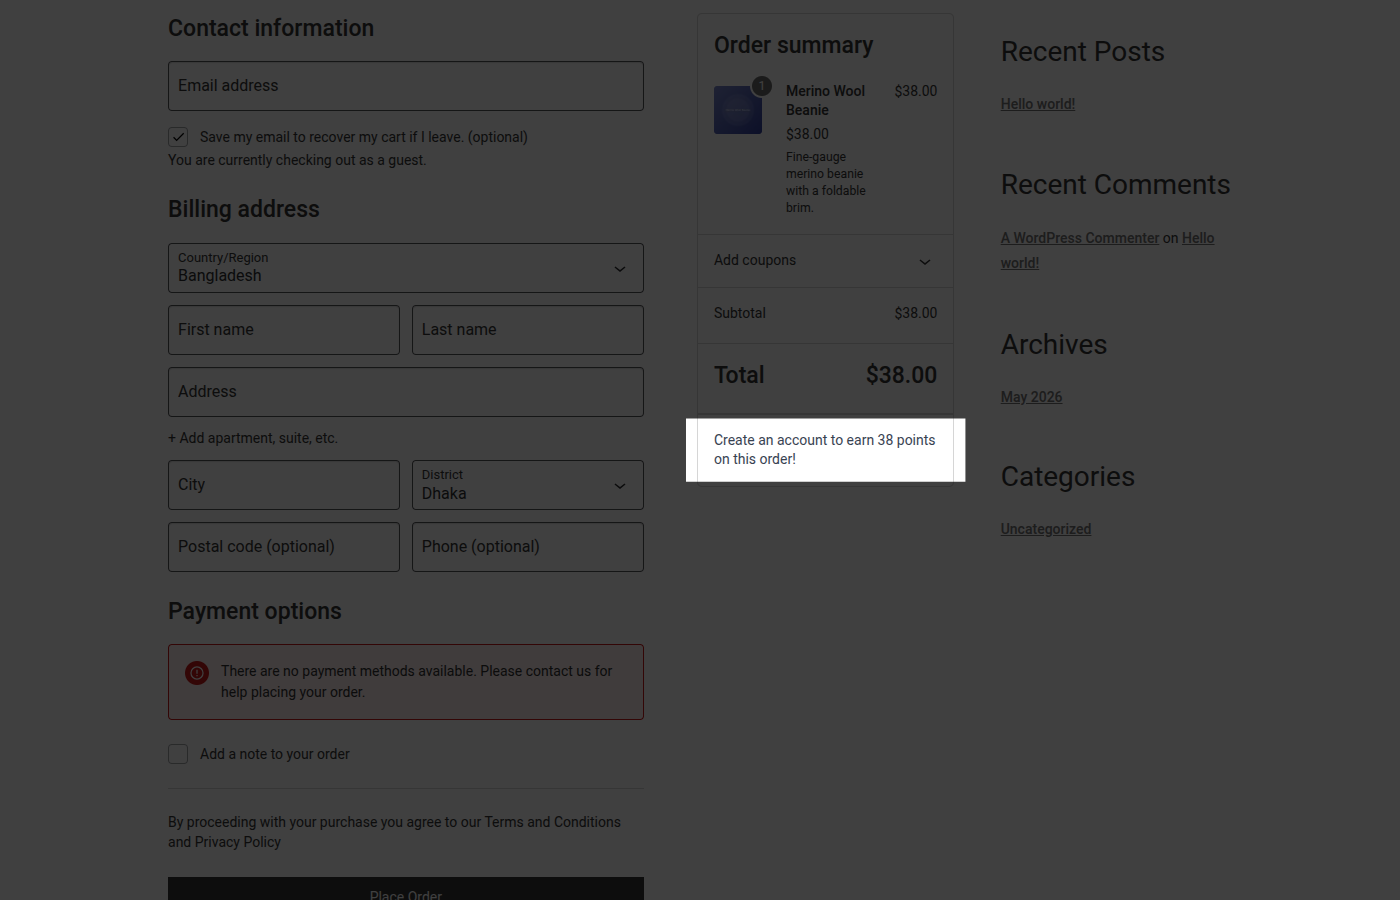 You can turn the guest-facing prompt on or off with the **Guest Notice** option under **Display & System** see [Settings Reference](/pointbay/admin/settings-reference/#display--system).
---
## Refunds and Reversals
If an order that earned points is later refunded, PointBay automatically takes those points back so customers can't keep points for merchandise they returned:
- **Full refund** every point earned on the order is removed.
- **Partial refund** points are removed in proportion to the amount refunded (see Example 2 above).
If the customer has already spent the points being clawed back, their balance can go **negative**. They aren't blocked from shopping they simply need to earn their way back to a positive balance before they can redeem points again. Points are also reversed automatically if a cash-on-delivery order is cancelled or fails before payment completes.
Every credit and every reversal is recorded as its own line in [Points History](/pointbay/admin/points-history/), so you can always see exactly why a customer's balance changed.
---
## Troubleshooting
- **Points weren't awarded on a completed order** check that **Order Status Trigger** matches the status the order actually reached. If your store's workflow ends at "Processing" rather than "Completed," orders will never trigger points unless the trigger is set to match.
- **Review bonus wasn't given** only a customer's *first* approved review of a given product counts, and reviews from logged-out guests never qualify.
- **Registration bonus wasn't given** confirm **Points for Registration** isn't still `0`, which is the default (off) state.
- **A refunded order's points didn't reverse** reversals are triggered by WooCommerce's own refund process; a manual balance edit outside WooCommerce (e.g. directly in the database) won't trigger one. Use [Manual Adjustments](/pointbay/admin/manual-adjustments/) to correct balances by hand instead.
See [Troubleshooting](/pointbay/resources/troubleshooting/) for more general issues.
## Related
- [Redeeming Points](/pointbay/features/redeeming-points/)
- [VIP Tiers](/pointbay/features/vip-tiers/)
- [Manual Adjustments](/pointbay/admin/manual-adjustments/)
- [Settings Reference](/pointbay/admin/settings-reference/)
## Redeeming Points
URL: https://wpanchorbay.github.io/pointbay/features/redeeming-points/
Description: How customers turn loyalty points into a discount at checkout, and the settings that control it.
Earning points only pays off if customers can actually spend them redemption is where their balance turns into real money off their next order. PointBay works with both the modern WooCommerce **Block** checkout and the **Classic** checkout, and the discount updates the order total in place as soon as it's applied.
Everything on this page is configured at **WooCommerce → Settings → Loyalty Points**, under the **Redemption Rules** group. Full field-by-field details are in the [Settings Reference](/pointbay/admin/settings-reference/#redemption-rules).
---
## How It Works
1. **The redeem panel appears.** A logged-in customer whose balance meets your minimum sees a **Redeem Loyalty Points** panel at checkout.
You can turn the guest-facing prompt on or off with the **Guest Notice** option under **Display & System** see [Settings Reference](/pointbay/admin/settings-reference/#display--system).
---
## Refunds and Reversals
If an order that earned points is later refunded, PointBay automatically takes those points back so customers can't keep points for merchandise they returned:
- **Full refund** every point earned on the order is removed.
- **Partial refund** points are removed in proportion to the amount refunded (see Example 2 above).
If the customer has already spent the points being clawed back, their balance can go **negative**. They aren't blocked from shopping they simply need to earn their way back to a positive balance before they can redeem points again. Points are also reversed automatically if a cash-on-delivery order is cancelled or fails before payment completes.
Every credit and every reversal is recorded as its own line in [Points History](/pointbay/admin/points-history/), so you can always see exactly why a customer's balance changed.
---
## Troubleshooting
- **Points weren't awarded on a completed order** check that **Order Status Trigger** matches the status the order actually reached. If your store's workflow ends at "Processing" rather than "Completed," orders will never trigger points unless the trigger is set to match.
- **Review bonus wasn't given** only a customer's *first* approved review of a given product counts, and reviews from logged-out guests never qualify.
- **Registration bonus wasn't given** confirm **Points for Registration** isn't still `0`, which is the default (off) state.
- **A refunded order's points didn't reverse** reversals are triggered by WooCommerce's own refund process; a manual balance edit outside WooCommerce (e.g. directly in the database) won't trigger one. Use [Manual Adjustments](/pointbay/admin/manual-adjustments/) to correct balances by hand instead.
See [Troubleshooting](/pointbay/resources/troubleshooting/) for more general issues.
## Related
- [Redeeming Points](/pointbay/features/redeeming-points/)
- [VIP Tiers](/pointbay/features/vip-tiers/)
- [Manual Adjustments](/pointbay/admin/manual-adjustments/)
- [Settings Reference](/pointbay/admin/settings-reference/)
## Redeeming Points
URL: https://wpanchorbay.github.io/pointbay/features/redeeming-points/
Description: How customers turn loyalty points into a discount at checkout, and the settings that control it.
Earning points only pays off if customers can actually spend them redemption is where their balance turns into real money off their next order. PointBay works with both the modern WooCommerce **Block** checkout and the **Classic** checkout, and the discount updates the order total in place as soon as it's applied.
Everything on this page is configured at **WooCommerce → Settings → Loyalty Points**, under the **Redemption Rules** group. Full field-by-field details are in the [Settings Reference](/pointbay/admin/settings-reference/#redemption-rules).
---
## How It Works
1. **The redeem panel appears.** A logged-in customer whose balance meets your minimum sees a **Redeem Loyalty Points** panel at checkout.
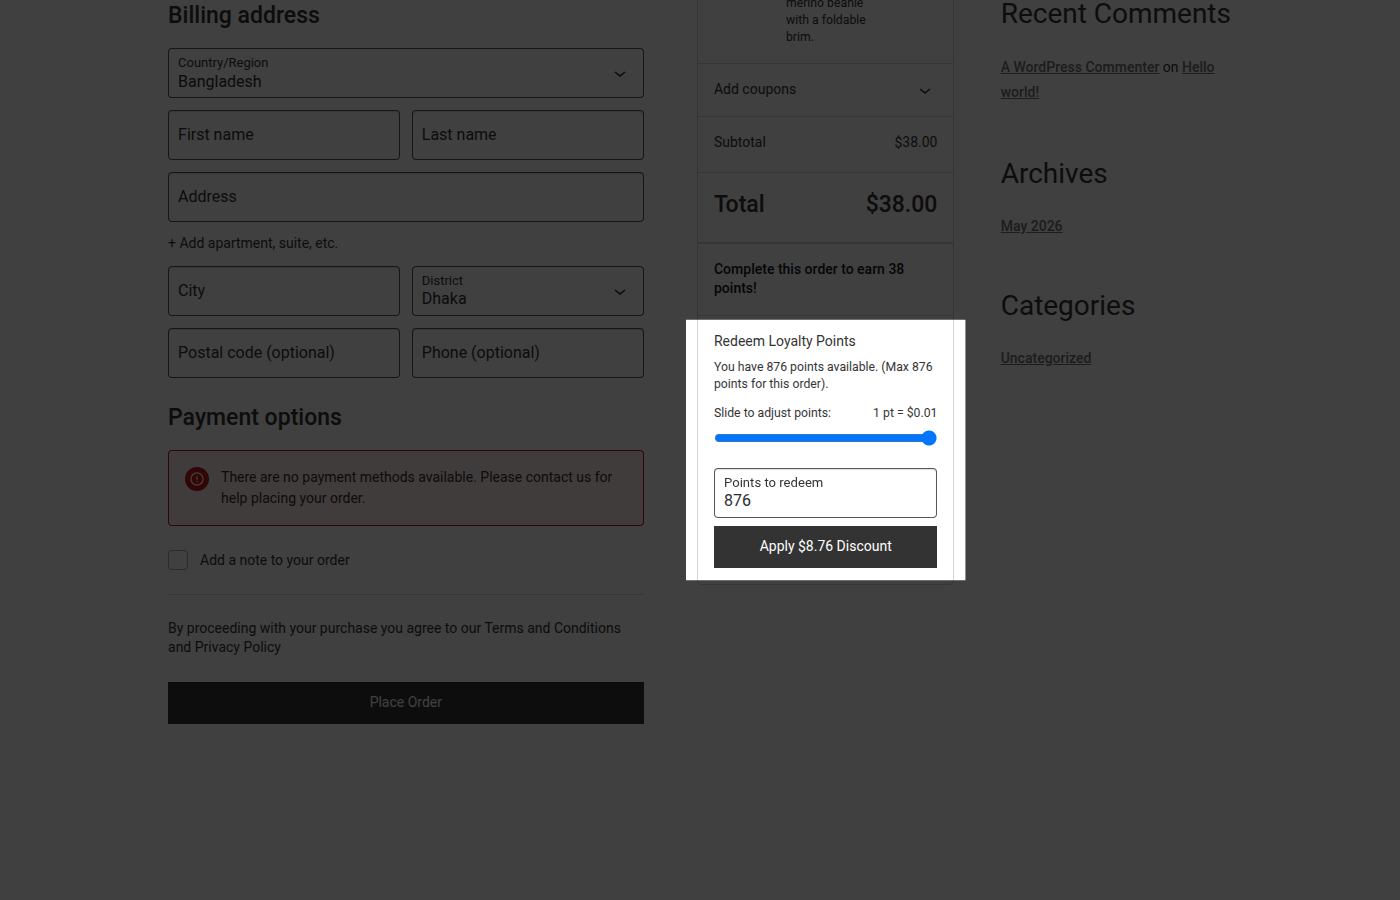 2. **They choose an amount.** Using the slider or number field, the customer picks how many points to apply and sees a live discount preview update as they move it.
3. **They apply it.** Clicking **Apply Discount** updates the order total immediately. A confirmation shows how many points were redeemed and the discount given, with an option to **Remove** them and start over.
2. **They choose an amount.** Using the slider or number field, the customer picks how many points to apply and sees a live discount preview update as they move it.
3. **They apply it.** Clicking **Apply Discount** updates the order total immediately. A confirmation shows how many points were redeemed and the discount given, with an option to **Remove** them and start over.
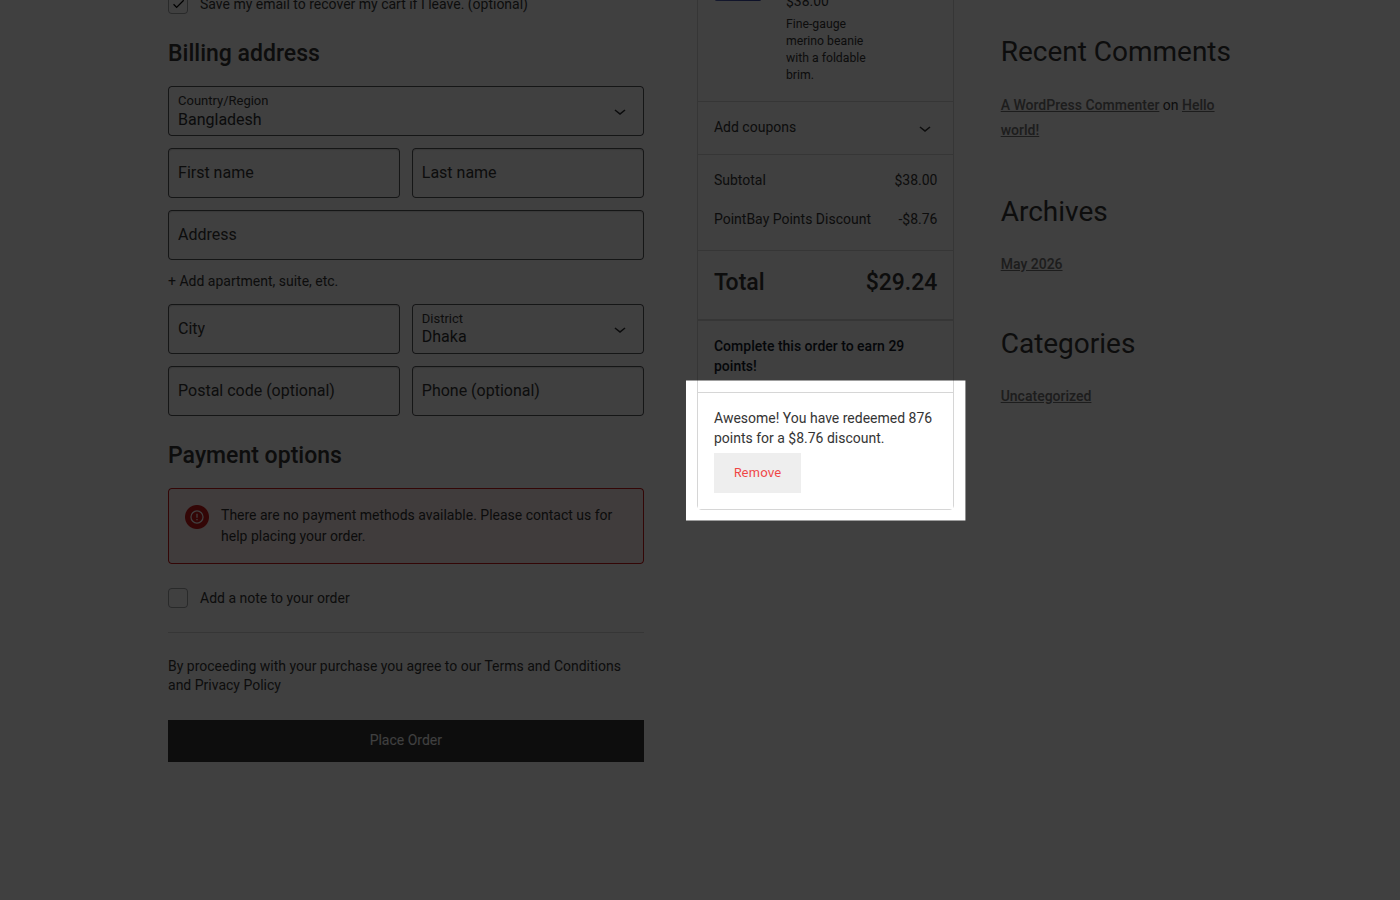 4. **The order is placed.** When the order goes through, the points are deducted from the customer's balance and recorded as a debit in [Points History](/pointbay/admin/points-history/).
Points can never be spent twice even if a customer opens several tabs and tries to check out at once, PointBay ensures the same points are only ever used on one order.
---
## Walkthrough: Set a Redemption Rate and Test It
1. Go to **WooCommerce → Settings → Loyalty Points**, in the **Redemption Rules** group.
2. Set **Point Value ($)** to what one point should be worth the default is `$0.01`.
3. Set **Minimum Points to Redeem** to the smallest balance a customer should be allowed to cash in, for example `100`.
4. Leave **Redemption Mode** on **Cart Fee** unless you have a reason to switch it (see below).
5. Click **Save changes**.
4. **The order is placed.** When the order goes through, the points are deducted from the customer's balance and recorded as a debit in [Points History](/pointbay/admin/points-history/).
Points can never be spent twice even if a customer opens several tabs and tries to check out at once, PointBay ensures the same points are only ever used on one order.
---
## Walkthrough: Set a Redemption Rate and Test It
1. Go to **WooCommerce → Settings → Loyalty Points**, in the **Redemption Rules** group.
2. Set **Point Value ($)** to what one point should be worth the default is `$0.01`.
3. Set **Minimum Points to Redeem** to the smallest balance a customer should be allowed to cash in, for example `100`.
4. Leave **Redemption Mode** on **Cart Fee** unless you have a reason to switch it (see below).
5. Click **Save changes**.
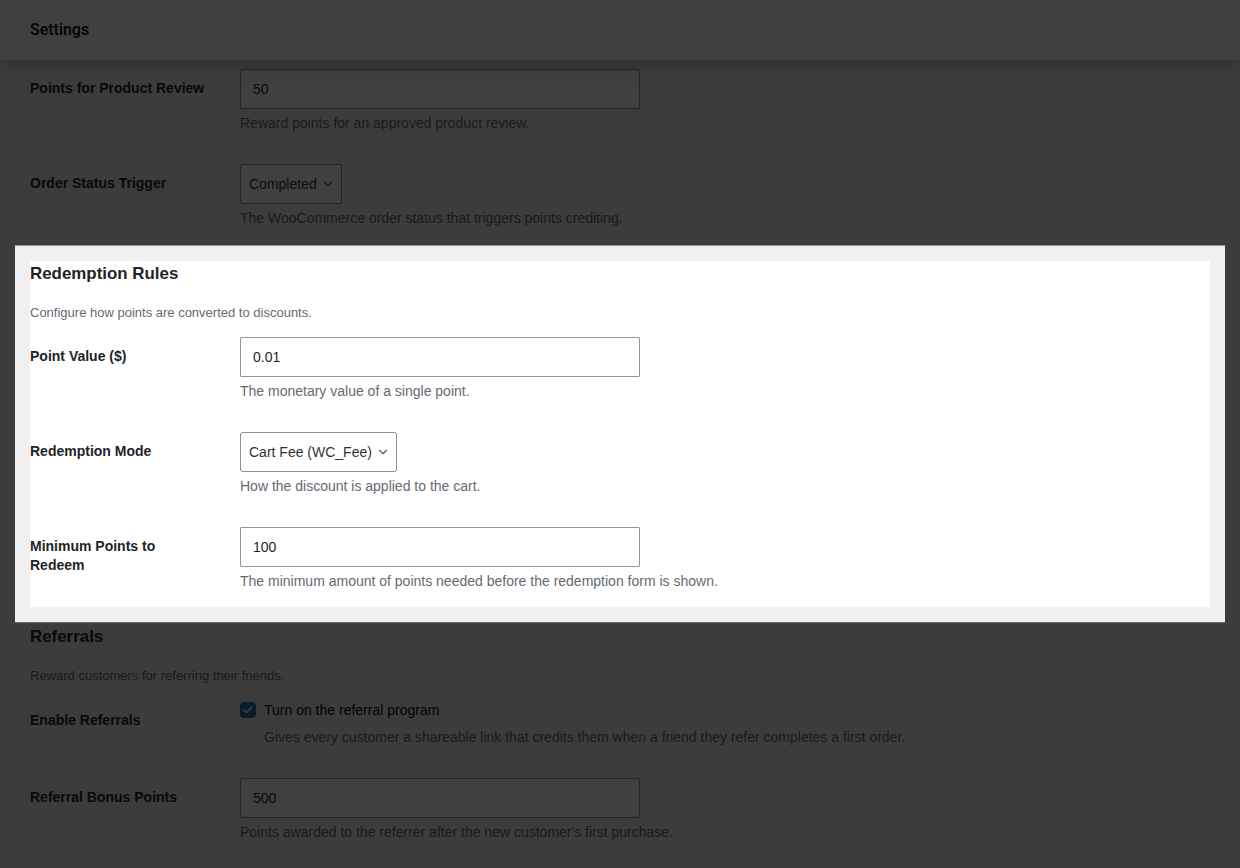 6. **Verify it worked:** log in as a test customer who has at least the minimum balance, go to checkout, and confirm the **Redeem Loyalty Points** panel appears and correctly discounts the order total.
---
## Worked Examples
**Example 1 a simple redemption.** At the default $0.01 per point and a 100-point minimum, a customer with 350 points redeems all of them: 350 × $0.01 = a **$3.50 discount** on their order.
**Example 2 the discount can't exceed the order.** A customer with 5,000 points tries to redeem all of them ($50.00 worth) on a $30 order. PointBay caps the discount at the order total, so the discount applied is **$30.00**, not $50.00 the customer's remaining points stay in their balance for next time rather than being wasted.
---
## Redemption Mode: Cart Fee vs. Virtual Coupon
Both modes give the customer the exact same discount amount the difference is purely how it's applied under the hood:
- **Cart Fee** (default) applies the discount as a negative line-item fee on the cart. This is the simplest option and works correctly for the vast majority of stores. On the settings screen this option is labeled **Cart Fee (WC_Fee)** the `(WC_Fee)` part is an internal WooCommerce class name you can ignore.
- **Virtual Coupon** applies the discount as an automatically generated, single-use coupon instead. Choose this if you use an automated tax service (such as TaxJar or Avalara) and notice incorrect tax totals when points are redeemed, since coupon-based discounts are handled natively by WooCommerce's own tax calculation.
:::tip
If redeeming points ever produces incorrect tax totals at checkout, switch **Redemption Mode** from Cart Fee to Virtual Coupon and re-test. See [Troubleshooting](/pointbay/resources/troubleshooting/) for more.
:::
---
## Classic vs. Block Checkout
The redeem experience is identical on both checkout types a **Redeem Loyalty Points** panel with a slider and an **Apply Discount** button so there's nothing extra to configure for either one. Only logged-in customers who meet the minimum-points threshold see the panel at all; guests and customers below the minimum see no redemption UI.
---
## Troubleshooting
- **The redeem panel doesn't appear** confirm the customer is logged in and their balance meets **Minimum Points to Redeem**. Guests never see the panel regardless of balance.
- **The discount looks right but taxes are wrong** switch **Redemption Mode** to **Virtual Coupon**; see above.
- **A customer says they redeemed points but their order shows no discount** check [Points History](/pointbay/admin/points-history/) for a matching debit; if none exists, the redemption likely wasn't completed (e.g. the order was abandoned before payment).
See [Troubleshooting](/pointbay/resources/troubleshooting/) for more general issues.
## Related
- [Earning Points](/pointbay/features/earning-points/)
- [Points History](/pointbay/admin/points-history/)
- [Settings Reference](/pointbay/admin/settings-reference/)
## Referral Program
URL: https://wpanchorbay.github.io/pointbay/features/referral-program/
Description: Reward customers for referring friends to your store with the built-in refer-a-friend program.
:::note
The core Referral Program referral links, the referrer's bonus, and the Refer a Friend card on the customer dashboard is **built into the free plugin**. **PointBay Pro** adds one thing on top: an optional welcome bonus paid to the *new* customer who was referred.
:::
The Referral Program turns your existing customers into advocates for your store. Each customer gets a personal referral link to share; when a friend uses it to sign up and place their first order, the referring customer earns bonus points and you can optionally reward the new customer too, giving both sides a reason to make the introduction happen.
The **Enable Referrals** toggle and the referrer's bonus amount live at **WooCommerce → Settings → Loyalty Points**, under the **Referrals** group (this group is shared with the free plugin, which owns the referrer-side settings). Full field details are in the [Settings Reference](/pointbay/admin/settings-reference/#referrals).
---
## How It Works
1. **Share** a logged-in customer copies their referral link from the **Refer a Friend** card on their [Customer Dashboard](/pointbay/features/customer-dashboard/).
2. **Visit** a friend clicks the link and arrives at your store. PointBay remembers the referral for 30 days, even if the friend doesn't buy immediately.
3. **Register** the friend creates an account.
4. **Purchase** the friend completes their first order.
5. **Reward** the referring customer receives their **Referral Bonus Points**, and the new customer receives their own **New Customer Bonus Points** welcome bonus, if you've set one above `0`.
Rewards are paid out **once per referred customer**, on their first completed order only later orders from the same friend don't earn the referrer any more points.
---
## Walkthrough: Turn On Referrals
1. Go to **WooCommerce → Settings → Loyalty Points**, in the **Referrals** group.

2. Turn on **Enable Referrals**.
3. Set **Referral Bonus Points** to what you want the referrer to earn (the default is `1000`).
4. With **PointBay Pro** active, also set **New Customer Bonus Points** to what the new customer should earn as a welcome bonus (the default is `100`) or leave it at `0` to reward only the referrer. This field doesn't appear at all without Pro.
6. **Verify it worked:** log in as a test customer who has at least the minimum balance, go to checkout, and confirm the **Redeem Loyalty Points** panel appears and correctly discounts the order total.
---
## Worked Examples
**Example 1 a simple redemption.** At the default $0.01 per point and a 100-point minimum, a customer with 350 points redeems all of them: 350 × $0.01 = a **$3.50 discount** on their order.
**Example 2 the discount can't exceed the order.** A customer with 5,000 points tries to redeem all of them ($50.00 worth) on a $30 order. PointBay caps the discount at the order total, so the discount applied is **$30.00**, not $50.00 the customer's remaining points stay in their balance for next time rather than being wasted.
---
## Redemption Mode: Cart Fee vs. Virtual Coupon
Both modes give the customer the exact same discount amount the difference is purely how it's applied under the hood:
- **Cart Fee** (default) applies the discount as a negative line-item fee on the cart. This is the simplest option and works correctly for the vast majority of stores. On the settings screen this option is labeled **Cart Fee (WC_Fee)** the `(WC_Fee)` part is an internal WooCommerce class name you can ignore.
- **Virtual Coupon** applies the discount as an automatically generated, single-use coupon instead. Choose this if you use an automated tax service (such as TaxJar or Avalara) and notice incorrect tax totals when points are redeemed, since coupon-based discounts are handled natively by WooCommerce's own tax calculation.
:::tip
If redeeming points ever produces incorrect tax totals at checkout, switch **Redemption Mode** from Cart Fee to Virtual Coupon and re-test. See [Troubleshooting](/pointbay/resources/troubleshooting/) for more.
:::
---
## Classic vs. Block Checkout
The redeem experience is identical on both checkout types a **Redeem Loyalty Points** panel with a slider and an **Apply Discount** button so there's nothing extra to configure for either one. Only logged-in customers who meet the minimum-points threshold see the panel at all; guests and customers below the minimum see no redemption UI.
---
## Troubleshooting
- **The redeem panel doesn't appear** confirm the customer is logged in and their balance meets **Minimum Points to Redeem**. Guests never see the panel regardless of balance.
- **The discount looks right but taxes are wrong** switch **Redemption Mode** to **Virtual Coupon**; see above.
- **A customer says they redeemed points but their order shows no discount** check [Points History](/pointbay/admin/points-history/) for a matching debit; if none exists, the redemption likely wasn't completed (e.g. the order was abandoned before payment).
See [Troubleshooting](/pointbay/resources/troubleshooting/) for more general issues.
## Related
- [Earning Points](/pointbay/features/earning-points/)
- [Points History](/pointbay/admin/points-history/)
- [Settings Reference](/pointbay/admin/settings-reference/)
## Referral Program
URL: https://wpanchorbay.github.io/pointbay/features/referral-program/
Description: Reward customers for referring friends to your store with the built-in refer-a-friend program.
:::note
The core Referral Program referral links, the referrer's bonus, and the Refer a Friend card on the customer dashboard is **built into the free plugin**. **PointBay Pro** adds one thing on top: an optional welcome bonus paid to the *new* customer who was referred.
:::
The Referral Program turns your existing customers into advocates for your store. Each customer gets a personal referral link to share; when a friend uses it to sign up and place their first order, the referring customer earns bonus points and you can optionally reward the new customer too, giving both sides a reason to make the introduction happen.
The **Enable Referrals** toggle and the referrer's bonus amount live at **WooCommerce → Settings → Loyalty Points**, under the **Referrals** group (this group is shared with the free plugin, which owns the referrer-side settings). Full field details are in the [Settings Reference](/pointbay/admin/settings-reference/#referrals).
---
## How It Works
1. **Share** a logged-in customer copies their referral link from the **Refer a Friend** card on their [Customer Dashboard](/pointbay/features/customer-dashboard/).
2. **Visit** a friend clicks the link and arrives at your store. PointBay remembers the referral for 30 days, even if the friend doesn't buy immediately.
3. **Register** the friend creates an account.
4. **Purchase** the friend completes their first order.
5. **Reward** the referring customer receives their **Referral Bonus Points**, and the new customer receives their own **New Customer Bonus Points** welcome bonus, if you've set one above `0`.
Rewards are paid out **once per referred customer**, on their first completed order only later orders from the same friend don't earn the referrer any more points.
---
## Walkthrough: Turn On Referrals
1. Go to **WooCommerce → Settings → Loyalty Points**, in the **Referrals** group.

2. Turn on **Enable Referrals**.
3. Set **Referral Bonus Points** to what you want the referrer to earn (the default is `1000`).
4. With **PointBay Pro** active, also set **New Customer Bonus Points** to what the new customer should earn as a welcome bonus (the default is `100`) or leave it at `0` to reward only the referrer. This field doesn't appear at all without Pro.
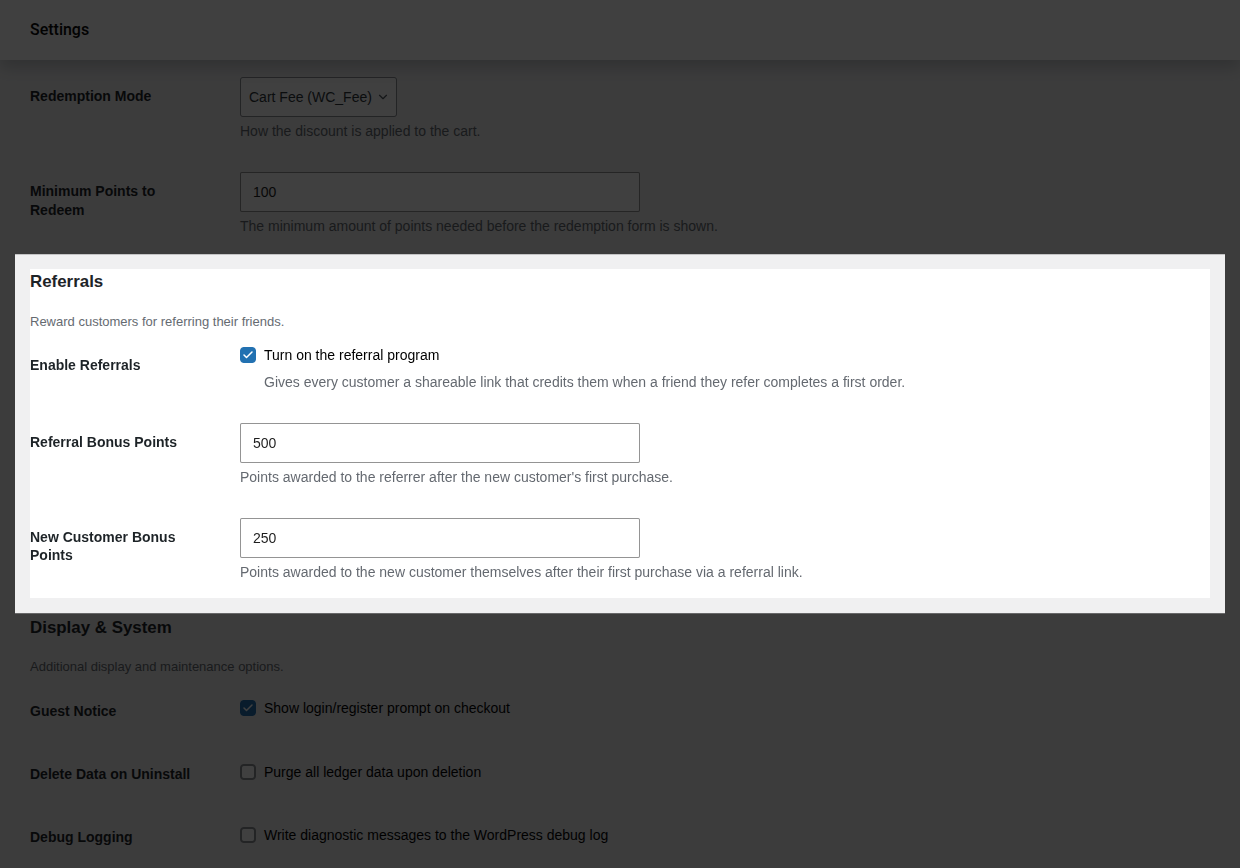 5. Click **Save changes**.
6. **Verify it worked:** with Pro active, go to **WooCommerce → Referrals & Tiers** and confirm the page reflects your configured new-customer bonus amount.

---
## Worked Examples
**Example 1 a successful referral, defaults.** Priya shares her referral link. Her friend Marcus clicks it, registers, and places his first order two weeks later. PointBay credits Priya **1,000 points** (Referral Bonus Points) and Marcus **100 points** (New Customer Bonus Points) both the moment Marcus's order is completed.
**Example 2 a referred order is refunded.** If Marcus's qualifying order is fully refunded before or after the bonuses were paid, PointBay automatically reverses **both** bonuses: Priya's 1,000 points and Marcus's 100 points are debited back out, each recorded as its own reversal entry in Points History.
---
## Reward Rules
- **One reward per friend.** A referrer is rewarded only on a referred friend's *first* completed order never on that friend's later purchases.
- **No self-referrals.** A customer can't earn a bonus by using their own referral link.
- **Reversals.** If the qualifying first order is later cancelled, fails, or is fully refunded, both the referrer's bonus and the new customer's welcome bonus are automatically taken back. **Partial** refunds, unlike with regular purchase points, don't affect the referral reward it's all-or-nothing based on whether the order is still a completed, non-refunded order.
All referral rewards and reversals appear in [Points History](/pointbay/admin/points-history/), labeled **Referral Bonus** / **Referral Reversal** for the referrer's side and **Referral Signup Bonus** / **Referral Signup Reversal** for the new customer's welcome bonus.
---
## Overview Page
With Pro active, **WooCommerce → Referrals & Tiers** gives you a read-only summary of your referral and tier setup at a glance including the current new-customer bonus amount and whether VIP Tiers are enabled with an **Edit Settings** link that takes you back to the settings screen to make changes.
5. Click **Save changes**.
6. **Verify it worked:** with Pro active, go to **WooCommerce → Referrals & Tiers** and confirm the page reflects your configured new-customer bonus amount.

---
## Worked Examples
**Example 1 a successful referral, defaults.** Priya shares her referral link. Her friend Marcus clicks it, registers, and places his first order two weeks later. PointBay credits Priya **1,000 points** (Referral Bonus Points) and Marcus **100 points** (New Customer Bonus Points) both the moment Marcus's order is completed.
**Example 2 a referred order is refunded.** If Marcus's qualifying order is fully refunded before or after the bonuses were paid, PointBay automatically reverses **both** bonuses: Priya's 1,000 points and Marcus's 100 points are debited back out, each recorded as its own reversal entry in Points History.
---
## Reward Rules
- **One reward per friend.** A referrer is rewarded only on a referred friend's *first* completed order never on that friend's later purchases.
- **No self-referrals.** A customer can't earn a bonus by using their own referral link.
- **Reversals.** If the qualifying first order is later cancelled, fails, or is fully refunded, both the referrer's bonus and the new customer's welcome bonus are automatically taken back. **Partial** refunds, unlike with regular purchase points, don't affect the referral reward it's all-or-nothing based on whether the order is still a completed, non-refunded order.
All referral rewards and reversals appear in [Points History](/pointbay/admin/points-history/), labeled **Referral Bonus** / **Referral Reversal** for the referrer's side and **Referral Signup Bonus** / **Referral Signup Reversal** for the new customer's welcome bonus.
---
## Overview Page
With Pro active, **WooCommerce → Referrals & Tiers** gives you a read-only summary of your referral and tier setup at a glance including the current new-customer bonus amount and whether VIP Tiers are enabled with an **Edit Settings** link that takes you back to the settings screen to make changes.
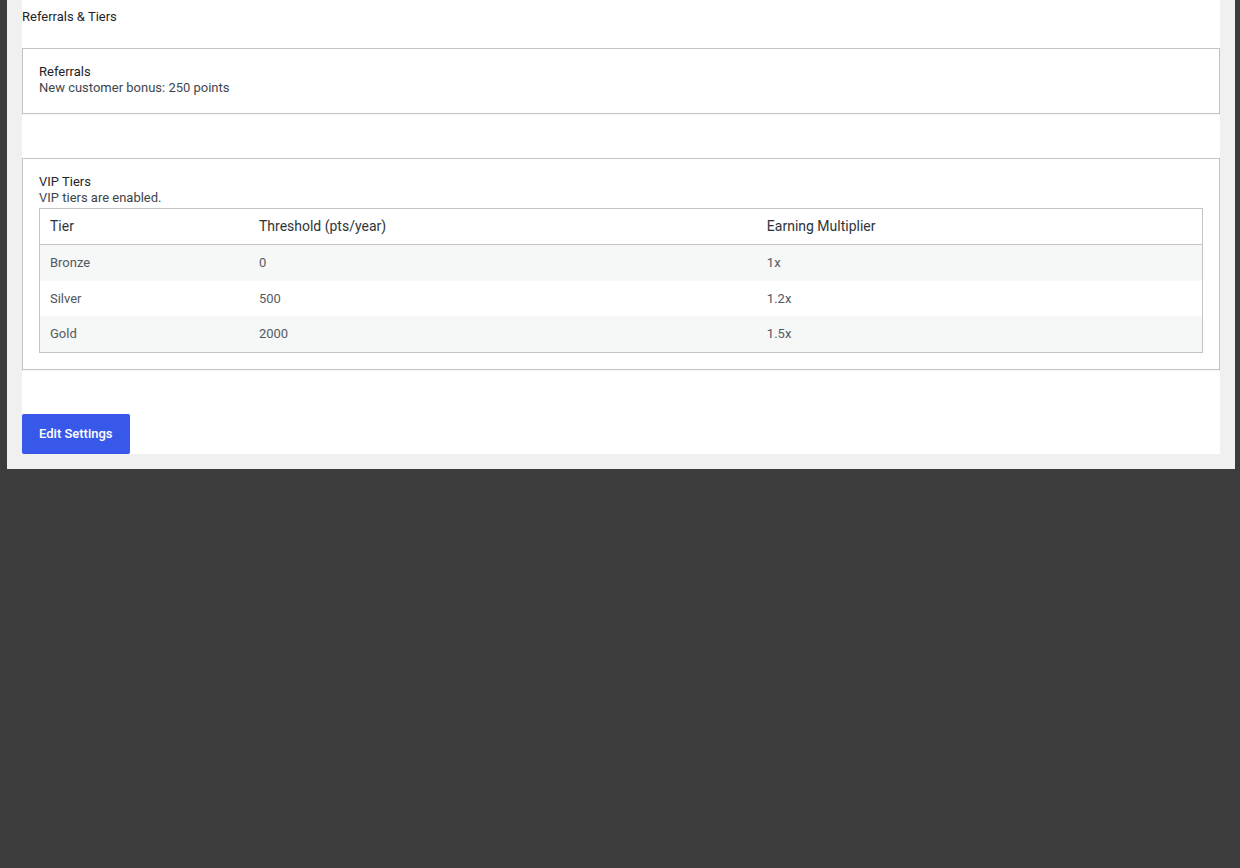 ---
## Troubleshooting
- **A referral link didn't credit anyone** confirm the friend actually completed checkout, not just visited; no order means no reward. Also confirm the 30-day tracking window hadn't already expired.
- **The referrer wasn't rewarded but the friend definitely bought something** check whether this was that friend's first order ever, since only a first order qualifies.
- **Both bonuses vanished after a refund** this is expected: a full refund on the qualifying order reverses both sides of the referral reward.
See [Troubleshooting](/pointbay/resources/troubleshooting/) for more general issues.
## Related
- [Customer Dashboard](/pointbay/features/customer-dashboard/)
- [VIP Tiers](/pointbay/features/vip-tiers/)
- [Points History](/pointbay/admin/points-history/)
- [Settings Reference](/pointbay/admin/settings-reference/)
## VIP Tiers
URL: https://wpanchorbay.github.io/pointbay/features/vip-tiers/
Description: Reward your most loyal customers with membership tiers that earn points faster.
:::note[Pro feature]
VIP Tiers are part of **PointBay Pro**. You'll need the Pro add-on active to configure tiers and give members a faster earning rate.
:::
VIP Tiers let you group customers into membership levels for example Bronze, Silver, and Gold and reward your most loyal shoppers with an **earning multiplier** that makes every purchase they make earn points faster. It's a way to give your best customers a visible reason to keep coming back instead of shopping elsewhere. Customers move up (and, if they go quiet, back down) automatically, with no manual work on your part.
The **Enable VIP Tiers** toggle and the tier editor both live at **WooCommerce → Settings → Loyalty Points**, under the **VIP Tiers** group turning the toggle on reveals the editor right there on the same page. The separate **Referrals & Tiers** admin page only shows a read-only summary of your configured tiers, with a link back to this settings screen to make changes. Full field details are in the [Settings Reference](/pointbay/admin/settings-reference/#vip-tiers).
---
## How It Works
- **Qualifying for a tier.** A customer's tier is based on the points they've **earned in the last 365 days** a rolling window, not their current spendable balance. This means members need to stay active to keep their status: points earned more than a year ago stop counting toward their tier, even if they haven't spent them.
- **Earning faster.** When a member makes a purchase, their tier's multiplier is applied on top of the normal Points Per Dollar rate.
- **Automatic updates.** A customer is promoted the moment they cross a threshold. Every customer's tier is also re-checked automatically once a day, so members who drop below a threshold because their older points aged out of the 365-day window are moved down to the correct tier without you having to intervene.
---
## Walkthrough: Turn On Tiers and Set Your Thresholds
1. Go to **WooCommerce → Settings → Loyalty Points**, in the **VIP Tiers** group.
2. Turn on **Enable VIP Tiers** the tier editor appears directly below the toggle, pre-filled with three starter tiers.

3. Each row is one tier with three fields, in this order: **Tier Name**, **Points Threshold** (points per year needed to reach it), and **Multiplier**. The rows don't have a persistent column header above them only placeholder text inside each empty field so remember the order is always Name → Threshold → Multiplier.
---
## Troubleshooting
- **A referral link didn't credit anyone** confirm the friend actually completed checkout, not just visited; no order means no reward. Also confirm the 30-day tracking window hadn't already expired.
- **The referrer wasn't rewarded but the friend definitely bought something** check whether this was that friend's first order ever, since only a first order qualifies.
- **Both bonuses vanished after a refund** this is expected: a full refund on the qualifying order reverses both sides of the referral reward.
See [Troubleshooting](/pointbay/resources/troubleshooting/) for more general issues.
## Related
- [Customer Dashboard](/pointbay/features/customer-dashboard/)
- [VIP Tiers](/pointbay/features/vip-tiers/)
- [Points History](/pointbay/admin/points-history/)
- [Settings Reference](/pointbay/admin/settings-reference/)
## VIP Tiers
URL: https://wpanchorbay.github.io/pointbay/features/vip-tiers/
Description: Reward your most loyal customers with membership tiers that earn points faster.
:::note[Pro feature]
VIP Tiers are part of **PointBay Pro**. You'll need the Pro add-on active to configure tiers and give members a faster earning rate.
:::
VIP Tiers let you group customers into membership levels for example Bronze, Silver, and Gold and reward your most loyal shoppers with an **earning multiplier** that makes every purchase they make earn points faster. It's a way to give your best customers a visible reason to keep coming back instead of shopping elsewhere. Customers move up (and, if they go quiet, back down) automatically, with no manual work on your part.
The **Enable VIP Tiers** toggle and the tier editor both live at **WooCommerce → Settings → Loyalty Points**, under the **VIP Tiers** group turning the toggle on reveals the editor right there on the same page. The separate **Referrals & Tiers** admin page only shows a read-only summary of your configured tiers, with a link back to this settings screen to make changes. Full field details are in the [Settings Reference](/pointbay/admin/settings-reference/#vip-tiers).
---
## How It Works
- **Qualifying for a tier.** A customer's tier is based on the points they've **earned in the last 365 days** a rolling window, not their current spendable balance. This means members need to stay active to keep their status: points earned more than a year ago stop counting toward their tier, even if they haven't spent them.
- **Earning faster.** When a member makes a purchase, their tier's multiplier is applied on top of the normal Points Per Dollar rate.
- **Automatic updates.** A customer is promoted the moment they cross a threshold. Every customer's tier is also re-checked automatically once a day, so members who drop below a threshold because their older points aged out of the 365-day window are moved down to the correct tier without you having to intervene.
---
## Walkthrough: Turn On Tiers and Set Your Thresholds
1. Go to **WooCommerce → Settings → Loyalty Points**, in the **VIP Tiers** group.
2. Turn on **Enable VIP Tiers** the tier editor appears directly below the toggle, pre-filled with three starter tiers.

3. Each row is one tier with three fields, in this order: **Tier Name**, **Points Threshold** (points per year needed to reach it), and **Multiplier**. The rows don't have a persistent column header above them only placeholder text inside each empty field so remember the order is always Name → Threshold → Multiplier.
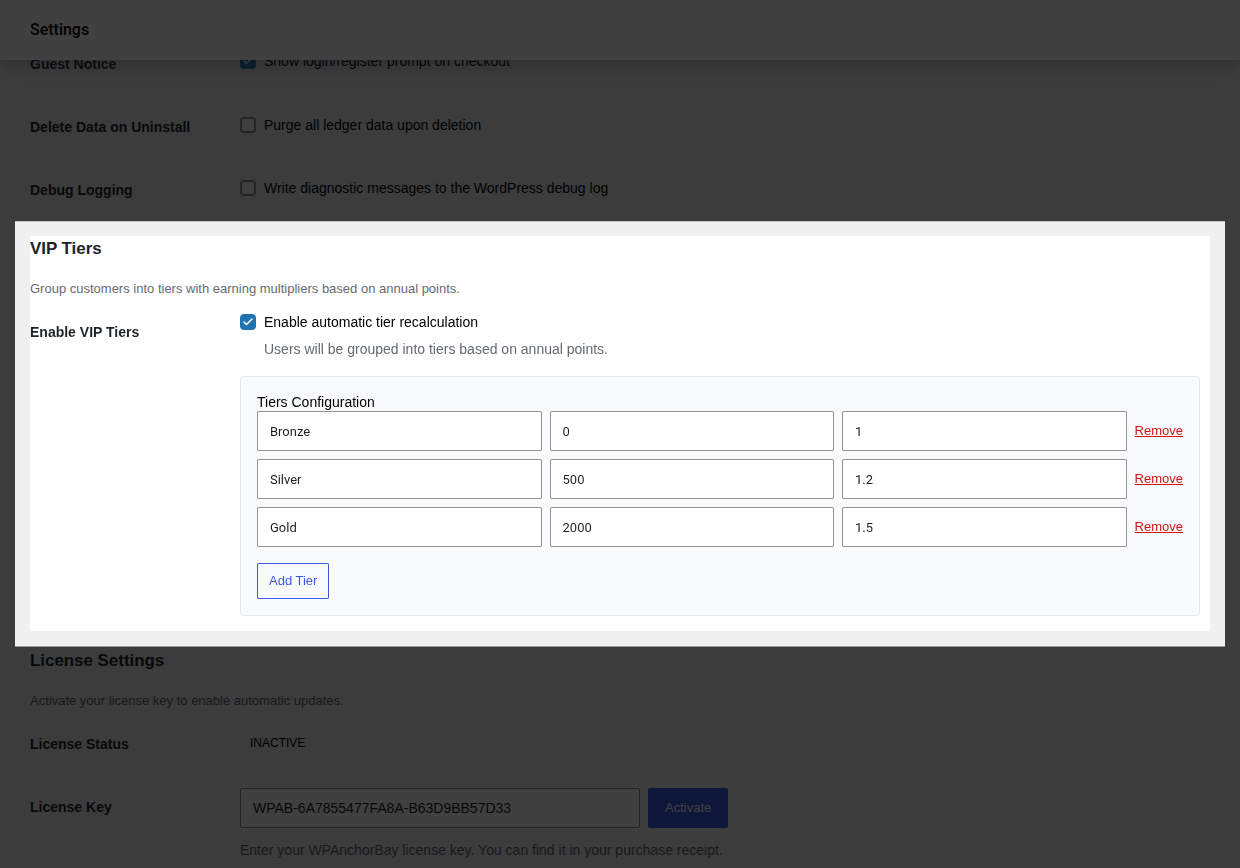 4. Edit the starter tiers to match your program, or use **Add Tier** / **Remove** to change how many tiers you offer.
5. Click **Save changes** at the bottom of the page there's no separate save for this group.
6. **Verify it worked:** place a test order as a customer who qualifies for a non-Bronze tier and confirm in [Points History](/pointbay/admin/points-history/) that the multiplier was applied to the credited amount. You can also check **WooCommerce → Referrals & Tiers** for a read-only summary of your configured tiers.
---
## Starter Tiers
PointBay Pro ships with a ready-to-use set of three tiers that you're free to rename, re-threshold, remove, or add to:
| Tier | Points needed (per year) | Earning multiplier |
|---|---|---|
| **Bronze** | 0 | 1.0× (standard rate) |
| **Silver** | 500 | 1.2× (20% faster) |
| **Gold** | 2,000 | 1.5× (50% faster) |
4. Edit the starter tiers to match your program, or use **Add Tier** / **Remove** to change how many tiers you offer.
5. Click **Save changes** at the bottom of the page there's no separate save for this group.
6. **Verify it worked:** place a test order as a customer who qualifies for a non-Bronze tier and confirm in [Points History](/pointbay/admin/points-history/) that the multiplier was applied to the credited amount. You can also check **WooCommerce → Referrals & Tiers** for a read-only summary of your configured tiers.
---
## Starter Tiers
PointBay Pro ships with a ready-to-use set of three tiers that you're free to rename, re-threshold, remove, or add to:
| Tier | Points needed (per year) | Earning multiplier |
|---|---|---|
| **Bronze** | 0 | 1.0× (standard rate) |
| **Silver** | 500 | 1.2× (20% faster) |
| **Gold** | 2,000 | 1.5× (50% faster) |
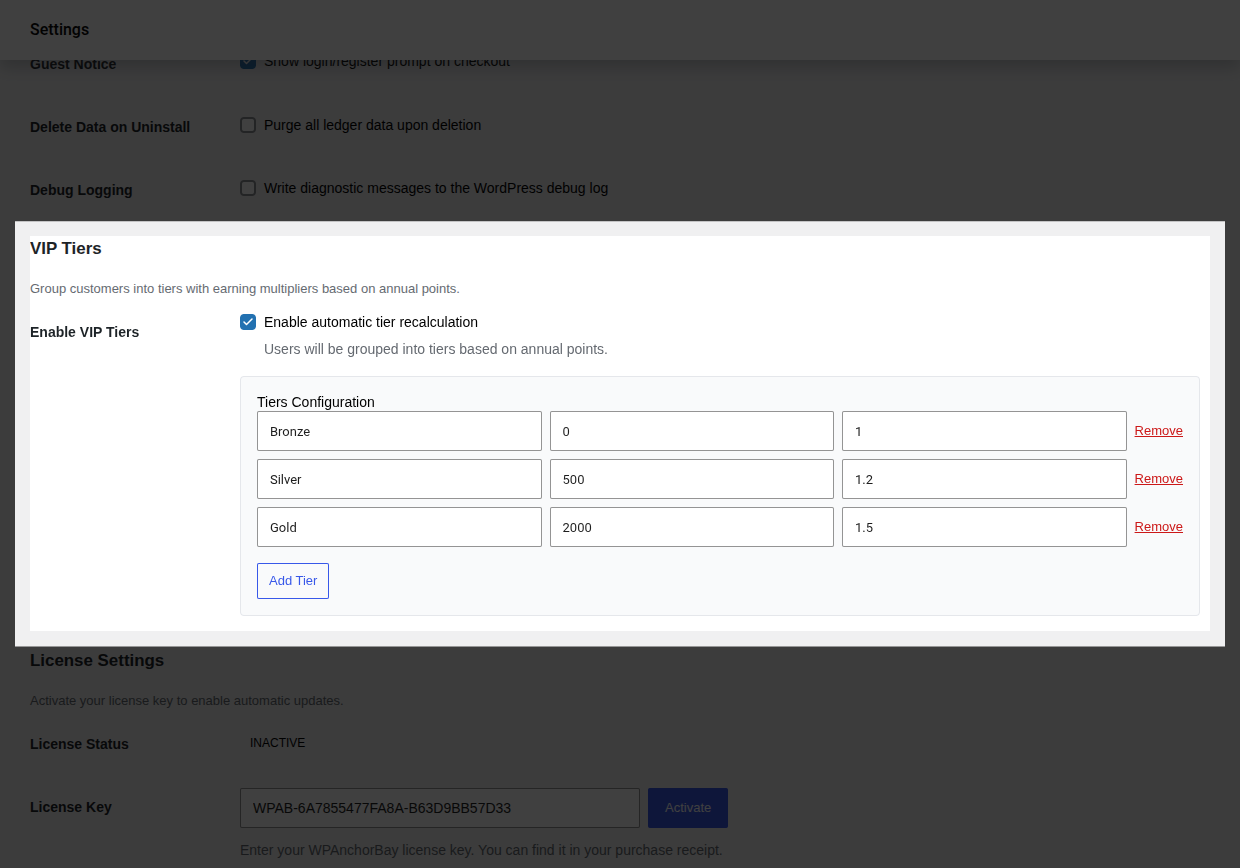 ---
## Worked Examples
**Example 1 a Gold member's purchase.** A **Gold** member (1.5×) places a $100 order at the default rate of 1 point per $1. Instead of the standard 100 points, they earn **150 points**.
**Example 2 a member drops a tier.** A Silver member (1.2×) earned 600 points 13 months ago and nothing since. Because those points have aged out of the 365-day qualifying window, the next daily tier check moves them back down to Bronze (1.0×) until they earn again.
---
## Edge Cases & Interactions
- Tier multipliers apply only to **purchase** points (see [Earning Points](/pointbay/features/earning-points/)) registration and review bonuses are always credited at their flat configured amount, unaffected by tier.
- If a purchase that benefited from a multiplier is later refunded, the reversal removes exactly what was credited (the multiplied amount), not a recalculated non-multiplied amount.
- Customers see their current tier and progress toward the next one on their [Customer Dashboard](/pointbay/features/customer-dashboard/).
---
## Troubleshooting
- **A customer's tier didn't update after a big purchase** tier promotions on crossing a threshold are immediate, but if it still looks wrong, confirm **Enable VIP Tiers** is actually on; the setting can be saved off after testing and forgotten.
- **A loyal customer got demoted unexpectedly** check whether their qualifying points simply aged out of the 365-day window; this is expected behavior, not a bug.
- **The tier editor rows are confusing** remember the fixed left-to-right order: Name, Threshold, Multiplier.
See [Troubleshooting](/pointbay/resources/troubleshooting/) for more general issues.
## Related
- [Earning Points](/pointbay/features/earning-points/)
- [Referral Program](/pointbay/features/referral-program/)
- [Customer Dashboard](/pointbay/features/customer-dashboard/)
- [Settings Reference](/pointbay/admin/settings-reference/)
## Installation & Licensing
URL: https://wpanchorbay.github.io/pointbay/getting-started/installation/
Description: Install PointBay, see what it adds to your store, and activate your PointBay Pro license.
This is the first stop before you can reward a single point it covers installing PointBay, confirming it took hold in your store, and, if you're using PointBay Pro, activating your license so it keeps itself updated.
---
## Prerequisites
Before you install, make sure your store meets these minimums:
- **WordPress** 6.8 or higher
- **WooCommerce** 6.1 or higher (required PointBay is a WooCommerce extension and won't do anything without it active)
- **PHP** 7.0 or higher (8.0+ recommended for best performance)
- **MySQL** 5.6+ or **MariaDB** 10.1+ using the InnoDB storage engine (the modern default on virtually every host)
If you're using PointBay Pro, have your license key ready you'll find it in your purchase receipt, in the format `WPAB-XXXXX-XXXXX-XXXXX`.
---
## Walkthrough: Install the Plugin
Choose whichever method matches how you normally manage plugins on this site.
### Option A: Upload in WordPress (recommended)
1. Download the plugin `.zip` file from your account.
2. In your WordPress admin, go to **Plugins → Add New** and click **Upload Plugin**.
---
## Worked Examples
**Example 1 a Gold member's purchase.** A **Gold** member (1.5×) places a $100 order at the default rate of 1 point per $1. Instead of the standard 100 points, they earn **150 points**.
**Example 2 a member drops a tier.** A Silver member (1.2×) earned 600 points 13 months ago and nothing since. Because those points have aged out of the 365-day qualifying window, the next daily tier check moves them back down to Bronze (1.0×) until they earn again.
---
## Edge Cases & Interactions
- Tier multipliers apply only to **purchase** points (see [Earning Points](/pointbay/features/earning-points/)) registration and review bonuses are always credited at their flat configured amount, unaffected by tier.
- If a purchase that benefited from a multiplier is later refunded, the reversal removes exactly what was credited (the multiplied amount), not a recalculated non-multiplied amount.
- Customers see their current tier and progress toward the next one on their [Customer Dashboard](/pointbay/features/customer-dashboard/).
---
## Troubleshooting
- **A customer's tier didn't update after a big purchase** tier promotions on crossing a threshold are immediate, but if it still looks wrong, confirm **Enable VIP Tiers** is actually on; the setting can be saved off after testing and forgotten.
- **A loyal customer got demoted unexpectedly** check whether their qualifying points simply aged out of the 365-day window; this is expected behavior, not a bug.
- **The tier editor rows are confusing** remember the fixed left-to-right order: Name, Threshold, Multiplier.
See [Troubleshooting](/pointbay/resources/troubleshooting/) for more general issues.
## Related
- [Earning Points](/pointbay/features/earning-points/)
- [Referral Program](/pointbay/features/referral-program/)
- [Customer Dashboard](/pointbay/features/customer-dashboard/)
- [Settings Reference](/pointbay/admin/settings-reference/)
## Installation & Licensing
URL: https://wpanchorbay.github.io/pointbay/getting-started/installation/
Description: Install PointBay, see what it adds to your store, and activate your PointBay Pro license.
This is the first stop before you can reward a single point it covers installing PointBay, confirming it took hold in your store, and, if you're using PointBay Pro, activating your license so it keeps itself updated.
---
## Prerequisites
Before you install, make sure your store meets these minimums:
- **WordPress** 6.8 or higher
- **WooCommerce** 6.1 or higher (required PointBay is a WooCommerce extension and won't do anything without it active)
- **PHP** 7.0 or higher (8.0+ recommended for best performance)
- **MySQL** 5.6+ or **MariaDB** 10.1+ using the InnoDB storage engine (the modern default on virtually every host)
If you're using PointBay Pro, have your license key ready you'll find it in your purchase receipt, in the format `WPAB-XXXXX-XXXXX-XXXXX`.
---
## Walkthrough: Install the Plugin
Choose whichever method matches how you normally manage plugins on this site.
### Option A: Upload in WordPress (recommended)
1. Download the plugin `.zip` file from your account.
2. In your WordPress admin, go to **Plugins → Add New** and click **Upload Plugin**.
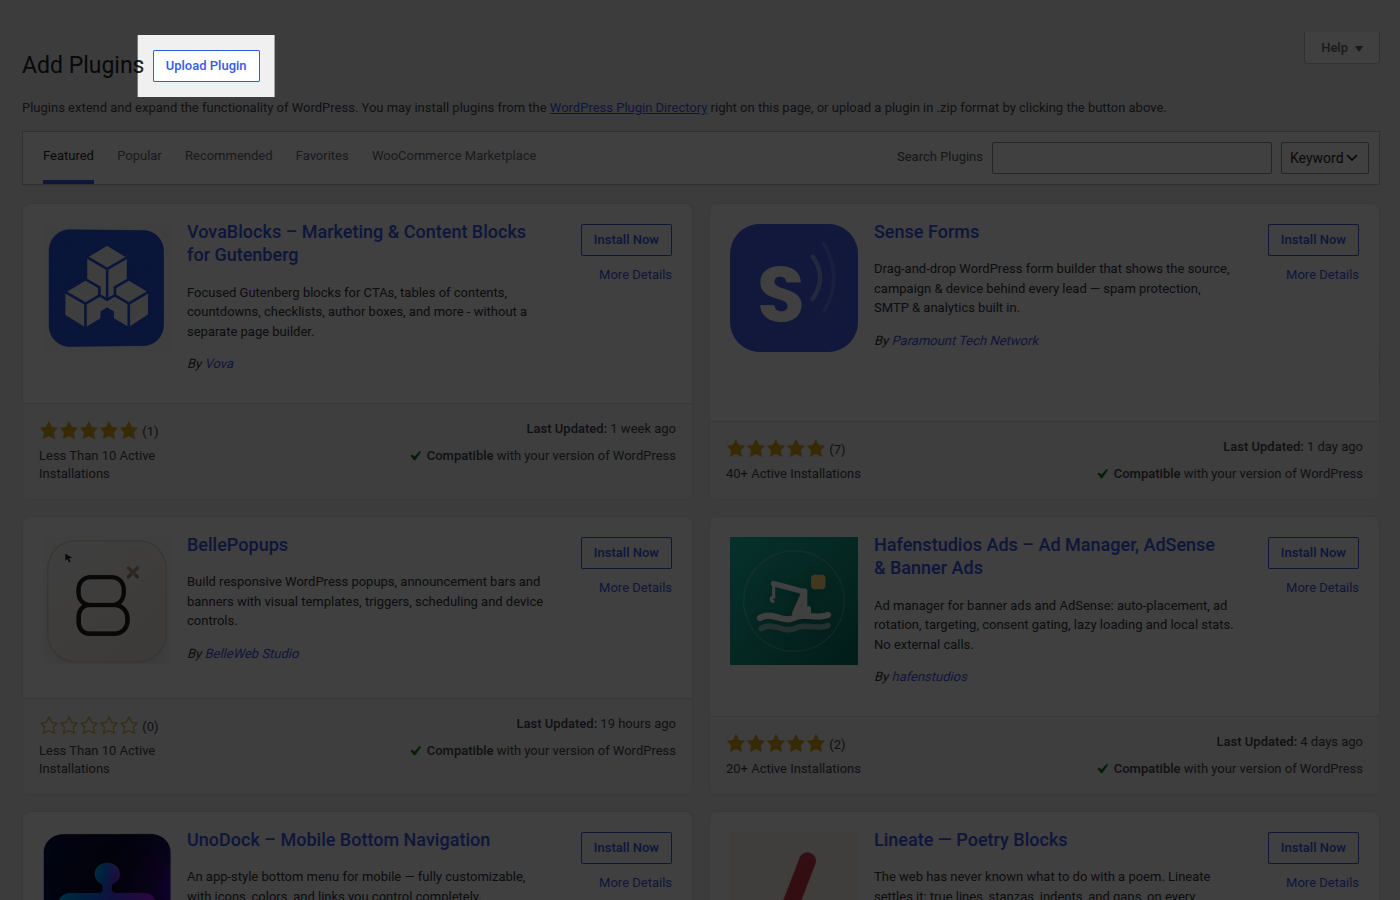 3. Click **Choose File**, select the `.zip` you downloaded, and click **Install Now**.
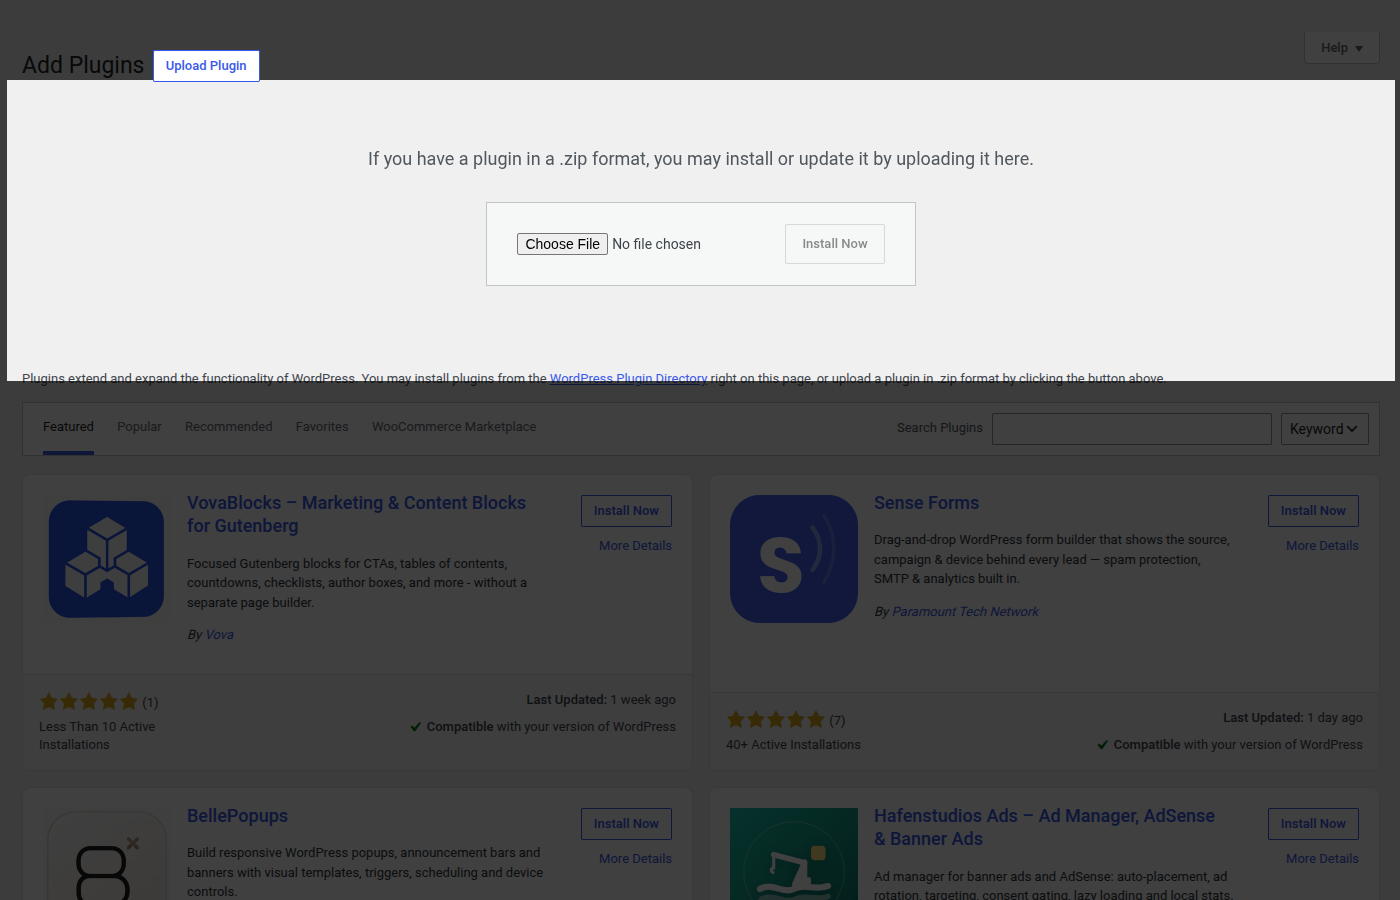 4. When the upload finishes, click **Activate Plugin**.

### Option B: Upload by FTP
Use this if your host limits web-based uploads (some shared-hosting plans do):
1. Unzip the download on your computer to get the plugin folder.
2. Connect to your server with an FTP/SFTP client and open `/wp-content/plugins/`.
3. Upload the plugin folder there.
4. In WordPress, go to **Plugins → Installed Plugins**, find PointBay in the list, and click **Activate**.
---
## Verify It Worked
Once activation finishes, everything PointBay adds lives under the **WooCommerce** menu in your admin sidebar:
- **WooCommerce → Settings → Loyalty Points** the settings screen where you configure the whole program. This same screen is also reachable via the shorter **Loyalty** link that appears directly under the WooCommerce menu.
- **WooCommerce → Points History** the full record of every points transaction, and where you can make manual adjustments.
- A **My Rewards** page inside every customer's **My Account** area, showing their balance and history.
4. When the upload finishes, click **Activate Plugin**.

### Option B: Upload by FTP
Use this if your host limits web-based uploads (some shared-hosting plans do):
1. Unzip the download on your computer to get the plugin folder.
2. Connect to your server with an FTP/SFTP client and open `/wp-content/plugins/`.
3. Upload the plugin folder there.
4. In WordPress, go to **Plugins → Installed Plugins**, find PointBay in the list, and click **Activate**.
---
## Verify It Worked
Once activation finishes, everything PointBay adds lives under the **WooCommerce** menu in your admin sidebar:
- **WooCommerce → Settings → Loyalty Points** the settings screen where you configure the whole program. This same screen is also reachable via the shorter **Loyalty** link that appears directly under the WooCommerce menu.
- **WooCommerce → Points History** the full record of every points transaction, and where you can make manual adjustments.
- A **My Rewards** page inside every customer's **My Account** area, showing their balance and history.
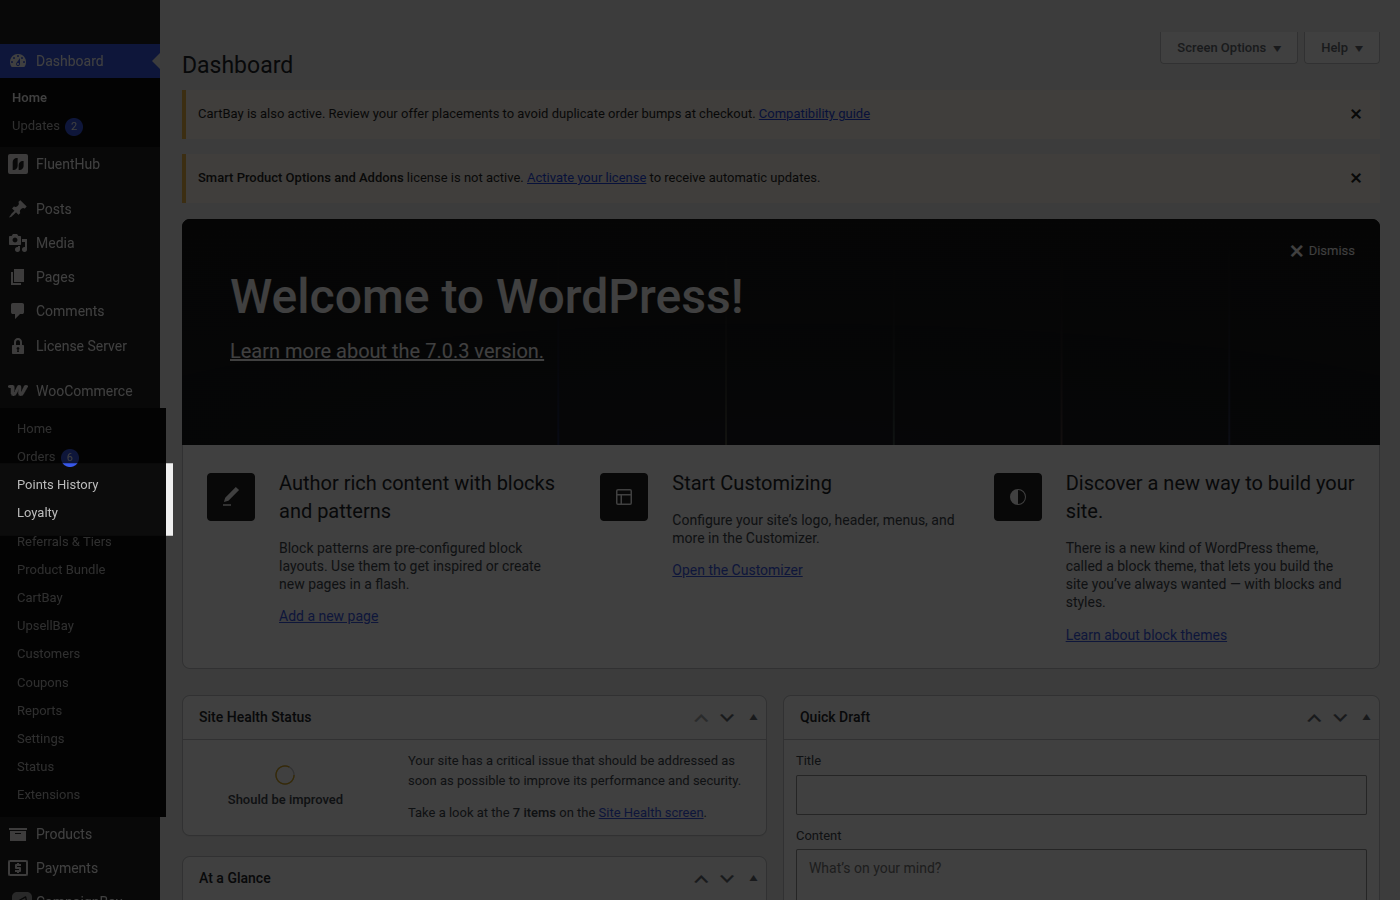 If you see the **Loyalty** and **Points History** links in the WooCommerce menu, installation succeeded and you're ready to configure the plugin see [Quick Setup](/pointbay/getting-started/quick-setup/).
---
## Activating Your Pro License
:::note[Pro feature]
Licensing applies to **PointBay Pro** only. The free plugin doesn't require a license at all.
:::
Activating your license unlocks automatic updates for PointBay Pro, so you don't have to manually reinstall it every time a new version ships.
1. Go to **WooCommerce → Settings → Loyalty Points** and scroll to the **License Settings** group.
2. Paste in your license key (`WPAB-XXXXX-XXXXX-XXXXX`).
3. Click **Activate**.

4. **Verify it worked:** confirm **License Status** now reads **Active**. The key field locks and a **Deactivate** button appears in its place.
To move the license to a different site later, come back to this screen and click **Deactivate** first a license can only be active on one site at a time.
:::caution
If **License Status** shows **Invalid** instead of **Active**, double-check the key for typos before contacting support a mistyped character is the most common cause.
:::
## What's Next
Head to [Quick Setup](/pointbay/getting-started/quick-setup/) to configure your first earning and redemption rules.
## Quick Setup
URL: https://wpanchorbay.github.io/pointbay/getting-started/quick-setup/
Description: Configure PointBay and test earning and redeeming points in a few minutes.
This is the fastest path to a working loyalty program enough to have customers earning and redeeming points today. It assumes PointBay is already installed and active; if it isn't yet, start with [Installation & Licensing](/pointbay/getting-started/installation/) first.
---
## Prerequisites
- PointBay is installed and active (see [Installation & Licensing](/pointbay/getting-started/installation/)).
- WooCommerce is set up with at least one purchasable product, so you can place a real test order.
- A test customer account you can log into separately from your admin account you'll need to check out as a customer, not as the store owner.
---
## Walkthrough: Configure and Test Your Program
All settings below are at **WooCommerce → Settings → Loyalty Points**, and every group is saved together with WooCommerce's own **Save changes** button at the bottom of the page there's no separate save per section.
### Step 1: Set your earning rate
1. In the **Earning Points** group, set **Points Per Dollar** how many points a customer earns for each $1 of order subtotal. The default is `1`.
2. Optionally set **Points for Registration** and **Points for Product Review** to reward those actions too (both default to `0`, which turns them off).
3. Choose the **Order Status Trigger** the order status that awards purchase points. The default is **Completed**.
If you see the **Loyalty** and **Points History** links in the WooCommerce menu, installation succeeded and you're ready to configure the plugin see [Quick Setup](/pointbay/getting-started/quick-setup/).
---
## Activating Your Pro License
:::note[Pro feature]
Licensing applies to **PointBay Pro** only. The free plugin doesn't require a license at all.
:::
Activating your license unlocks automatic updates for PointBay Pro, so you don't have to manually reinstall it every time a new version ships.
1. Go to **WooCommerce → Settings → Loyalty Points** and scroll to the **License Settings** group.
2. Paste in your license key (`WPAB-XXXXX-XXXXX-XXXXX`).
3. Click **Activate**.

4. **Verify it worked:** confirm **License Status** now reads **Active**. The key field locks and a **Deactivate** button appears in its place.
To move the license to a different site later, come back to this screen and click **Deactivate** first a license can only be active on one site at a time.
:::caution
If **License Status** shows **Invalid** instead of **Active**, double-check the key for typos before contacting support a mistyped character is the most common cause.
:::
## What's Next
Head to [Quick Setup](/pointbay/getting-started/quick-setup/) to configure your first earning and redemption rules.
## Quick Setup
URL: https://wpanchorbay.github.io/pointbay/getting-started/quick-setup/
Description: Configure PointBay and test earning and redeeming points in a few minutes.
This is the fastest path to a working loyalty program enough to have customers earning and redeeming points today. It assumes PointBay is already installed and active; if it isn't yet, start with [Installation & Licensing](/pointbay/getting-started/installation/) first.
---
## Prerequisites
- PointBay is installed and active (see [Installation & Licensing](/pointbay/getting-started/installation/)).
- WooCommerce is set up with at least one purchasable product, so you can place a real test order.
- A test customer account you can log into separately from your admin account you'll need to check out as a customer, not as the store owner.
---
## Walkthrough: Configure and Test Your Program
All settings below are at **WooCommerce → Settings → Loyalty Points**, and every group is saved together with WooCommerce's own **Save changes** button at the bottom of the page there's no separate save per section.
### Step 1: Set your earning rate
1. In the **Earning Points** group, set **Points Per Dollar** how many points a customer earns for each $1 of order subtotal. The default is `1`.
2. Optionally set **Points for Registration** and **Points for Product Review** to reward those actions too (both default to `0`, which turns them off).
3. Choose the **Order Status Trigger** the order status that awards purchase points. The default is **Completed**.
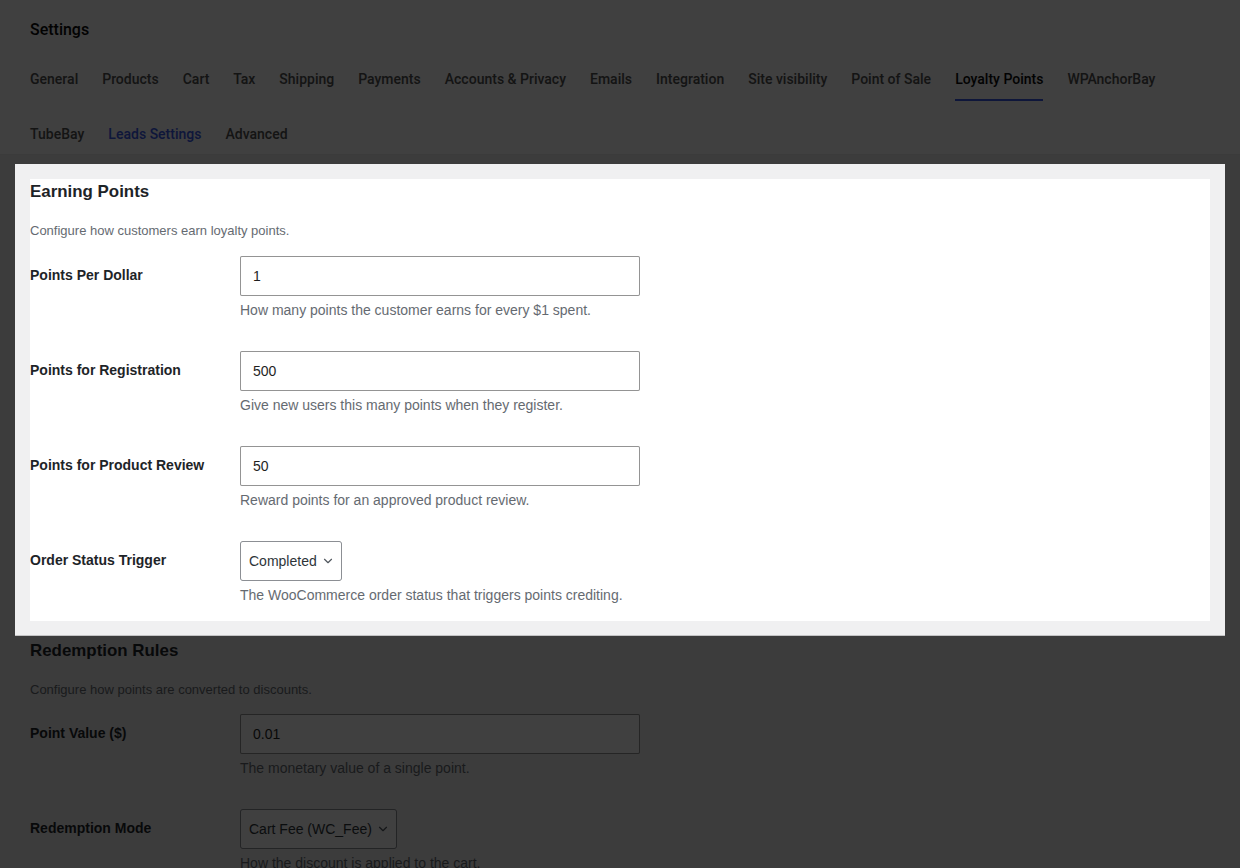 4. Click **Save changes**.
Full details on every field: [Settings Reference → Earning Points](/pointbay/admin/settings-reference/#earning-points).
### Step 2: Set your redemption rules
1. In the **Redemption Rules** group, set **Point Value ($)** what one point is worth as a discount. The default is `0.01` (100 points = $1.00 off).
2. Choose a **Redemption Mode** **Cart Fee** or **Virtual Coupon**. Cart Fee is the simpler default; switch to Virtual Coupon only if an automated tax service reports incorrect totals once redemption is live.
3. Set **Minimum Points to Redeem** the balance a customer needs before the redeem option appears at checkout (default `100`).
4. Click **Save changes**.
Full details on every field: [Settings Reference → Earning Points](/pointbay/admin/settings-reference/#earning-points).
### Step 2: Set your redemption rules
1. In the **Redemption Rules** group, set **Point Value ($)** what one point is worth as a discount. The default is `0.01` (100 points = $1.00 off).
2. Choose a **Redemption Mode** **Cart Fee** or **Virtual Coupon**. Cart Fee is the simpler default; switch to Virtual Coupon only if an automated tax service reports incorrect totals once redemption is live.
3. Set **Minimum Points to Redeem** the balance a customer needs before the redeem option appears at checkout (default `100`).
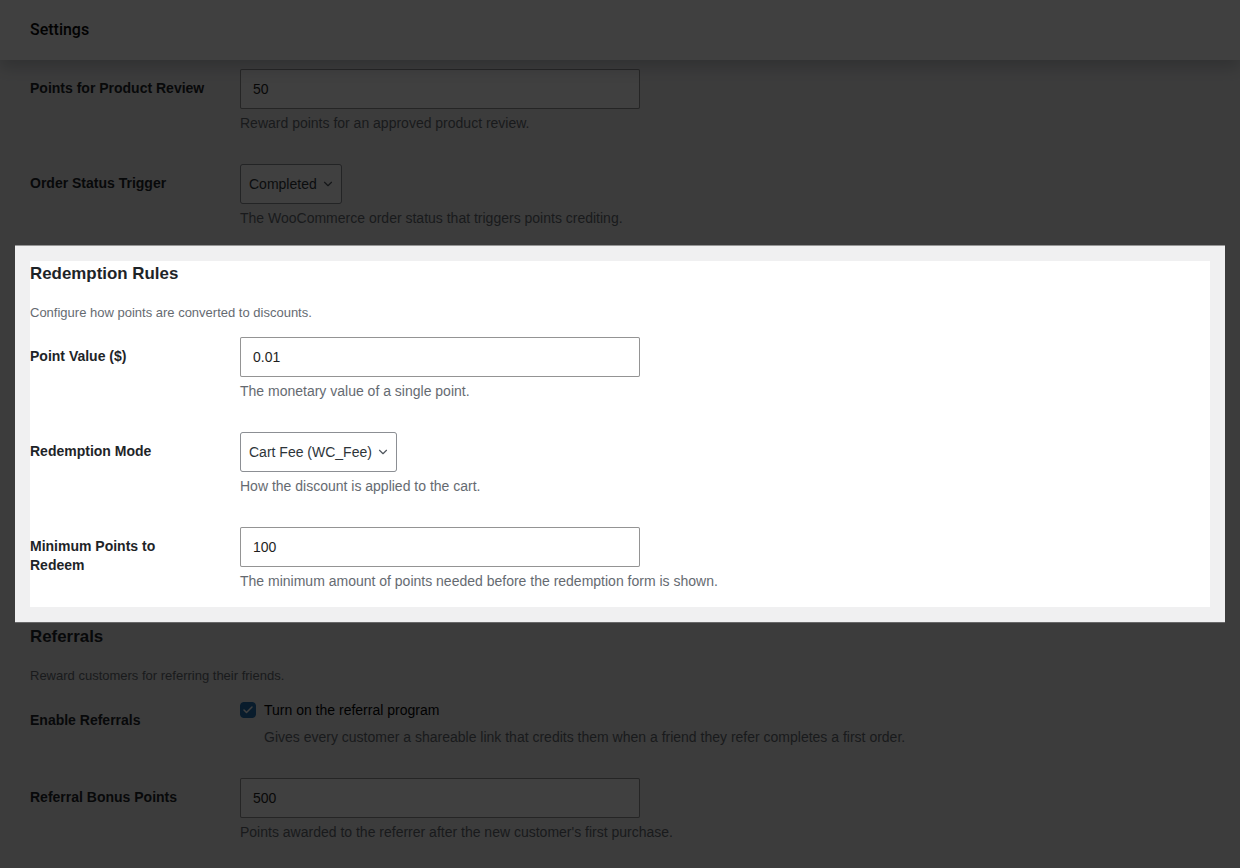 4. Click **Save changes**.
Full details on every field: [Settings Reference → Redemption Rules](/pointbay/admin/settings-reference/#redemption-rules).
### Step 3: Test earning
1. In an incognito window (or logged in as a separate test customer), buy a product and complete checkout.
2. In the admin, go to **WooCommerce → Orders** and set that order to your trigger status (for example, **Completed**), if it isn't already.
3. Open **WooCommerce → Points History** you should see a new **Credit** entry for that customer, referencing the order number.

### Step 4: Test redeeming
1. Make sure your test customer's balance is at or above your **Minimum Points to Redeem**.
2. As that customer, add items to the cart and go to checkout.
3. In the **Redeem Loyalty Points** panel, choose an amount and click **Apply Discount** the order total should drop by the corresponding amount.
4. Place the order, then check **Points History** again for the matching **Debit** entry.

---
## Verify It Worked
If Step 3 produced a Credit and Step 4 produced a Debit in Points History, matching the order and amount you'd expect, your program is fully wired up end to end earning and redeeming both work.
## What's Next
Your basic program is live. To go further:
- [Earning Points](/pointbay/features/earning-points/) the full detail on how points are calculated, including refunds.
- [Redeeming Points](/pointbay/features/redeeming-points/) checkout behavior, Cart Fee vs. Virtual Coupon, and edge cases.
With **PointBay Pro** active, you can also layer on:
- [VIP Tiers](/pointbay/features/vip-tiers/) reward repeat customers with a faster earning rate.
- [Referral Program](/pointbay/features/referral-program/) turn customers into advocates with a refer-a-friend link.
## Meta files and discovery endpoints
URL: https://wpanchorbay.github.io/pointbay/others/ai-crawler/
Description: Machine-readable files that help crawlers and AI agents discover the PointBay documentation.
These public machine-readable files help crawlers, agents, and automation discover the docs and related integration metadata:
- [robots.txt](../../robots.txt) for crawler policy and the sitemap reference.
- [llms.txt](../../llms.txt) for the concise LLM-friendly overview of the documentation set. This endpoint is also advertised with a site-wide `` tag.
- [llms-full.txt](../../llms-full.txt) for the expanded plain-text export of the docs corpus. This endpoint is also advertised with a site-wide `` tag.
- Per-page Markdown/MDX source exports under `/markdown/` (`
4. Click **Save changes**.
Full details on every field: [Settings Reference → Redemption Rules](/pointbay/admin/settings-reference/#redemption-rules).
### Step 3: Test earning
1. In an incognito window (or logged in as a separate test customer), buy a product and complete checkout.
2. In the admin, go to **WooCommerce → Orders** and set that order to your trigger status (for example, **Completed**), if it isn't already.
3. Open **WooCommerce → Points History** you should see a new **Credit** entry for that customer, referencing the order number.

### Step 4: Test redeeming
1. Make sure your test customer's balance is at or above your **Minimum Points to Redeem**.
2. As that customer, add items to the cart and go to checkout.
3. In the **Redeem Loyalty Points** panel, choose an amount and click **Apply Discount** the order total should drop by the corresponding amount.
4. Place the order, then check **Points History** again for the matching **Debit** entry.

---
## Verify It Worked
If Step 3 produced a Credit and Step 4 produced a Debit in Points History, matching the order and amount you'd expect, your program is fully wired up end to end earning and redeeming both work.
## What's Next
Your basic program is live. To go further:
- [Earning Points](/pointbay/features/earning-points/) the full detail on how points are calculated, including refunds.
- [Redeeming Points](/pointbay/features/redeeming-points/) checkout behavior, Cart Fee vs. Virtual Coupon, and edge cases.
With **PointBay Pro** active, you can also layer on:
- [VIP Tiers](/pointbay/features/vip-tiers/) reward repeat customers with a faster earning rate.
- [Referral Program](/pointbay/features/referral-program/) turn customers into advocates with a refer-a-friend link.
## Meta files and discovery endpoints
URL: https://wpanchorbay.github.io/pointbay/others/ai-crawler/
Description: Machine-readable files that help crawlers and AI agents discover the PointBay documentation.
These public machine-readable files help crawlers, agents, and automation discover the docs and related integration metadata:
- [robots.txt](../../robots.txt) for crawler policy and the sitemap reference.
- [llms.txt](../../llms.txt) for the concise LLM-friendly overview of the documentation set. This endpoint is also advertised with a site-wide `` tag.
- [llms-full.txt](../../llms-full.txt) for the expanded plain-text export of the docs corpus. This endpoint is also advertised with a site-wide `` tag.
- Per-page Markdown/MDX source exports under `/markdown/` (`