# NotifyBay Documentation
Canonical: https://wpanchorbay.github.io/notifybay/
This file contains the main public documentation content in a machine-readable text format.
## NotifyBay: The Ultimate WooCommerce Sales Recovery Suite
URL: https://wpanchorbay.github.io/notifybay/
Description: Master your store's inventory and pricing strategy. Automatically recover lost revenue with professional Back-in-Stock and Price Drop notifications.
import { CardGrid } from '@astrojs/starlight/components';
import Card from '../../components/starlight/Card.astro';
import WPAnchorBayFooter from '../../components/WPAnchorBayFooter.astro';
Automatically re-engage customers the micro-second a product is restocked or a price hits their target.
Analyze waitlist volume to prioritize your next purchase order. Know what will sell before you even buy it.
Powered by a robust background engine that monitors your inventory 24/7. No manual work required after setup.
Built with clean code, standard WooCommerce hooks, and a reliable Action Scheduler queue for high-volume stores.
---
## Intelligent Sales Recovery Modules
NotifyBay provides two powerful modules designed to handle the most common reasons for customer bounce: stockouts and price sensitivity.
Captures intent when inventory is at zero. Users can subscribe to specific variations (size/color) and receive an instant notification upon replenishment.
* **FOMO Social Proof:** Show how many others are waiting to create a "sold-out" buzz.
* **Double Opt-In:** Ensure high-quality leads with email verification.
Perfect for high-ticket items. Let customers set their "dream price" and wait for your next sale to trigger the conversion.
* **Target Pricing:** Customers choose exactly what they are willing to pay.
* **Archive Icons:** Heart icons on shop pages for quick wishlisting.
## Proactive Dashboard & Analytics
Transform your admin area into a data-driven command center. NotifyBay doesn't just send emails—it tells you how to grow your business.
Calculates the total market value of your current waitlists. Use this to justify inventory expansion or restocking priority.
A 6-month historical view of customer requests. Identify seasonal patterns and growing product popularity at a glance.
## Exceptional Customer Experience
Building trust is just as important as building a list. NotifyBay provides your customers with the transparency they expect from a premium store.
Customers can view, manage, or cancel their notification requests directly from their native WooCommerce dashboard.
Automatically send follow-up emails when restocked items are running low again, driving immediate "last chance" conversions.
## Built for Growth & Compliance
Whether you are a small boutique or a high-volume enterprise, NotifyBay scales with you.
Includes Double Opt-In support and one-click unsubscription to ensure your email marketing stays compliant and your reputation stays clean.
Place your forms anywhere using native Gutenberg Blocks or flexible Shortcodes. Complete control over your site's layout.
## Customer Dashboard (My Account)
URL: https://wpanchorbay.github.io/notifybay/customer-experience/customer-dashboard/
Description: Empower your customers with a professional self-service portal to manage their own notifications.
NotifyBay integrates seamlessly with the native WooCommerce **My Account** area. This provides a professional, transparent experience for your shoppers, allowing them to track and manage their own notification requests without needing to contact your support team.
By giving customers control over their data, you build trust and reduce administrative overhead for your store.
---
## Automatic Dashboard Integration
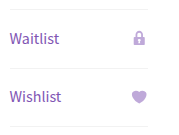
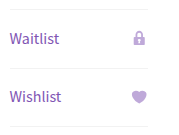
When NotifyBay is active, it automatically injects two new tabs into the standard WooCommerce account menu for logged-in users:
1. **Waitlist:** A portal for tracking back-in-stock requests.
2. **Wishlist:** A portal for tracking price drop alerts.
---
## ⏳ The Waitlist Portal
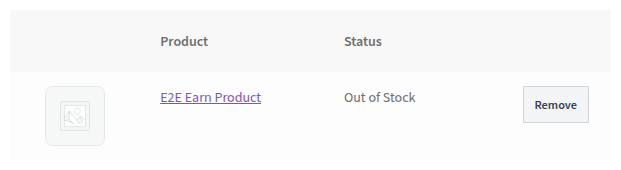
In the **Waitlist** section, customers can see a real-time table of every product they are waiting for. This serves as a "hidden" shopping cart of items they intend to buy once replenished.
### Self-Service Features:
* **Live Status Updates:** Customers can see if a product is still "Out of Stock" or if it has been marked as "Back in Stock!" (notified).
* **One-Click Removal:** If a customer is no longer interested in an item, they can click the **Remove** button to instantly opt-out of the notification.
* **Product Visuals:** Includes high-quality thumbnails to remind customers exactly what they are waiting for.
---
## ⭐ The Wishlist Portal
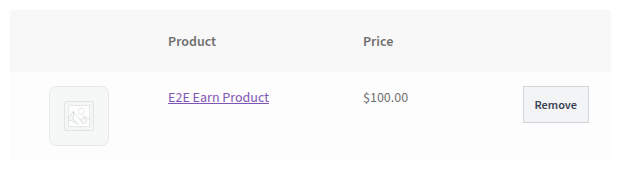
The **Wishlist** section provides similar transparency for customers waiting for a better deal.
### Self-Service Features:
* **Real-Time Pricing:** Shows the current price of the item compared to their interest level.
* **Manage Alerts:** Customers can prune their wishlist by removing items they have already purchased elsewhere or are no longer tracking.
---
## Privacy & Trust Benefits
Providing a dedicated dashboard tab for notifications is more than just a convenience—it's a strategic trust-builder for your brand:
1. **Transparency:** Customers can see exactly what data you are holding and which products they are subscribed to.
2. **Zero-Friction Opt-Out:** By providing an easy "Remove" button in their own account, you prevent frustrated customers from marking your automated emails as spam.
3. **Encourages Logins:** Customers are more likely to create an account and stay logged in to manage their lists, allowing you to build deeper customer profiles and track long-term intent.
---
## Setup & Troubleshooting
### Enabling the Tabs
There is **zero configuration** required to enable these tabs. As long as NotifyBay is installed and activated, the "Waitlist" tab will appear.
> [!NOTE]
> The **Wishlist** tab will only appear if the Price Drop feature is enabled in your [General Settings](/notifybay/settings/general-display/).
### "I don't see the tabs in my account?"
1. **Verify Activation:** Ensure the NotifyBay plugin is active.
2. **WooCommerce Version:** Ensure you are running a modern version of WooCommerce (5.0+).
3. **Theme Compatibility:** Most standard WooCommerce themes support custom account tabs automatically. If your theme uses a custom account layout, you may need to place the forms manually using [Shortcodes or Blocks](/notifybay/getting-started/manual-placement/).
## Dashboard Analytics
URL: https://wpanchorbay.github.io/notifybay/dashboard/analytics/
Description: Turn customer interest into actionable growth. Learn how to read your NotifyBay dashboard metrics and prioritize inventory.
The **NotifyBay Dashboard** transforms thousands of individual customer requests into a high-level strategic overview of your store's performance. It helps you stop guessing what to order or when to run a sale by showing you exactly what your customers want right now.
To access your analytics, navigate to **NotifyBay > Dashboard** in your WordPress admin.
---
## 1. Top Metric Cards
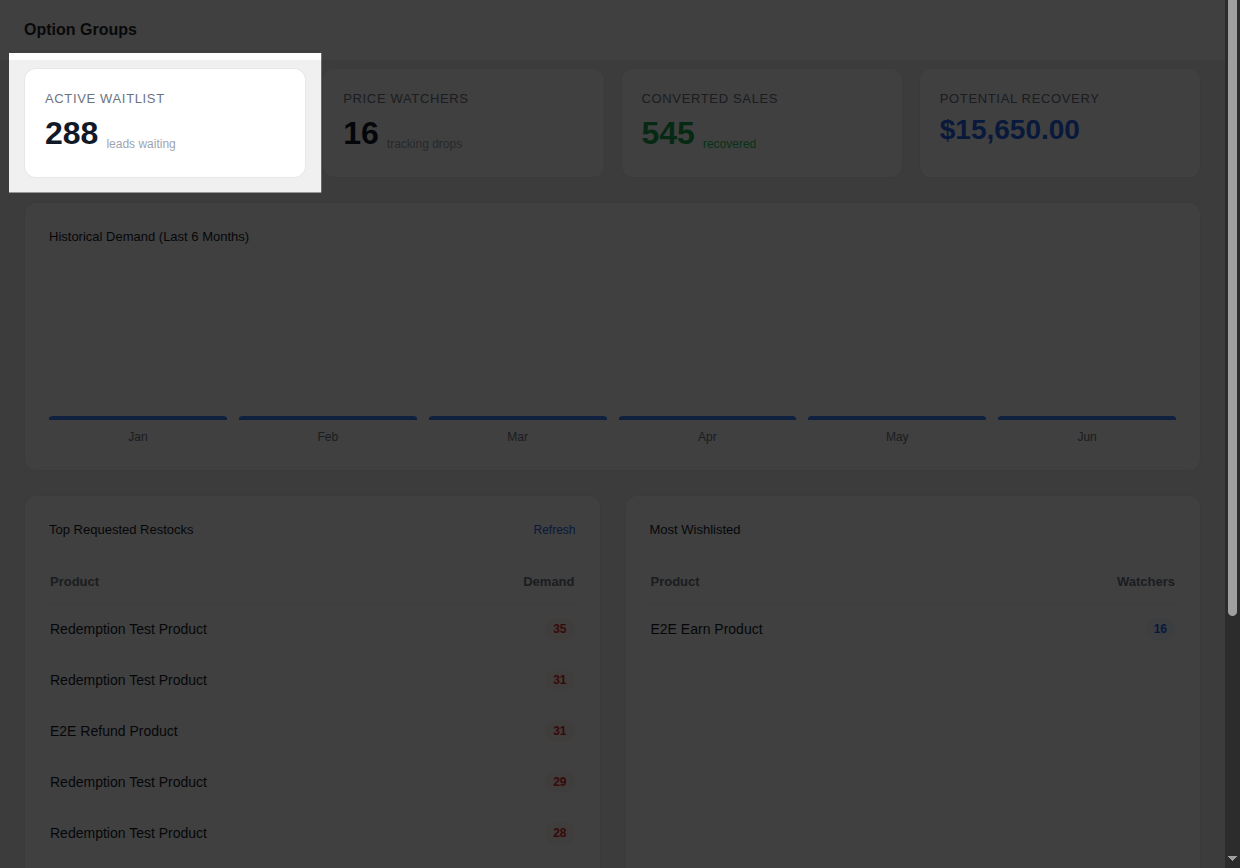
The four cards at the top of your dashboard provide an instant snapshot of your revenue opportunities and historical success.
### Active Waitlist
This is the total number of unique shoppers currently waiting for out-of-stock items.
* **The Goal:** Keep this number low by restocking high-demand items quickly.
* **Merchant Tip:** A rising Active Waitlist during a marketing campaign indicates you are out-performing your inventory—it's a signal to increase your next purchase order.
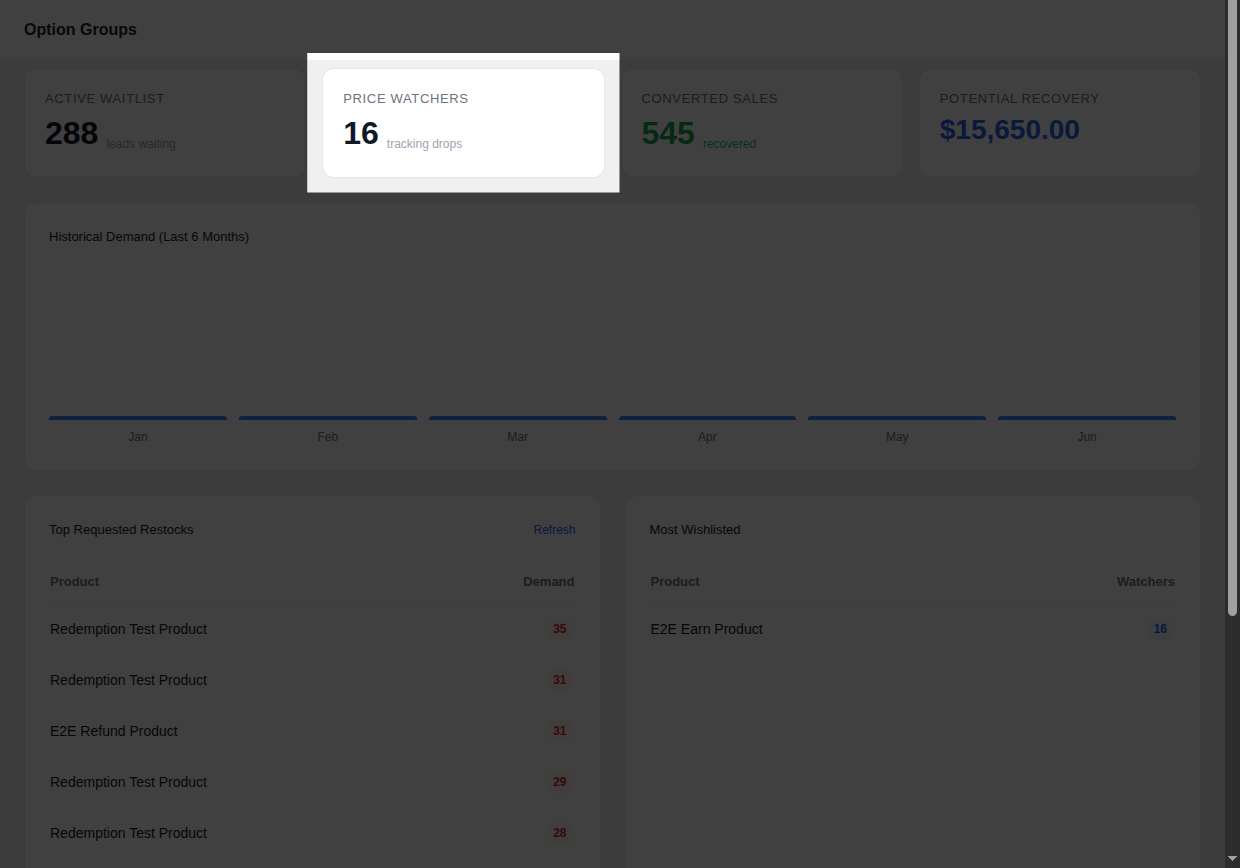
### Price Watchers
The total count of customers who have set a "Target Price" for in-stock items but haven't purchased yet.
* **The Goal:** Convert these "browsers" into "buyers" by hitting their target price.
* **Merchant Tip:** High numbers here mean your products are desired, but the current price is a barrier. Consider a temporary sale to clear this queue.
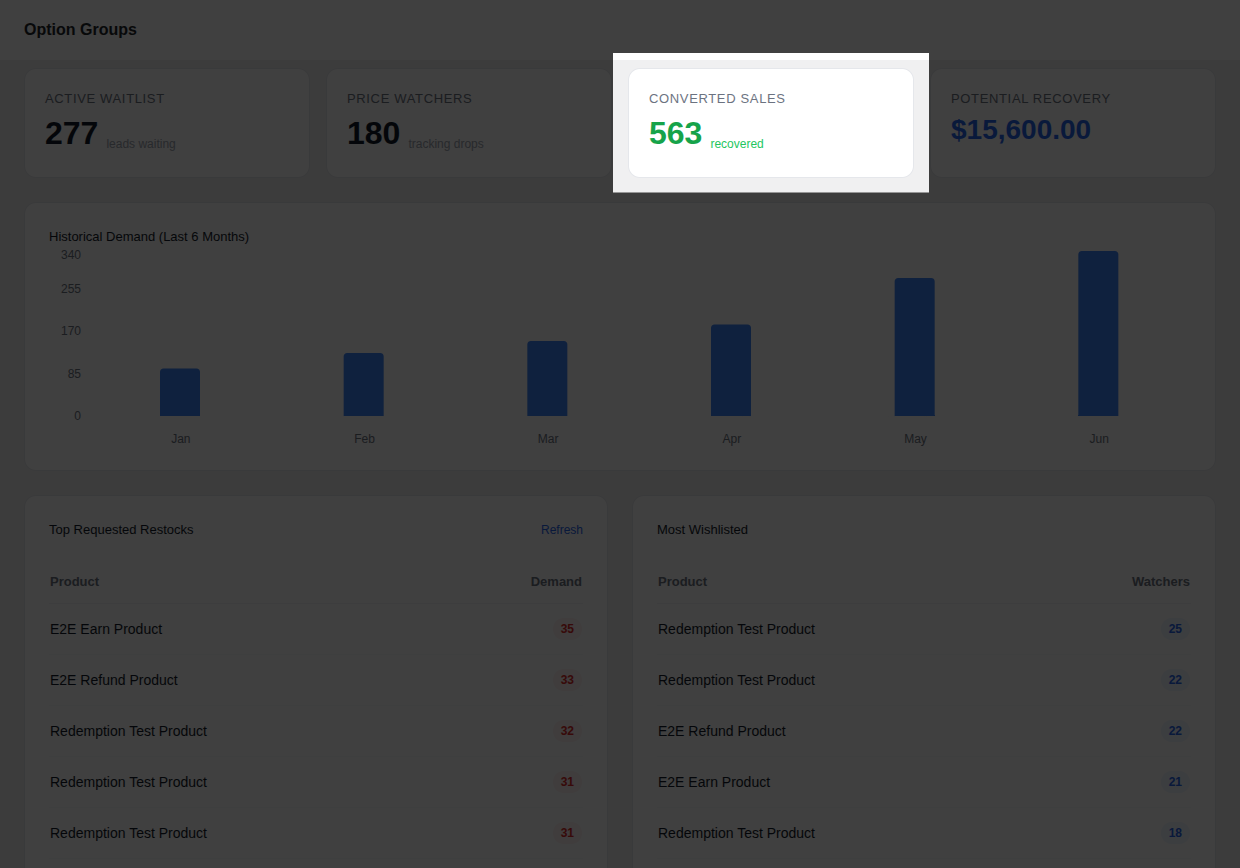
### Converted Sales
Your primary **ROI Metric**. This tracks the total number of sales generated *directly* from a NotifyBay email link.
* **The Goal:** Watch this number grow to prove the monetary value the plugin adds to your store.
* **How it works:** A sale is counted if a customer clicks an automated restock or price drop email and completes their purchase within your defined [Conversion Window](/notifybay/settings/engine-logic/).
### Potential Recovery
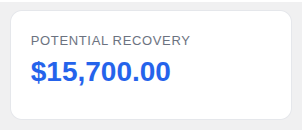
The estimated market value of your current waitlist.
* **Calculation:** It multiplies the number of active waitlist leads by the current price of those items.
* **The Goal:** This is the "Money on the Table." Use this figure to justify inventory budgets to your team or bank.

---
## 2. Historical Demand Trends
This interactive chart displays your lead generation volume over the last **6 months**.
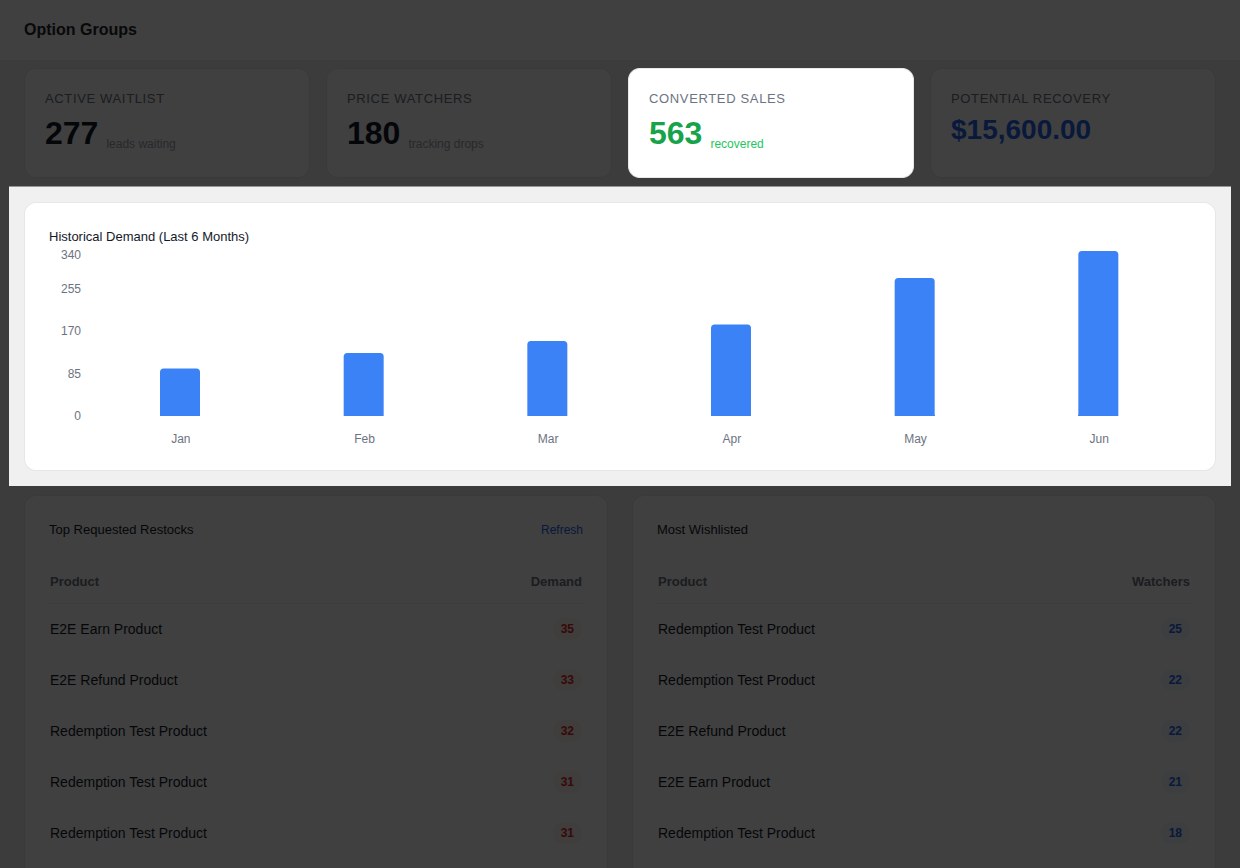
* **Seasonality:** Identify which months your customers are most active in requesting items.
* **Campaign Impact:** Correlate spikes in the chart with your social media ads or influencer shoutouts. If an ad drives 500 people to a waitlist, you know that campaign was a success even if you were out of stock.
---
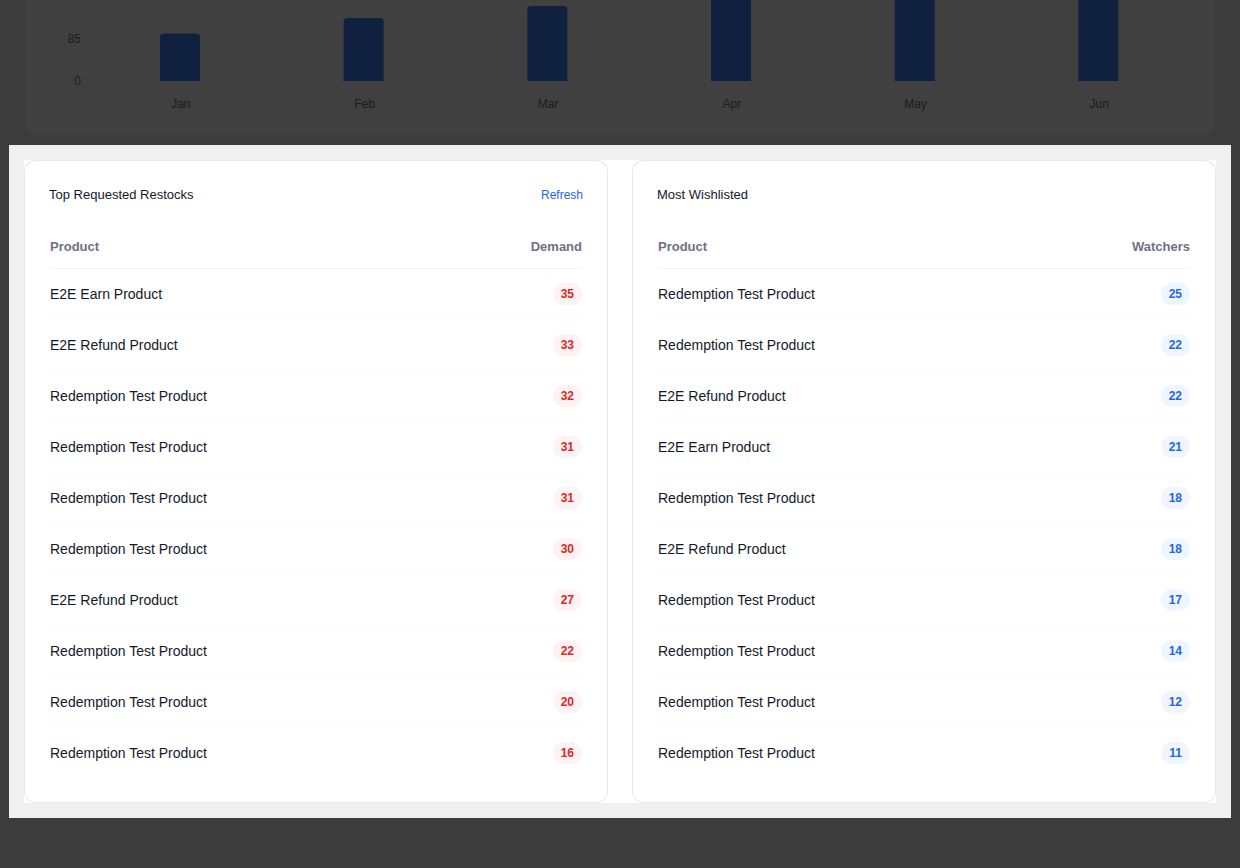
## 3. High-Priority Action Tables
Located at the bottom of the dashboard, these tables tell you exactly which products to restock first.
### Top Requested Restocks
Ranks your out-of-stock products by the number of active subscribers waiting for them.
* **Action:** Restock the product at the top of this list first—it represents your fastest guaranteed revenue.
### Most Wishlisted
Ranks your in-stock products by the number of price watchers.
* **Action:** If a product has high watchers, it's a prime candidate for your next flash sale or email promotion.
---
> [!TIP]
> Use the **Refresh** button at the top of the action tables to ensure you are seeing the most recent data if you have been restocking items in a separate browser tab.
## Product Demand & Strategy
URL: https://wpanchorbay.github.io/notifybay/dashboard/product-demand/
Description: Move from reactive to proactive management. Learn how to use historical trends and top requests to guide your purchasing and pricing.
While the [Main Analytics](/notifybay/dashboard/analytics/) provide high-level numbers, the **Product Demand** section of your dashboard provides the granular data needed for day-to-day operations.
These tools are designed to help you make data-driven decisions on exactly what to restock, when to run a sale, and how to forecast your inventory needs.
---
## 1. The Historical Demand Chart
This bar chart provides a 6-month rolling view of every notification request generated across your entire store (including both Waitlists and Wishlists).
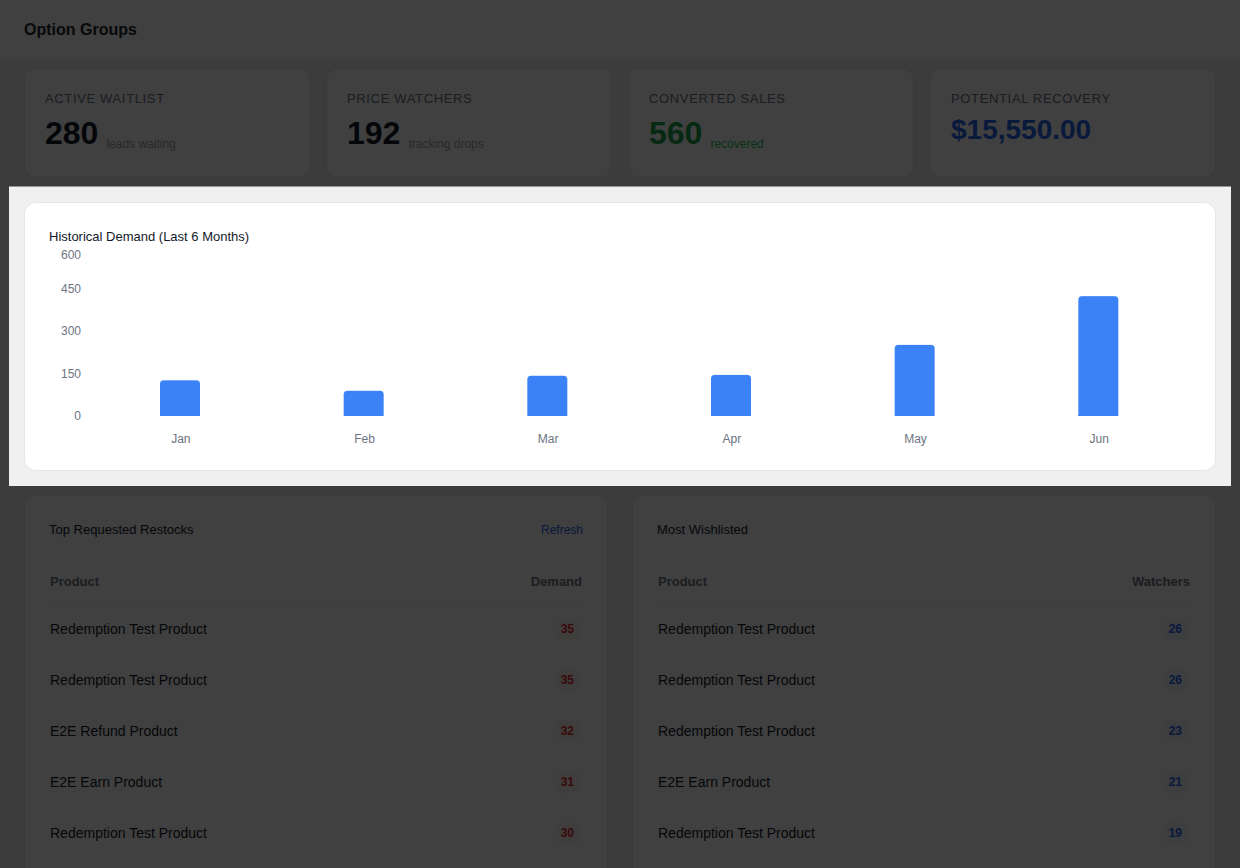
### Strategic Insights:
* **Identify Seasonality:** Notice spikes in requests during specific months. If you sell apparel and see a spike in "Small" waitlist requests every October, you can use this as proof to order higher quantities earlier next year.
* **Measure Campaign Success:** Did a recent social media ad drive traffic to an out-of-stock item? The spike in this chart confirms that the campaign was successful at capturing intent, even if the inventory wasn't ready.
* **Inventory Health:** If your bars are consistently growing while your sales remain flat, it indicates a systemic issue with under-ordering. You are capturing interest, but failing to replenish fast enough to convert it.
---
## 2. Top Requested Restocks (Inventory Priority)
This table is your definitive guide for your next purchase order. It ranks your out-of-stock products by the number of active subscribers waiting for them.
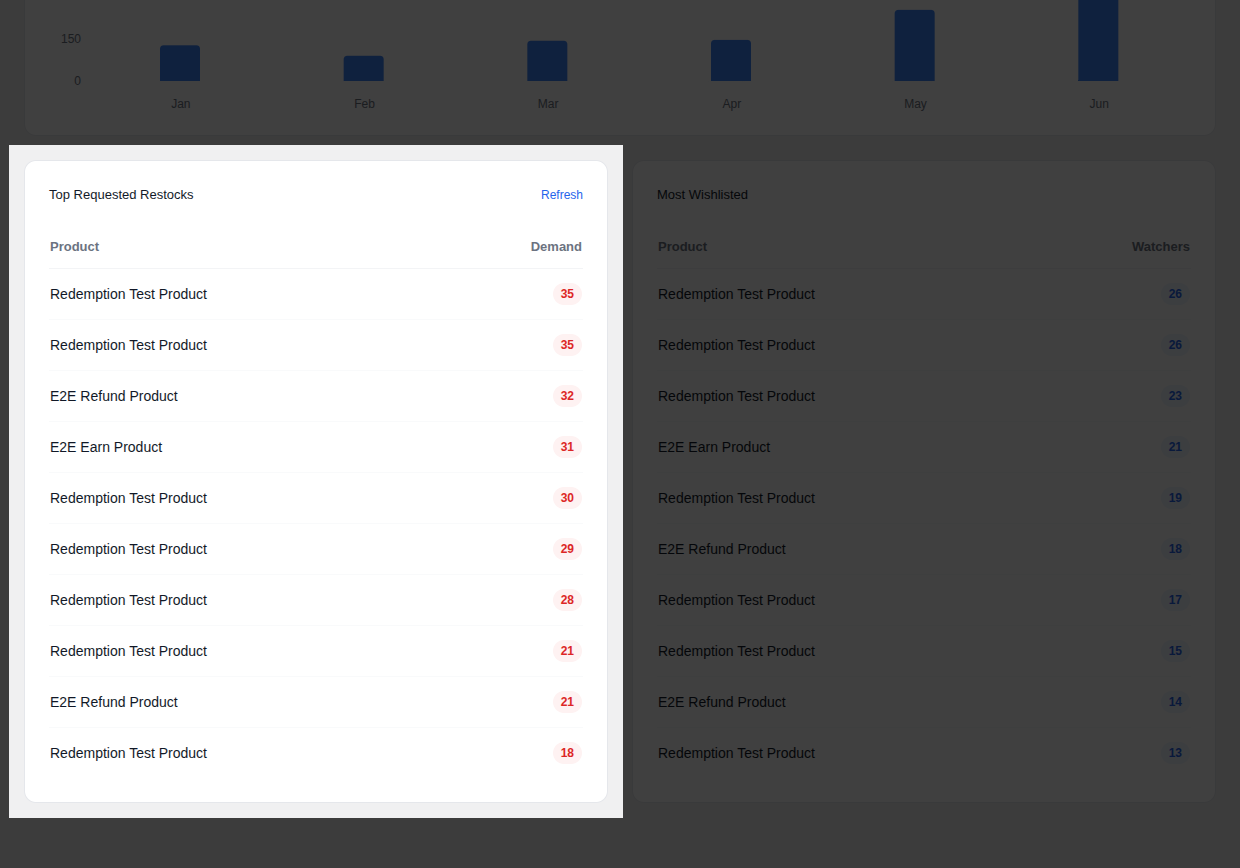
* **The "Demand" Column:** This red badge shows the exact number of people who will receive an email the moment you update your stock.
* **Purchasing Priority:** Always restock the product at the very top of this list first. It represents your fastest guaranteed revenue.
* **Supplier Negotiation:** If a specific product is consistently at the top of this list, use a [CSV Export](/notifybay/leads/bulk-actions-export/) of that data to negotiate better bulk pricing or faster shipping times with your manufacturer.
---
## 3. Most Wishlisted (Pricing Intelligence)
This table ranks your in-stock products by the number of active price watchers. If a product has a very high number of watchers, it means demand is high, but your current price is acting as a significant barrier to entry.
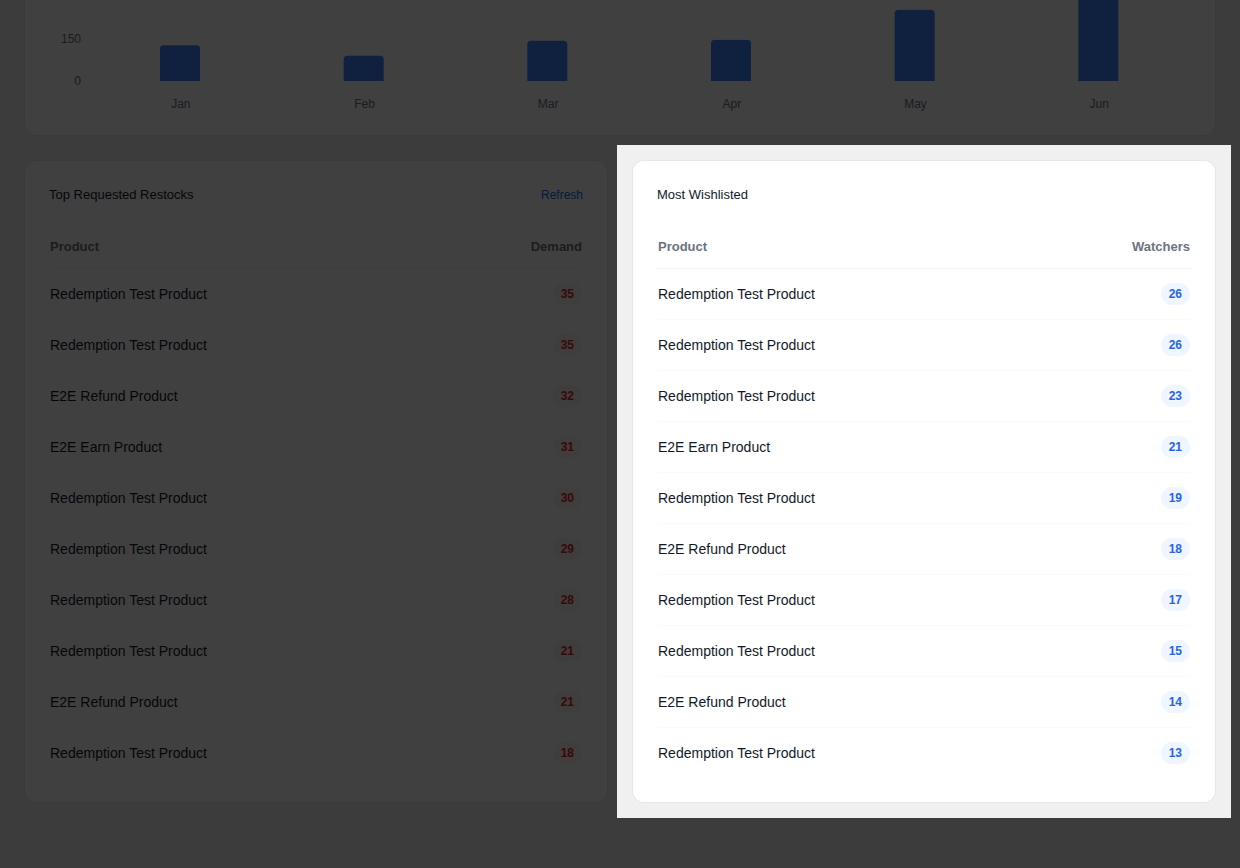
* **Strategic Discounting:** Instead of store-wide sales that eat into your margins, run targeted promotions *only* on the items at the top of this list to trigger a flood of automated notifications.
* **Competitive Analysis:** If a product is highly wishlisted but rarely bought at full price, check your competitors. Are they undercutting you? You may need to permanently adjust your base price to remain competitive.
* **Bundle Opportunities:** If you cannot lower the price further, consider bundling a highly wishlisted item with a high-margin, low-cost accessory to increase perceived value.
---
## 4. Real-Time Data Refresh
The Dashboard uses intelligent caching to keep your site fast. However, if you are actively restocking items and want to see the updated table rankings immediately, use the **Refresh** tool.
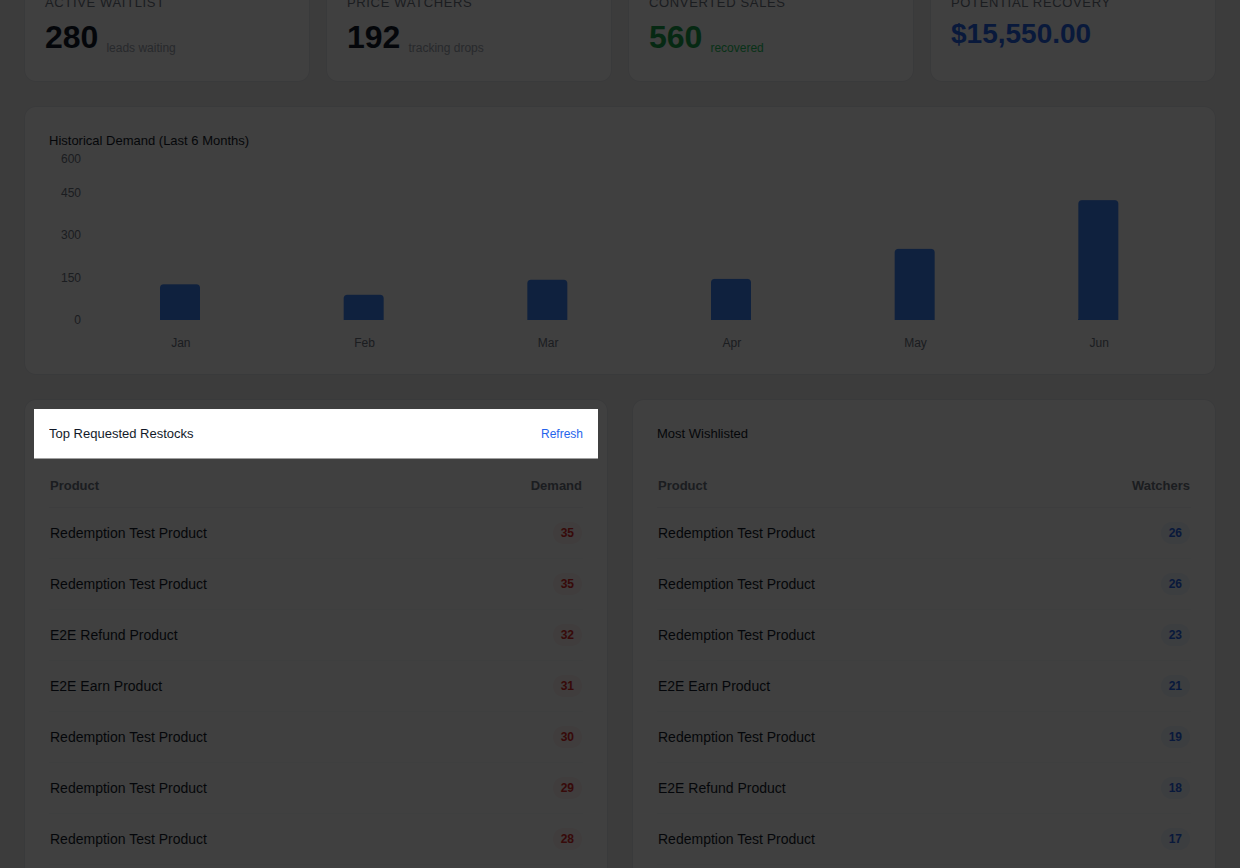
1. Locate the **Refresh** link at the top right of the action tables.
2. Click to force a live calculation of your subscriber data.
---
> [!TIP]
> Use the **Potential Recovery** metric on the main analytics page to determine exactly how much budget to allocate to the top items in your **Restocks** list.
## Configuration
URL: https://wpanchorbay.github.io/notifybay/getting-started/configuration/
Description: Essential setup steps for NotifyBay merchants.
Once you have [installed](/notifybay/getting-started/installation/) NotifyBay, there are a few essential settings you should configure to ensure the plugin behaves exactly how you want.
## 1. Enable Features
By default, the **Waitlist (Back-in-Stock)** feature is enabled. If you also want to allow customers to track price drops, you must enable the **Wishlist** feature:
1. Go to **NotifyBay > Settings**.
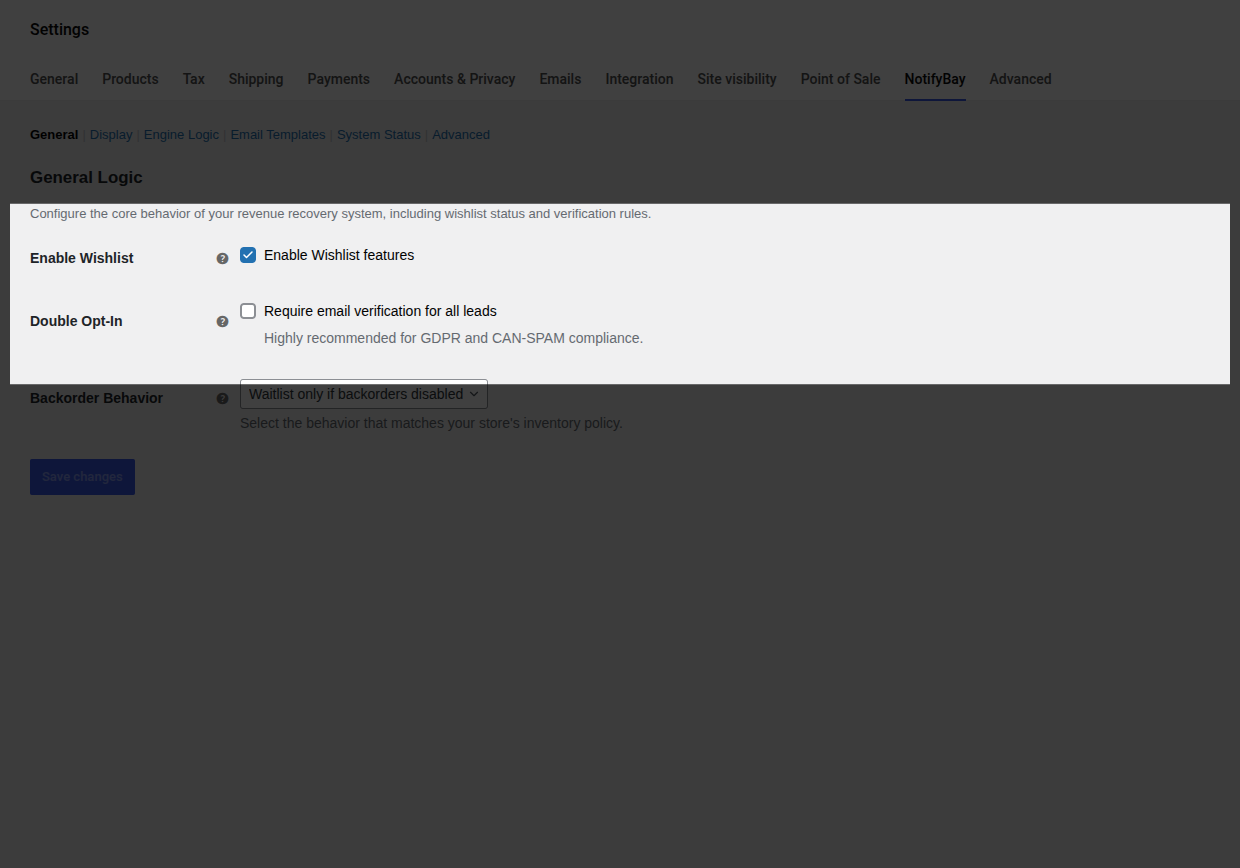
2. In the **General** tab, check the box for **Enable Wishlist**.
3. Click **Save Settings**.
## 2. Double Opt-In (Highly Recommended)
To maintain a high-quality email list and comply with global privacy laws (like GDPR), we strongly recommend enabling Double Opt-In.
1. In the **General** tab, find the **Compliance & Security** section.
2. Enable **Double Opt-In**.
3. Users will now receive a confirmation email they must click before they are added to your active notification queue.
## 3. Customize Your Buttons
You should make the "Notify Me" and "Track Price" buttons match your store's branding:
1. Go to the **Display** tab in Settings.
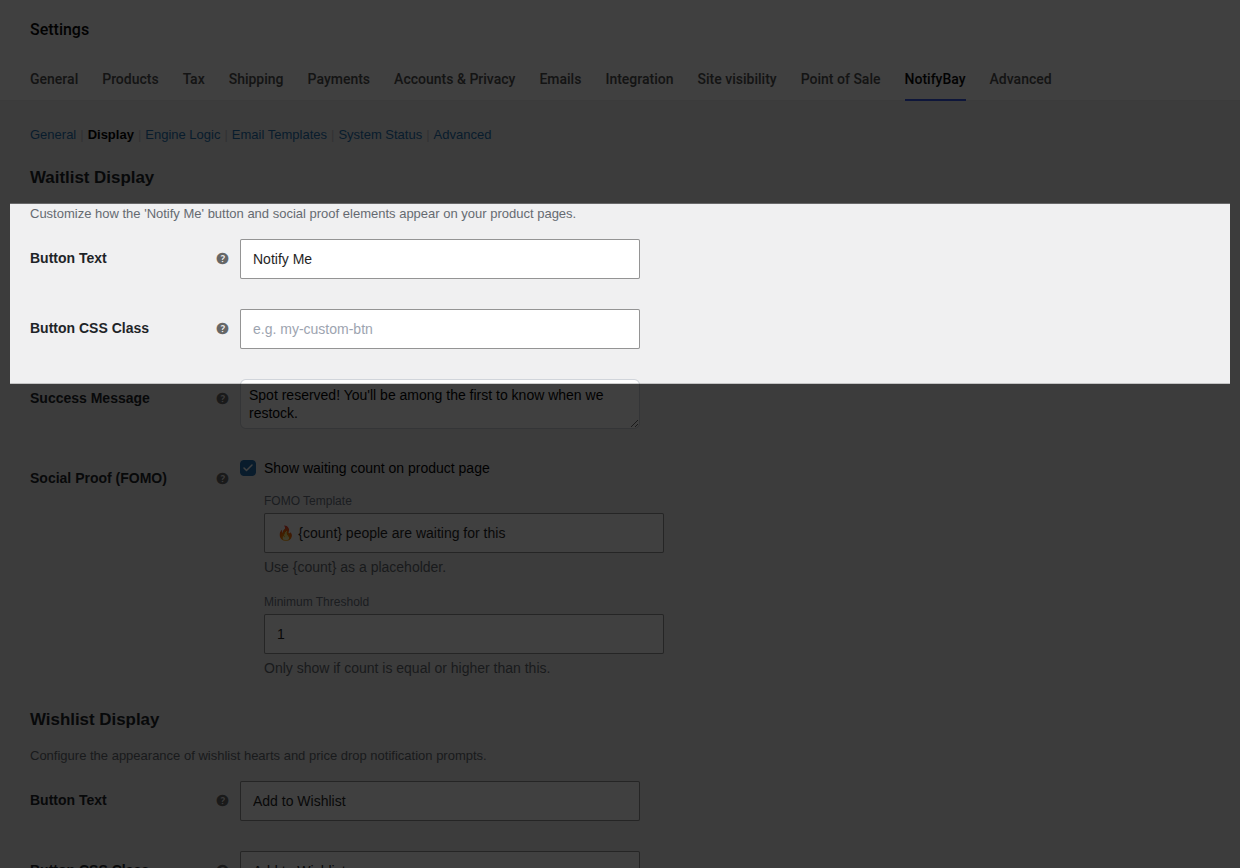
2. Update the **Button Text** to something that fits your brand voice (e.g., "Join the Waitlist" or "Alert Me on Sale").
3. If your theme uses specific CSS classes for buttons (like `btn btn-primary`), enter them in the **Button CSS Class** field.
## 4. Set Your "Hurry" Logic
NotifyBay can automatically create urgency by sending a follow-up email when stock is running low.
1. Go to the **Engine Logic** tab.
2. Set your **Low Stock Threshold** (e.g., if you set this to `5`, a "Hurry" email will be sent when only 5 items are left).
3. Ensure the **Hurry Alerts** feature is toggled on.
---
> [!TIP]
> After configuring your settings, we recommend testing the signup process on a single out-of-stock product to ensure everything looks and behaves as expected.
## Installation
URL: https://wpanchorbay.github.io/notifybay/getting-started/installation/
Description: A complete walkthrough of purchasing, installing, and activating NotifyBay on your WooCommerce store.
Installing NotifyBay is a straightforward process. Because NotifyBay is a premium, high-performance suite, it is currently available exclusively through our official website.
## Step 0: Purchase & Download
Before you can install the plugin, you must have a valid copy of the NotifyBay `.zip` file.
1. Visit [NotifyBay.com](https://notifybay.com) and complete your purchase.
2. Log into your **Customer Dashboard** on our site.
3. Download the latest version of the plugin (e.g., `notifybay.zip`).
4. Keep this file on your computer—you will need it for the next step.
---
## Step 1: Upload to WordPress
1. Log into your WordPress admin dashboard.
2. Navigate to **Plugins > Add New Plugin**.
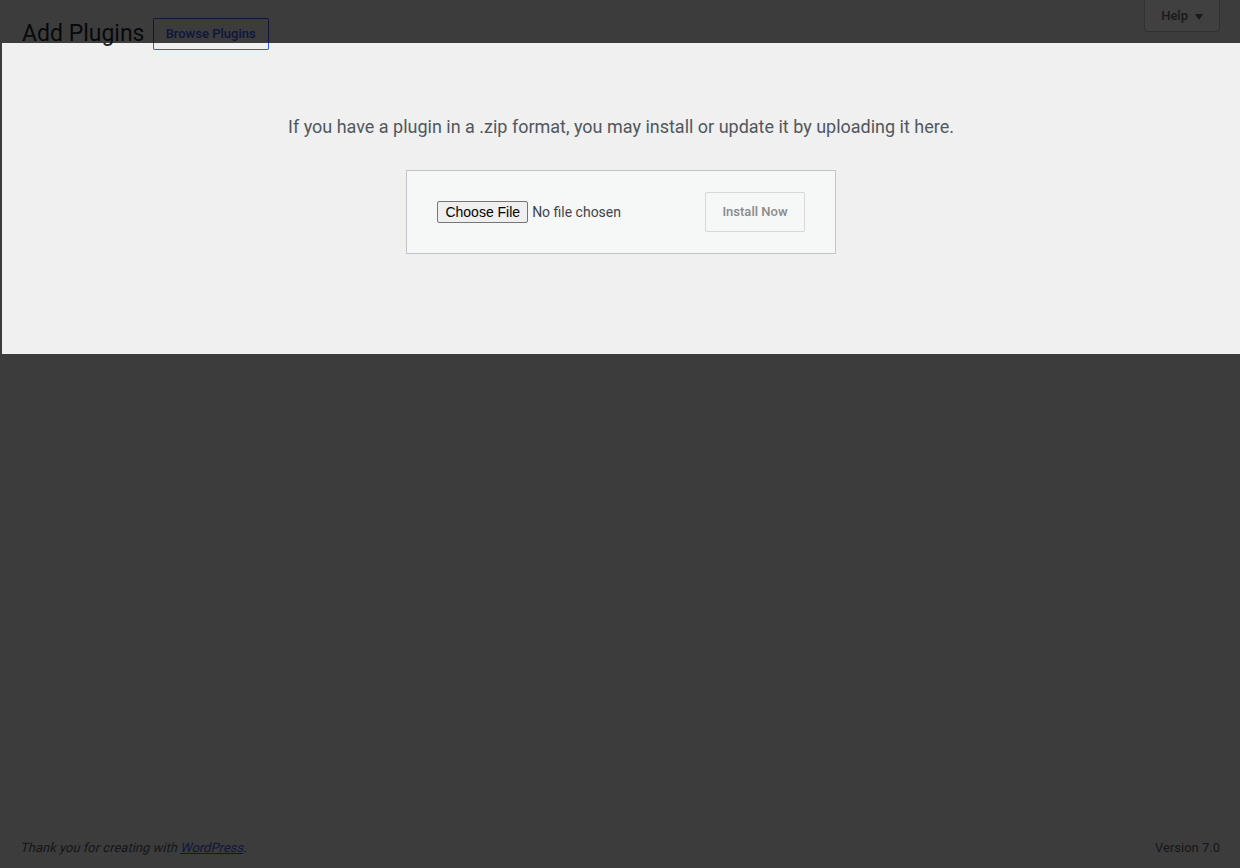
3. Click the **Upload Plugin** button at the top of the page.
4. Click **Choose File** and select the `notifybay.zip` file you downloaded in Step 0.
5. Click **Install Now**.
## Step 2: Activation
Once WordPress has finished uploading the file, you will be taken to a success screen.
1. Click the blue **Activate Plugin** button.
2. NotifyBay is now active on your site!
## Step 3: Verify the Menu
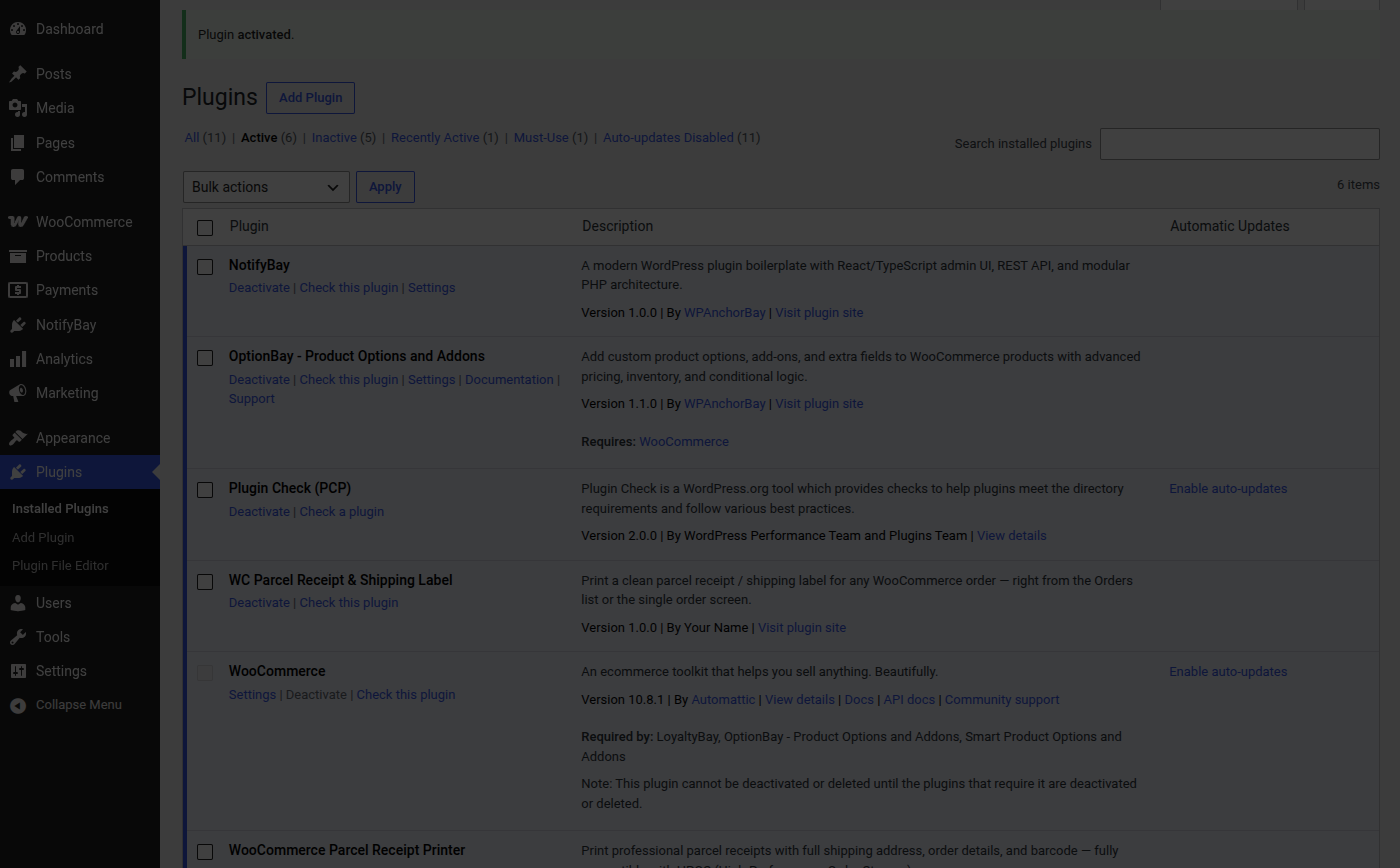
After activation, a new menu item will appear in your WordPress sidebar.
* Look for the **NotifyBay** menu item, typically located just below the "WooCommerce" or "Marketing" menus.
---
## Troubleshooting Installation
### "The uploaded file exceeds the upload_max_filesize..."
This is a common server limit. You have two options:
1. **Ask your Host:** Contact your hosting provider and ask them to increase your "PHP Upload Limit" to 10MB or higher.
2. **Use FTP:** Upload the unzipped `notifybay` folder directly to `/wp-content/plugins/` using an SFTP client like FileZilla.
### "No NotifyBay menu appears after activation"
NotifyBay requires **WooCommerce** to be active. If you don't see the NotifyBay menu, please verify that WooCommerce is installed and enabled. If WooCommerce is missing, NotifyBay will stay dormant to prevent errors on your site.
> [!TIP]
> Ready to start recovering revenue? Head over to the [Quick Start Guide](/notifybay/getting-started/quick-start/) to set up your first waitlist!
## Introduction to NotifyBay
URL: https://wpanchorbay.github.io/notifybay/getting-started/introduction/
Description: Master your store's inventory and pricing strategy. Automatically recover lost revenue with professional Back-in-Stock and Price Drop notifications.
Welcome to the **NotifyBay** user guide.
NotifyBay is a high-performance, conversion-focused WooCommerce suite designed to recover lost revenue. It empowers store owners to bridge the gap between customer intent and successful conversion by automating **Back-in-Stock (Waitlist)** and **Price Drop (Wishlist)** notifications.
Every eCommerce store faces two major conversion killers: **Inventory stockouts** and **price sensitivity**. Instead of letting those potential buyers abandon your site, NotifyBay engages them exactly when their interest is highest.
---
## Powerful Sales Recovery Modules
NotifyBay provides two distinct modules to capture customer demand and automate your marketing.
### ⏳ Back-in-Stock (Waitlist)
When a product hits zero inventory, NotifyBay replaces the static "Out of Stock" message with an elegant, high-converting "Notify Me" form.
- **The Trigger:** As soon as you update stock in WooCommerce, NotifyBay immediately emails everyone waiting.
- **Variation Aware:** Customers can subscribe to specific sizes or colors, ensuring they only get notified for the exact item they want.
- **Lead Expiry:** Allow customers to choose how long they want to stay on the list (e.g., 7, 30, or 90 days), ensuring your notification list stays fresh and relevant.

### ⭐ Price Drop (Wishlist)
Allow customers to track their favorite products and wait for a deal. Users can set a "Target Price"—their ideal purchase price.
- **The Trigger:** If you lower the product price (via a sale or permanent change) to meet or beat their target, they receive an automated alert to come back and buy.
- **Strategic Discounting:** Analyze subscriber data to see exactly what price point will trigger the most sales.
---
## The Intelligence Engine
NotifyBay isn't just a mailer; it's a smart background engine built for modern, high-volume stores.
### 1. Smart Restocking (Thresholds)
Avoid "trigger-happy" notifications. If you only restock 1 unit (perhaps a return), NotifyBay can be configured to wait until a larger shipment arrives before firing off thousands of emails. This prevents customer frustration and "sold-out again" disappointment.
### 2. Fair-Play Restock Batches
If you restock 10 items but have 100 people waiting, NotifyBay can notify exactly the first 10 people in line. It then "reserves" those units for a few hours before notifying the next batch, ensuring every customer who gets an email actually has a chance to buy.

### 3. "Hurry" (Last Chance) Automation
NotifyBay can automatically send a second "Hurry" email when a recently restocked item is about to sell out again. This follow-up triggers immediate conversions by creating a genuine "last chance" scenario.
---
## Exceptional Customer Experience
Building trust is just as important as building a list. NotifyBay provides your customers with the transparency they expect from a premium store.
### Customer Self-Service Dashboard
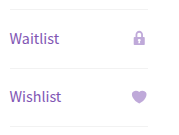
Logged-in users can manage, track, and cancel their alerts directly from their native WooCommerce **My Account** page. This reduces support tickets and gives customers complete control over their data.
### GDPR & Compliance Ready
Includes full support for **Double Opt-In** verification and one-click unsubscription to ensure your email marketing stays compliant and your sender reputation stays clean.
---
## Data-Driven ROI
Stop guessing what to order or when to run a sale. The NotifyBay dashboard provides clear, actionable metrics:
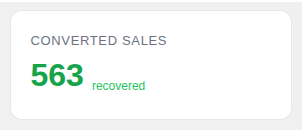
- **Converted Sales:** See exactly how much money was generated from your notification emails.
- **Potential Recovery:** Know the total market value of your waitlists to prioritize your purchasing budget.
---
## Ready to Start Recovering Revenue?
NotifyBay is a premium solution available exclusively via our official website.
### Next Steps:
1. **[Installation Guide](/notifybay/getting-started/installation/):** Learn how to upload and activate your copy.
2. **[Quick Start Guide](/notifybay/getting-started/quick-start/):** Get your first "Notify Me" button live in under 5 minutes.
3. **[Manual Placement](/notifybay/getting-started/manual-placement/):** Learn how to use Gutenberg Blocks and Shortcodes.
## Manual Placement (Blocks & Shortcodes)
URL: https://wpanchorbay.github.io/notifybay/getting-started/manual-placement/
Description: Take full control over your store layout. Learn how to place NotifyMe and Track Price forms exactly where you want them using native Gutenberg Blocks or Shortcodes.
By default, NotifyBay automatically places the Sales Recovery forms on your standard WooCommerce single product pages. However, modern stores often use custom landing pages, blog posts, or unique theme layouts that require more flexibility.
NotifyBay provides two professional ways to manually place your forms: **Native Gutenberg Blocks** and **Dynamic Shortcodes**.
---
## 1. Using Gutenberg Blocks
If you are using the modern WordPress Block Editor (Gutenberg), NotifyBay includes dedicated blocks that look and feel like a native part of your editing experience.
### How to Add a Block:
1. Open any Page or Post in the WordPress editor.
2. Click the **+ (Toggle Block Inserter)** button at the top left.
3. Search for **"NotifyBay"**.
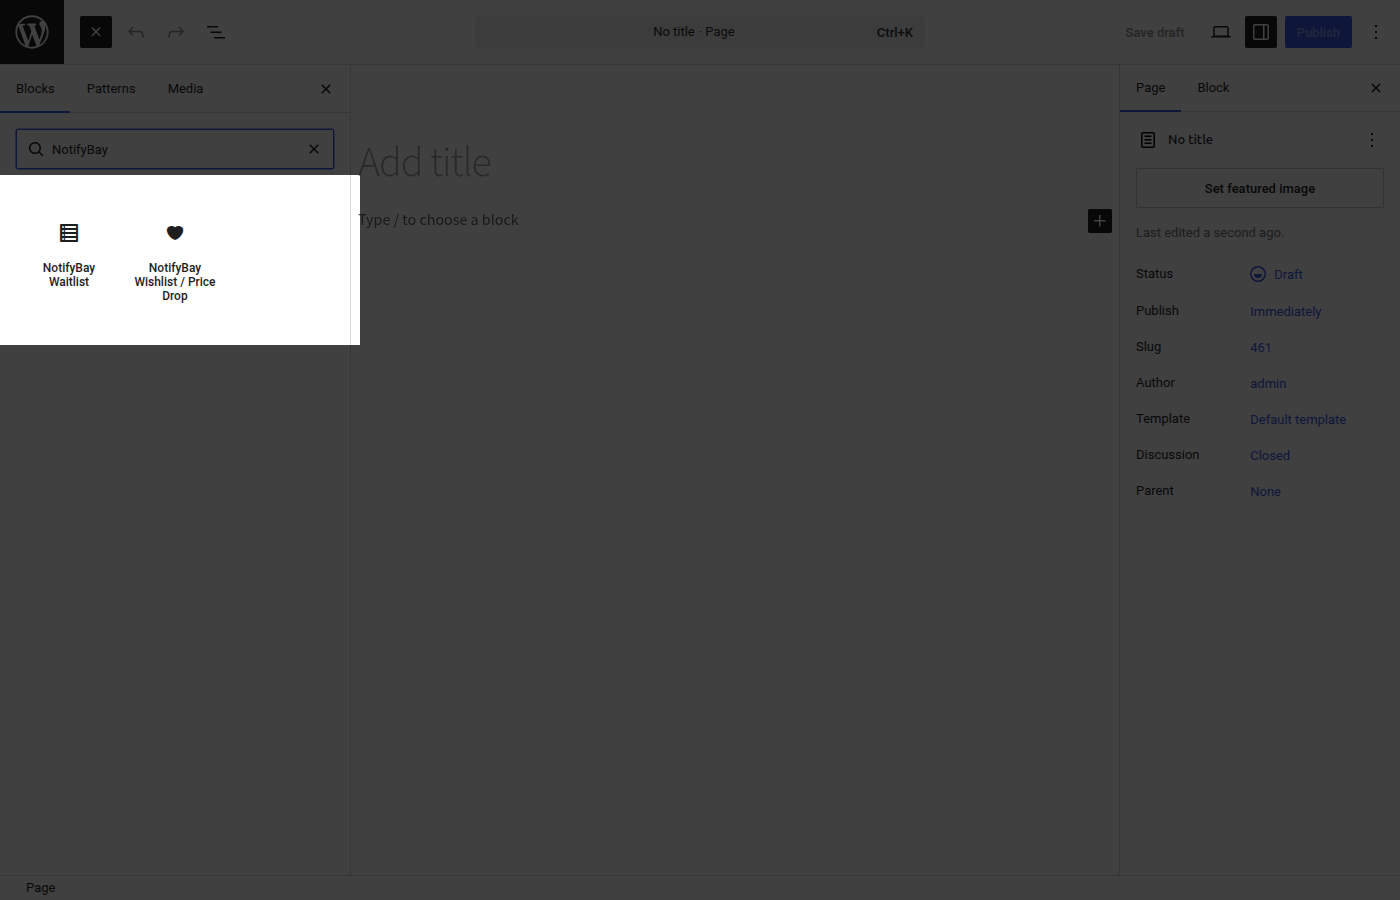
4. Select the block you need:
* **NotifyBay Waitlist:** Adds the "Notify Me" restock form.
* **NotifyBay Wishlist:** Adds the "Track Price" heart/button.
### Configuring the Block:
Once the block is placed, you can customize it using the settings sidebar on the right.
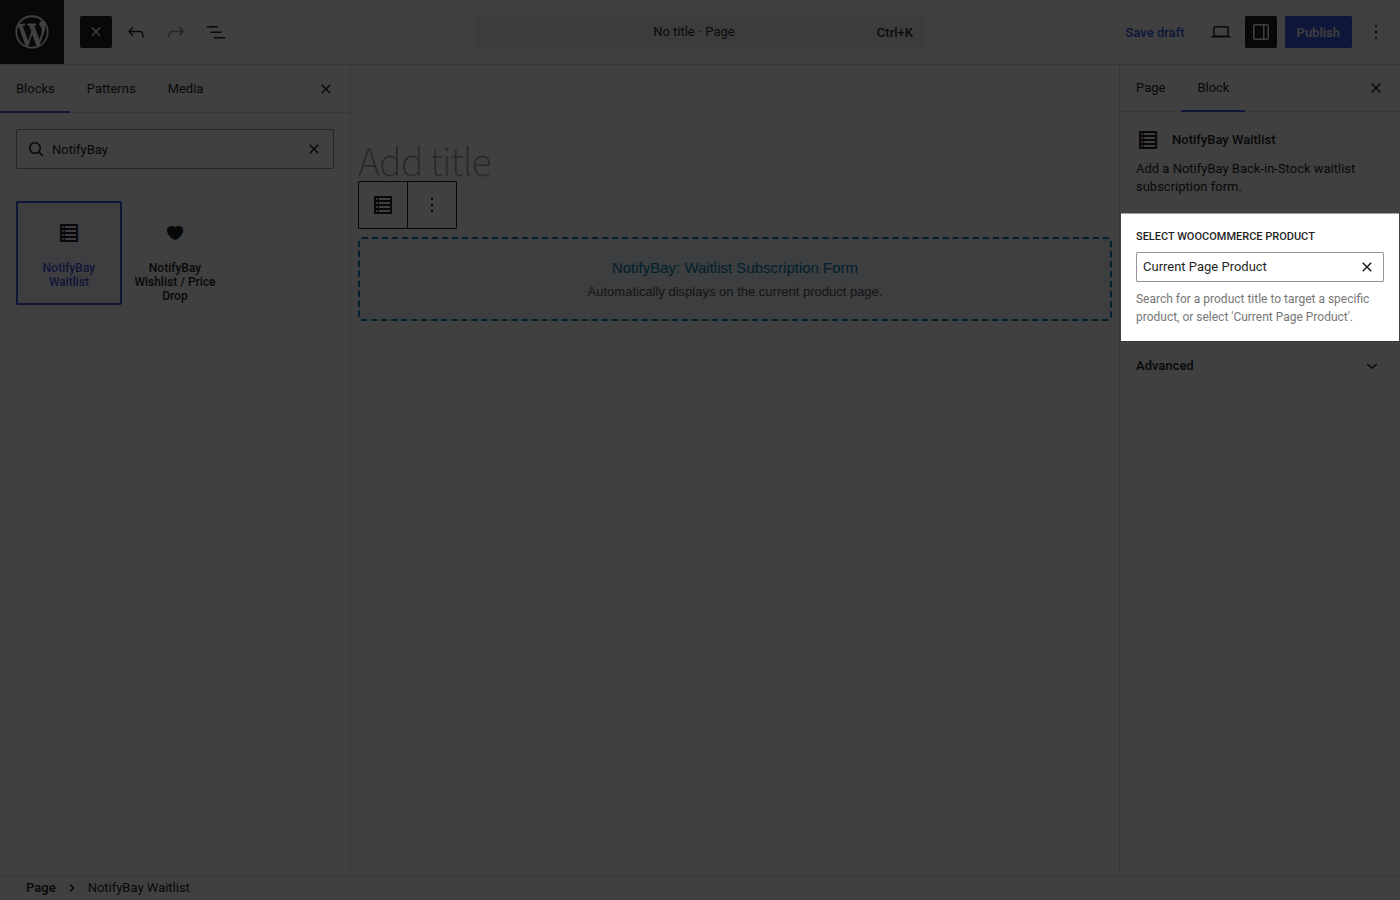
**Dynamic Product Search:**
Instead of looking up IDs manually, you can search for a product title directly inside the block settings.
- **Current Page Product:** By default, the block automatically detects the product if it's placed on a product page.
- **Target Specific Product:** Use the search box to find and select any product from your store to target it specifically.
---
## 2. Using Shortcodes
Shortcodes are a flexible alternative that work inside the Classic Editor, Sidebar Widgets, and popular page builders like **Elementor**, **Divi**, or **Beaver Builder**.
### The Restock (Waitlist) Shortcode
Use this to display the back-in-stock subscription form:
```text
[notifybay_waitlist]
```
### The Price Drop (Wishlist) Shortcode
Use this to display the "Track Price" or "Add to Wishlist" button:
```text
[notifybay_wishlist]
```
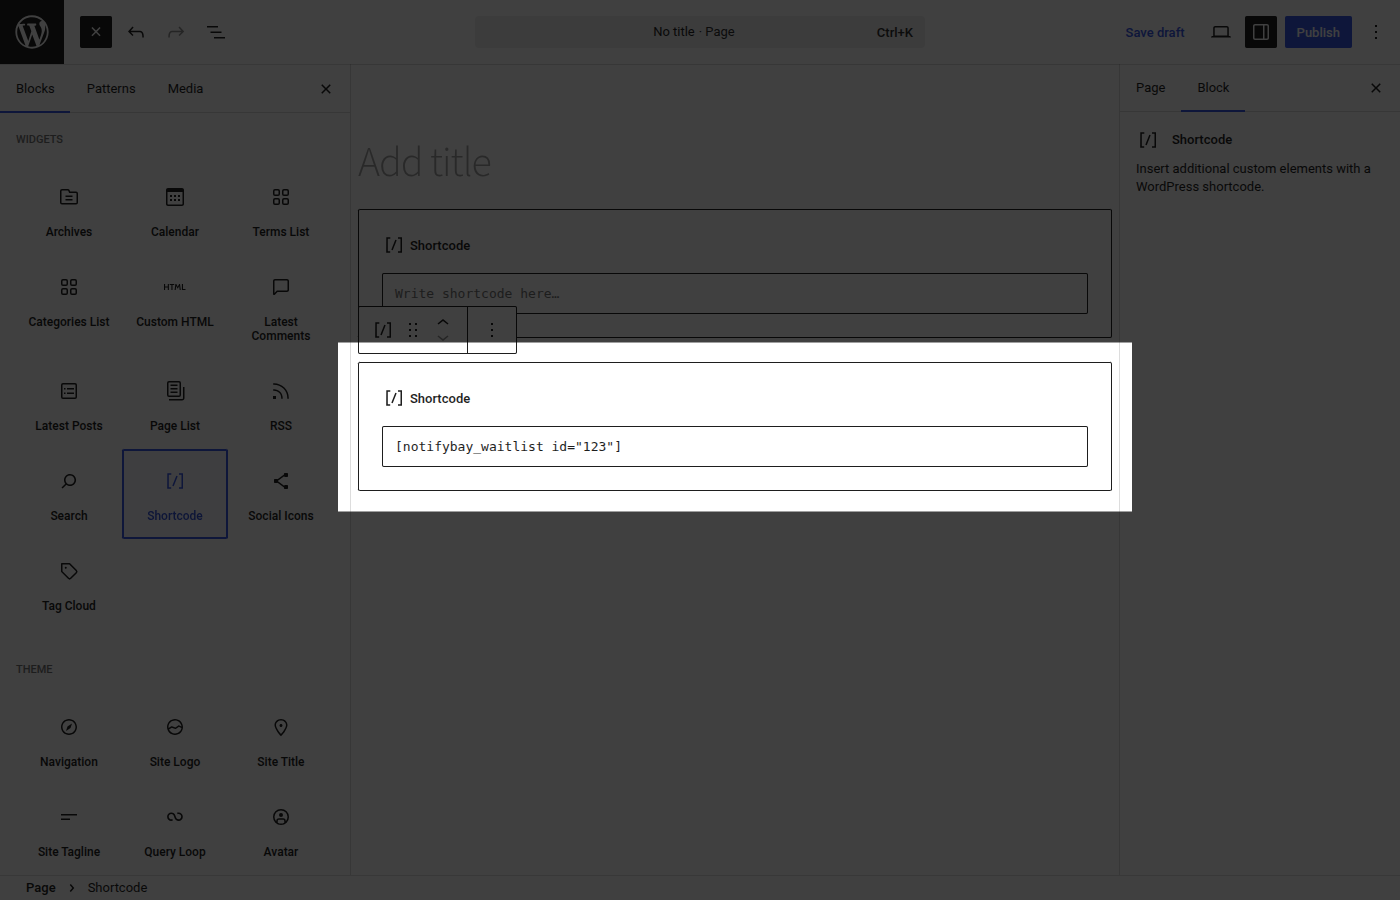
### Customizing the Shortcode
If you are placing the shortcode on a page that isn't the product itself, you must tell the shortcode which product to watch using the `id` attribute.
**Example:** To show a waitlist form for Product #123 on your homepage:
```text
[notifybay_waitlist id="123"]
```
---
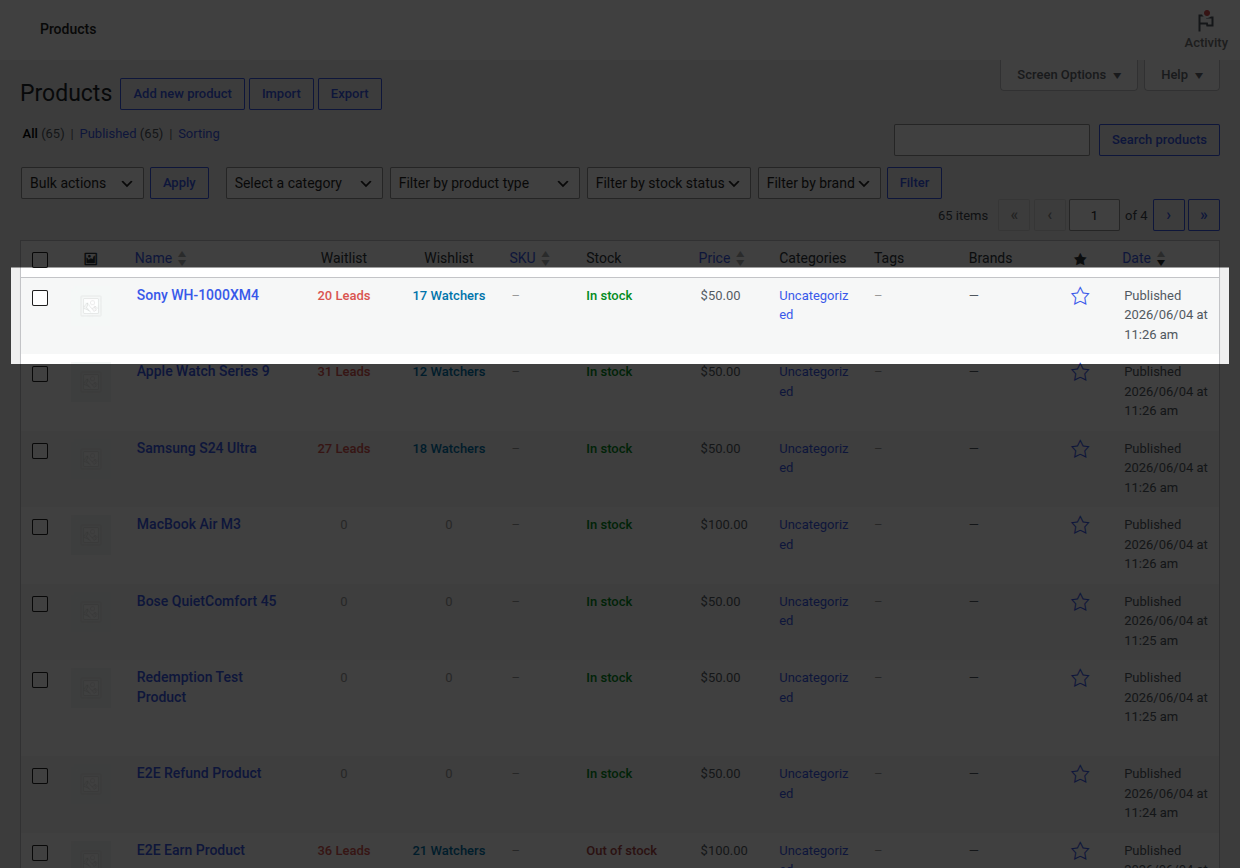
## Finding Your Product ID
You will need the Product ID whenever you are using Shortcodes on a non-product page.
1. In your WordPress dashboard, go to **Products > All Products**.
2. Hover your mouse over the title of the product you want to track.
3. The **ID** will appear in small gray text immediately below the title (e.g., `ID: 123`).
---
## Summary: Which Method is Best?
| Placement Need | Recommended Method | Why? |
| :--- | :--- | :--- |
| **Standard Pages & Posts** | **Gutenberg Blocks** | Visual, easy to search/select products, and no code required. |
| **Page Builders** | **Shortcodes** | Best compatibility with Elementor, Divi, etc. |
| **Sidebar Widgets** | **Shortcodes** | Works perfectly inside "Text" or "Shortcode" widgets. |
| **Custom Theme Code** | **PHP Function** | Developers can use `echo do_shortcode('[notifybay_waitlist]');`. |
> [!TIP]
> After manually placing a form, always visit the page as a guest (Incognito mode) to ensure the button or form renders exactly as you intended.
## Quick Start Guide
URL: https://wpanchorbay.github.io/notifybay/getting-started/quick-start/
Description: Get NotifyBay running on your WooCommerce store in 5 minutes with our foolproof 3-step setup.
Once you have [installed](/notifybay/getting-started/installation/) NotifyBay, you can get it up and running on your storefront in just a few minutes. This guide walks you through the absolute essentials to start recovering revenue today.
---
## Step 1: Activate Your Core Modules
First, decide which notification features you want to offer your customers.
1. Navigate to **NotifyBay > Settings** in your WordPress admin sidebar.
2. On the **General** tab, find the **Feature Selection** section.
3. Ensure **Waitlist (Back-in-Stock)** is toggled ON to capture intent for out-of-stock items.
4. Toggle **Enable Wishlist** to ON if you want customers to track price drops.
5. Click **Save Settings** at the bottom of the page.
## Step 2: Configure Your Button Appearance
NotifyBay needs to look like a native part of your store. You can customize the look and placement in the Display tab.
1. Click the **Display** (Appearance) tab at the top of the Settings screen.
2. **Placement:** By default, NotifyBay is set to **Automatic**. This works for almost all themes by automatically inserting the form near the "Add to Cart" button.
3. **Button Styling:**
* Change the **Waitlist Button Text** (e.g., "Alert me when in stock!").
* Add your theme's primary button class to the **Button CSS Class** field (e.g., `button alt` or `btn-primary`) to ensure a perfect visual match.
4. Click **Save Settings**.
## Step 3: Verify & Send Your First Test
Before going live, it's critical to verify the "Customer-to-Dashboard" flow.
1. **Open an Incognito Window:** Open your store as a guest visitor.
2. **Join a Waitlist:** Go to any **Out of Stock** product. You should see your new button. Click it, enter a test email, and submit.
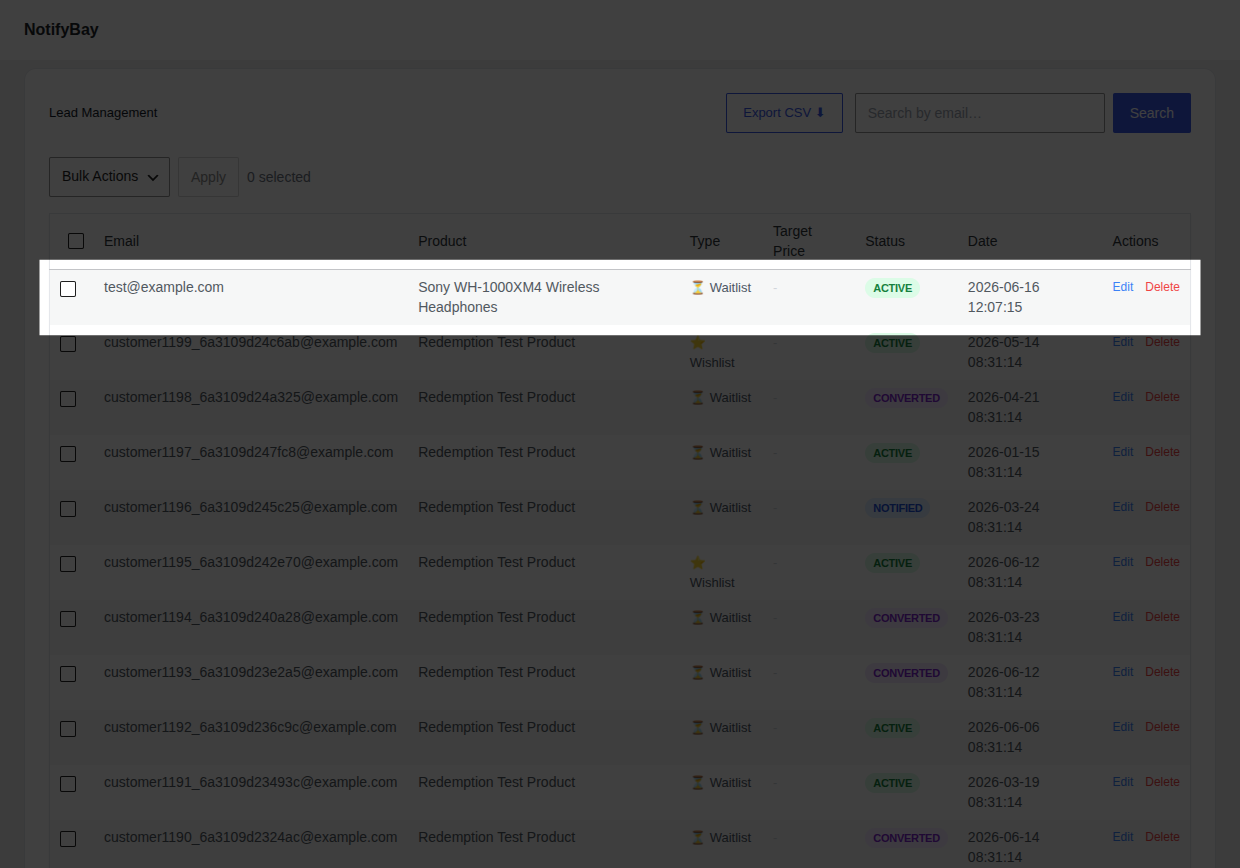
3. **Check your Dashboard:** Go back to your admin browser tab and navigate to **NotifyBay > Leads**.
4. **Success:** You should see your test email at the top of the list with an "Active" status.
---
### What's Next?
Now that your engine is running, you can:
- [Customize your email templates](/notifybay/settings/email-templates/) to match your brand voice.
- Set up [Double Opt-In](/notifybay/getting-started/configuration/) for better email hygiene.
- Learn how to place forms manually using [Shortcodes or Blocks](/notifybay/getting-started/manual-placement/).
## Bulk Actions & Data Export
URL: https://wpanchorbay.github.io/notifybay/leads/bulk-actions-export/
Description: Efficiency at scale. Learn how to manage thousands of subscribers with bulk tools and leverage your data for external marketing.
As your store grows, your waitlists and wishlists will naturally scale. Managing subscribers one by one becomes impossible. NotifyBay provides professional bulk management tools and high-fidelity CSV exports to help you maintain a clean database and drive external marketing campaigns.
---
## Managing Leads in Bulk
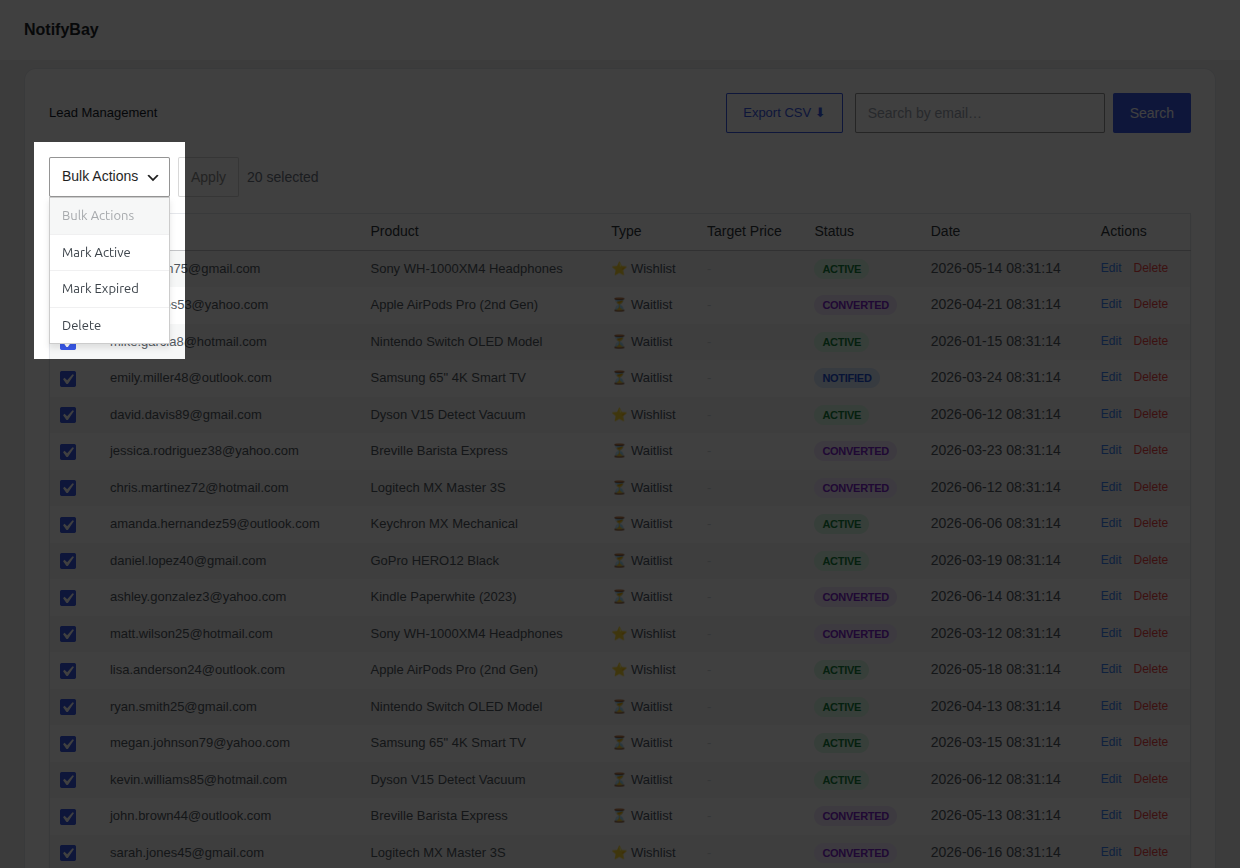
The **NotifyBay > Leads** interface includes a bulk processing engine that allows you to update hundreds of records in seconds.
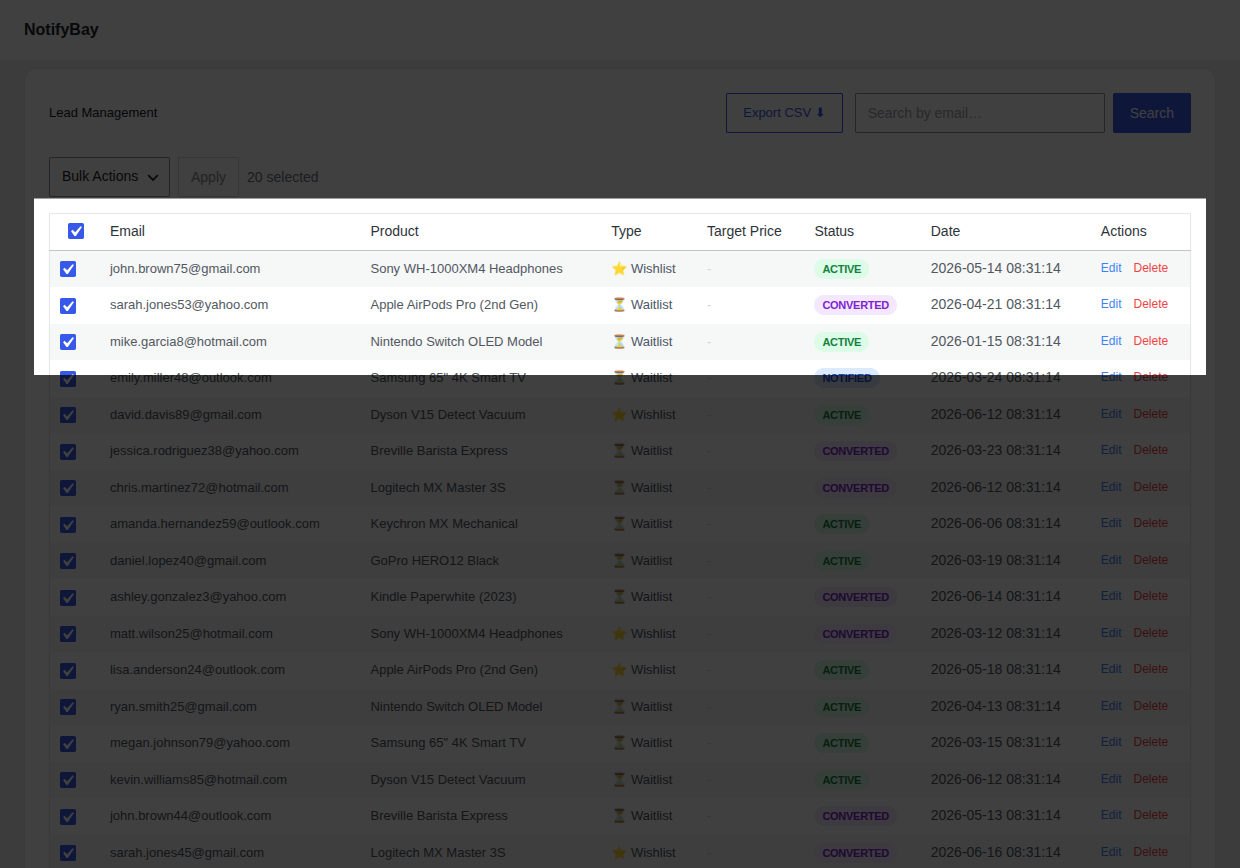
### 1. How to Select Multiple Leads
* **Individual Selection:** Click the checkbox on the far left of any row.
* **Page Selection:** Click the master checkbox in the table header to select all **20 leads** on the current page.
* **Search & Select:** Use the search bar to find a specific segment (e.g., all `@gmail.com` users), then use the master checkbox to select just that group.
### 2. Available Bulk Actions
Once you have selected your leads, choose one of the following actions from the dropdown menu and click **Apply**:
* **Mark Active:** Resets the status to Active. Useful if you want to re-notify customers about a second restock or a new price drop.
* **Mark Expired:** Manually retires leads that have been in the system for too long.
* **Mark Unsubscribed:** Respects customer privacy by manually removing them from your active queue if they contact you via other channels.
* **Delete:** Permanently wipes the records from your database.
> [!WARNING]
> **Deletion is permanent.** Once you delete a lead, it cannot be recovered, and its historical data will be removed from your analytics.
---
## Exporting Your Data (CSV)
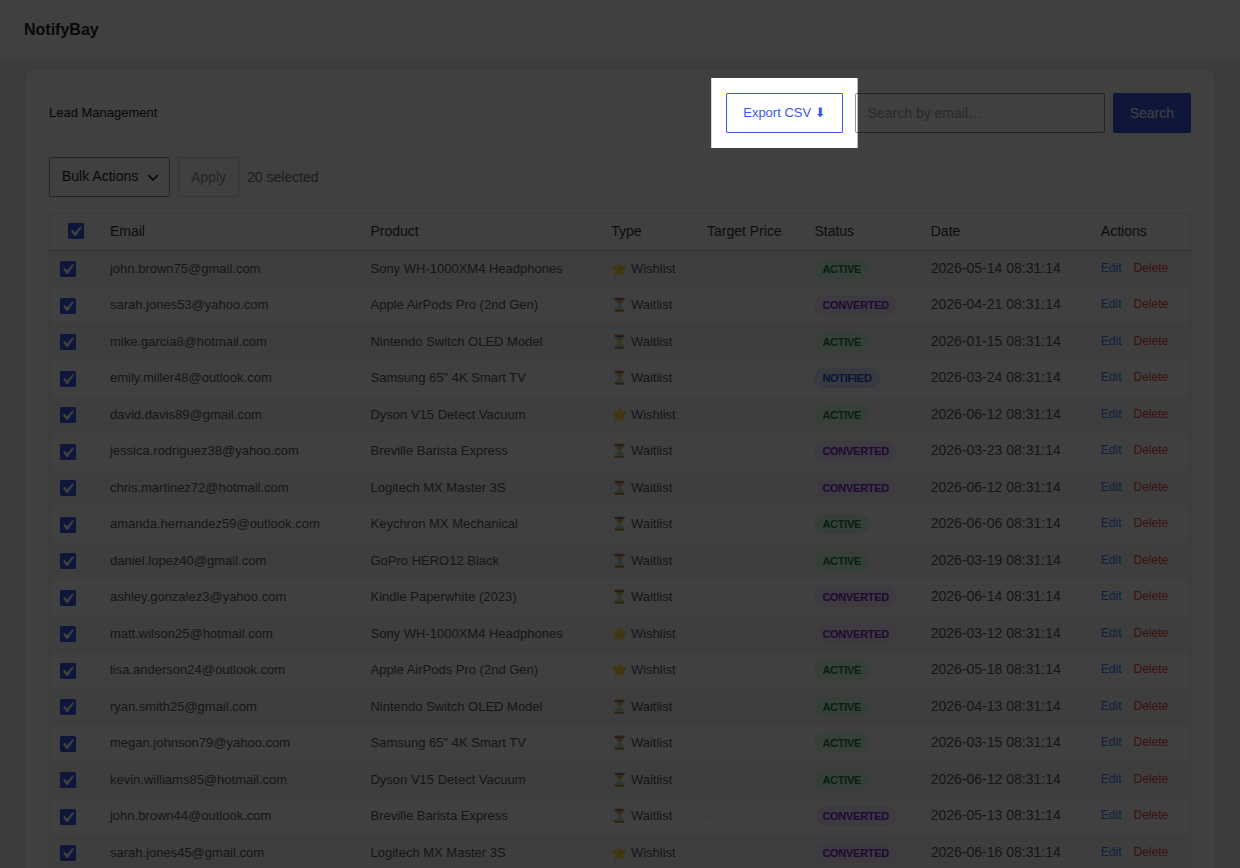
NotifyBay provides a "one-click" export feature that generates a professionally formatted CSV file of your entire subscriber database.
### How to Export:
1. Navigate to **NotifyBay > Leads**.
2. Click the **Export CSV ⬇** button at the top right of the page.
3. The file (e.g., `notifybay-leads-2024-06-18.csv`) will download immediately.
### What's Inside the Export?
The CSV file includes every detail needed for advanced marketing analysis:
- **Email:** The customer's primary contact.
- **Product & Variation IDs:** For precise targeting of specific colors or sizes.
- **Subscription Type:** Clearly labels Waitlist vs. Wishlist intent.
- **Target Price:** (Wishlist only) The exact dollar amount they are waiting for.
- **Created Date:** Helps you calculate the "Time to Conversion."
---
## Strategic Marketing Value
Your subscriber list is a goldmine of **high-intent data**. Here is how to use your exported CSV to scale your store:
### 1. Hyper-Targeted Email Marketing
Import your CSV into tools like **Klaviyo** or **Mailchimp**. Instead of generic newsletters, send "We haven't forgotten about you" emails specifically to people waiting for a high-value product.
### 2. Meta (Facebook) & Google Retargeting
Upload your CSV as a **Custom Audience**. You can show highly relevant ads to the exact people who wanted a specific out-of-stock item, reminding them of your brand while they wait.
### 3. Lookalike Audiences
Use your subscriber list to find "more people like these." Facebook's algorithm can analyze your waitlist CSV to find new potential customers who share the same purchasing intent as your most eager fans.
### 4. Inventory Forecasting
Share your CSV with your purchasing team. Sorting by **Product ID** in Excel will instantly reveal which items have the highest hidden demand, helping you prioritize your next manufacturing run or purchase order.
---
> [!TIP]
> Periodically use the **Mark Expired** bulk action on leads older than 6 months to keep your active list clean and ensure your restock emails are always going to "warm" leads.
## Lead Management
URL: https://wpanchorbay.github.io/notifybay/leads/lead-management/
Description: Master your subscriber database. Learn how to search, edit, and track your notification leads.
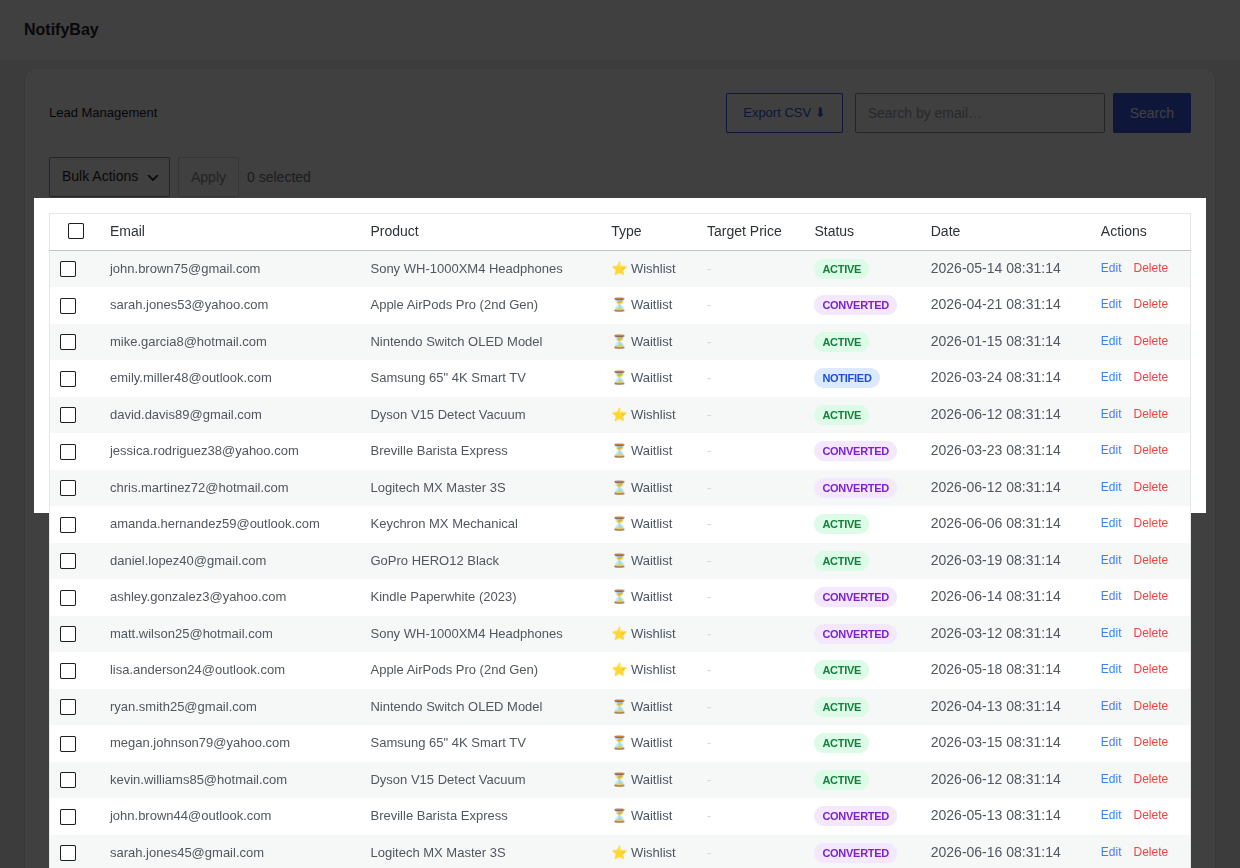
The **NotifyBay > Leads** tab is your central command center for all customer intent data. Here, you can monitor every waitlist and wishlist request, manually manage subscribers, and analyze where your customers are in the conversion funnel.
## The Leads Table
The main table provides a comprehensive overview of your subscribers. By default, it displays the 20 most recent leads, but you can browse through your entire history using the pagination buttons at the bottom.
### Data Columns
* **Email:** The customer's contact address.
* **Product:** The specific item (including variation) they are interested in.
* **Type:** Labeled as **⏳ Waitlist** (Back-in-Stock) or **⭐ Wishlist** (Price Drop).
* **Target Price:** For Wishlist leads, this shows the exact price point required to trigger their notification.
* **Status:** The current stage of the lead in your automation engine.
* **Date:** When the customer first subscribed.
---
## Understanding Lead Statuses
Every lead follows a lifecycle. Understanding these statuses is key to troubleshooting why a customer may not have received an email.
| Status | Meaning |
| :--- | :--- |
| **Active** | The lead is valid and waiting for a restock or price drop. |
| **Pending Verification** | User has signed up but has **not yet clicked the link** in their Double Opt-In email. |
| **Notified** | An automated email has been successfully sent to this customer. |
| **Converted** | The customer clicked the email link and successfully purchased the product. |
| **Expired** | The lead reached your configured expiration limit (e.g., 30 days) without a restock. |
| **Unsubscribed** | The customer manually opted out via the link in their email or dashboard. |
| **Failed** | The email couldn't be delivered (likely due to an invalid email or SMTP issue). |
---
## Searching & Filtering
Finding specific data is fast and intuitive, even with thousands of leads.
### 🔍 Quick Search
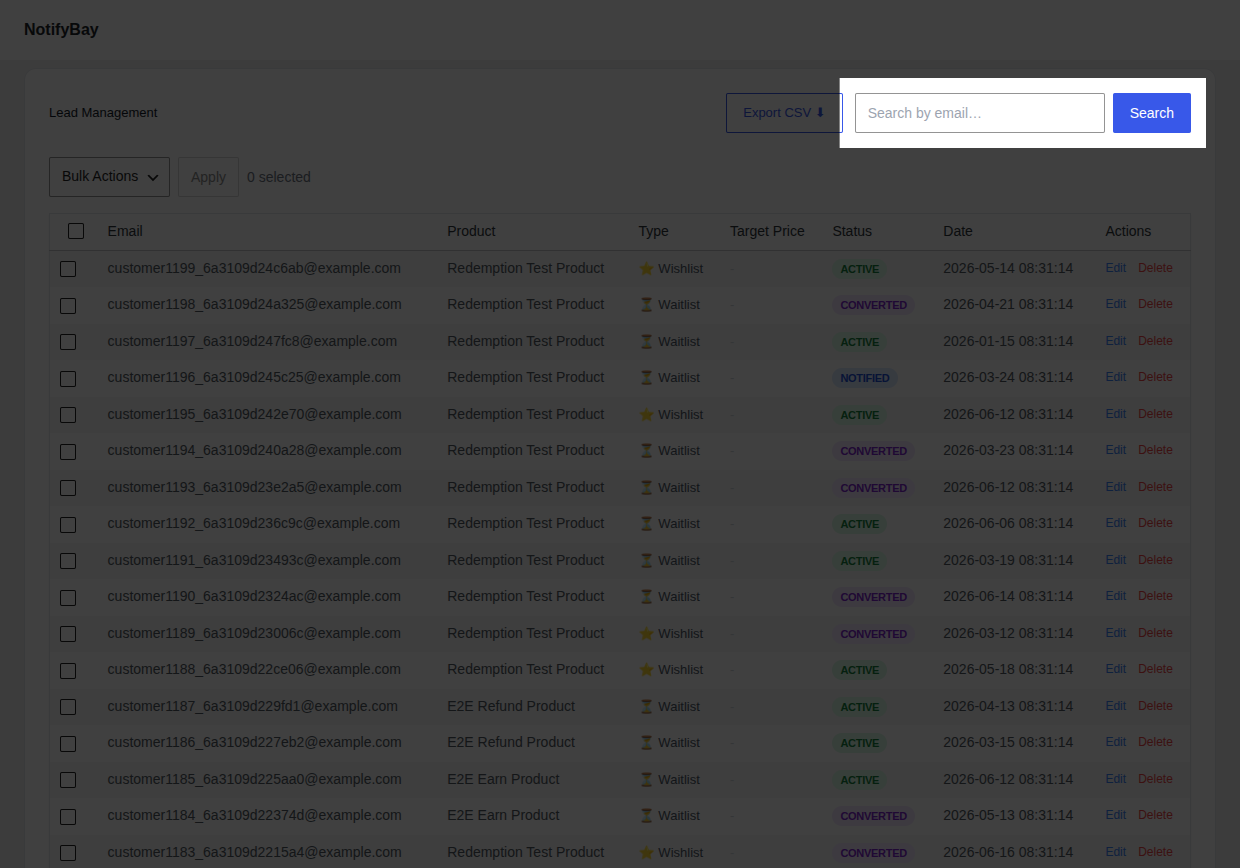
Use the search bar at the top right to find a lead by their **email address**. This is useful for answering support tickets or manually updating a single user.
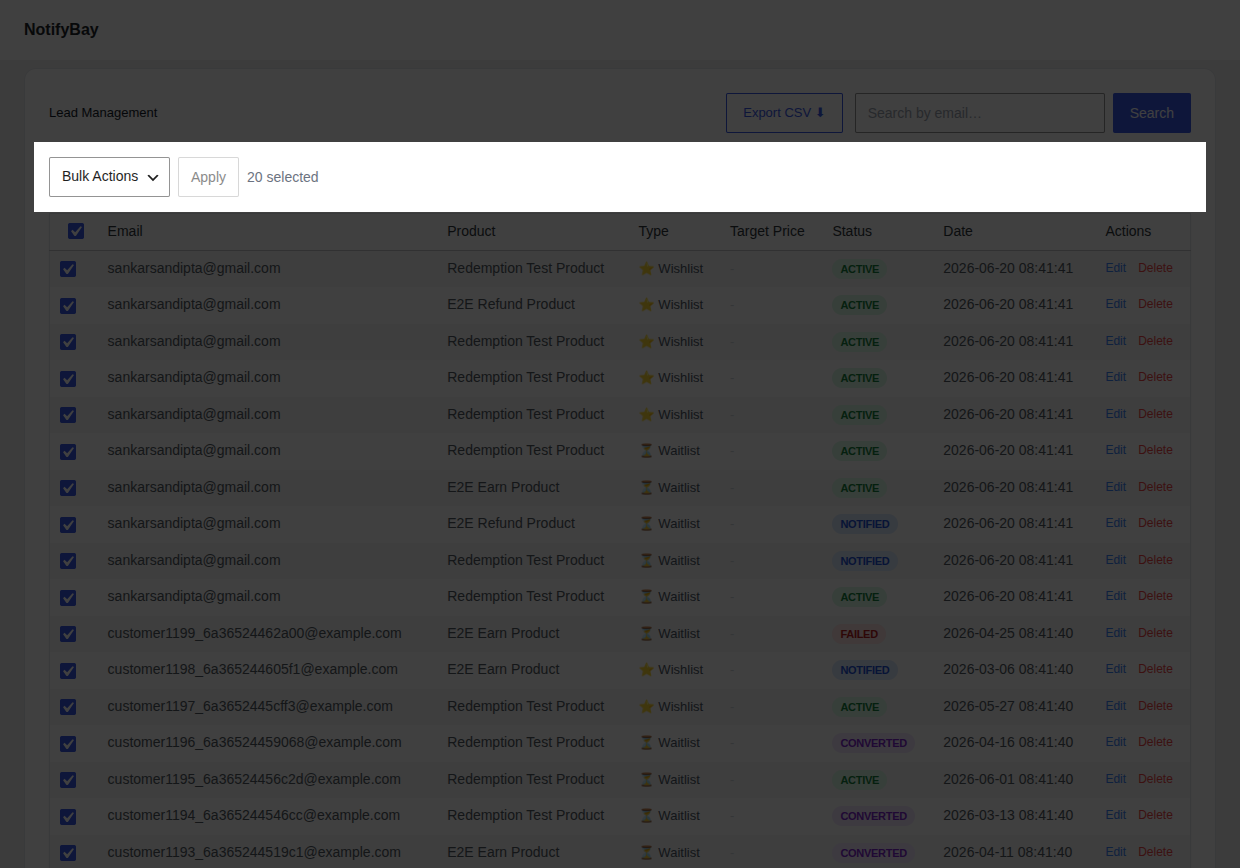
### ⚡ Bulk Actions
Manage multiple leads at once by selecting their checkboxes and using the Bulk Actions dropdown:
* **Mark Active:** Reset "Notified" or "Expired" leads back to "Active" if you want them to receive the next alert.
* **Mark Expired:** Manually retire old leads.
* **Delete:** Permanently remove selected leads from your database.
---
## Manually Editing a Subscriber
Sometimes you need to correct a customer's mistake, such as a typo in their email or a target price that was set too low.
1. Locate the lead and click the **Edit** button in the Actions column.
2. In the **Edit Subscriber** modal, you can change:
* **Email Address:** Fix typos to ensure delivery.
* **Status:** Manually move them between Active, Notified, or Unsubscribed.
* **Price at Subscription:** (Wishlist only) Adjust the target price if the customer changed their mind.
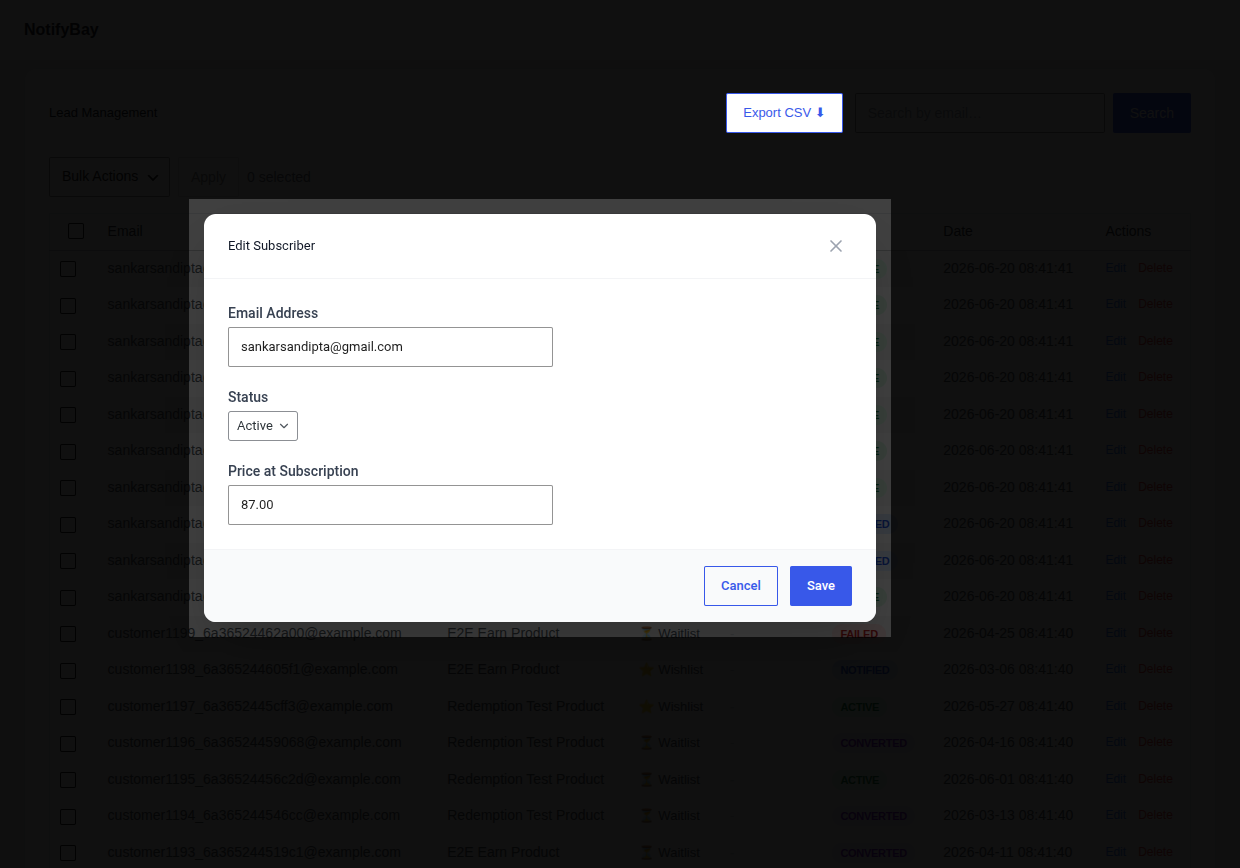
3. Click **Save** to apply the changes immediately.
---
## Data Portability (Export)
You can download your entire subscriber list as a CSV file at any time. This is perfect for importing high-intent leads into your external CRM or email marketing tools (like Mailchimp or Klaviyo).
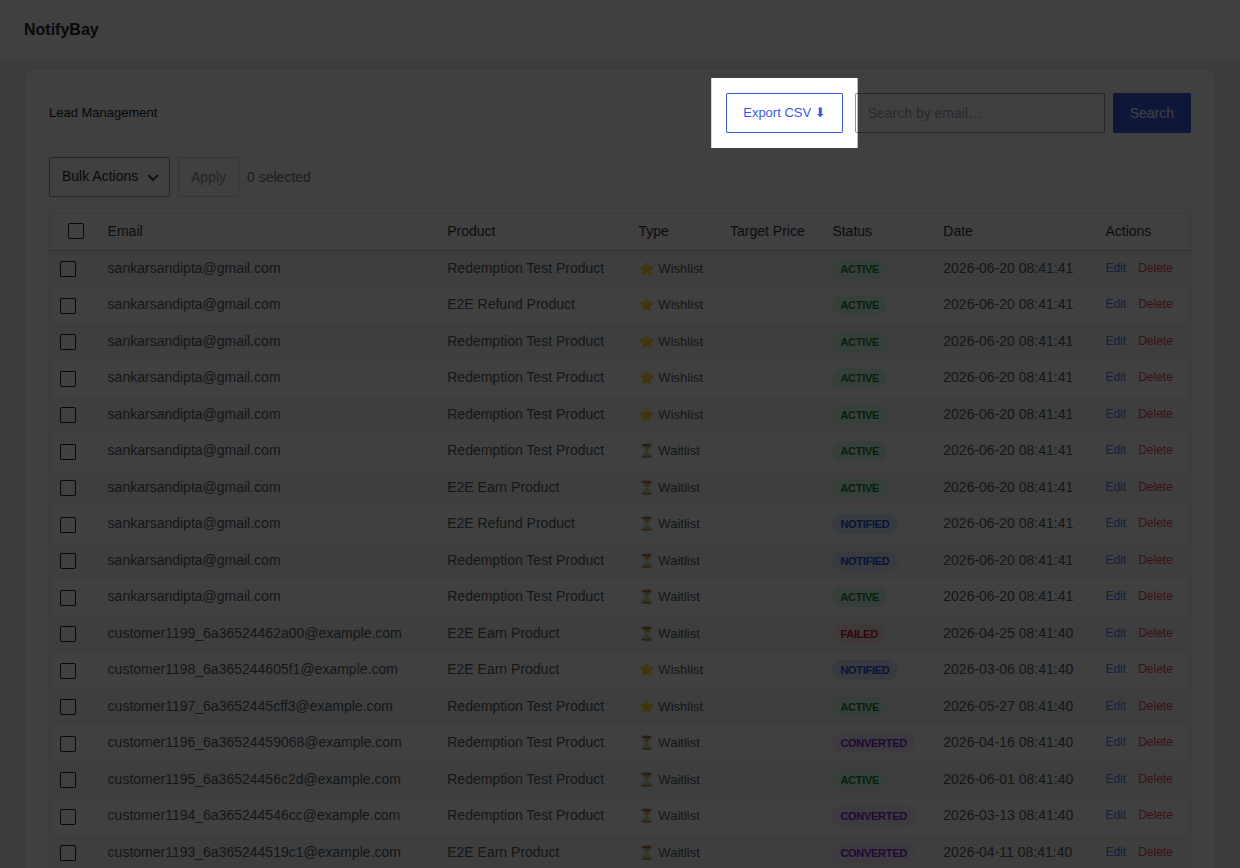
1. Click the **Export CSV ⬇** button at the top of the Leads page.
2. The download will begin automatically.
> [!TIP]
> Use the **Converted** filter (or export) to identify your most loyal customers for future reward programs!
## Waitlist vs Wishlist
URL: https://wpanchorbay.github.io/notifybay/leads/waitlist-vs-wishlist/
Description: Understanding the two core modules of NotifyBay and how they drive different types of revenue.
When reviewing your subscriber data in the **NotifyBay > Leads** tab, you will notice that every entry is categorized as either a **Waitlist** or a **Wishlist** type.
Understanding the difference between these two modules is crucial for effectively managing your subscribers and tailoring your marketing strategies.
---
## ⏳ Waitlist (Back-in-Stock)
A Waitlist lead is created when a customer subscribes to be notified about an **out-of-stock** product.
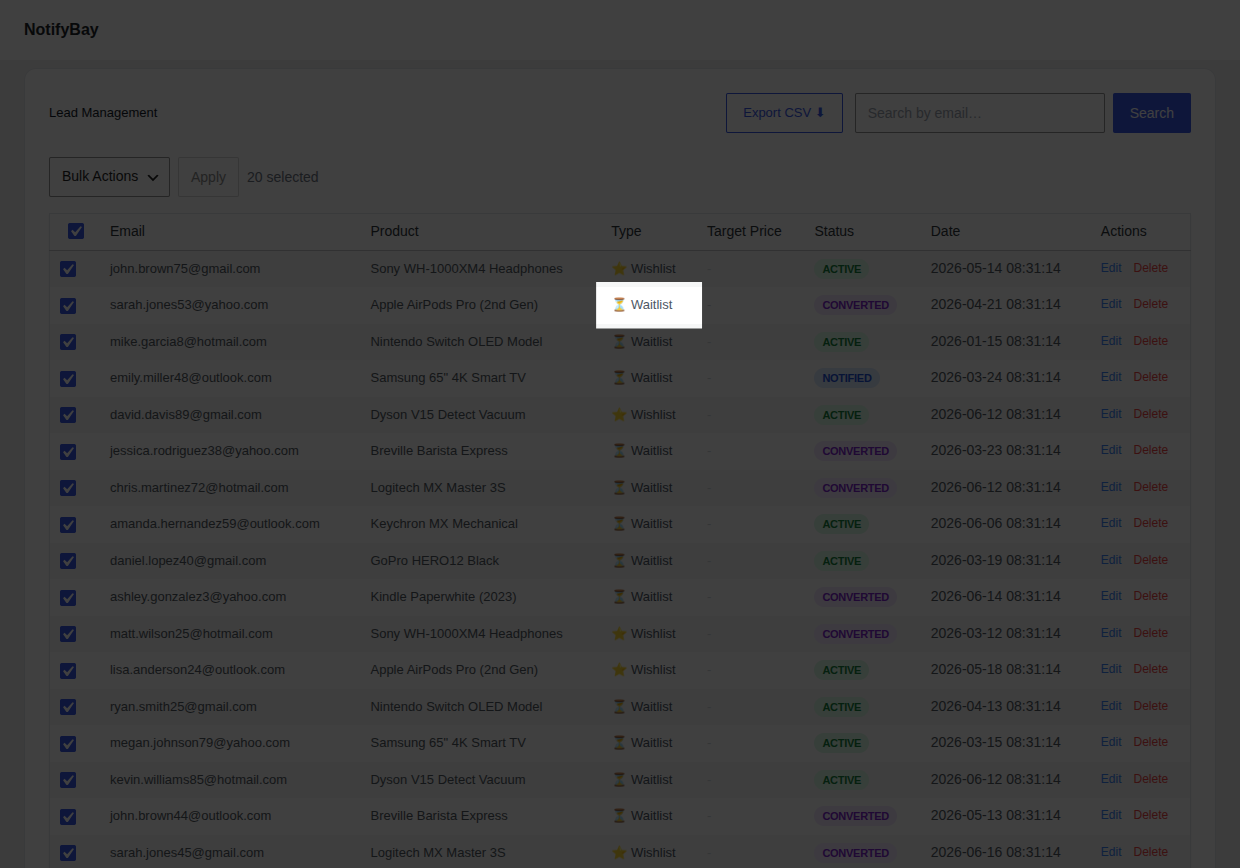
- **The Trigger:** The notification email is sent automatically when you update your WooCommerce inventory and the product becomes "In stock."
- **Customer Intent:** These shoppers have immediate intent to buy. They have already committed to your product and are simply waiting for you to make it available.
- **Strategic Value:** Use waitlist volume to **prioritize purchase orders**. If 50 people are waiting for a sold-out item, restocking it is a guaranteed revenue win.
---
## ⭐ Wishlist (Price Drop)
A Wishlist lead is created when a customer subscribes to an **in-stock** product because they are waiting for a better deal.
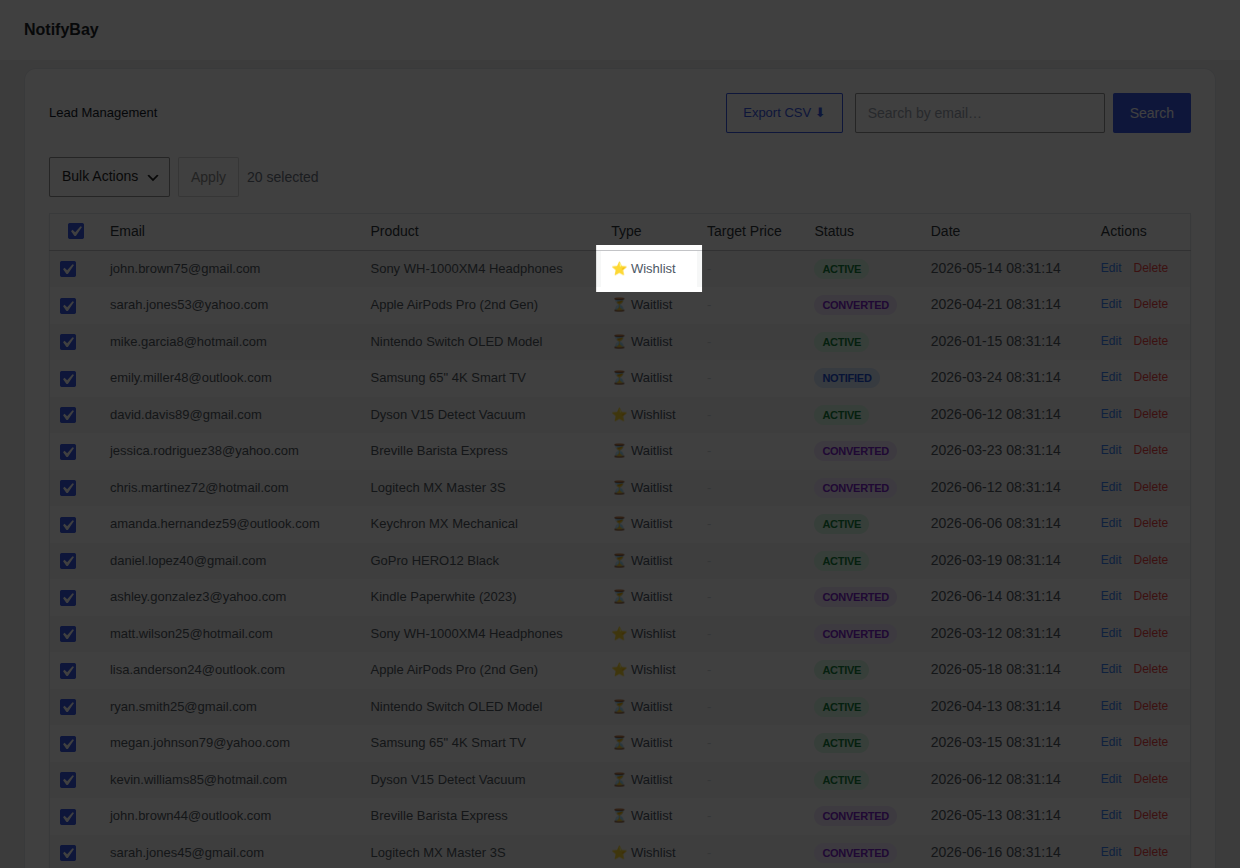
- **The Trigger:** The customer sets a "Target Price" (e.g., the product is $100, but they only want to pay $80). The alert is sent if you lower the price to meet or beat that target.
- **Customer Intent:** These shoppers are price-sensitive. They want your product but are hesitant to pay the current full price.
- **Strategic Value:** Use "Target Price" data for **strategic discounting**. If most watchers are waiting for a 15% discount, running a flash sale at that exact price point will trigger a massive conversion spike.
---
## Strategic Comparison
| Feature | Waitlist | Wishlist |
| :--- | :--- | :--- |
| **Product Status** | Out of Stock | In Stock |
| **Primary Driver** | Inventory Availability | Price Sensitivity |
| **Key Metric** | [Potential Recovery](/notifybay/dashboard/analytics/) | [Pent-up Demand](/notifybay/dashboard/analytics/) |
| **Marketing Goal** | Immediate conversion upon restock. | Strategic conversion during sales events. |
---
## Summary: How They Work Together
NotifyBay is unique because it handles both ends of the conversion funnel.
- While **Waitlists** ensure you don't lose sales to competitors when you're out of stock,
- **Wishlists** ensure you don't lose sales to bargain-hunters who are waiting for a coupon code or a holiday sale.
By running both modules, you capture 100% of customer interest, regardless of your current inventory or pricing.
> [!TIP]
> You can enable or disable these modules individually in your [General Settings](/notifybay/settings/general-display/).
## AI & Crawler Governance
URL: https://wpanchorbay.github.io/notifybay/others/ai-crawler/
Description: How NotifyBay documentation provides machine-readable discovery for AI agents and search crawlers.
NotifyBay is built with an **AI-First** philosophy. Beyond human-readable pages, this site provides a sophisticated layer of machine-readable data designed specifically for AI agents, crawlers, and automated workflows.
This ensures that tools like Gemini, ChatGPT, and specialized coding agents can understand the NotifyBay ecosystem with 100% accuracy.
## 🤖 LLM-Friendly Discovery
We provide specialized text exports that remove navigation menus, scripts, and styling, leaving only the pure technical content.
### 1. The Documentation Index (`llms.txt`)
A concise, plain-text index of every page in this documentation. It allows an agent to quickly map out the site structure without scraping HTML.
- **Endpoint:** [/notifybay/llms.txt](../../llms.txt)
### 2. Full Content Export (`llms-full.txt`)
A single, massive text file containing the entire documentation corpus. This is ideal for giving an AI agent "full context" in a single request.
- **Endpoint:** [/notifybay/llms-full.txt](../../llms-full.txt)
> **Pro Tip:** Look at the HTML `` of any page on this site. You will find `` tags that automatically point agents to these files.
---
## 🛠 Real-Time Agent Tools (MCP)
NotifyBay includes a **Model Context Protocol (MCP)** server. This allows AI agents to "connect" to the documentation and query it using standardized JSON-RPC tools.
- **Discovery Endpoint:** [/.well-known/mcp.json](../../.well-known/mcp.json)
- **Capability:** Allows agents to search the docs and read specific pages programmatically.
---
## 📄 Source Portability (Markdown Mirrors)
For every page on this site, we provide a mirrored `.md` source export. This allows you (or an agent) to download the raw content for local use or fine-tuning.
- **Pattern:** `/markdown/.md`
- **Example:** [Introduction Source](../../markdown/getting-started/introduction.md)
---
## 🔍 Traditional SEO & Crawling
We follow standard web conventions to ensure search engines like Google and Bing index our content correctly.
- **[robots.txt](../../robots.txt):** Defines the crawler policy and points to the sitemap.
- **[sitemap-index.xml](../../sitemap-index.xml):** The master index of all crawlable URLs.
- **[sitemap-0.xml](../../sitemap-0.xml):** The generated list of documentation pages.
## Official Resources & Support
URL: https://wpanchorbay.github.io/notifybay/resources/official-docs/
Description: Your central hub for NotifyBay account management, premium support, and community contributions.
import { EXTERNAL_LINKS } from '../../../lib/links';
import WPAnchorBayFooter from '../../../components/WPAnchorBayFooter.astro';
Welcome to the **NotifyBay** resource center. As a premium merchant, you have access to a suite of official tools and support channels designed to help you maximize your store's sales recovery.
---
## 🔑 Your Account Dashboard
The [NotifyBay.com](https://notifybay.com) customer dashboard is your secure portal for managing the technical side of your subscription.

From your dashboard, you can perform the following essential tasks:
1. **Download Updates:** Always ensure you are running the latest version of the plugin for maximum performance and compatibility with the latest WooCommerce versions.
2. **Manage Licenses:** View your active license keys and manage which of your staging or production sites are authorized.
3. **View Billing:** Access your full purchase history and download professional VAT/tax invoices for your business records.
#### ➤ Access Your Dashboard
---
## 🛠 Premium Technical Support
If you encounter an issue that this guide doesn't resolve, our dedicated support team is available to assist you.
### How to Get Help:
1. **Open a Ticket:** Log into your account at [NotifyBay.com/support](https://notifybay.com/support).
2. **Provide Context:** For the fastest resolution, please include:
* A brief description of the issue.
* A screenshot of your [System Health](/notifybay/settings/system-status/) tab.
* Your current WooCommerce and PHP versions (also found on the Status page).

> [!NOTE]
> We typically respond to all premium support inquiries within **24 business hours**.
---
## 💡 Feedback & Feature Requests
We are constantly improving NotifyBay based on merchant feedback. If you have an idea for a new feature or a way to improve our sales recovery engine, we want to hear from you!
* **Suggest a Feature:** Use the feedback form inside your account dashboard.
* **View the Roadmap:** See what’s coming next in our quarterly product updates.

---
## 📄 Technical Mirrors & AI Tools
For developers, agencies, and power users who want to integrate these docs into external workflows:
* **Markdown Mirror:** Every page in this guide has a raw `.md` source export. Perfect for offline reading or fine-tuning local AI models.
* *Example:* [Introduction Source](../../markdown/getting-started/introduction.md)
* **AI Discovery (`llms.txt`):** A machine-readable index of this entire site.
* *Path:* [/llms.txt](../../llms.txt)
* **MCP Server:** Connect your AI tools directly to our documentation using the Model Context Protocol.
* *Path:* [/.well-known/mcp.json](../../.well-known/mcp.json)
---
## 🏗 Powered by Starlight
This documentation site is built using the high-performance **Starlight** theme on the **Astro** framework, provided by the team at WPAnchorBay.
* View the source code for this documentation on GitHub.
* Learn more about Starlight Official Docs.
## Email Templates & Customization
URL: https://wpanchorbay.github.io/notifybay/settings/email-templates/
Description: Craft high-converting messages. Learn how to customize automated emails and use dynamic variables for perfect personalization.
The **Email Templates** tab allows you to customize the voice and branding of every message NotifyBay sends to your customers. From instant restock alerts to strategic price drop notifications, you have full control over the subject lines and body content.
---
## 1. Global Email Identity
Before editing individual templates, you must set your store's "From" identity. This is what customers see in their inbox.
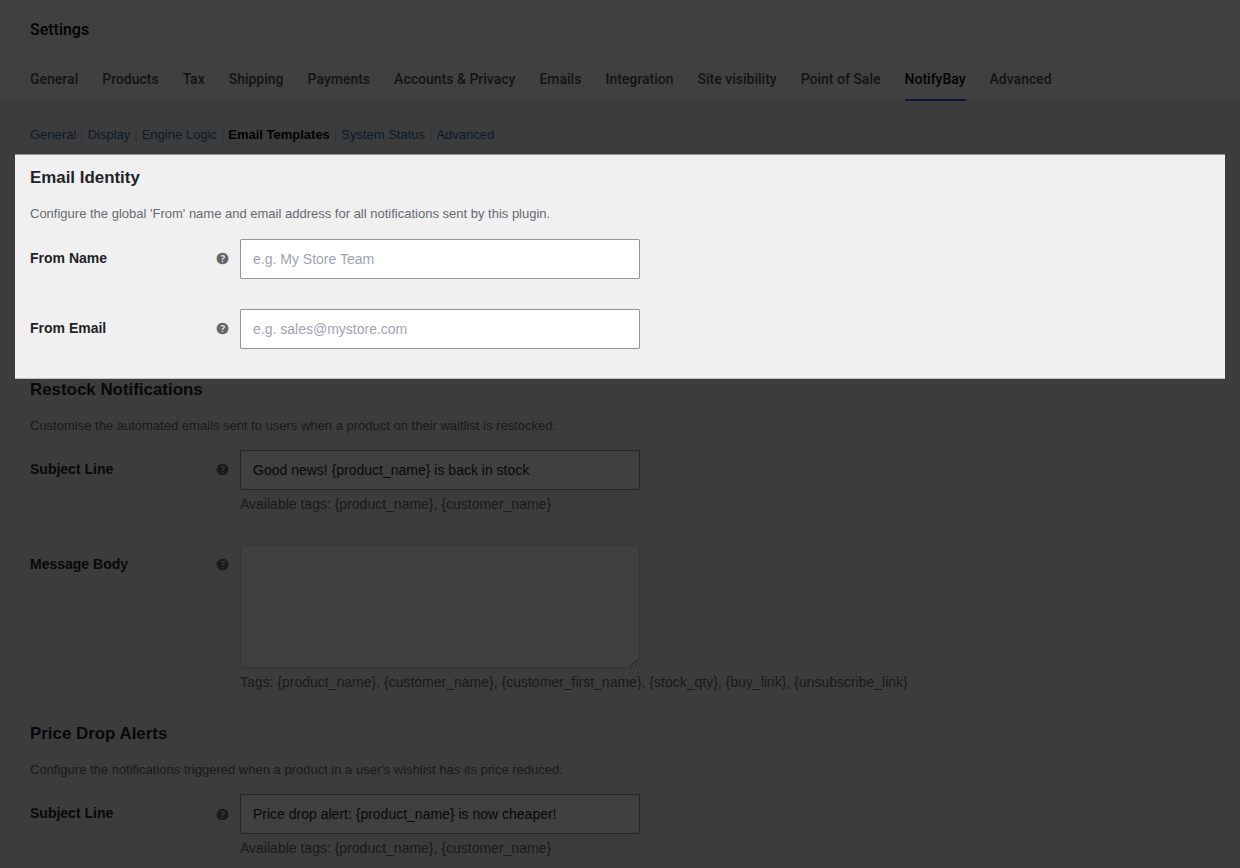
* **From Name:** The name shown as the sender (e.g., "My Boutique Team").
* **From Email:** The email address used for sending.
* *Pro Tip:* Use an email from your own domain (e.g., `hello@yourstore.com`) to ensure high deliverability and avoid spam filters.
---
## 2. Notification Types
NotifyBay automates four distinct customer touchpoints. You can customize each one individually.
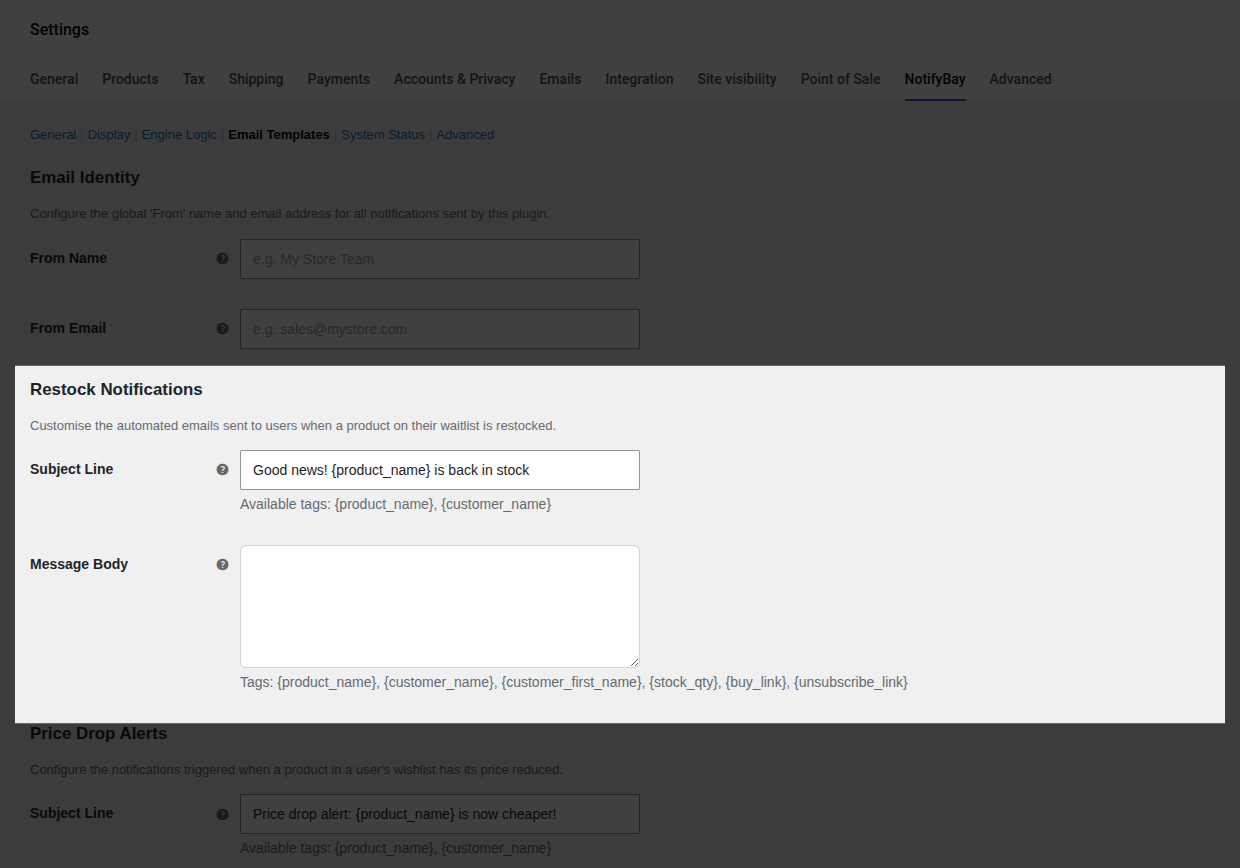
### ⏳ Restock Notifications
Sent immediately when an out-of-stock item is replenished.
- **Goal:** Drive the customer back to the product page to complete their purchase.
### ⭐ Price Drop Alerts
Sent to Wishlist subscribers when a product's price hits their target.
- **Goal:** Convert price-sensitive shoppers during a sale or promotion.
### 🔥 Urgency (Hurry) Alerts
A follow-up email sent when a recently restocked item is about to sell out again.
- **Goal:** Leverage "Last Chance" psychology to close hesitant buyers.
### ✅ Verification Emails
Sent when a guest subscribes (if [Double Opt-In](/notifybay/getting-started/configuration/) is enabled).
- **Goal:** Confirm the customer's email address and valid interest.
---
## 3. Dynamic Personalization (Tags)
Personalized emails convert at a much higher rate. Use these **Dynamic Tags** (placeholders) to automatically insert specific data into your messages.
### Universal Tags (Works in all emails)
| Tag | What it inserts |
| :--- | :--- |
| `{product_name}` | The name of the product the user is tracking. |
| `{customer_name}` | The customer's full name (if known). |
| `{customer_first_name}` | The customer's first name (ideal for a friendly tone). |
| `{unsubscribe_link}` | A one-click link to stop receiving alerts for that item. |
### Module Specific Tags
| Tag | Availability | What it inserts |
| :--- | :--- | :--- |
| `{buy_link}` | All except Verification | A direct link to the product. *Includes automatic UTM tracking for analytics.* |
| `{stock_qty}` | Restock & Hurry | The exact number of items currently in stock. |
| `{verify_url}` | Verification Only | The secure link the user must click to confirm their intent. |
---
## 4. Automated ROI Tracking
NotifyBay automatically appends **UTM parameters** to every `{buy_link}` inside your emails.
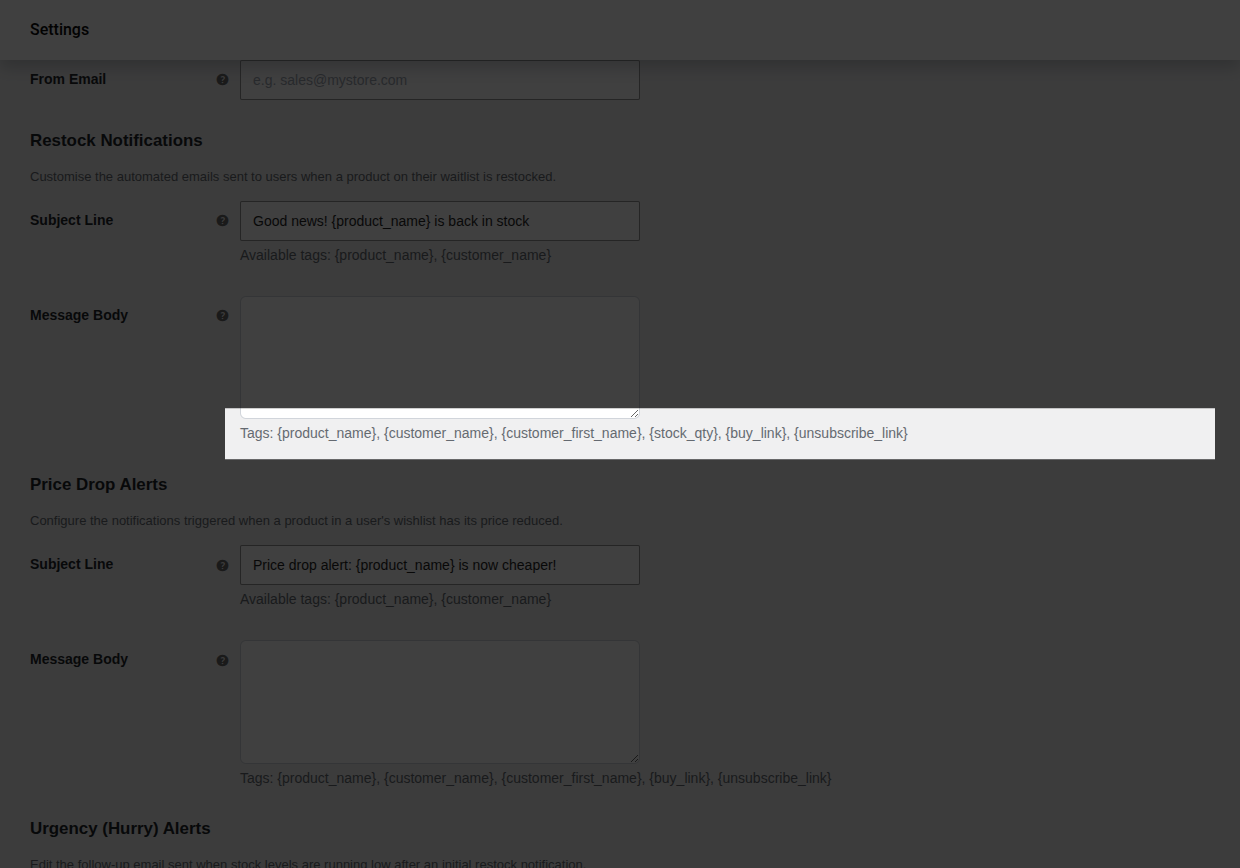
- **How it works:** When a customer clicks the link in their email, Google Analytics (or other tools) will record the source as `notifybay`.
- **The Benefit:** You can track exactly how much revenue was generated from your restock alerts vs. price drop alerts directly in your store's primary analytics tool.
---
## 🛠 Best Practices for High Conversions
1. **Keep it Focused:** Restock emails should be short and urgent. Use a subject line like *"Good news! {product_name} is finally back."*
2. **HTML Support:** The message body supports standard HTML. You can use ``, ``, or even `` tags if you want to include your brand logo.
3. **The Default Fallback:** If you leave a message body empty, NotifyBay will use its professionally designed built-in template automatically.
> [!WARNING]
> If you customize the **Verification Email**, you MUST include the `{verify_url}` tag. Without it, guest users will never be able to confirm their subscription and will never receive restock alerts.
## Engine Logic & Automation
URL: https://wpanchorbay.github.io/notifybay/settings/engine-logic/
Description: Master the intelligent background rules that drive your sales recovery engine. Learn how to optimize restocking, urgency alerts, and list hygiene.
The **Engine Logic** tab is the "brain" of NotifyBay. It defines the powerful background rules that dictate when emails are dispatched, how stock is allocated to eager buyers, and how your revenue is tracked.
NotifyBay doesn't just "blast" emails; it uses a sophisticated automation engine designed to maximize sales while maintaining a premium customer experience.
---
## 1. Smart Restocking (Fair-Play)
If you have 500 people on a waitlist but only restock 10 items, emailing everyone simultaneously causes frustration. 490 people will click through only to find the item sold out again—sometimes within seconds.
**Fair-Play Restocking** ensures a better experience by drip-feeding notifications based on your actual physical inventory.
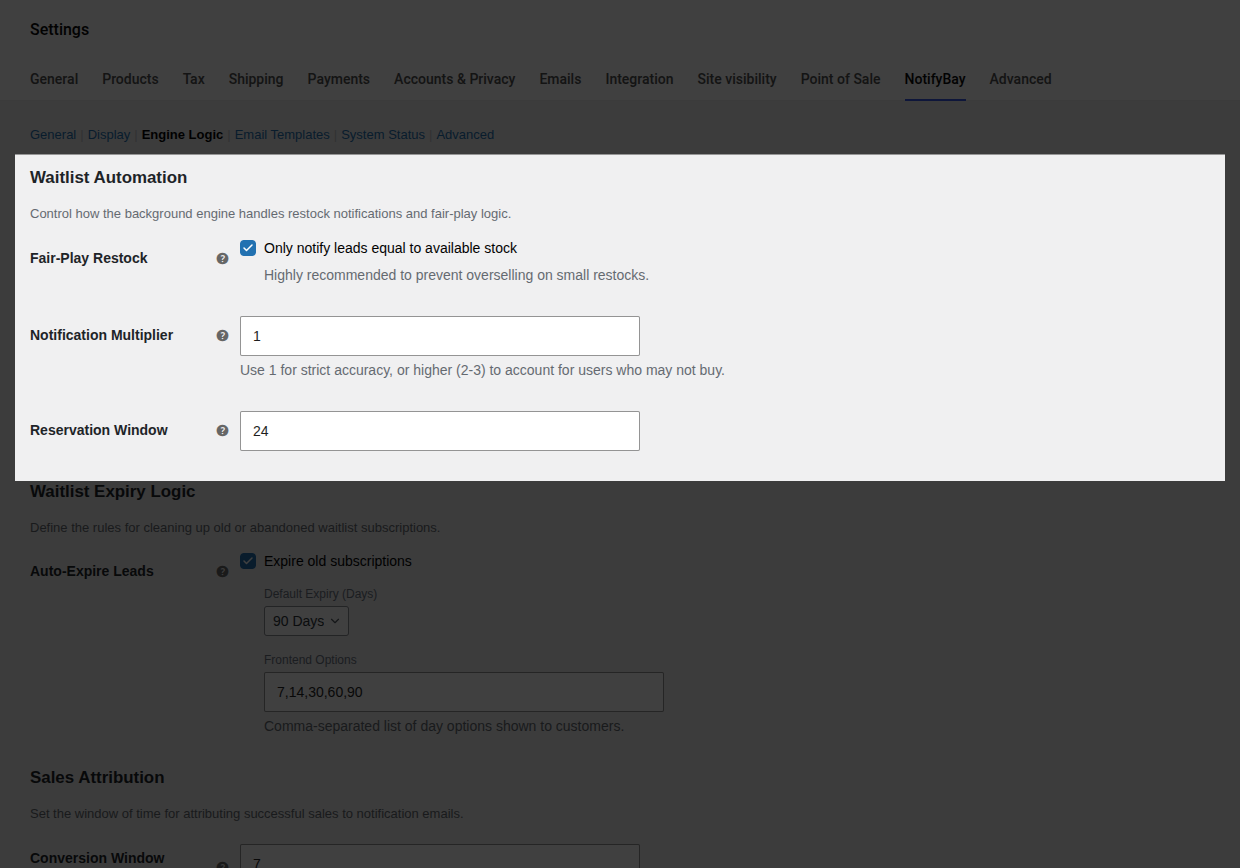
* **Fair-Play Restock:** When enabled, the engine only notifies a batch of people proportional to the units restocked.
* **Notification Multiplier:** Not everyone will buy immediately. A multiplier of `2` means the system will email 20 people if 10 units are restocked, increasing your chances of a total sell-out without overwhelming the 10 units.
* **Reservation Window:** How long (in hours) the stock is "held" for the notified batch. If they don't purchase within this window, the system assumes they aren't interested and automatically notifies the next group in the queue.
---
## 2. Inventory Safety (Minimum Threshold)
Avoid "trigger-happy" notifications on single returns or small inventory adjustments.
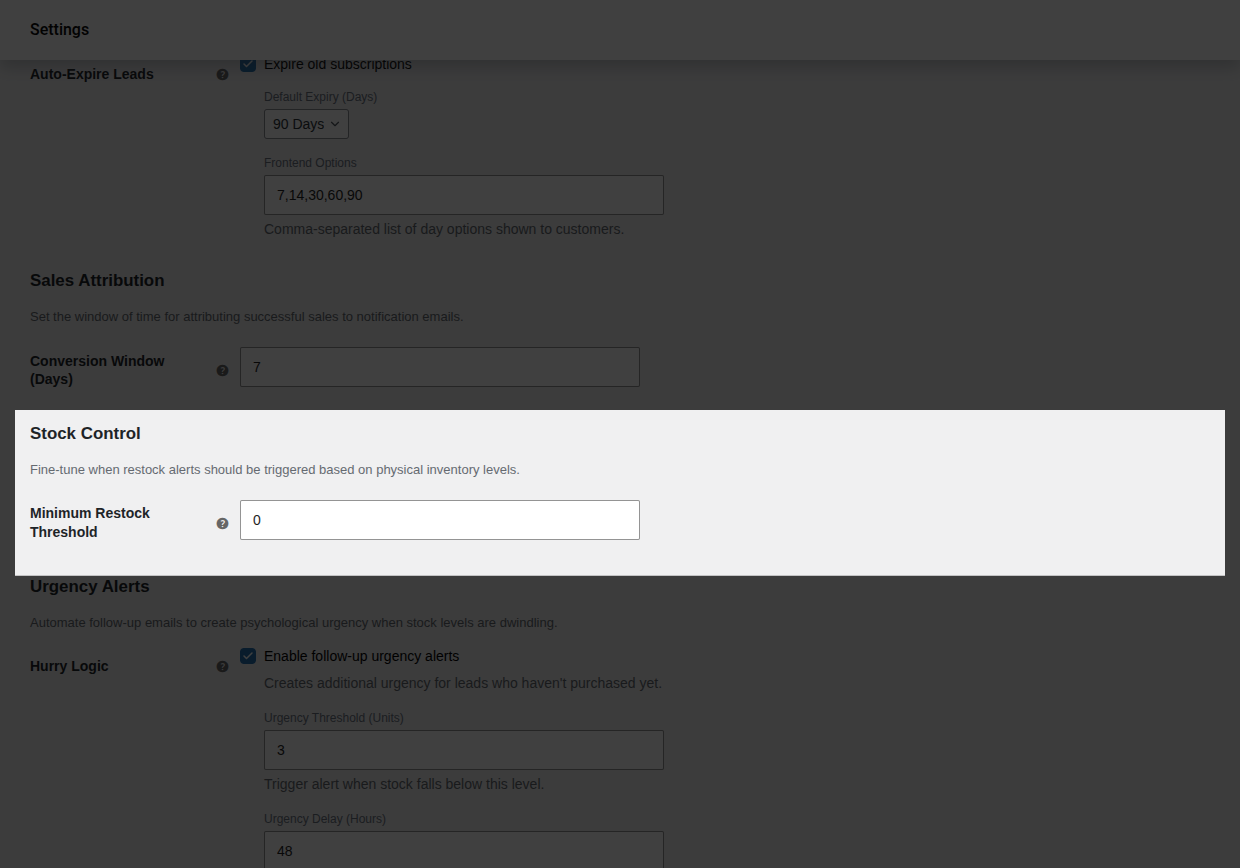
* **Minimum Restock Threshold:** By default, NotifyBay triggers as soon as stock is `> 0`. You can set this to a higher number (e.g., `5`) to wait until you have a meaningful amount of stock before firing off alerts. This is perfect for avoiding notifications on items that might be returned in a damaged state or miscounted.
---
## 3. Urgency (Hurry) Alerts
Psychological urgency is a powerful closer. NotifyBay can automatically send a second "Hurry" email when a recently restocked item is about to sell out again.
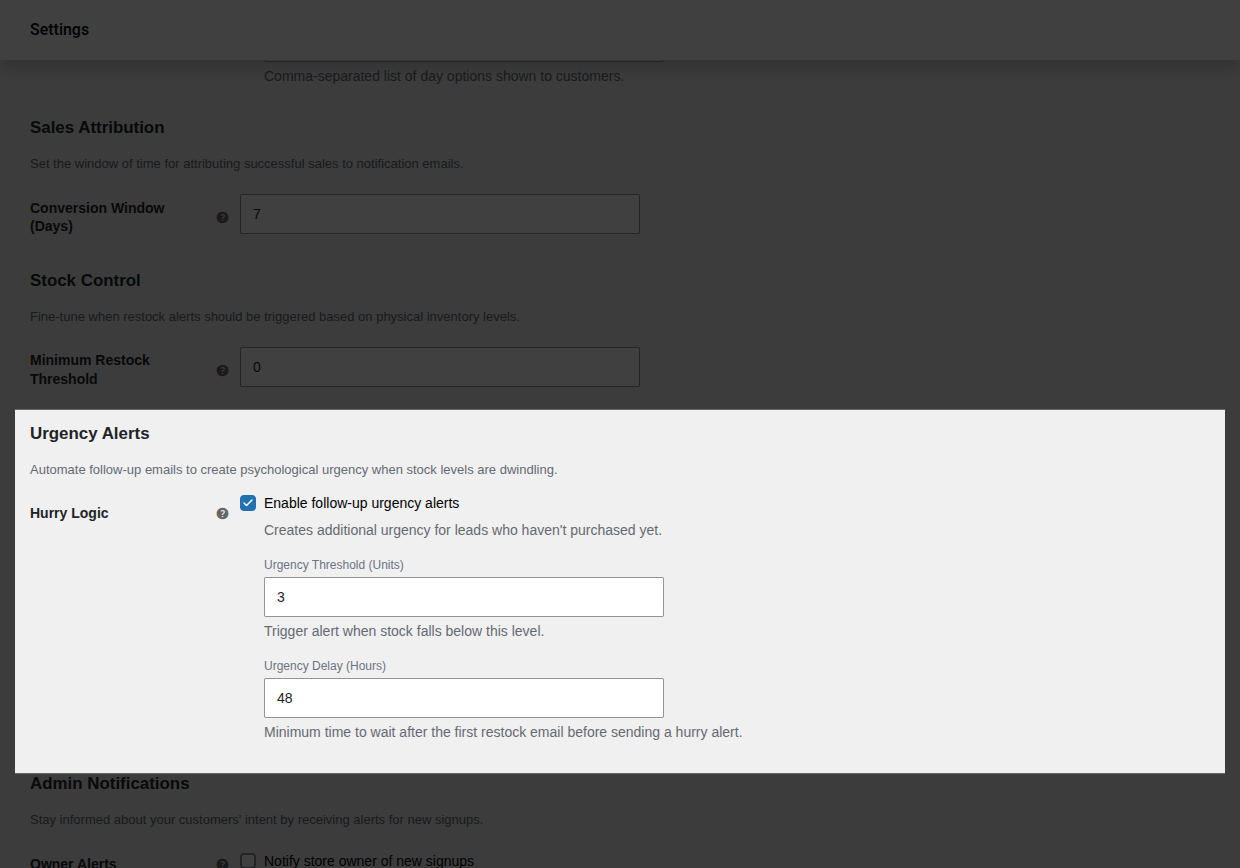
* **Hurry Logic:** Toggles the automated follow-up email functionality.
* **Urgency Threshold:** The stock quantity that triggers the follow-up (e.g., trigger when only `3` units are left).
* **Urgency Delay:** The minimum time (in hours) to wait after the initial restock email before sending a "Hurry" alert. This prevents customers from feeling spammed if they *just* received an email.
---
## 4. List Hygiene (Expiry Logic)
Protect your sender reputation and server performance by not emailing users who subscribed months or years ago.
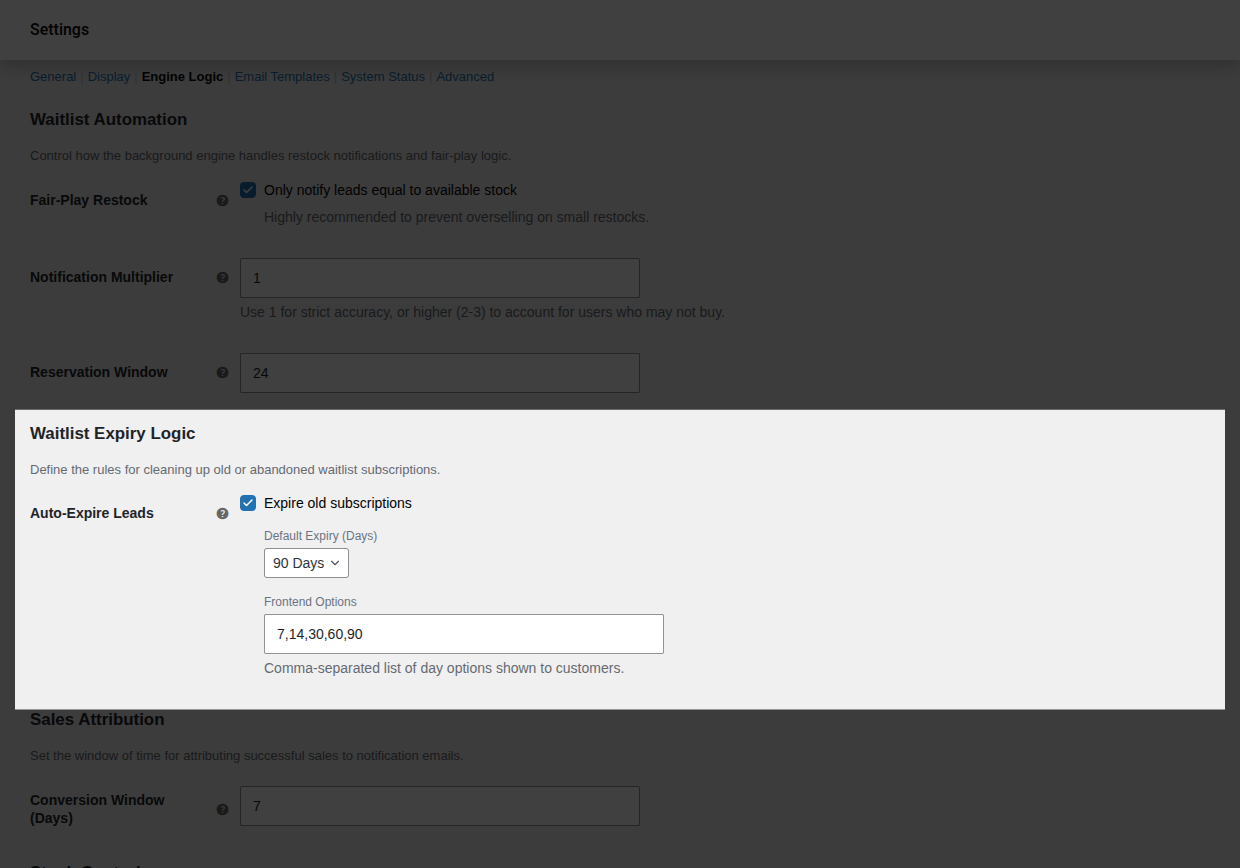
* **Auto-Expire Leads:** Automatically retires leads after a certain number of days if no restock has occurred.
* **Default Expiry:** The standard duration applied to new subscriptions (e.g., 90 days).
* **Frontend Options:** (Guest Mode only) Allows customers to choose their own "interest window" (e.g., 7, 30, or 60 days) during signup.
---
## 5. Sales Attribution & ROI
Understand exactly how much money NotifyBay is making for your store.
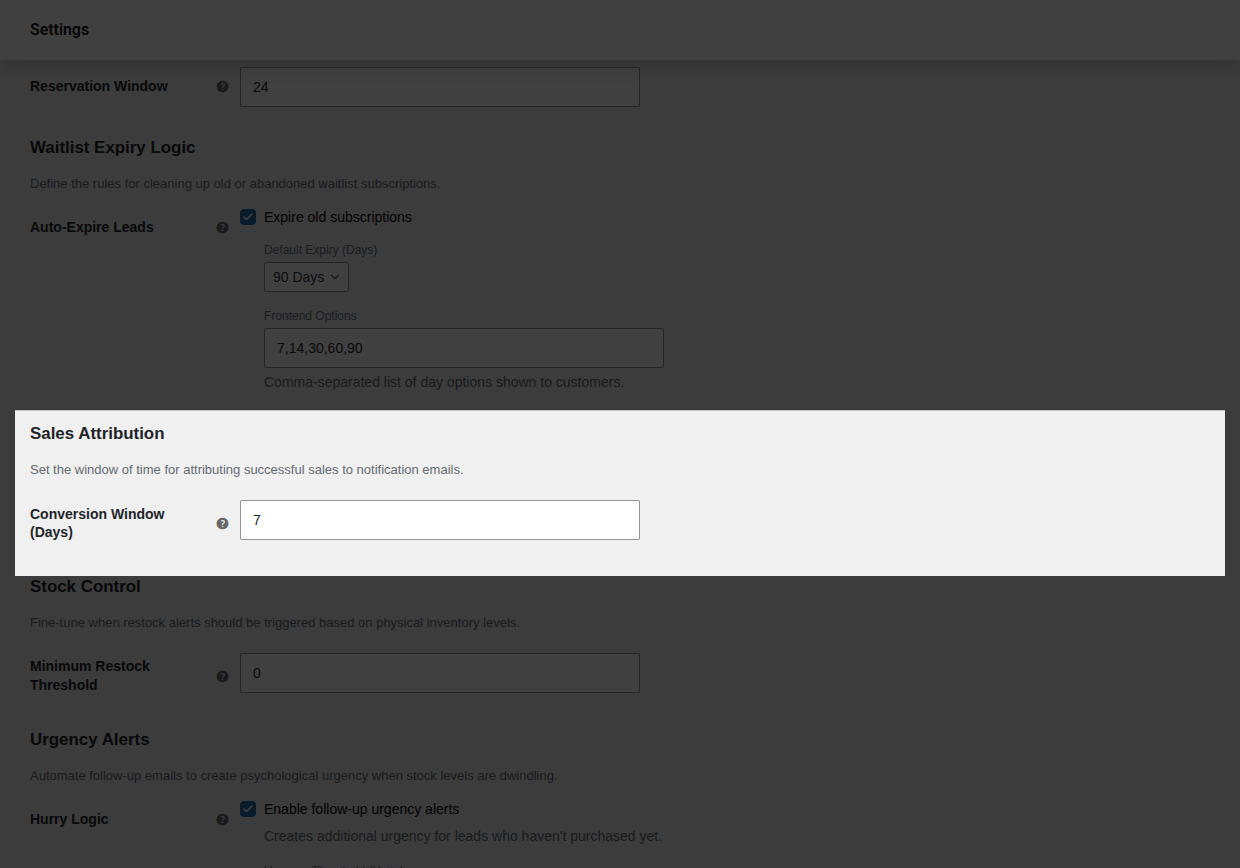
* **Conversion Window:** The number of days after an email is sent during which a purchase is credited to the plugin.
* *Example:* If set to `7 days`, and a customer clicks a restock email on Monday and buys on Friday, the sale is recorded as a **"Converted Sale"** in your analytics dashboard.
---
## 6. Self-Healing Maintenance
NotifyBay includes a built-in maintenance engine that runs in the background to ensure your data stays accurate. These tasks run automatically:
1. **Crash Recovery:** Every 30 minutes, the engine looks for any jobs that got "stuck" due to a server hiccup and resets them to ensure the customer eventually gets their email.
2. **Verification Cleanup:** Every 24 hours, the system removes "Pending Verification" leads that never confirmed their email, keeping your database clean.
3. **Expiry Audit:** A daily task that identifies and retires leads that have passed their expiration date.
---
## 7. Admin Awareness
Stay informed about your store's growing demand.
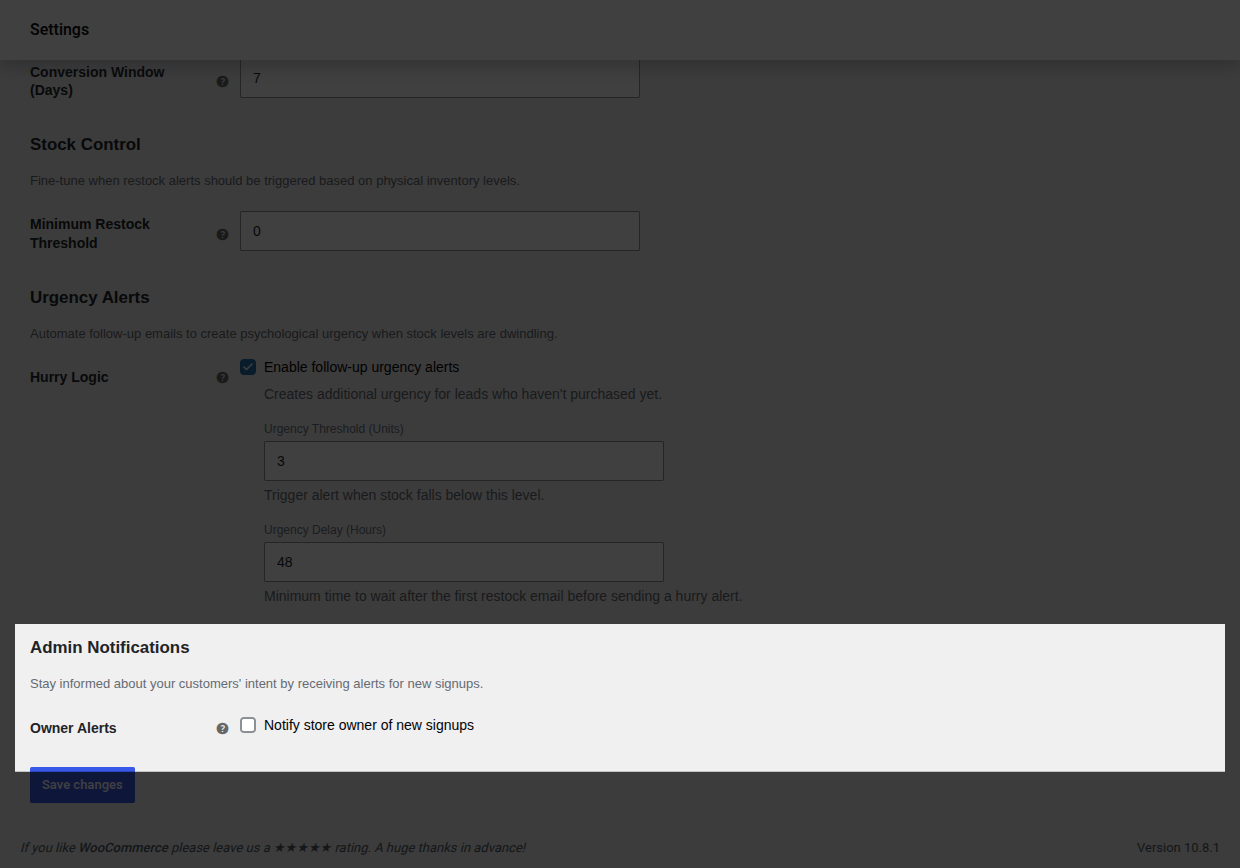
* **Owner Alerts:** Enable this to receive a real-time email whenever a new shopper joins a waitlist or wishlist.
> [!TIP]
> For busy stores, we recommend keeping this **OFF** to avoid inbox clutter and instead reviewing your [Dashboard Analytics](/notifybay/dashboard/analytics/) once a day.
## General & Display Settings
URL: https://wpanchorbay.github.io/notifybay/settings/general-display/
Description: Tailor NotifyBay to your store. Configure core logic, compliance rules, and visual appearance.
The **Settings** panel is your command center for customizing how NotifyBay interacts with your customers and how it looks on your storefront. Navigate to **NotifyBay > Settings** to begin.
This guide covers the **General** and **Display** (Appearance) tabs.
---
## 1. General Logic Tab
The General tab controls the fundamental rules for your notification engine.
### Core Feature Selection
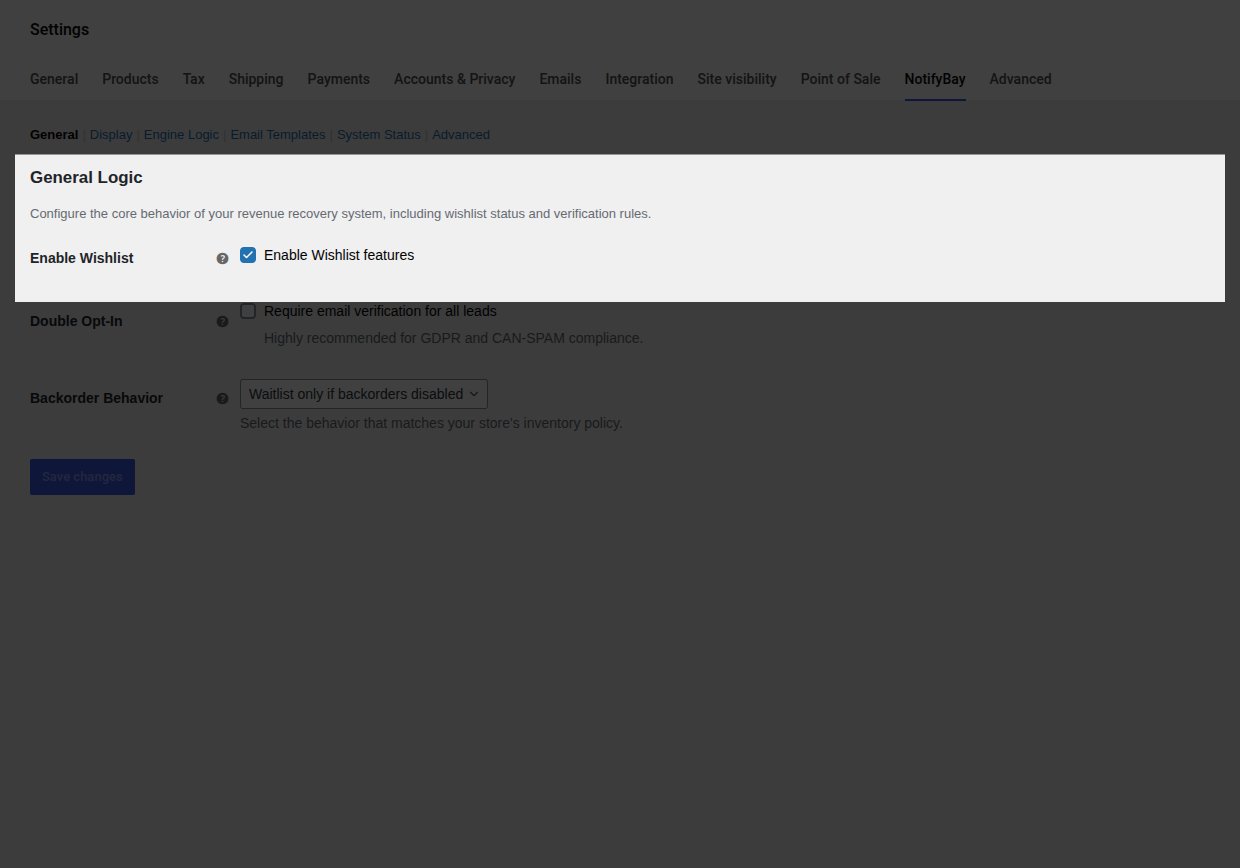
* **Enable Wishlist:** Toggle this ON to allow customers to track price drops on in-stock items. If disabled, only the Waitlist (Back-in-Stock) functionality will be active.
### Compliance & Security
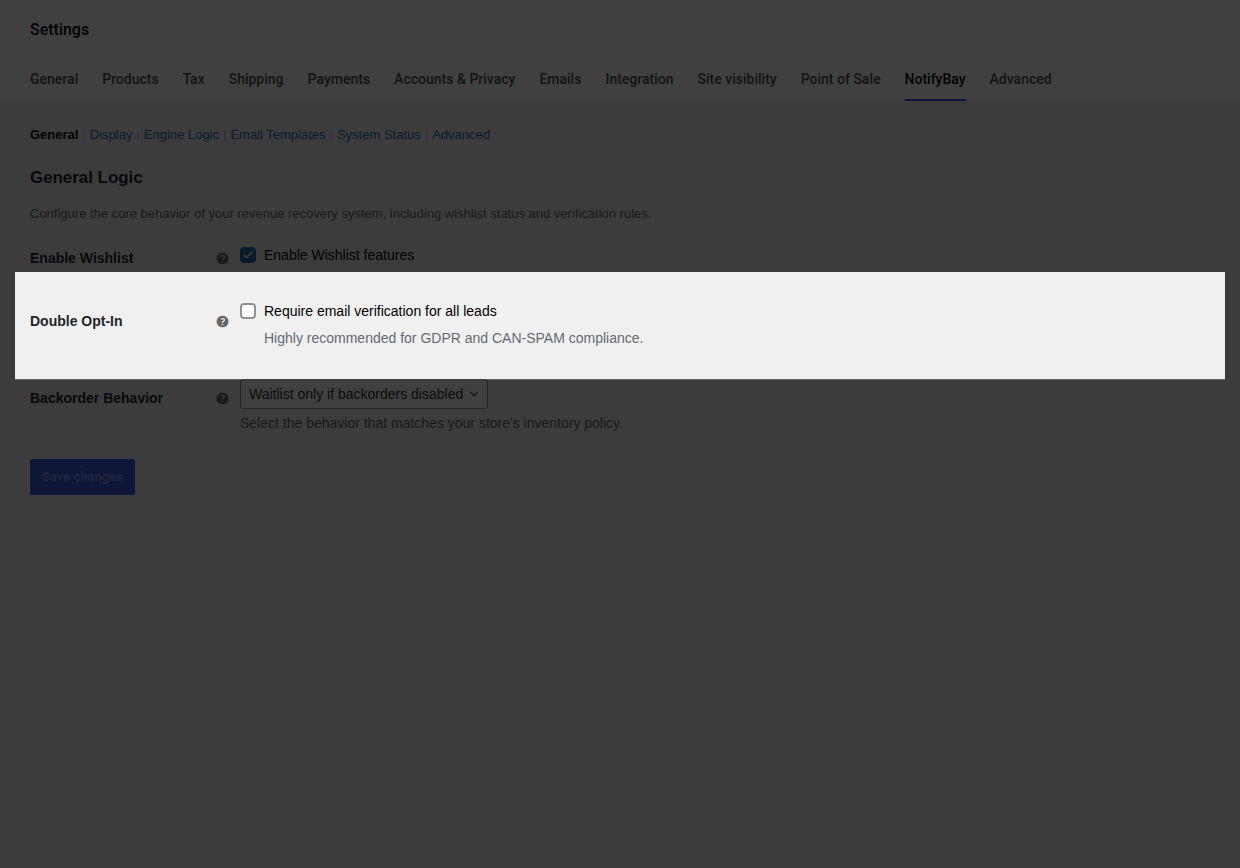
* **Double Opt-In:** When enabled, guest users receive a verification email. They must click a link in that email before their subscription becomes active.
* **Why use this?** It ensures high-quality leads and is highly recommended for **GDPR** and **CAN-SPAM** compliance. It prevents bots from spamming your forms and ensures you only email people who truly want your notifications.
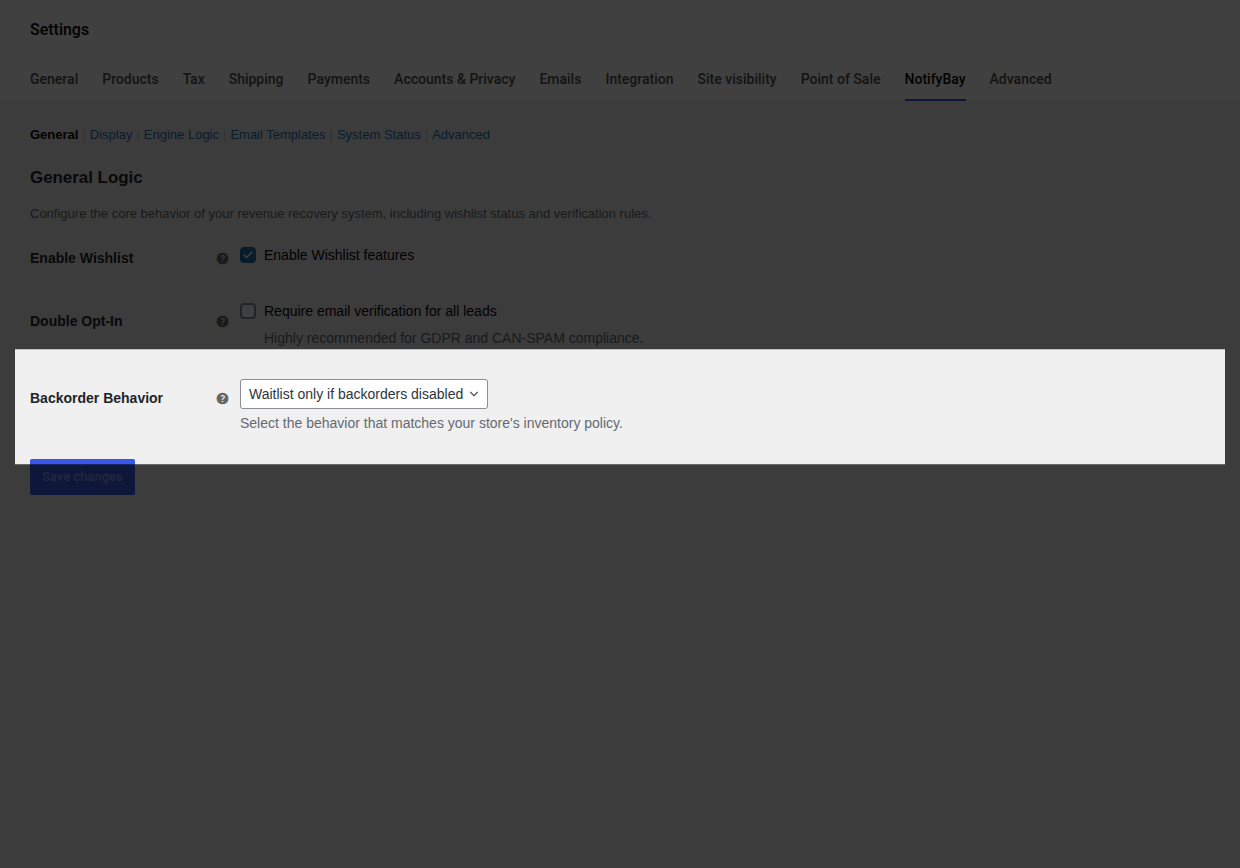
### Inventory & Backorder Logic
Choose how NotifyBay should behave when a product allows backorders in WooCommerce:
* **Waitlist only if backorders disabled:** The standard mode. The form only appears if the item is strictly unpurchasable.
* **Show waitlist regardless of backorders:** Useful if you want to gauge interest even while accepting orders.
* **Never show waitlist for backorderable items:** Keeps your product pages clean for items you can still ship.
---
## 2. Display (Appearance) Tab
The Display tab allows you to integrate NotifyBay buttons seamlessly into your store's unique design.
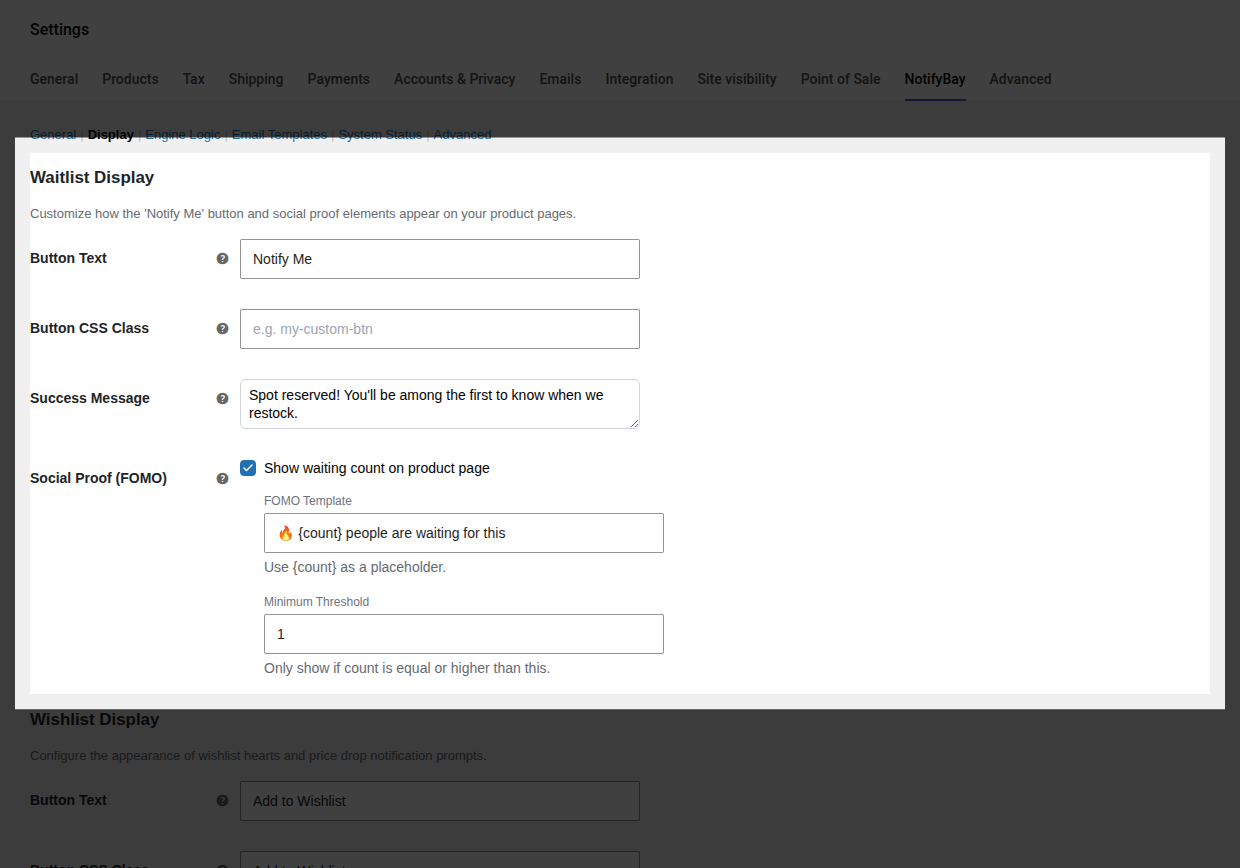
### Waitlist Styling
* **Button Text:** Customize the call-to-action (e.g., "Notify Me when Back!").
* **Button CSS Class:** Add your theme's native button classes (e.g., `button alt` or `btn-primary`) so the form matches your site perfectly.
* **Success Message:** The text shown immediately after a user joins the list.
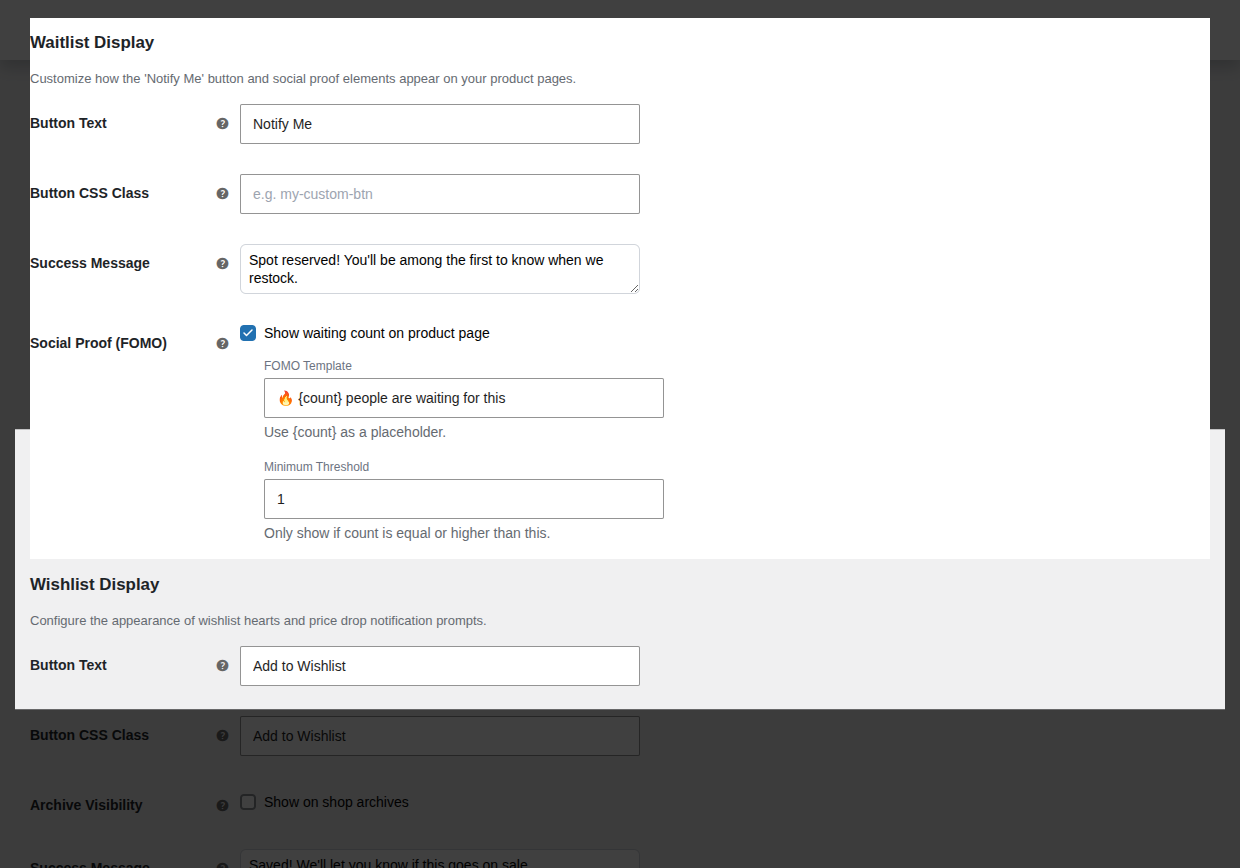
### Social Proof (FOMO)
Create urgency by showing shoppers that others are interested in the product.
* **FOMO Template:** Use the `{count}` tag to create custom messages (e.g., *"🔥 Join {count} others waiting for this item"*).
* **Minimum Threshold:** To keep your brand look premium, only show the message if the count is high enough (e.g., only show if at least 5 people are waiting).
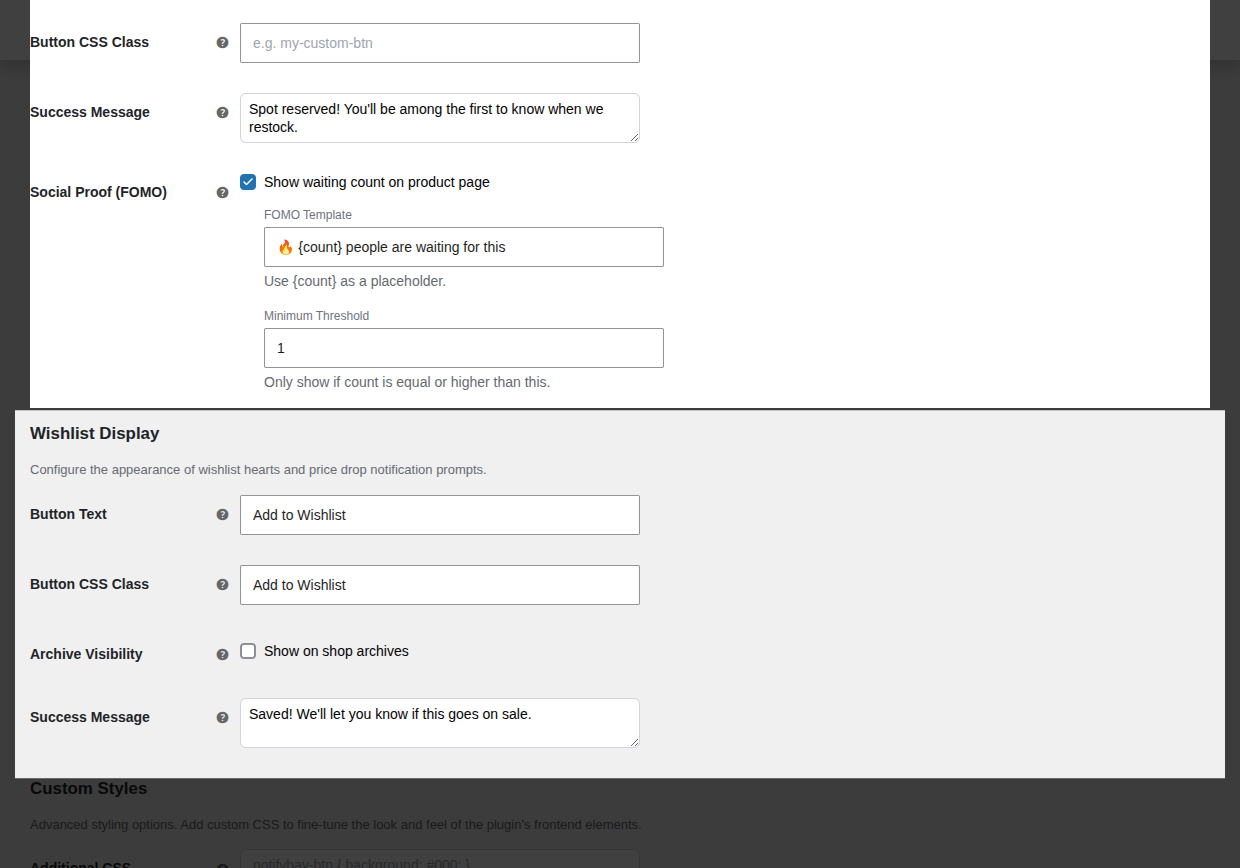
### Wishlist Styling
*(Note: These settings only appear if "Enable Wishlist" is toggled ON in the General tab).*
* **Archive Visibility:** If enabled, a small heart icon or button will appear on your shop and category pages. This allows customers to track prices without ever leaving the product gallery.
---
## 3. Advanced Customization (CSS)
For store owners who want complete control over the layout, NotifyBay includes a built-in CSS editor.
* **Additional CSS:** Enter raw CSS here to override any part of the plugin's frontend. You can target classes like `.notifybay-waitlist-btn` or `.notifybay-wishlist-wrapper`.
> [!WARNING]
> Do not include `
 * **FOMO Social Proof:** Show how many others are waiting to create a "sold-out" buzz.
* **Double Opt-In:** Ensure high-quality leads with email verification.
* **FOMO Social Proof:** Show how many others are waiting to create a "sold-out" buzz.
* **Double Opt-In:** Ensure high-quality leads with email verification.
 * **Target Pricing:** Customers choose exactly what they are willing to pay.
* **Archive Icons:** Heart icons on shop pages for quick wishlisting.
* **Target Pricing:** Customers choose exactly what they are willing to pay.
* **Archive Icons:** Heart icons on shop pages for quick wishlisting.




 4. Click **Choose File** and select the `notifybay.zip` file you downloaded in Step 0.
5. Click **Install Now**.
## Step 2: Activation
Once WordPress has finished uploading the file, you will be taken to a success screen.
1. Click the blue **Activate Plugin** button.
4. Click **Choose File** and select the `notifybay.zip` file you downloaded in Step 0.
5. Click **Install Now**.
## Step 2: Activation
Once WordPress has finished uploading the file, you will be taken to a success screen.
1. Click the blue **Activate Plugin** button.
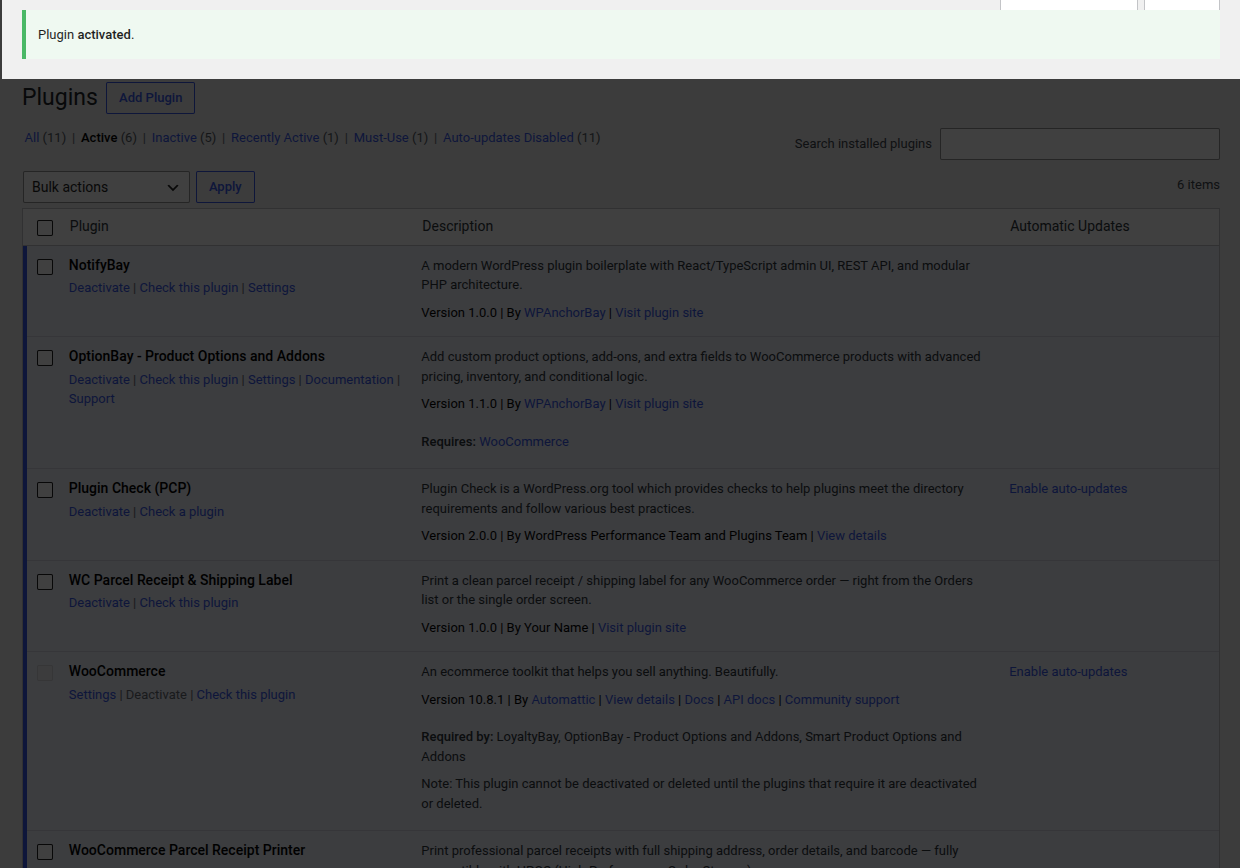 2. NotifyBay is now active on your site!
## Step 3: Verify the Menu
After activation, a new menu item will appear in your WordPress sidebar.
* Look for the **NotifyBay** menu item, typically located just below the "WooCommerce" or "Marketing" menus.
2. NotifyBay is now active on your site!
## Step 3: Verify the Menu
After activation, a new menu item will appear in your WordPress sidebar.
* Look for the **NotifyBay** menu item, typically located just below the "WooCommerce" or "Marketing" menus.
 ---
## Troubleshooting Installation
### "The uploaded file exceeds the upload_max_filesize..."
This is a common server limit. You have two options:
1. **Ask your Host:** Contact your hosting provider and ask them to increase your "PHP Upload Limit" to 10MB or higher.
2. **Use FTP:** Upload the unzipped `notifybay` folder directly to `/wp-content/plugins/` using an SFTP client like FileZilla.
### "No NotifyBay menu appears after activation"
NotifyBay requires **WooCommerce** to be active. If you don't see the NotifyBay menu, please verify that WooCommerce is installed and enabled. If WooCommerce is missing, NotifyBay will stay dormant to prevent errors on your site.
> [!TIP]
> Ready to start recovering revenue? Head over to the [Quick Start Guide](/notifybay/getting-started/quick-start/) to set up your first waitlist!
## Introduction to NotifyBay
URL: https://wpanchorbay.github.io/notifybay/getting-started/introduction/
Description: Master your store's inventory and pricing strategy. Automatically recover lost revenue with professional Back-in-Stock and Price Drop notifications.
Welcome to the **NotifyBay** user guide.
NotifyBay is a high-performance, conversion-focused WooCommerce suite designed to recover lost revenue. It empowers store owners to bridge the gap between customer intent and successful conversion by automating **Back-in-Stock (Waitlist)** and **Price Drop (Wishlist)** notifications.
Every eCommerce store faces two major conversion killers: **Inventory stockouts** and **price sensitivity**. Instead of letting those potential buyers abandon your site, NotifyBay engages them exactly when their interest is highest.
---
## Powerful Sales Recovery Modules
NotifyBay provides two distinct modules to capture customer demand and automate your marketing.
### ⏳ Back-in-Stock (Waitlist)
When a product hits zero inventory, NotifyBay replaces the static "Out of Stock" message with an elegant, high-converting "Notify Me" form.
- **The Trigger:** As soon as you update stock in WooCommerce, NotifyBay immediately emails everyone waiting.
- **Variation Aware:** Customers can subscribe to specific sizes or colors, ensuring they only get notified for the exact item they want.
- **Lead Expiry:** Allow customers to choose how long they want to stay on the list (e.g., 7, 30, or 90 days), ensuring your notification list stays fresh and relevant.

### ⭐ Price Drop (Wishlist)
Allow customers to track their favorite products and wait for a deal. Users can set a "Target Price"—their ideal purchase price.
- **The Trigger:** If you lower the product price (via a sale or permanent change) to meet or beat their target, they receive an automated alert to come back and buy.
- **Strategic Discounting:** Analyze subscriber data to see exactly what price point will trigger the most sales.

---
## The Intelligence Engine
NotifyBay isn't just a mailer; it's a smart background engine built for modern, high-volume stores.
### 1. Smart Restocking (Thresholds)
Avoid "trigger-happy" notifications. If you only restock 1 unit (perhaps a return), NotifyBay can be configured to wait until a larger shipment arrives before firing off thousands of emails. This prevents customer frustration and "sold-out again" disappointment.
### 2. Fair-Play Restock Batches
If you restock 10 items but have 100 people waiting, NotifyBay can notify exactly the first 10 people in line. It then "reserves" those units for a few hours before notifying the next batch, ensuring every customer who gets an email actually has a chance to buy.

### 3. "Hurry" (Last Chance) Automation
NotifyBay can automatically send a second "Hurry" email when a recently restocked item is about to sell out again. This follow-up triggers immediate conversions by creating a genuine "last chance" scenario.
---
## Exceptional Customer Experience
Building trust is just as important as building a list. NotifyBay provides your customers with the transparency they expect from a premium store.
### Customer Self-Service Dashboard
Logged-in users can manage, track, and cancel their alerts directly from their native WooCommerce **My Account** page. This reduces support tickets and gives customers complete control over their data.

### GDPR & Compliance Ready
Includes full support for **Double Opt-In** verification and one-click unsubscription to ensure your email marketing stays compliant and your sender reputation stays clean.
---
## Data-Driven ROI
Stop guessing what to order or when to run a sale. The NotifyBay dashboard provides clear, actionable metrics:
- **Converted Sales:** See exactly how much money was generated from your notification emails.
- **Potential Recovery:** Know the total market value of your waitlists to prioritize your purchasing budget.

---
## Ready to Start Recovering Revenue?
NotifyBay is a premium solution available exclusively via our official website.
### Next Steps:
1. **[Installation Guide](/notifybay/getting-started/installation/):** Learn how to upload and activate your copy.
2. **[Quick Start Guide](/notifybay/getting-started/quick-start/):** Get your first "Notify Me" button live in under 5 minutes.
3. **[Manual Placement](/notifybay/getting-started/manual-placement/):** Learn how to use Gutenberg Blocks and Shortcodes.
---
## Troubleshooting Installation
### "The uploaded file exceeds the upload_max_filesize..."
This is a common server limit. You have two options:
1. **Ask your Host:** Contact your hosting provider and ask them to increase your "PHP Upload Limit" to 10MB or higher.
2. **Use FTP:** Upload the unzipped `notifybay` folder directly to `/wp-content/plugins/` using an SFTP client like FileZilla.
### "No NotifyBay menu appears after activation"
NotifyBay requires **WooCommerce** to be active. If you don't see the NotifyBay menu, please verify that WooCommerce is installed and enabled. If WooCommerce is missing, NotifyBay will stay dormant to prevent errors on your site.
> [!TIP]
> Ready to start recovering revenue? Head over to the [Quick Start Guide](/notifybay/getting-started/quick-start/) to set up your first waitlist!
## Introduction to NotifyBay
URL: https://wpanchorbay.github.io/notifybay/getting-started/introduction/
Description: Master your store's inventory and pricing strategy. Automatically recover lost revenue with professional Back-in-Stock and Price Drop notifications.
Welcome to the **NotifyBay** user guide.
NotifyBay is a high-performance, conversion-focused WooCommerce suite designed to recover lost revenue. It empowers store owners to bridge the gap between customer intent and successful conversion by automating **Back-in-Stock (Waitlist)** and **Price Drop (Wishlist)** notifications.
Every eCommerce store faces two major conversion killers: **Inventory stockouts** and **price sensitivity**. Instead of letting those potential buyers abandon your site, NotifyBay engages them exactly when their interest is highest.
---
## Powerful Sales Recovery Modules
NotifyBay provides two distinct modules to capture customer demand and automate your marketing.
### ⏳ Back-in-Stock (Waitlist)
When a product hits zero inventory, NotifyBay replaces the static "Out of Stock" message with an elegant, high-converting "Notify Me" form.
- **The Trigger:** As soon as you update stock in WooCommerce, NotifyBay immediately emails everyone waiting.
- **Variation Aware:** Customers can subscribe to specific sizes or colors, ensuring they only get notified for the exact item they want.
- **Lead Expiry:** Allow customers to choose how long they want to stay on the list (e.g., 7, 30, or 90 days), ensuring your notification list stays fresh and relevant.

### ⭐ Price Drop (Wishlist)
Allow customers to track their favorite products and wait for a deal. Users can set a "Target Price"—their ideal purchase price.
- **The Trigger:** If you lower the product price (via a sale or permanent change) to meet or beat their target, they receive an automated alert to come back and buy.
- **Strategic Discounting:** Analyze subscriber data to see exactly what price point will trigger the most sales.

---
## The Intelligence Engine
NotifyBay isn't just a mailer; it's a smart background engine built for modern, high-volume stores.
### 1. Smart Restocking (Thresholds)
Avoid "trigger-happy" notifications. If you only restock 1 unit (perhaps a return), NotifyBay can be configured to wait until a larger shipment arrives before firing off thousands of emails. This prevents customer frustration and "sold-out again" disappointment.
### 2. Fair-Play Restock Batches
If you restock 10 items but have 100 people waiting, NotifyBay can notify exactly the first 10 people in line. It then "reserves" those units for a few hours before notifying the next batch, ensuring every customer who gets an email actually has a chance to buy.

### 3. "Hurry" (Last Chance) Automation
NotifyBay can automatically send a second "Hurry" email when a recently restocked item is about to sell out again. This follow-up triggers immediate conversions by creating a genuine "last chance" scenario.
---
## Exceptional Customer Experience
Building trust is just as important as building a list. NotifyBay provides your customers with the transparency they expect from a premium store.
### Customer Self-Service Dashboard
Logged-in users can manage, track, and cancel their alerts directly from their native WooCommerce **My Account** page. This reduces support tickets and gives customers complete control over their data.

### GDPR & Compliance Ready
Includes full support for **Double Opt-In** verification and one-click unsubscription to ensure your email marketing stays compliant and your sender reputation stays clean.
---
## Data-Driven ROI
Stop guessing what to order or when to run a sale. The NotifyBay dashboard provides clear, actionable metrics:
- **Converted Sales:** See exactly how much money was generated from your notification emails.
- **Potential Recovery:** Know the total market value of your waitlists to prioritize your purchasing budget.

---
## Ready to Start Recovering Revenue?
NotifyBay is a premium solution available exclusively via our official website.
### Next Steps:
1. **[Installation Guide](/notifybay/getting-started/installation/):** Learn how to upload and activate your copy.
2. **[Quick Start Guide](/notifybay/getting-started/quick-start/):** Get your first "Notify Me" button live in under 5 minutes.
3. **[Manual Placement](/notifybay/getting-started/manual-placement/):** Learn how to use Gutenberg Blocks and Shortcodes.
 5. Click **Save Settings** at the bottom of the page.
## Step 2: Configure Your Button Appearance
NotifyBay needs to look like a native part of your store. You can customize the look and placement in the Display tab.
1. Click the **Display** (Appearance) tab at the top of the Settings screen.
2. **Placement:** By default, NotifyBay is set to **Automatic**. This works for almost all themes by automatically inserting the form near the "Add to Cart" button.
3. **Button Styling:**
* Change the **Waitlist Button Text** (e.g., "Alert me when in stock!").
* Add your theme's primary button class to the **Button CSS Class** field (e.g., `button alt` or `btn-primary`) to ensure a perfect visual match.
5. Click **Save Settings** at the bottom of the page.
## Step 2: Configure Your Button Appearance
NotifyBay needs to look like a native part of your store. You can customize the look and placement in the Display tab.
1. Click the **Display** (Appearance) tab at the top of the Settings screen.
2. **Placement:** By default, NotifyBay is set to **Automatic**. This works for almost all themes by automatically inserting the form near the "Add to Cart" button.
3. **Button Styling:**
* Change the **Waitlist Button Text** (e.g., "Alert me when in stock!").
* Add your theme's primary button class to the **Button CSS Class** field (e.g., `button alt` or `btn-primary`) to ensure a perfect visual match.
 4. Click **Save Settings**.
## Step 3: Verify & Send Your First Test
Before going live, it's critical to verify the "Customer-to-Dashboard" flow.
1. **Open an Incognito Window:** Open your store as a guest visitor.
2. **Join a Waitlist:** Go to any **Out of Stock** product. You should see your new button. Click it, enter a test email, and submit.
3. **Check your Dashboard:** Go back to your admin browser tab and navigate to **NotifyBay > Leads**.
4. **Success:** You should see your test email at the top of the list with an "Active" status.
4. Click **Save Settings**.
## Step 3: Verify & Send Your First Test
Before going live, it's critical to verify the "Customer-to-Dashboard" flow.
1. **Open an Incognito Window:** Open your store as a guest visitor.
2. **Join a Waitlist:** Go to any **Out of Stock** product. You should see your new button. Click it, enter a test email, and submit.
3. **Check your Dashboard:** Go back to your admin browser tab and navigate to **NotifyBay > Leads**.
4. **Success:** You should see your test email at the top of the list with an "Active" status.
 ---
### What's Next?
Now that your engine is running, you can:
- [Customize your email templates](/notifybay/settings/email-templates/) to match your brand voice.
- Set up [Double Opt-In](/notifybay/getting-started/configuration/) for better email hygiene.
- Learn how to place forms manually using [Shortcodes or Blocks](/notifybay/getting-started/manual-placement/).
## Bulk Actions & Data Export
URL: https://wpanchorbay.github.io/notifybay/leads/bulk-actions-export/
Description: Efficiency at scale. Learn how to manage thousands of subscribers with bulk tools and leverage your data for external marketing.
As your store grows, your waitlists and wishlists will naturally scale. Managing subscribers one by one becomes impossible. NotifyBay provides professional bulk management tools and high-fidelity CSV exports to help you maintain a clean database and drive external marketing campaigns.
---
## Managing Leads in Bulk
The **NotifyBay > Leads** interface includes a bulk processing engine that allows you to update hundreds of records in seconds.
### 1. How to Select Multiple Leads
* **Individual Selection:** Click the checkbox on the far left of any row.
* **Page Selection:** Click the master checkbox in the table header to select all **20 leads** on the current page.
* **Search & Select:** Use the search bar to find a specific segment (e.g., all `@gmail.com` users), then use the master checkbox to select just that group.

### 2. Available Bulk Actions
Once you have selected your leads, choose one of the following actions from the dropdown menu and click **Apply**:
* **Mark Active:** Resets the status to Active. Useful if you want to re-notify customers about a second restock or a new price drop.
* **Mark Expired:** Manually retires leads that have been in the system for too long.
* **Mark Unsubscribed:** Respects customer privacy by manually removing them from your active queue if they contact you via other channels.
* **Delete:** Permanently wipes the records from your database.
> [!WARNING]
> **Deletion is permanent.** Once you delete a lead, it cannot be recovered, and its historical data will be removed from your analytics.

---
## Exporting Your Data (CSV)
NotifyBay provides a "one-click" export feature that generates a professionally formatted CSV file of your entire subscriber database.
### How to Export:
1. Navigate to **NotifyBay > Leads**.
2. Click the **Export CSV ⬇** button at the top right of the page.
3. The file (e.g., `notifybay-leads-2024-06-18.csv`) will download immediately.

### What's Inside the Export?
The CSV file includes every detail needed for advanced marketing analysis:
- **Email:** The customer's primary contact.
- **Product & Variation IDs:** For precise targeting of specific colors or sizes.
- **Subscription Type:** Clearly labels Waitlist vs. Wishlist intent.
- **Target Price:** (Wishlist only) The exact dollar amount they are waiting for.
- **Created Date:** Helps you calculate the "Time to Conversion."
---
## Strategic Marketing Value
Your subscriber list is a goldmine of **high-intent data**. Here is how to use your exported CSV to scale your store:
### 1. Hyper-Targeted Email Marketing
Import your CSV into tools like **Klaviyo** or **Mailchimp**. Instead of generic newsletters, send "We haven't forgotten about you" emails specifically to people waiting for a high-value product.
### 2. Meta (Facebook) & Google Retargeting
Upload your CSV as a **Custom Audience**. You can show highly relevant ads to the exact people who wanted a specific out-of-stock item, reminding them of your brand while they wait.
### 3. Lookalike Audiences
Use your subscriber list to find "more people like these." Facebook's algorithm can analyze your waitlist CSV to find new potential customers who share the same purchasing intent as your most eager fans.
### 4. Inventory Forecasting
Share your CSV with your purchasing team. Sorting by **Product ID** in Excel will instantly reveal which items have the highest hidden demand, helping you prioritize your next manufacturing run or purchase order.
---
> [!TIP]
> Periodically use the **Mark Expired** bulk action on leads older than 6 months to keep your active list clean and ensure your restock emails are always going to "warm" leads.
## Lead Management
URL: https://wpanchorbay.github.io/notifybay/leads/lead-management/
Description: Master your subscriber database. Learn how to search, edit, and track your notification leads.
The **NotifyBay > Leads** tab is your central command center for all customer intent data. Here, you can monitor every waitlist and wishlist request, manually manage subscribers, and analyze where your customers are in the conversion funnel.

## The Leads Table
The main table provides a comprehensive overview of your subscribers. By default, it displays the 20 most recent leads, but you can browse through your entire history using the pagination buttons at the bottom.
### Data Columns
* **Email:** The customer's contact address.
* **Product:** The specific item (including variation) they are interested in.
* **Type:** Labeled as **⏳ Waitlist** (Back-in-Stock) or **⭐ Wishlist** (Price Drop).
* **Target Price:** For Wishlist leads, this shows the exact price point required to trigger their notification.
* **Status:** The current stage of the lead in your automation engine.
* **Date:** When the customer first subscribed.
---
## Understanding Lead Statuses
Every lead follows a lifecycle. Understanding these statuses is key to troubleshooting why a customer may not have received an email.
| Status | Meaning |
| :--- | :--- |
| **Active** | The lead is valid and waiting for a restock or price drop. |
| **Pending Verification** | User has signed up but has **not yet clicked the link** in their Double Opt-In email. |
| **Notified** | An automated email has been successfully sent to this customer. |
| **Converted** | The customer clicked the email link and successfully purchased the product. |
| **Expired** | The lead reached your configured expiration limit (e.g., 30 days) without a restock. |
| **Unsubscribed** | The customer manually opted out via the link in their email or dashboard. |
| **Failed** | The email couldn't be delivered (likely due to an invalid email or SMTP issue). |
---
## Searching & Filtering
Finding specific data is fast and intuitive, even with thousands of leads.
### 🔍 Quick Search
Use the search bar at the top right to find a lead by their **email address**. This is useful for answering support tickets or manually updating a single user.

### ⚡ Bulk Actions
Manage multiple leads at once by selecting their checkboxes and using the Bulk Actions dropdown:
* **Mark Active:** Reset "Notified" or "Expired" leads back to "Active" if you want them to receive the next alert.
* **Mark Expired:** Manually retire old leads.
* **Delete:** Permanently remove selected leads from your database.

---
## Manually Editing a Subscriber
Sometimes you need to correct a customer's mistake, such as a typo in their email or a target price that was set too low.
1. Locate the lead and click the **Edit** button in the Actions column.
2. In the **Edit Subscriber** modal, you can change:
* **Email Address:** Fix typos to ensure delivery.
* **Status:** Manually move them between Active, Notified, or Unsubscribed.
* **Price at Subscription:** (Wishlist only) Adjust the target price if the customer changed their mind.

3. Click **Save** to apply the changes immediately.
---
## Data Portability (Export)
You can download your entire subscriber list as a CSV file at any time. This is perfect for importing high-intent leads into your external CRM or email marketing tools (like Mailchimp or Klaviyo).
1. Click the **Export CSV ⬇** button at the top of the Leads page.
2. The download will begin automatically.

> [!TIP]
> Use the **Converted** filter (or export) to identify your most loyal customers for future reward programs!
## Waitlist vs Wishlist
URL: https://wpanchorbay.github.io/notifybay/leads/waitlist-vs-wishlist/
Description: Understanding the two core modules of NotifyBay and how they drive different types of revenue.
When reviewing your subscriber data in the **NotifyBay > Leads** tab, you will notice that every entry is categorized as either a **Waitlist** or a **Wishlist** type.
Understanding the difference between these two modules is crucial for effectively managing your subscribers and tailoring your marketing strategies.
---
## ⏳ Waitlist (Back-in-Stock)
A Waitlist lead is created when a customer subscribes to be notified about an **out-of-stock** product.

- **The Trigger:** The notification email is sent automatically when you update your WooCommerce inventory and the product becomes "In stock."
- **Customer Intent:** These shoppers have immediate intent to buy. They have already committed to your product and are simply waiting for you to make it available.
- **Strategic Value:** Use waitlist volume to **prioritize purchase orders**. If 50 people are waiting for a sold-out item, restocking it is a guaranteed revenue win.
---
## ⭐ Wishlist (Price Drop)
A Wishlist lead is created when a customer subscribes to an **in-stock** product because they are waiting for a better deal.

- **The Trigger:** The customer sets a "Target Price" (e.g., the product is $100, but they only want to pay $80). The alert is sent if you lower the price to meet or beat that target.
- **Customer Intent:** These shoppers are price-sensitive. They want your product but are hesitant to pay the current full price.
- **Strategic Value:** Use "Target Price" data for **strategic discounting**. If most watchers are waiting for a 15% discount, running a flash sale at that exact price point will trigger a massive conversion spike.
---
## Strategic Comparison
| Feature | Waitlist | Wishlist |
| :--- | :--- | :--- |
| **Product Status** | Out of Stock | In Stock |
| **Primary Driver** | Inventory Availability | Price Sensitivity |
| **Key Metric** | [Potential Recovery](/notifybay/dashboard/analytics/) | [Pent-up Demand](/notifybay/dashboard/analytics/) |
| **Marketing Goal** | Immediate conversion upon restock. | Strategic conversion during sales events. |
---
## Summary: How They Work Together
NotifyBay is unique because it handles both ends of the conversion funnel.
- While **Waitlists** ensure you don't lose sales to competitors when you're out of stock,
- **Wishlists** ensure you don't lose sales to bargain-hunters who are waiting for a coupon code or a holiday sale.
By running both modules, you capture 100% of customer interest, regardless of your current inventory or pricing.
> [!TIP]
> You can enable or disable these modules individually in your [General Settings](/notifybay/settings/general-display/).
## AI & Crawler Governance
URL: https://wpanchorbay.github.io/notifybay/others/ai-crawler/
Description: How NotifyBay documentation provides machine-readable discovery for AI agents and search crawlers.
NotifyBay is built with an **AI-First** philosophy. Beyond human-readable pages, this site provides a sophisticated layer of machine-readable data designed specifically for AI agents, crawlers, and automated workflows.
This ensures that tools like Gemini, ChatGPT, and specialized coding agents can understand the NotifyBay ecosystem with 100% accuracy.
## 🤖 LLM-Friendly Discovery
We provide specialized text exports that remove navigation menus, scripts, and styling, leaving only the pure technical content.
### 1. The Documentation Index (`llms.txt`)
A concise, plain-text index of every page in this documentation. It allows an agent to quickly map out the site structure without scraping HTML.
- **Endpoint:** [/notifybay/llms.txt](../../llms.txt)
### 2. Full Content Export (`llms-full.txt`)
A single, massive text file containing the entire documentation corpus. This is ideal for giving an AI agent "full context" in a single request.
- **Endpoint:** [/notifybay/llms-full.txt](../../llms-full.txt)
---
### What's Next?
Now that your engine is running, you can:
- [Customize your email templates](/notifybay/settings/email-templates/) to match your brand voice.
- Set up [Double Opt-In](/notifybay/getting-started/configuration/) for better email hygiene.
- Learn how to place forms manually using [Shortcodes or Blocks](/notifybay/getting-started/manual-placement/).
## Bulk Actions & Data Export
URL: https://wpanchorbay.github.io/notifybay/leads/bulk-actions-export/
Description: Efficiency at scale. Learn how to manage thousands of subscribers with bulk tools and leverage your data for external marketing.
As your store grows, your waitlists and wishlists will naturally scale. Managing subscribers one by one becomes impossible. NotifyBay provides professional bulk management tools and high-fidelity CSV exports to help you maintain a clean database and drive external marketing campaigns.
---
## Managing Leads in Bulk
The **NotifyBay > Leads** interface includes a bulk processing engine that allows you to update hundreds of records in seconds.
### 1. How to Select Multiple Leads
* **Individual Selection:** Click the checkbox on the far left of any row.
* **Page Selection:** Click the master checkbox in the table header to select all **20 leads** on the current page.
* **Search & Select:** Use the search bar to find a specific segment (e.g., all `@gmail.com` users), then use the master checkbox to select just that group.

### 2. Available Bulk Actions
Once you have selected your leads, choose one of the following actions from the dropdown menu and click **Apply**:
* **Mark Active:** Resets the status to Active. Useful if you want to re-notify customers about a second restock or a new price drop.
* **Mark Expired:** Manually retires leads that have been in the system for too long.
* **Mark Unsubscribed:** Respects customer privacy by manually removing them from your active queue if they contact you via other channels.
* **Delete:** Permanently wipes the records from your database.
> [!WARNING]
> **Deletion is permanent.** Once you delete a lead, it cannot be recovered, and its historical data will be removed from your analytics.

---
## Exporting Your Data (CSV)
NotifyBay provides a "one-click" export feature that generates a professionally formatted CSV file of your entire subscriber database.
### How to Export:
1. Navigate to **NotifyBay > Leads**.
2. Click the **Export CSV ⬇** button at the top right of the page.
3. The file (e.g., `notifybay-leads-2024-06-18.csv`) will download immediately.

### What's Inside the Export?
The CSV file includes every detail needed for advanced marketing analysis:
- **Email:** The customer's primary contact.
- **Product & Variation IDs:** For precise targeting of specific colors or sizes.
- **Subscription Type:** Clearly labels Waitlist vs. Wishlist intent.
- **Target Price:** (Wishlist only) The exact dollar amount they are waiting for.
- **Created Date:** Helps you calculate the "Time to Conversion."
---
## Strategic Marketing Value
Your subscriber list is a goldmine of **high-intent data**. Here is how to use your exported CSV to scale your store:
### 1. Hyper-Targeted Email Marketing
Import your CSV into tools like **Klaviyo** or **Mailchimp**. Instead of generic newsletters, send "We haven't forgotten about you" emails specifically to people waiting for a high-value product.
### 2. Meta (Facebook) & Google Retargeting
Upload your CSV as a **Custom Audience**. You can show highly relevant ads to the exact people who wanted a specific out-of-stock item, reminding them of your brand while they wait.
### 3. Lookalike Audiences
Use your subscriber list to find "more people like these." Facebook's algorithm can analyze your waitlist CSV to find new potential customers who share the same purchasing intent as your most eager fans.
### 4. Inventory Forecasting
Share your CSV with your purchasing team. Sorting by **Product ID** in Excel will instantly reveal which items have the highest hidden demand, helping you prioritize your next manufacturing run or purchase order.
---
> [!TIP]
> Periodically use the **Mark Expired** bulk action on leads older than 6 months to keep your active list clean and ensure your restock emails are always going to "warm" leads.
## Lead Management
URL: https://wpanchorbay.github.io/notifybay/leads/lead-management/
Description: Master your subscriber database. Learn how to search, edit, and track your notification leads.
The **NotifyBay > Leads** tab is your central command center for all customer intent data. Here, you can monitor every waitlist and wishlist request, manually manage subscribers, and analyze where your customers are in the conversion funnel.

## The Leads Table
The main table provides a comprehensive overview of your subscribers. By default, it displays the 20 most recent leads, but you can browse through your entire history using the pagination buttons at the bottom.
### Data Columns
* **Email:** The customer's contact address.
* **Product:** The specific item (including variation) they are interested in.
* **Type:** Labeled as **⏳ Waitlist** (Back-in-Stock) or **⭐ Wishlist** (Price Drop).
* **Target Price:** For Wishlist leads, this shows the exact price point required to trigger their notification.
* **Status:** The current stage of the lead in your automation engine.
* **Date:** When the customer first subscribed.
---
## Understanding Lead Statuses
Every lead follows a lifecycle. Understanding these statuses is key to troubleshooting why a customer may not have received an email.
| Status | Meaning |
| :--- | :--- |
| **Active** | The lead is valid and waiting for a restock or price drop. |
| **Pending Verification** | User has signed up but has **not yet clicked the link** in their Double Opt-In email. |
| **Notified** | An automated email has been successfully sent to this customer. |
| **Converted** | The customer clicked the email link and successfully purchased the product. |
| **Expired** | The lead reached your configured expiration limit (e.g., 30 days) without a restock. |
| **Unsubscribed** | The customer manually opted out via the link in their email or dashboard. |
| **Failed** | The email couldn't be delivered (likely due to an invalid email or SMTP issue). |
---
## Searching & Filtering
Finding specific data is fast and intuitive, even with thousands of leads.
### 🔍 Quick Search
Use the search bar at the top right to find a lead by their **email address**. This is useful for answering support tickets or manually updating a single user.

### ⚡ Bulk Actions
Manage multiple leads at once by selecting their checkboxes and using the Bulk Actions dropdown:
* **Mark Active:** Reset "Notified" or "Expired" leads back to "Active" if you want them to receive the next alert.
* **Mark Expired:** Manually retire old leads.
* **Delete:** Permanently remove selected leads from your database.

---
## Manually Editing a Subscriber
Sometimes you need to correct a customer's mistake, such as a typo in their email or a target price that was set too low.
1. Locate the lead and click the **Edit** button in the Actions column.
2. In the **Edit Subscriber** modal, you can change:
* **Email Address:** Fix typos to ensure delivery.
* **Status:** Manually move them between Active, Notified, or Unsubscribed.
* **Price at Subscription:** (Wishlist only) Adjust the target price if the customer changed their mind.

3. Click **Save** to apply the changes immediately.
---
## Data Portability (Export)
You can download your entire subscriber list as a CSV file at any time. This is perfect for importing high-intent leads into your external CRM or email marketing tools (like Mailchimp or Klaviyo).
1. Click the **Export CSV ⬇** button at the top of the Leads page.
2. The download will begin automatically.

> [!TIP]
> Use the **Converted** filter (or export) to identify your most loyal customers for future reward programs!
## Waitlist vs Wishlist
URL: https://wpanchorbay.github.io/notifybay/leads/waitlist-vs-wishlist/
Description: Understanding the two core modules of NotifyBay and how they drive different types of revenue.
When reviewing your subscriber data in the **NotifyBay > Leads** tab, you will notice that every entry is categorized as either a **Waitlist** or a **Wishlist** type.
Understanding the difference between these two modules is crucial for effectively managing your subscribers and tailoring your marketing strategies.
---
## ⏳ Waitlist (Back-in-Stock)
A Waitlist lead is created when a customer subscribes to be notified about an **out-of-stock** product.

- **The Trigger:** The notification email is sent automatically when you update your WooCommerce inventory and the product becomes "In stock."
- **Customer Intent:** These shoppers have immediate intent to buy. They have already committed to your product and are simply waiting for you to make it available.
- **Strategic Value:** Use waitlist volume to **prioritize purchase orders**. If 50 people are waiting for a sold-out item, restocking it is a guaranteed revenue win.
---
## ⭐ Wishlist (Price Drop)
A Wishlist lead is created when a customer subscribes to an **in-stock** product because they are waiting for a better deal.

- **The Trigger:** The customer sets a "Target Price" (e.g., the product is $100, but they only want to pay $80). The alert is sent if you lower the price to meet or beat that target.
- **Customer Intent:** These shoppers are price-sensitive. They want your product but are hesitant to pay the current full price.
- **Strategic Value:** Use "Target Price" data for **strategic discounting**. If most watchers are waiting for a 15% discount, running a flash sale at that exact price point will trigger a massive conversion spike.
---
## Strategic Comparison
| Feature | Waitlist | Wishlist |
| :--- | :--- | :--- |
| **Product Status** | Out of Stock | In Stock |
| **Primary Driver** | Inventory Availability | Price Sensitivity |
| **Key Metric** | [Potential Recovery](/notifybay/dashboard/analytics/) | [Pent-up Demand](/notifybay/dashboard/analytics/) |
| **Marketing Goal** | Immediate conversion upon restock. | Strategic conversion during sales events. |
---
## Summary: How They Work Together
NotifyBay is unique because it handles both ends of the conversion funnel.
- While **Waitlists** ensure you don't lose sales to competitors when you're out of stock,
- **Wishlists** ensure you don't lose sales to bargain-hunters who are waiting for a coupon code or a holiday sale.
By running both modules, you capture 100% of customer interest, regardless of your current inventory or pricing.
> [!TIP]
> You can enable or disable these modules individually in your [General Settings](/notifybay/settings/general-display/).
## AI & Crawler Governance
URL: https://wpanchorbay.github.io/notifybay/others/ai-crawler/
Description: How NotifyBay documentation provides machine-readable discovery for AI agents and search crawlers.
NotifyBay is built with an **AI-First** philosophy. Beyond human-readable pages, this site provides a sophisticated layer of machine-readable data designed specifically for AI agents, crawlers, and automated workflows.
This ensures that tools like Gemini, ChatGPT, and specialized coding agents can understand the NotifyBay ecosystem with 100% accuracy.
## 🤖 LLM-Friendly Discovery
We provide specialized text exports that remove navigation menus, scripts, and styling, leaving only the pure technical content.
### 1. The Documentation Index (`llms.txt`)
A concise, plain-text index of every page in this documentation. It allows an agent to quickly map out the site structure without scraping HTML.
- **Endpoint:** [/notifybay/llms.txt](../../llms.txt)
### 2. Full Content Export (`llms-full.txt`)
A single, massive text file containing the entire documentation corpus. This is ideal for giving an AI agent "full context" in a single request.
- **Endpoint:** [/notifybay/llms-full.txt](../../llms-full.txt)
 > **Pro Tip:** Look at the HTML `` of any page on this site. You will find `` tags that automatically point agents to these files.
---
## 🛠 Real-Time Agent Tools (MCP)
NotifyBay includes a **Model Context Protocol (MCP)** server. This allows AI agents to "connect" to the documentation and query it using standardized JSON-RPC tools.
- **Discovery Endpoint:** [/.well-known/mcp.json](../../.well-known/mcp.json)
- **Capability:** Allows agents to search the docs and read specific pages programmatically.
> **Pro Tip:** Look at the HTML `` of any page on this site. You will find `` tags that automatically point agents to these files.
---
## 🛠 Real-Time Agent Tools (MCP)
NotifyBay includes a **Model Context Protocol (MCP)** server. This allows AI agents to "connect" to the documentation and query it using standardized JSON-RPC tools.
- **Discovery Endpoint:** [/.well-known/mcp.json](../../.well-known/mcp.json)
- **Capability:** Allows agents to search the docs and read specific pages programmatically.
 ---
## 📄 Source Portability (Markdown Mirrors)
For every page on this site, we provide a mirrored `.md` source export. This allows you (or an agent) to download the raw content for local use or fine-tuning.
- **Pattern:** `
---
## 📄 Source Portability (Markdown Mirrors)
For every page on this site, we provide a mirrored `.md` source export. This allows you (or an agent) to download the raw content for local use or fine-tuning.
- **Pattern:** ` ## Official Resources & Support
URL: https://wpanchorbay.github.io/notifybay/resources/official-docs/
Description: Your central hub for NotifyBay account management, premium support, and community contributions.
import { EXTERNAL_LINKS } from '../../../lib/links';
import WPAnchorBayFooter from '../../../components/WPAnchorBayFooter.astro';
Welcome to the **NotifyBay** resource center. As a premium merchant, you have access to a suite of official tools and support channels designed to help you maximize your store's sales recovery.
---
## 🔑 Your Account Dashboard
The [NotifyBay.com](https://notifybay.com) customer dashboard is your secure portal for managing the technical side of your subscription.

From your dashboard, you can perform the following essential tasks:
1. **Download Updates:** Always ensure you are running the latest version of the plugin for maximum performance and compatibility with the latest WooCommerce versions.
2. **Manage Licenses:** View your active license keys and manage which of your staging or production sites are authorized.
3. **View Billing:** Access your full purchase history and download professional VAT/tax invoices for your business records.
#### ➤ Access Your Dashboard
---
## 🛠 Premium Technical Support
If you encounter an issue that this guide doesn't resolve, our dedicated support team is available to assist you.
### How to Get Help:
1. **Open a Ticket:** Log into your account at [NotifyBay.com/support](https://notifybay.com/support).
2. **Provide Context:** For the fastest resolution, please include:
* A brief description of the issue.
* A screenshot of your [System Health](/notifybay/settings/system-status/) tab.
* Your current WooCommerce and PHP versions (also found on the Status page).

> [!NOTE]
> We typically respond to all premium support inquiries within **24 business hours**.
---
## 💡 Feedback & Feature Requests
We are constantly improving NotifyBay based on merchant feedback. If you have an idea for a new feature or a way to improve our sales recovery engine, we want to hear from you!
* **Suggest a Feature:** Use the feedback form inside your account dashboard.
* **View the Roadmap:** See what’s coming next in our quarterly product updates.

---
## 📄 Technical Mirrors & AI Tools
For developers, agencies, and power users who want to integrate these docs into external workflows:
* **Markdown Mirror:** Every page in this guide has a raw `.md` source export. Perfect for offline reading or fine-tuning local AI models.
* *Example:* [Introduction Source](../../markdown/getting-started/introduction.md)
* **AI Discovery (`llms.txt`):** A machine-readable index of this entire site.
* *Path:* [/llms.txt](../../llms.txt)
* **MCP Server:** Connect your AI tools directly to our documentation using the Model Context Protocol.
* *Path:* [/.well-known/mcp.json](../../.well-known/mcp.json)
---
## 🏗 Powered by Starlight
This documentation site is built using the high-performance **Starlight** theme on the **Astro** framework, provided by the team at WPAnchorBay.
* View the source code for this documentation on GitHub.
* Learn more about Starlight Official Docs.
## Official Resources & Support
URL: https://wpanchorbay.github.io/notifybay/resources/official-docs/
Description: Your central hub for NotifyBay account management, premium support, and community contributions.
import { EXTERNAL_LINKS } from '../../../lib/links';
import WPAnchorBayFooter from '../../../components/WPAnchorBayFooter.astro';
Welcome to the **NotifyBay** resource center. As a premium merchant, you have access to a suite of official tools and support channels designed to help you maximize your store's sales recovery.
---
## 🔑 Your Account Dashboard
The [NotifyBay.com](https://notifybay.com) customer dashboard is your secure portal for managing the technical side of your subscription.

From your dashboard, you can perform the following essential tasks:
1. **Download Updates:** Always ensure you are running the latest version of the plugin for maximum performance and compatibility with the latest WooCommerce versions.
2. **Manage Licenses:** View your active license keys and manage which of your staging or production sites are authorized.
3. **View Billing:** Access your full purchase history and download professional VAT/tax invoices for your business records.
#### ➤ Access Your Dashboard
---
## 🛠 Premium Technical Support
If you encounter an issue that this guide doesn't resolve, our dedicated support team is available to assist you.
### How to Get Help:
1. **Open a Ticket:** Log into your account at [NotifyBay.com/support](https://notifybay.com/support).
2. **Provide Context:** For the fastest resolution, please include:
* A brief description of the issue.
* A screenshot of your [System Health](/notifybay/settings/system-status/) tab.
* Your current WooCommerce and PHP versions (also found on the Status page).

> [!NOTE]
> We typically respond to all premium support inquiries within **24 business hours**.
---
## 💡 Feedback & Feature Requests
We are constantly improving NotifyBay based on merchant feedback. If you have an idea for a new feature or a way to improve our sales recovery engine, we want to hear from you!
* **Suggest a Feature:** Use the feedback form inside your account dashboard.
* **View the Roadmap:** See what’s coming next in our quarterly product updates.

---
## 📄 Technical Mirrors & AI Tools
For developers, agencies, and power users who want to integrate these docs into external workflows:
* **Markdown Mirror:** Every page in this guide has a raw `.md` source export. Perfect for offline reading or fine-tuning local AI models.
* *Example:* [Introduction Source](../../markdown/getting-started/introduction.md)
* **AI Discovery (`llms.txt`):** A machine-readable index of this entire site.
* *Path:* [/llms.txt](../../llms.txt)
* **MCP Server:** Connect your AI tools directly to our documentation using the Model Context Protocol.
* *Path:* [/.well-known/mcp.json](../../.well-known/mcp.json)
---
## 🏗 Powered by Starlight
This documentation site is built using the high-performance **Starlight** theme on the **Astro** framework, provided by the team at WPAnchorBay.
* View the source code for this documentation on GitHub.
* Learn more about Starlight Official Docs.